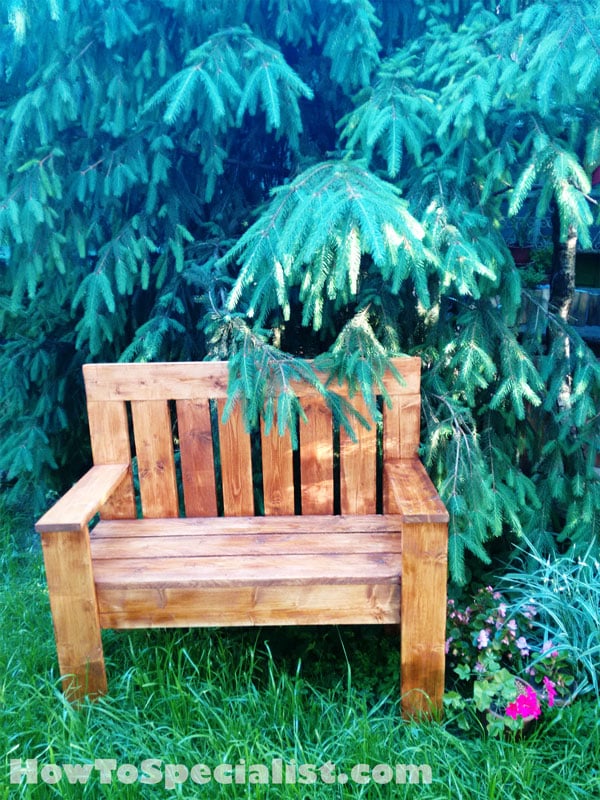
This step by step diy project is about 2×4 bench plans. If you want to build a beautiful wooden bench with backrest for your garden, using just 2x4s, we recommend you to check out this project. Any person with basic woodworking skills can get the job done in just a few days. Don’t forget to take a look over the rest of the indoor and outdoor projects and to adjust the design and size of the bench to suit your needs.
You should always plan everything from the very beginning and to adjust the size of the bench to your needs, while you can still use the woodworking techniques described in this project. Taking into account the simple design, this outdoor bench can match the style of any backyard. Mark the cut lines on the slats before making the cuts and use a jigsaw to get the job done.
There are a few tips that you should take into account, if you want to get a professional result. Therefore, take accurate measurements and use professional tool when making the cuts or when drilling pilot holes. Align the components at both ends and add waterproof glue to the joints, if you want to create a rigid structure. Round the exposed edges with sandpaper or by using a good router. See all my Premium Plans in the Shop.
Made from this plan
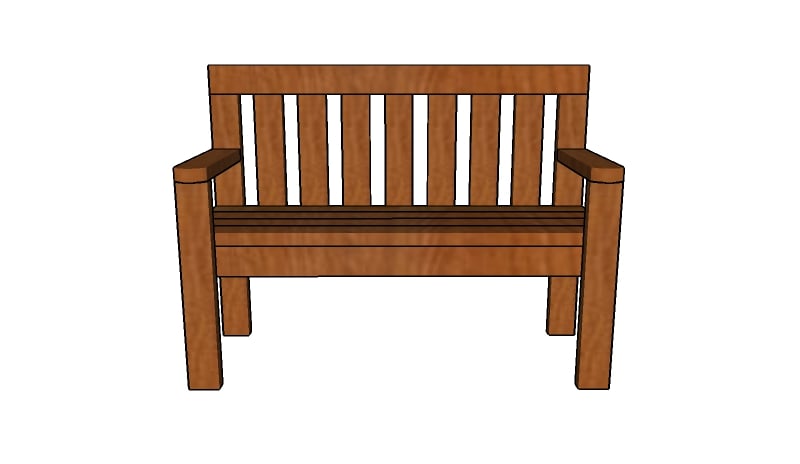
2×4 bench plans
Building a 2×4 bench
Materials
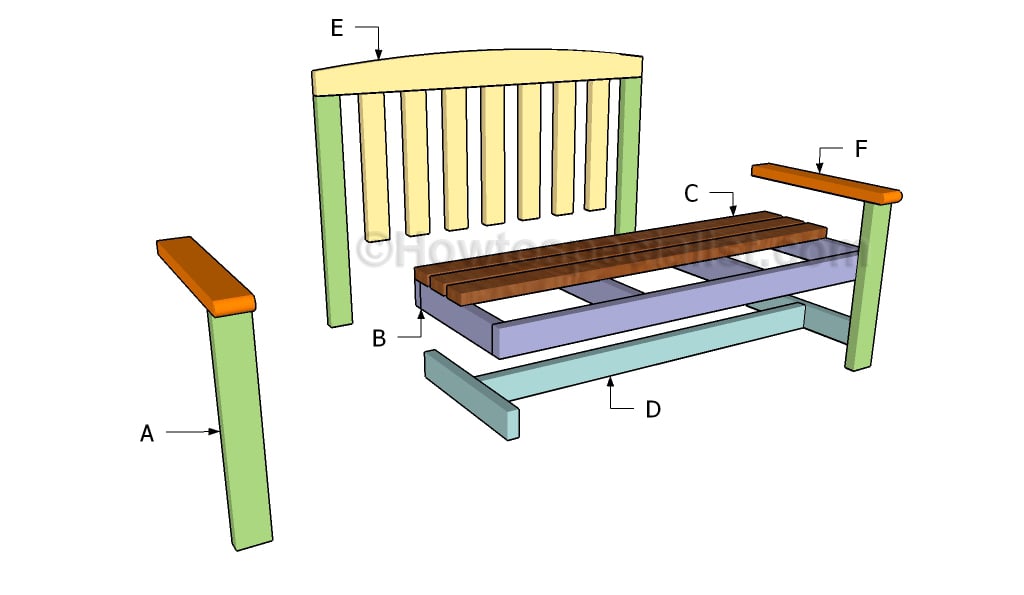
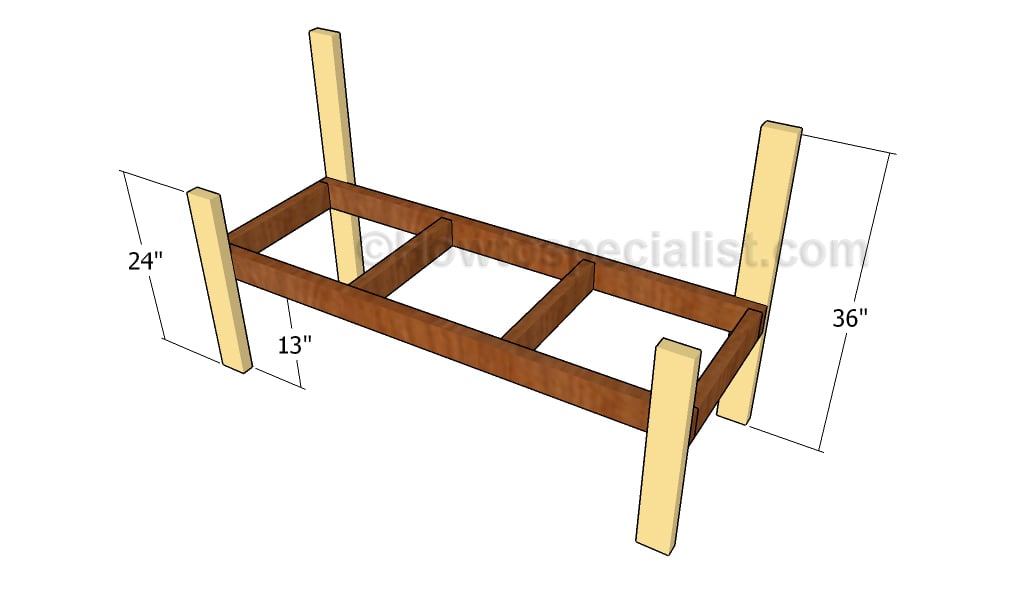
- A – 2 pieces of 2×4 lumber – 24″ long, 2 pieces – 36″ long SIDES
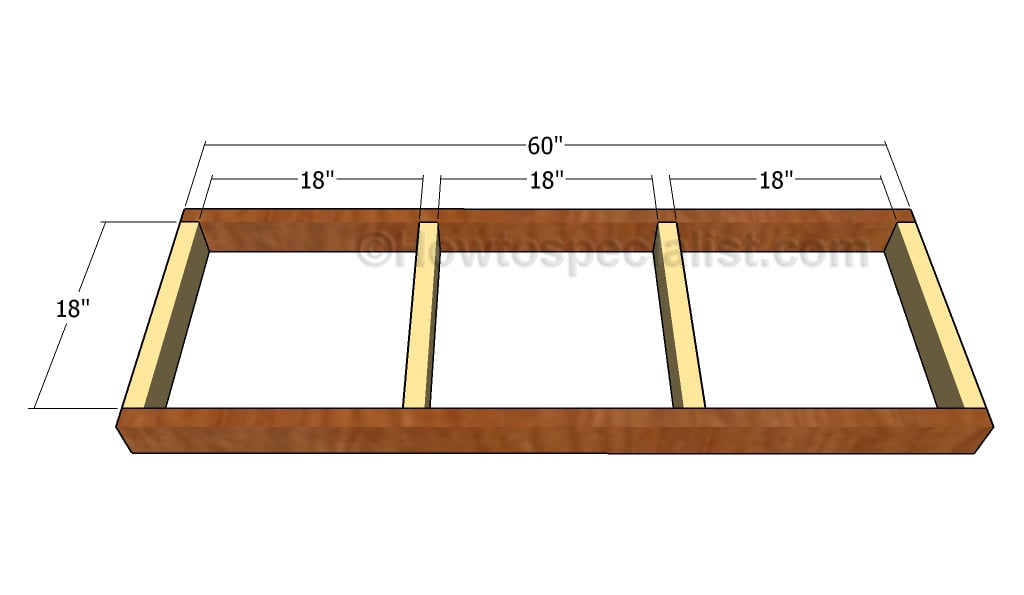
- B – 2 pieces of 2×4 lumber – 60″ long, 4 pieces of 2×4 lumber – 18″ long SEAT FRAME
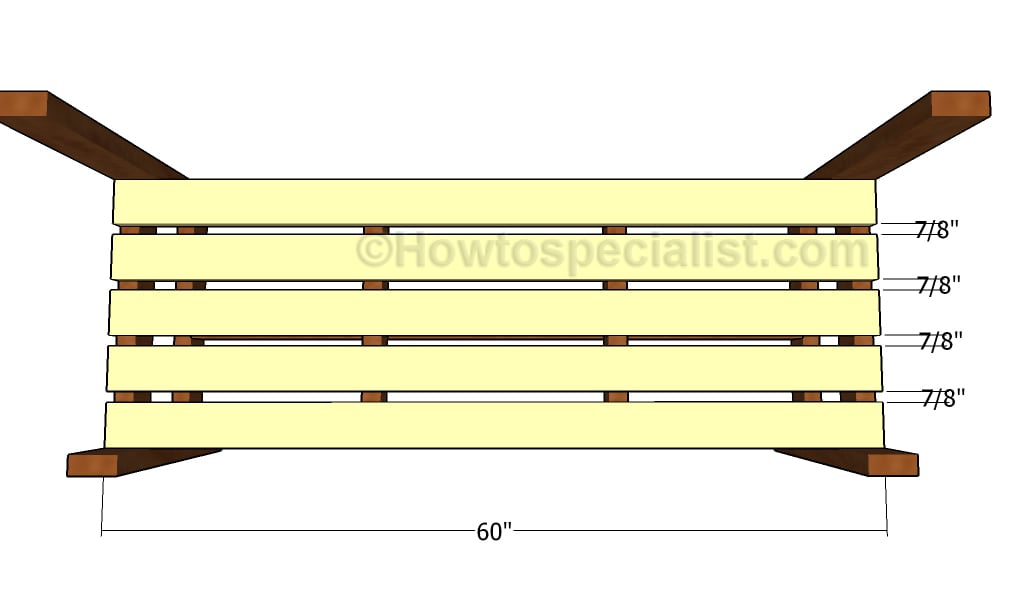
- C – 5 pieces of 2×4 lumber – 60″ long SEAT
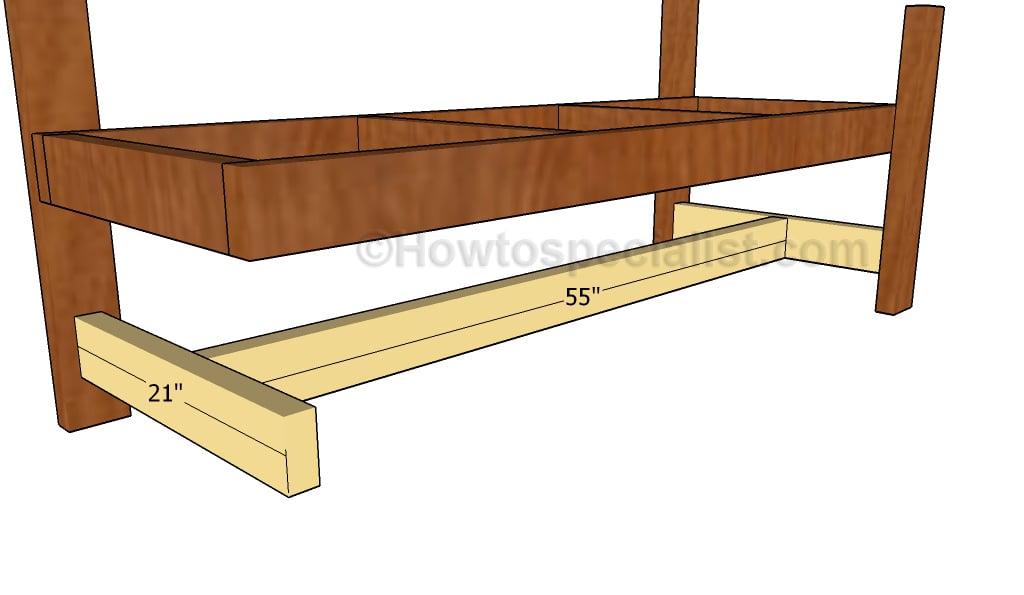
- D – 2 pieces of 2×4 lumber – 21″ long, 1 piece of 2×4 lumber – 55″ long STRETCHER
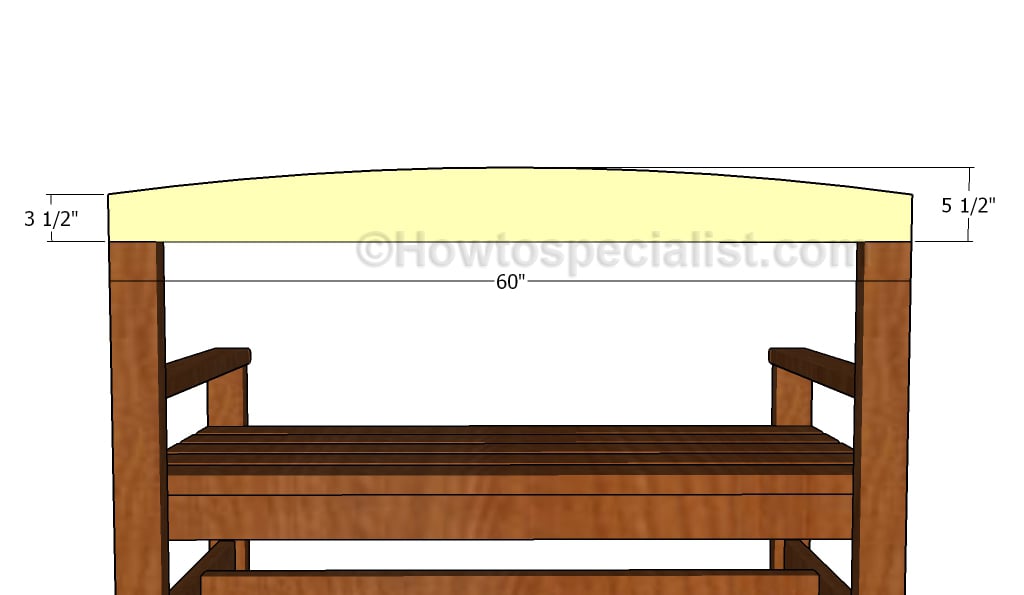
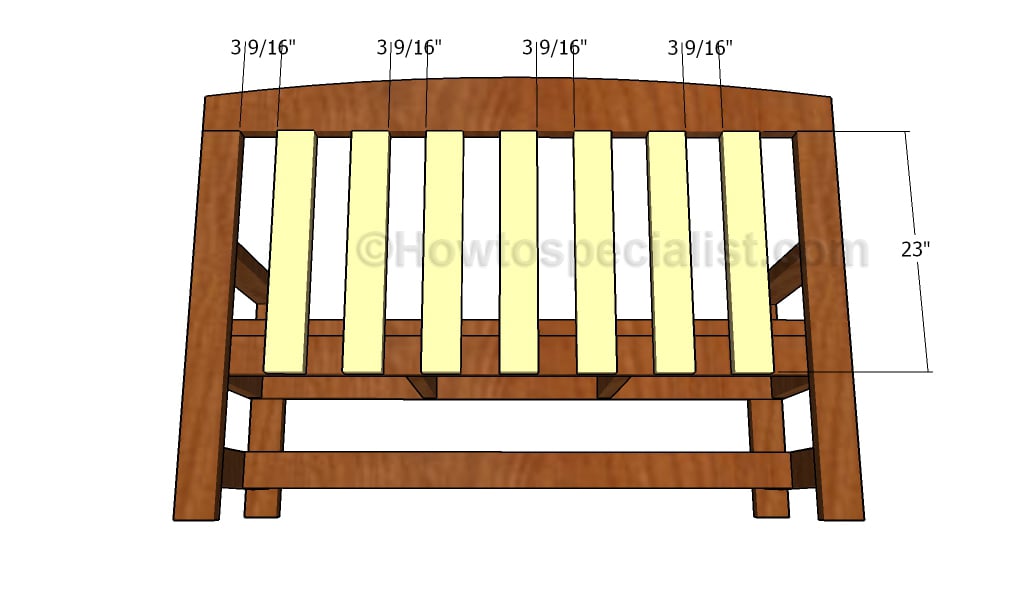
- E – 1 piece of 2×6 lumber – 60″ long, 7 pieces of 2×4 lumber – 23″ long BACKREST
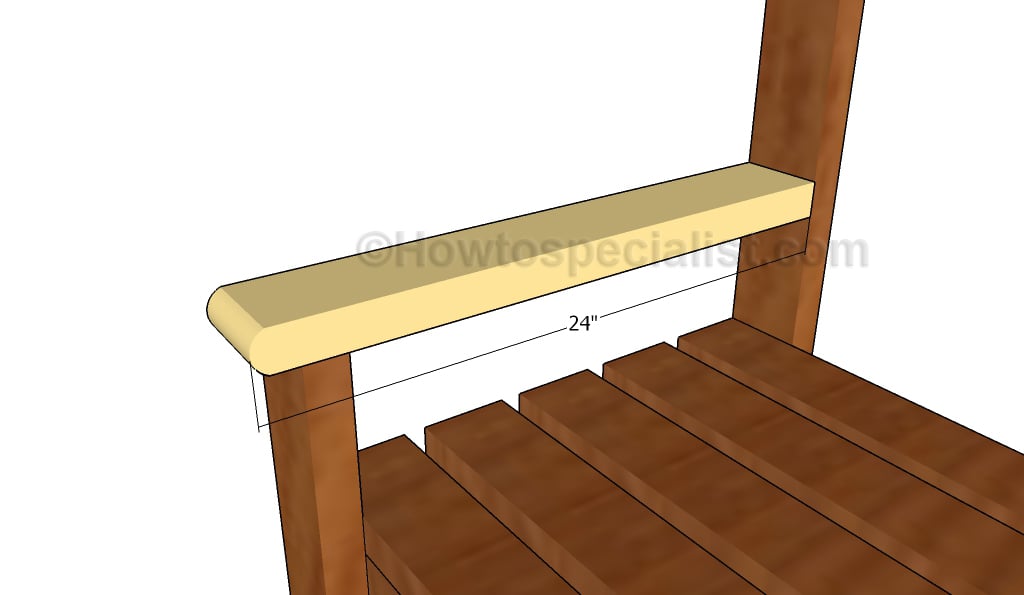
- F – 2 pieces of 2×4 lumber – 24″ long ARMRESTS
- 10 pieces of 2×4 lumber – 8′
- 1 piece of 2×6 lumber – 6′
- 2 1/2″ screws
- glue, stain
Tools
- Safety gloves, glasses
- Miter saw, jigsaw
- Chalk line, tape measure, spirit level, carpentry pencil
- Drill machinery and drill bits
Tips
- Use a good miter saw to make the angle cuts
- Drill pilot holes before inserting the screws
Time
- One Weekend
Related
How to build a 2×4 bench
Building the seat frame
The first step of the project is to build the frame of the bench. Cut the components out of 2×4 lumber at the right size, using the information displayed in the diagram. Drill pocket holes at both ends of the short components and secure them to the perpendicular slats using 2 1/2″ screws. Add glue to the joints and make sure the corners are right-angled.
Attaching the legs
Next, you need to attach the 2×4 legs to the frame of the bench. Cut the components at the right size and drill pilot holes through the components before inserting the screws, to prevent the wood from splitting. Use 2 1/2″ screws and use a spirit level to make sure the seat is horizontal and the legs are plumb.
Fitting the bottom stretcher
Fit the stretcher to the bottom of the wooden bench, in order to add strength to the structure. Drill pocket holes at both ends of the braces and secure them to the legs using 2 1/2″ screws. Drill pocket holes at both ends of the stretcher and secure them to the braces using 2 1/2″ screws.
Fitting the seat slats
Build the seat out of 2×4 lumber. Drill pilot holes through the slats and secure them to the frame using 2 1/2″ screws. Place the slats equally-spaced, in order to get a professional result.
Fitting the armrests
Build the armrests out of 2×4 lumber. Use a jigsaw to round the end of the components and smooth the edges with fine-grit sandpaper. Drill pocket holes and secure the component to the back leg with 2 1/2″ screws. In addition, drill pocket holes at the top of the front legs and secure them to the armrests using 2 1/2″ screws.
Building the top slat
Build the top of the backrest out of 2×6 lumber. Mark the curved cut line on the slat and get the job done with a jigsaw. Smooth the edge with fine-grit sandpaper. Drill pocket holes at the top of the back legs and secure them into place using 2 1/2″ screws. Add glue to the joints and remove the excess with a damp cloth.
Building the backrest
Building the backrest for the garden bench is a straight forward process, if you follow the following instructions. Cut the slats at the right size and drill pocket holes at one end. Fit the slats to the structure, equally-spaced, and lock them to the seat frame using 2 1/2″ screws. Insert the screws through the top ends into the top slat. Add glue to add strength to the bond of the components.
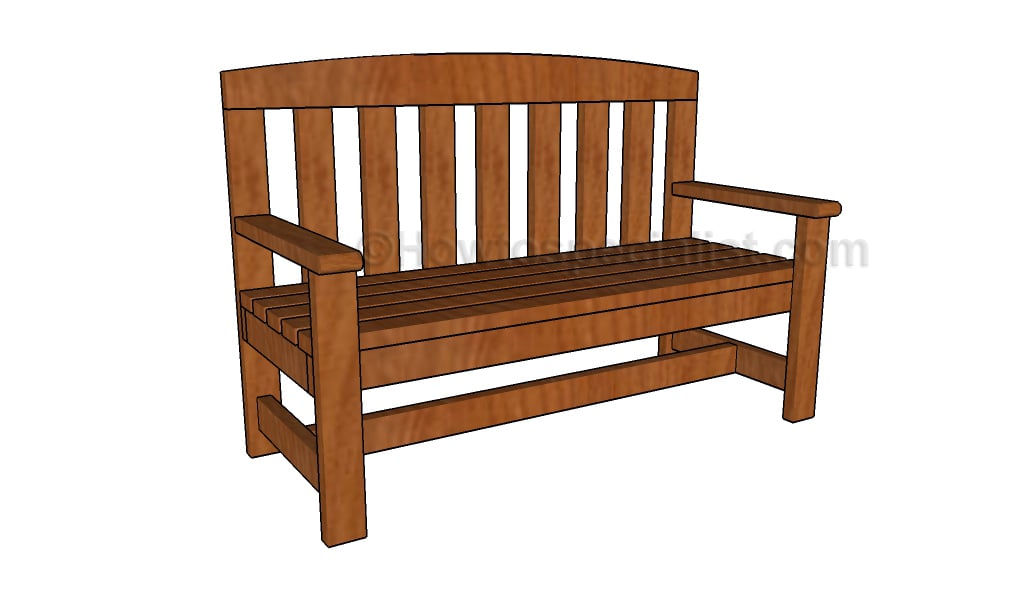
Outdoor bench with backrest
You can easily adjust the width and the design of this bench to suit your needs. This project is very simple to build, making it ideal for a beginner to woodworking. This also makes for a wonderful gift for the loved ones.
2×4 bench plans
For that polished, professional look, the finishing touches are key! Start by filling any visible holes, gaps, or seams with high-quality wood filler. Apply it generously and use a putty knife to smooth it out evenly, ensuring the filler gets into all crevices for a seamless finish.
Give it a few hours to dry completely, rushing this step can compromise the final look. Next, inspect the bench for any screws that might be sticking out; grab your screwdriver to tighten them or adjust as needed. Sand over the filled spots and any rough edges, blending them with the rest of the surface. This attention to detail will make all the difference, giving your bench that crisp, clean, and pro-level finish!
2×4 bench – free plans
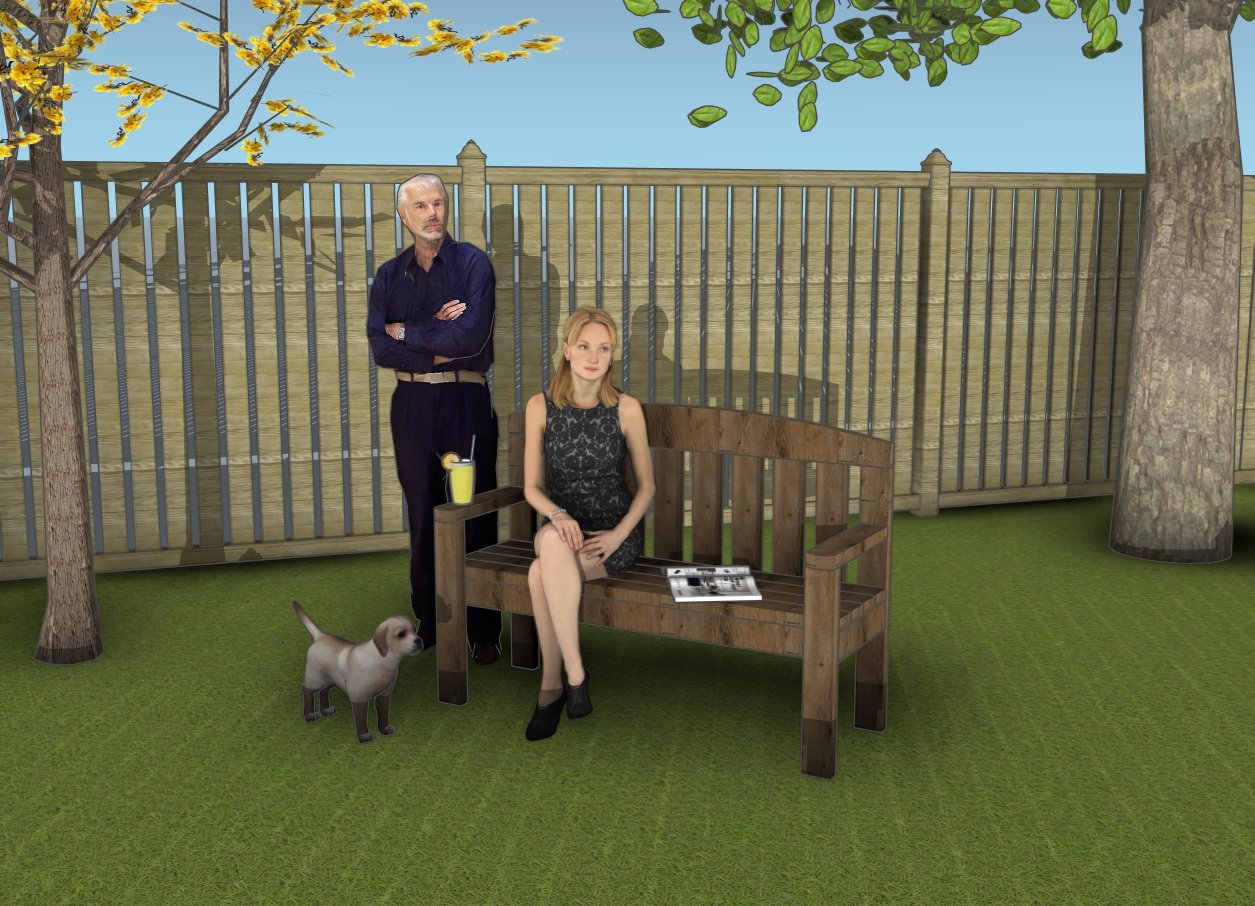
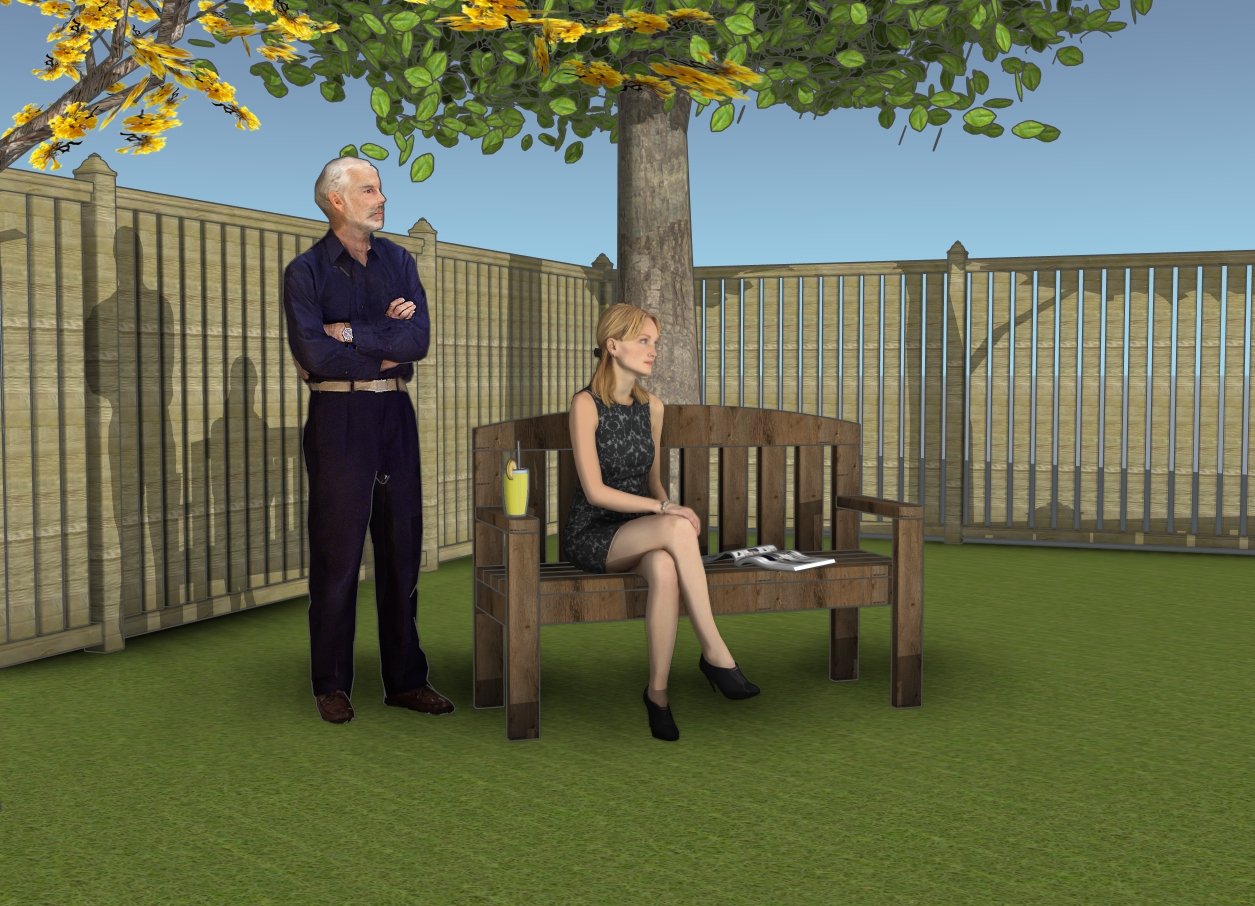
A 2×4 bench with a backrest is a simple, budget-friendly project that adds comfort and style to your outdoor space. It’s sturdy, weather-resistant, and easy to build, making it perfect for both new and seasoned DIYers. With a supportive backrest, it’s ideal for relaxing and enjoying your outdoor setup, whether you add a splash of paint or keep it natural for a classic look!
How to build an easy 2×4 bench
2×4 Wooden Bench
If you liked the design, you should take a look over this step by step tutorial project. This bench is built entirely using 2x4s but it is a little narrower. However, all the techniques used are similar to the ones required for the plans shown above.
Thank you for reading our project about 2×4 bench plans and we recommend you to check out the rest of the projects. Don’t forget to SHARE and LIKE our projects with your friends, by using the social media widgets, if you want to help us keep adding free woodworking plans.
62 comments
What are pocket holes?
A system used to join together slats. You use a pocket hole jig and drill pocket holes along the edge of one of the slats. Then you add glue to the joints and insert screws. I discuss more about pocket holes here: http://howtospecialist.com/tools-for-starting-woodworking/
Hi Jack. Did you use regular treated lumber? If not, what kind of wood did you use?
Hi there….just wondering how many 2×4’s i’ll need to make this. It only says one up top. thanks bunches!
9 pieces of 2×4 x8ft and 1 piece of 2×6 x6ft
I am almost finished. As I’m a newbie, not sure but I ended up needing 11/ 2×4’s.
First ever project. Really enjoyed it.
Thanks bunches Jack!! i’ll post a picture when she’s all done!!
This bench looks like something I can do. I try to be handy and it looks easy enough.
Looking forward to seeing how your bench comes out!
Nice looking plan….thanks for it. One question – how do you mark the arc for the rounded top?
You can use a bendable item and then trace the cut line along it. Alternatively, you could just round the corners using a round object (can, plate and so on)
Unless my math is off here it’s going to take more like 11 8 foot 2×4’s. Even if you don’t have any waste and the saw literally eats up no wood on the cuts the total inches add up to 918″ or 76 1/2′. That’s 9 1/2 2×4’s. It looks like a good plan and won’t stop me from making it, but it’s going to require at least 10 boards.
You are right, Jeff. 10 pieces of 2×4 and 1 piece of 2×6 lumber. Or 11 pieces of 2×4, if you don’t want to use the 2×6 for the arched backrest top. Good luck with the project and let me know how it comes out.
I am coming up with 11 2″x4″x8′ pieces for the bench for 2″x4″ cuts part. See the cut plan below. How do I reduce it to 10 pieces. Can someone share their cut plan? Sorry for the formatting. I built this in Excel with color coding, but the pasting option will not allow that picture.
2″x4″x8′ 12″ 24″ 36″ 48″ 60″ 72″ 84″ 96″
12″ 12″ 12″ 12″ 12″ 12″ 12″ 12″
1 C – 1 Bench Seat A-1 24″
2 C – 2 Bench Seat A-2 24″
3 C -3 Bench Seat F-1 24″
4 C – 4 Bench Seat F-2 24″
5 C – 5 Bench Seat A-3 36″
6 B – 1 Seat Frame B -3 18″ | B – 4 18″
7 B – 2 Seat Frame B -5 18″ | B – 6 18″
8 D – 3 Stretcher 55″ | A-4 36″
9 E 2-5 23″ (4 pieces)
10 E 6-8 23″ (3 pieces) + D -1 ( 21″)
11 D-2 21″
i used 11 pieces, couldnt figure out how to do it in less but i always buy one extra! i often… well often enough, mess up something.
a couple of hints… make the pocket holes in the arms (part that attaches to back leg) the back and front leg at the top on the back, and all the back pieces all at once (along with the frame ones). it makes it easier doing them together.
the ones on the front legs have to go on the front side, not hidden well, due to location, but if you do them before attaching the legs in the first part, it is easy… although, i would have to use a shorter driver than my drill.
Just finished It! I took one or two short cuts based on my resources but the plans were great, just submitted my pics, thanks again!
Thank you for sharing, Moe! It looks really well. I love how you managed to build it, even if you don’t have a lot of space for a proper workshop. Looking forward to seeing you next builds!
I am looking to tackle this project this upcoming weekend, but I’m having trouble figuring out how I can round the edges of the 2×4’s for the armrests with a jigsaw? Any help is greatly appreciated
There are some jigsaws that can cut that deep (clamp it tightly in place before making the cut). I’m not sure if that is the case for you. You should also consider using a router with a round over bit.
hi,
is it better to paint the 2x4s before putting the bench together or you do the painting after? also what kind of preservative do you use to protect the wood?
It is better to paint them before the assembly.
I could not get all the cuts out of 10 8′ 2×4’s. I used 4 different cut calculators online to see if there was a better way, none of them could do it with 10. It has to be 11 2×4’s, plus the 2×6. Good plans otherwise.
After finishing assembling my first of 2 benches, I have another tip to offer up. If you plan on using any cushions on this bench, make the front legs an inch or two longer. This will raise the armrests up just a touch, and makes all the difference with cushions.
Wonderful tip as we plan to put a cushion on ours… thanks a million!
I just completed this project. It was my first one from this site. This is one of the first things I’ve ever made. It was a gift for my wife on our anniversary this month. Love the plans.
That’s awesome! I would love to see your projects! You can send the pics at: http://howtospecialist.com/give-back/
Only problem I had was putting pocket holes on front legs to attach arm rest. This needs to be done before attaching front legs. Also you are not going to have room to screw them in because of base and slats.
With that being said,great build and design. We love the way it looks. Thank you
Where would you drill your pocket holes on the legs? I’m new to this and looking to build this for my grandparents for Christmas for their front porch
At the top of the front and back legs, so you can secure them to the armrests and to the top backrest support.
So on the back of the legs just above the items you want to attach? I apologize, I am new to this whole pocket hole thing. I built my first project using them last week. I get confused on where to put them.
2nd question. What kind of wood would I need to buy since this bench will be outside?
Cedar, if you can afford. If not, go with pine and use some outdoor stain and poly. Drill the pocket holes at the top of the back legs the screws will go through the legs into the horizontal backrest support.
Since my grandfather is elderly I’m thinking I would need to raise the seat a little higher. He has a hard time getting up and down from a sitting position. What is your recommendation on what to move the seat height and the front and back leg heights?
I can’t recommend you a specific height. My advice would be to make a few tests with your grandfather before making the cuts.
If you use 2x4x10 you only need 7 and have 1/5 of the waste.
1/5 of the scrap that is.
Having read through this and also reading all the comments on how much wood to use, seem most use more than called for, I do not see any where in the plans or list of materials for the back slats. They are pictured and explained how to attach, but as to how many 2×4’s are required for them nothing.. Plan to build this in the next few months very nice project
Look at E in the materials list.
Started my bench I am a 70 year young lady and want this for my flowers out front got all my pieces cut to your measurements . Started with the seat part of the bench my rectangle does not quite lay flat ? Did I not cut something not quit right? That being said I am not using perfect 2×4 either it is what we call cull it is cheaper and they are 48 inches long so less cutting But could you maybe suggest what I did wrong
Thank you
Love the plan
Use a L-square to see if the corners are square. Also check if the slats are straight. When assembling the frame lay the components on a level surface so you make sure everything is aligned.
I love this bench and am in the process of making my second one. I believe I may have solved the whole 10 board or 11 board mystery. In your YouTube video you show using only three of the 18” seat frame pieces and in the instructions it uses four. I always draw out my saw plans as well and the bench used an 11th 2×4 board (not including the 2×6) only for the 18” piece and making it again this time and trying to figure out how it’s only 10 I watched the video. Being that the 18” piece was all that came out of my 11th board it occurred to me that it would indeed be ten boards if one followed the video style. If you use four braces it will use 11 boards.
I’m not complaining at all! I just wanted to share what I think the difference may be. I always buy extra wood anyway and I love this plan. Wonderful detail!
Thank you for the feedback. I’m looking forward to seeing your benches!
I made my from cedar. wish I could post the photos.
I would love to feature it on the blog! You can send a few pics here: http://howtospecialist.com/give-back/
just added another bench. Not your ordinary end of bed bench, I added a small back rail. Most I have seen are just a flat bench. Thank you all.
That looks awesome, Howard! Thank you for sharing… it sure is not the flat bench end of bed bench, yours has character.
I used eight 2 x 4 x 10 boards along with 2 x 6. Very little waste.
Plans were good. Used some decking I had left over. 4 x 11/2. Didn’t like the upright back though so left out one of the seat lengths to give the back slats a nice comfortable angle. Wife loves it. Thanks
That sounds awesome. I would love to see and feature your project. You can send a few pics here: http://howtospecialist.com/give-back/
Hi! I am thinking of using these plans for my senior project and since this will be my first time working with wood, can you please tell me the exact type of wood you would recommend to buy when making this bench? Also, would it be possible to use one large piece of wood for the bench seat so I can mosaic it without the gaps?
You can use pine, redwood or cedar. Yes, you can use a large piece of the back.
Hi! I’m currently looking for designs for benches and came across this one. I really like the simple design and how it doesn’t seem too complex to build. I was just curious about how many people would be able to fit on the bench.
I would say 2 people to keep it comfortable.
Great plans! Just completed mine an love it.
Feedback;
I too could not get it done with only 10 pcs of 2×4. Perhaps you could diagram how you accomplished this in the plans.
The list of tools does not mention a pocket hole jig or pocket hole screws.
Perhaps an update of the plans is in order to clarify the items I now see are prevalent in the comments.
Regardless, it all worked out, and the bench is great!
Take care
How long would it take 2 people to build one of these benches?
Also, how many screws would you say this bench takes?
Hello – just need to know how many screws in the first part (seat frame). Is it one at each end of the short cuts?
Thanks
Ben
I am trying to get measurements to make a 4ft bench instead of 5ft. Any ideas?
I just finished mine today started it yesterday 12hrs total. Amazing design, just a couple of things I changed the height on the arms to 26 after reading some comments and it’s perfect. Also the stretcher for some reason on mine the 21 didn’t work I made it to 21.5 and worked better. But overall I was really happy with it!!!
Congrats to all who have made their benches, the pictures are all fabulous!
I am going to make this out of local Aussie hardwoods as a memorial to my wife’s father Eric, who died on Dec 29th last year. It will be a lovely reminder of him that we will keep on the deck of the holiday house down the coast at Lake Tabourie, on the east coast of Australia.
Hope everyone is safe and well over there in the USA, you are a good, and generous people in my experience.
Cheers,
David
Sydney, Australia.
Sorry for your loss. I’m sure it will be a nice project with family meaning. I like to believe there are nice people everywhere :)
Do you have a pdf version of your plans?
See the Get for Free button at the end of the article.
Hi Jack,
Thank you for posting these plans. Had great fun building mine as a DIY project. Read these comments after I finished (!), and agree with advice to put pocket holes in shorter legs for arm rests before attaching to main frame!
Best bit of your plans for me were the spacing for the back rests – could use a spare cut of 2×4 in between each one and it fits perfectly!
Bit of extra expense for me was a mini pocket hole jig, and a cheap electric plane to deal with my less-than-perfect jigsaw cut of the top backrest. It I’m an amateur!
Comments are closed.