This step by step project is about outdoor glider swing plans. If you want to relax in the garden, building a beautiful glider swing is a great idea. The best aspect of this project is that you only need 2x4s and 2x3s to build this sturdy glider bench. Moreover, I truly recommend you to check out the rest of the outdoor plans on my site, for even more building ideas. PDF downloadable plans with premium features in the Store.
There are many designs and plans you could choose from, so you should take a look on more projects before starting the actual project. Nevertheless, if you are looking for a simple but sturdy design, this project might be the solution to your needs. Moreover, you could build all the components from 2×4 lumber, as to save both time and money. Make sure you check all the dimensions before making the cuts, otherwise the components might not fit together easily. See all my Premium Plans in the Shop.
Made from this plan
Outdoor Glider Swing Plans
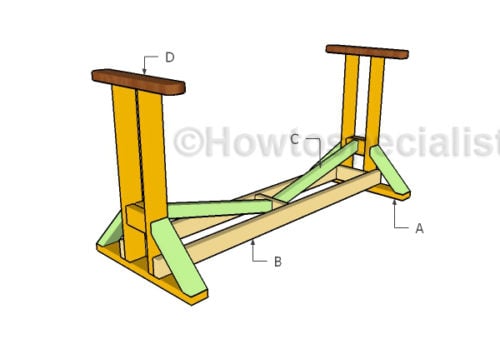
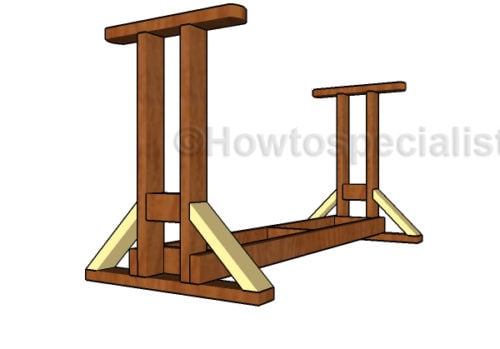
Building the glider stand
Materials
- A – 4 pieces of 2×4 lumber – 32 1/4” long, 4 pieces – 5 3/4″ long, 2 pieces – 28 3/4″ long SIDES
- B – 2 pieces of 2×4 lumber – 70″ long, 3 pieces – 8 3/4″ long FRAME
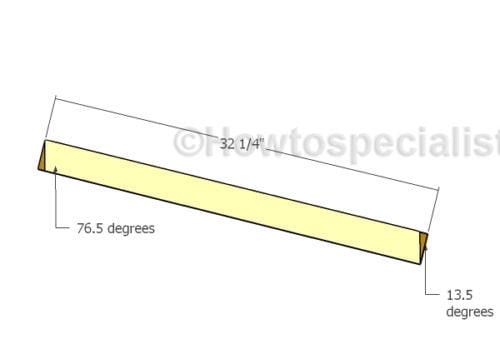
- C – 2 pieces of 2×4 lumber – 14 1/3″ long, 2 pieces of 2×3 lumber – 32 1/4″ long BRACES
- D – 2 pieces of 2×4 lumber – 22 1/4″ long TOP
- 6 piece of of 2×4 lumber – 6′
- 1 piece of 2×3 lumber – 6′
- 2 1/2″ screws, 3 1/2″ screws
- wood filler , wood glue, stain/paint
Tools
- Safety gloves, glasses
- Miter saw, jigsaw
- Chalk line, tape measure, spirit level, carpentry pencil
- Drill machinery and drill bits
Tips
- Pre-drill holes in the wooden components, before driving in the screws
- Use a good miter saw to make the angle cuts
Building a wood glider swing stand plans
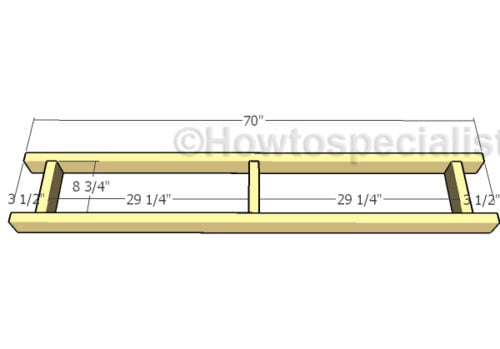
Main frame
The first step of the project is to build the main frame for the glider swing. Cut the components at the dimensions described in the diagram. Drill pilot holes through the 70″ components and insert 3 1/2″ screws into the perpendicular supports. Make sure the corners are square.
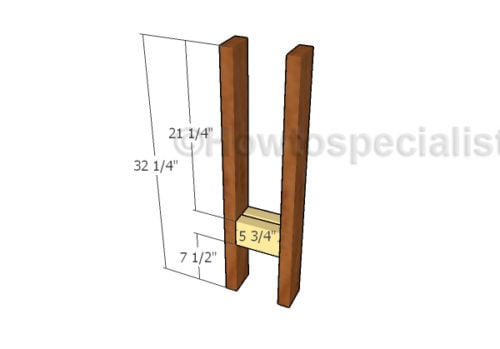
Side frames
Continue the project by assembling the sides for the glider swing stand. Cut the components for the stand from 2×4 lumber. Drill pilot holes through the vertical legs and insert 3 1/2″ screws into the horizontal supports. Make sure the corners are square and align the edges flush.

Building the side frames
Drill pilot holes through the bottom and top supports and insert 3 1/2″ screws into the legs. Make sure the corners are square and add glue to the joints.

Assembling the frame of the stand
Fit the main frame to the sides of the stand. Make sure the corners are square, drill pilot holes and insert 2 1/2″ screws. Use a spirit level to plumb the sides and check if the main frame is horizontal.
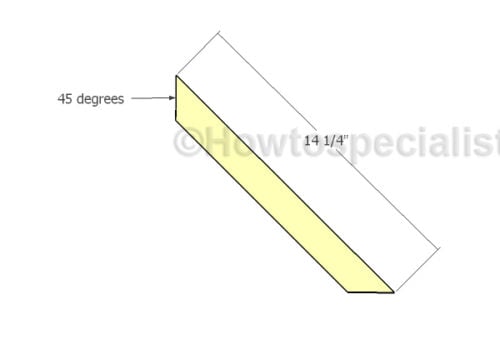
Side braces
Build the braces for the sides of the stand. Make 45 degrees to both ends of the braces and smooth edges with sandpaper.
Fitting the side braces
Fit the braces to the sides of the swing stand. Drill pilot holes and insert 2 1/2″ screws to lock it into place tightly.
Braces
In addition, you need to make more braces for the glider swing stand, so you enhance its rigidity. Make the angle cuts to both ends of the 2×3 braces and smooth the edges with sandpaper.
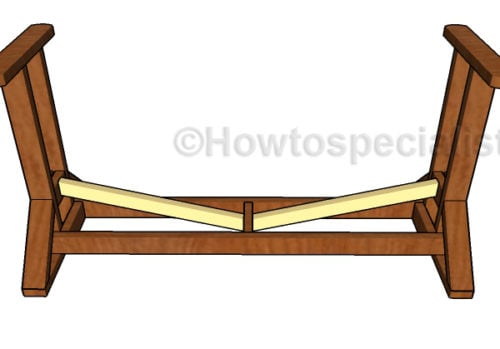
Fitting the braces
Fit the braces to the glider stand, as shown in the plans. Make sure you place the braces to the middle of the components, drill pilot holes and insert 2 1/2′ screws.
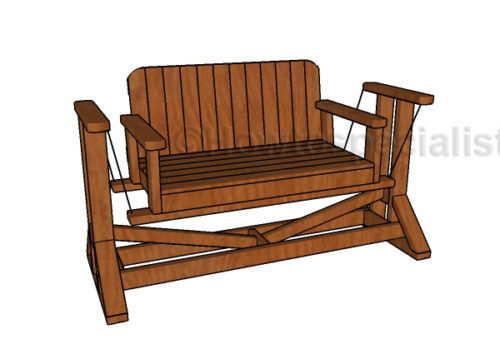
Glider swing plans
Make sure you check out PART 1 of the glider swing project, so you learn how to build the bench. Even if you are a rookie when it comes to DIY, you will be surprised how easy it is to make this glider swing with some common household tools and materials.
Thank you for reading our project about outdoor glider swing plans and we recommend you to check out the rest of the articles. Don’t forget to share our projects with your friends, by using the social media widgets.
<< Previous | Next >>
6 comments
How do u connect the chair to the stand? What do u use!! Rope??! Chain!??!
I would use chain. It is more durable.
any suggestion for the connection points? trying to think of something that won’t stick through the arm rest and poke someone in the arm.
That’s the safest way to create a proper support for the swing. You could double the top slats with another one, with pilot holes for the protruding screws,
I made the outdoor glider swing and it came out great (Thank you for the plans). It came out so good 2 of my co-worker are going to make it. My swing is for my outdoor patio and I have been looking for a cover to put over it to keep the weather out. Do you have any ideas what I can cover my swing with besides a tarp?
hi my friend
why don’t let to download your plan? if share, why do this? it’s a question for me. pls answer….
thank’s alot sohrab