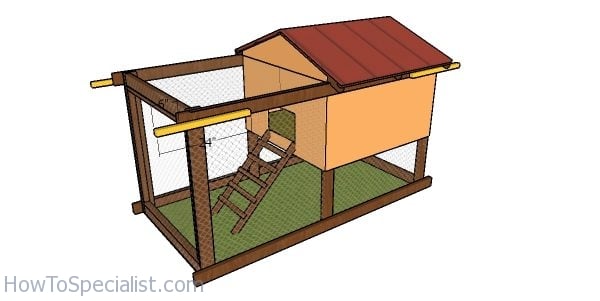
This step by step woodworking project is about simple chicken tractor plans. This is a super lightweight coop with an attached run, that you can move with ease from one place to another so the chickens always have fresh grass. This tractor is built on a sturdy 2×4 frame structure and it features a coop with a back door for easy access when needed to clean it. You can adjust the size of my plans to suit your needs. See my other DIY projects HERE.
We recommend you to invest in the best materials you could afford. Therefore, you should buy weather-resistant lumber, such as pine or cedar. Always take accurate measurements before adjusting the size of the components at the proper size. Drill pilot holes trough the components before inserting the wood screws, to prevent the wood from splitting. See all my Premium Plans HERE.
Made from this plan
Simple Chicken Tractor – Free DIY Plans

Building a chicken tractor
Materials
- A – 2 pieces of 2×4 lumber – 48″ long, 3 pieces – 42″ long 2xFRAME
- B – 1 piece of 2×4 lumber – 45″ long, 2 pieces – 41″ long FLOOR FRAME
- C – 1 piece of 1/2″ plywood – 45″x48″ long FLOOR
- D – 2 pieces of 2×4 lumber – 48″ long, 2 pieces – 42″ long FRONT FRAME
- E – 4 pieces of 2×4 lumber – 96″ long, 4 pieces of 2×2 lumber – 24″ long RAILS
- F – 2 pieces of 2×2 lumber – 38 long, 2 pieces – 42″ long, 4 pieces – 12″ long DOOR
- G – 6 pieces of 2×2 lumber – 30″ long RAFTERS
- H – 6 pieces of 1×2 lumber – 48″ long PURLINS
- I – 25 sq ft of metal sheets ROOFING
- J – 2 pieces of 1/2″ plywood – 24″x48″ long, 1 piece – 45″x37 1/2″ long, 1 piece – 16″x45″ long, 1 piece – 21 1/2″x45″ long WALLS
- K – 2 pieces of 2×2 lumber – 34 3/4″ long, 5 pieces – 16″ long LADDER
- 13 pieces of 2×4 lumber – 8′
- 2 pieces of 1/2″ plywood – 4’x8′
- 7 pieces of 2×2 lumber – 8′
- 25 sq ft of metal sheets
- 3 pieces of 1×2 lumber – 8′
- chicken wire
- hinges
- latch
- 100 pieces of 2 1/2″ screws
- 100 pieces of 1 5/8″ screws
- stain, wood filler, wood glue
Tools
- Safety gloves, glasses
- Miter saw, jigsaw
- Chalk line, tape measure, spirit level, carpentry pencil
- Drill machinery and drill bits
Time
- One Weekend
How to build a simple chicken coop tractor
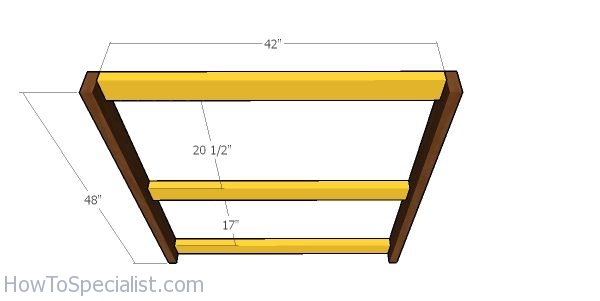
Frame for the chicken tractor
Use 2×4 lumber for the frame of the chicken tractor. Drill pilot holes through the side supports and insert 2 1/2″ screws into the supports. Make sure the corners are square.
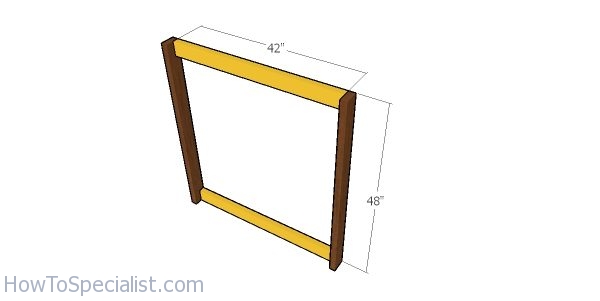
Floor frame – chicken tractor
Next, attach the floor supports to the sides of the chicken coop. Drill pocket holes at both ends of the 2×4 components and insert 2 1/2″ screws to lock them to the side frames. Make sure the corners are square.
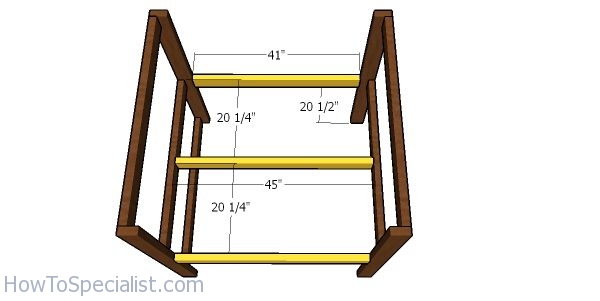
Frame for the chicken run
Next, build the frame for the chicken run. Drill pilot holes and insert 2 1/2″ screws to assemble everything together tightly.
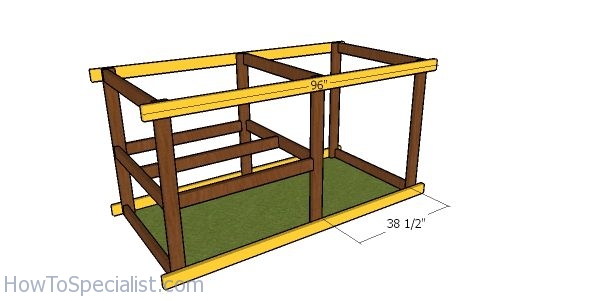
Fitting the rails to the coop tractor
Attach the 2×4 rails to the sides of the chicken coop, as shown in the diagram. Drill pilot holes and insert 2 1/2″ screws to lock them to the frames of the coop.
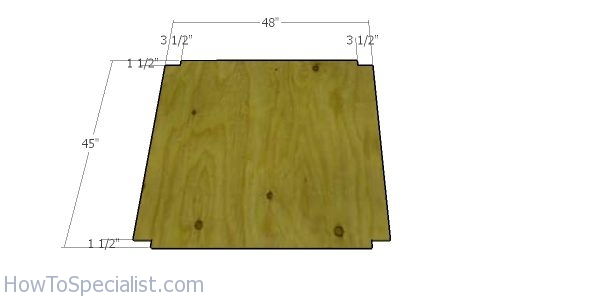
Floor sheet – coop
Use 1/2″ plywood for the floor of the chicken tractor. Use a circular saw to make cuts to the corners, as shown in the diagram.
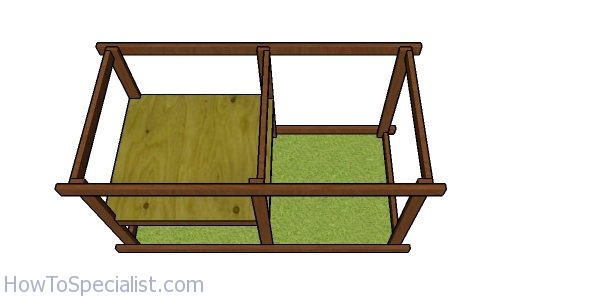
Fitting the floor – chicken coop
Fit the floor to the frame of the tractor. Align the edges flush and insert 1 5/8″ screws to lock them into place tightly.
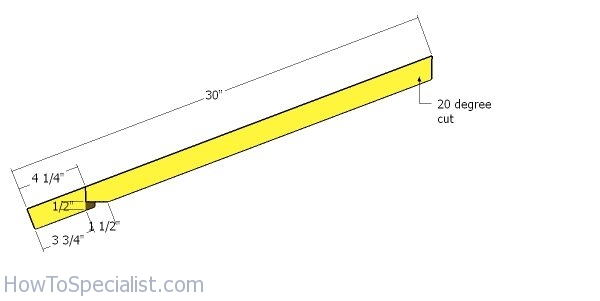
Building the rafters – chicken tractor
Use 2×2 lumber for the rafters. Make a birdmouth cut to the rafters and an angle cut to the opposite end.
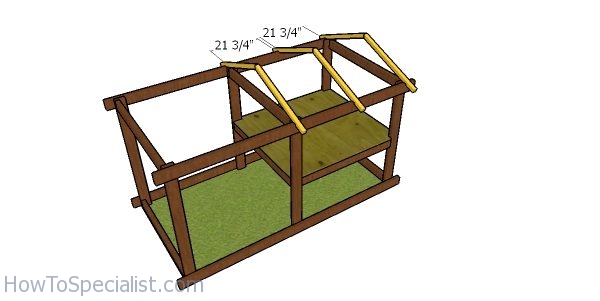
Fitting the rafters – chicken tractor
Fit the rafters to the top of the chicken coop, as shown in the diagram. Align the edges flush and insert screws to lock them into place.
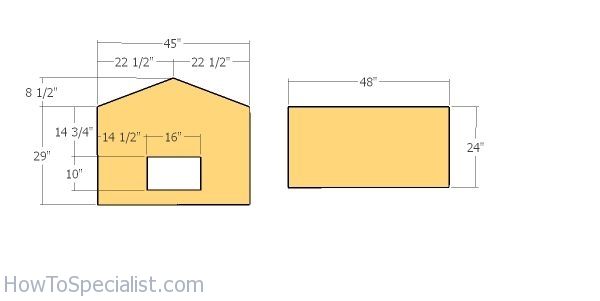
Exterior walls – chicken tractor
Use 1/2″ plywood for the exterior walls. Make the cuts to the panels as shown in the diagram.
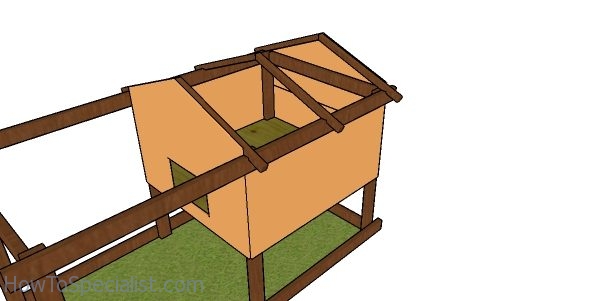
Fitting the panels to the coop tractor
Attach the panels to the sides and to the front of the chicken coop and lock them into place with 6d nails. Insert the nails every 8″ along the framing.
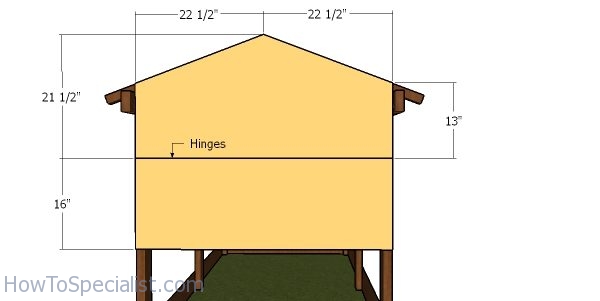
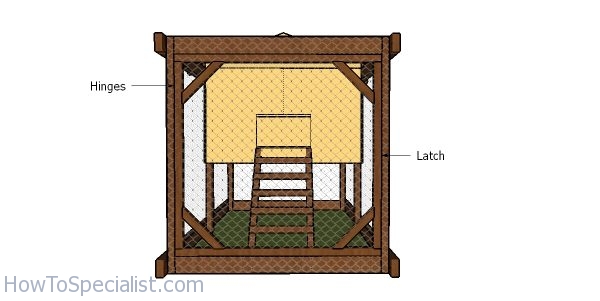
Back wall panels
Cut the panels for the back of the chicken coop. Align the edges and lock the top panel into place with nails Use hinges and a latch for the bottom section. That will be the door and it will help you have access to the interior of the coop so you can clean it when needed.
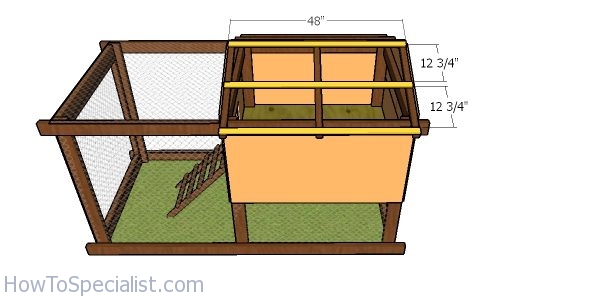
Fitting the purlins – chicken tractor
Fit the 1×2 lumber to the top of the coop roof. Place the purlins and then use 1 5/8″ screws to lock it into place tightly.
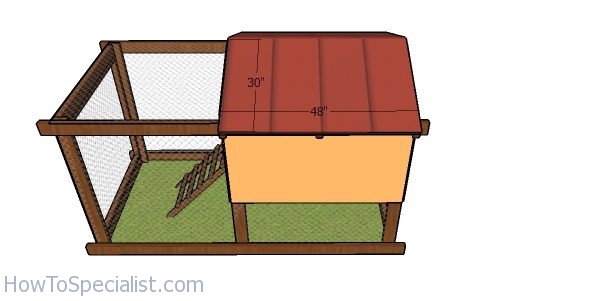
Fitting the roofing – chicken tractor
Attach the metal roofing sheets to the top of the chicken coop, as shown in the diagram. You can use asphalt shingles, as well, but I recommend you the metal roofing because it is a lot lighter and you will be able to move the chicken tractor from one location to another.
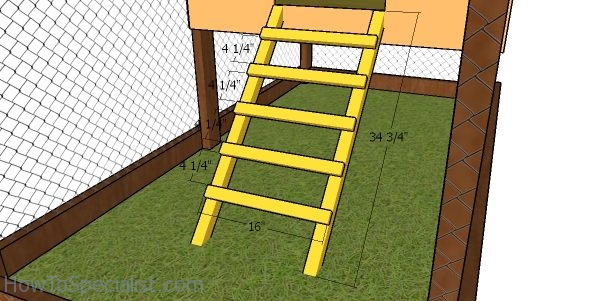
Building the ladder for the chicken tractor
Use 2×2 lumber for the ladder. Drill pilot holes and insert 2 1/2″ screws to assemble it together tightly. Attach the ladder to the entrance, as shown in the plans.
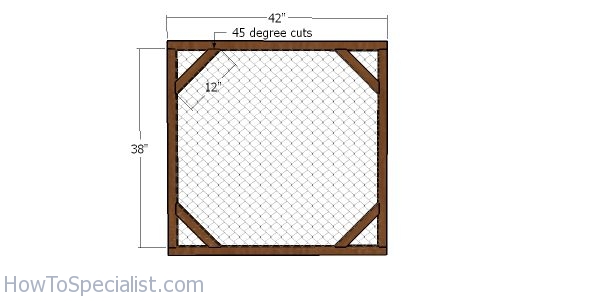
Door – Chicken tractor
Use 2×2 lumber for the door. Use a miter saw to make 45 degree cuts at both ends of the braces. Drill pilot holes and assemble the door with 2 1/2″ screws. Make sure the corners are square and align the edges flush.
Fitting the door – chicken tractor
Fit the door to the front of the chicken tractor. Align the edges flush and use hinges and a latch to secure the door into place.
Fitting the handles – chicken tractor
Attach the 2×2 lumber for the handles. Attach the handles to the frame of the chicken tractor, drill pilot holes and insert 2 1/2″ screws to lock them into place.
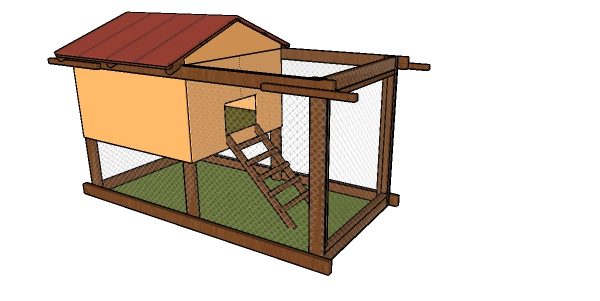
How to build a simple chicken tractor
See all my chicken coop plans HERE. If you like my project, don’t forget to SHARE it on Facebook and Pinterest. You shouldn’t miss my 4×8 barn chicken coop plans and my large chicken coop plans.
Thank you for reading our project about simple chicken tractor plans and I recommend you to check out the rest of the projects. Don’t forget to LIKE and SHARE our projects with your friends, by using the social media widgets. SUBSCRIBE to be the first that gets our latest projects.