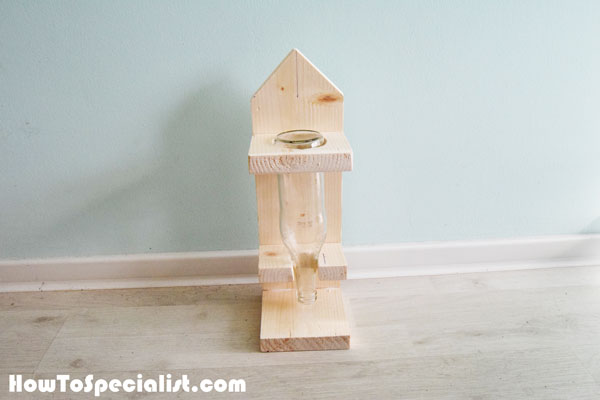
This step by step woodworking project is about how to build a bottle bird feeder. If you have many bird visiting your garden you should happy and entertained with this unique but very simple to build bottle bird feeder. The whole project is designed for a 12 oz bottle, so make sure you adjust the dimensions if you go for a larger bottle. In addition, I recommend you to use cedar as the wood will be exposed to the elements. See my other top projects for more DIY inspiration.
We recommend you to invest in the best materials you could afford. Therefore, you should buy weather-resistant lumber, such as pine or cedar. Always take accurate measurements before adjusting the size of the components at the proper size. Drill pilot holes trough the components before inserting the wood screws, to prevent the wood from splitting. There are even concrete log holders out there, but I personally like to show you how to build a wood fireplace log holder. See all my Premium Plans in the Shop.
Made from this plan
It’s that easy to build a bird feeder!

Building a bottle feeder
Materials
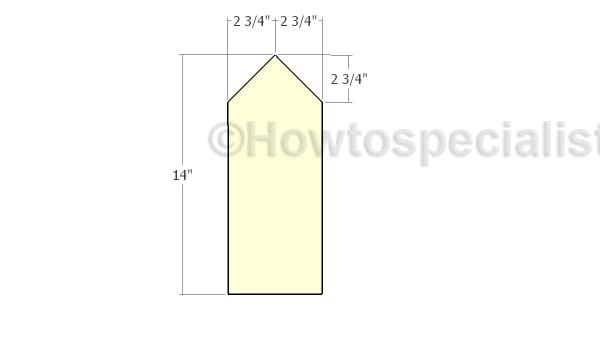
- A – 1 piece of 1×6 lumber – 14″ long BACK
- B – 2 pieces of 1×6 lumber – 5 1/2″ long BOTTOM
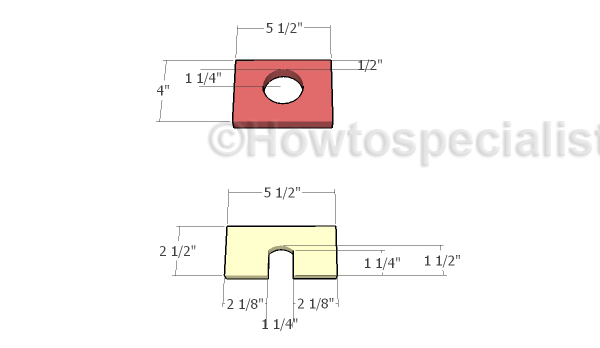
- C – 1 piece of 1×6 lumber – 4″ long, 1 piece – 2 1/2″ long SUPPORTS
- D – 2 pieces of 1×6 lumber – 5 1/2″ long ROOF
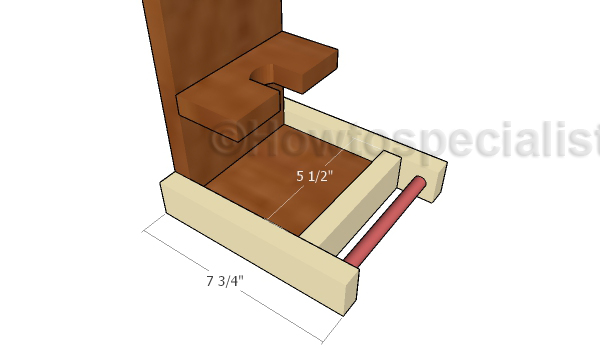
- E – 2 pieces of 1×2 lumber – 7 3/4″ long, 1 piece – 5 1/2″ long TRIMS
- F – 1 piece of 1/2″ dowel – 5 1/2″ long PERCH
- 1 piece of 1×6 lumber – 6′
- 1 pieces of 1×2 lumber – 6′
- 1 piece of 1/2″ dowel
- 50 pieces of 1 1/4″ brad nails
- 10 pieces 1 1/4″ screws, wood glue
Tools
- Safety gloves, glasses
- Miter saw, jigsaw
- Chalk line, tape measure, spirit level, carpentry pencil
- Drill machinery and drill bits
Time
- One Weekend
Bottle bird feeder plans
Building the back
The first step of the project is to build the back for the bird feeder from 1×6 lumber. Make 45 degree cuts to the top and smooth the edges with sandpaper.
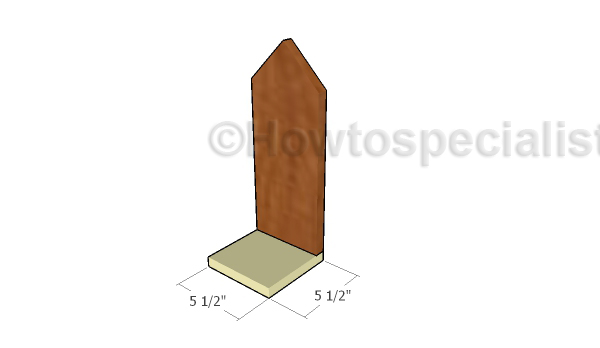
Attaching the bottom
Attach the bottom piece for the back of the bird feeder. Drill pilot holes, align the edges and insert 1 1/4″ screws or brad nails and waterproof glue
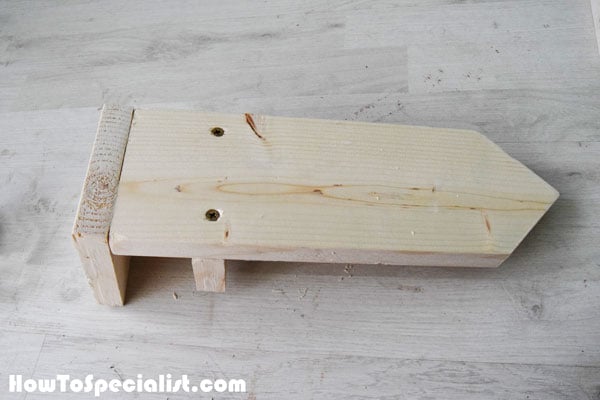
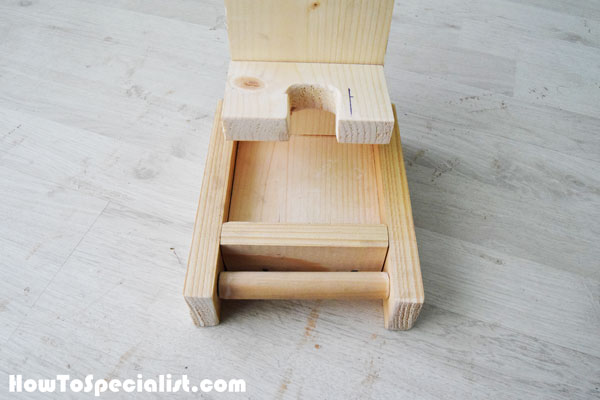
Building the supports
Build the supports for the bottle. Place the bottle on the top support and mark the outline of the bottle. Use a jigsaw to make the hole and smooth the edges with sandpaper. For the bottom support you need to mark the outline of the neck and get the job done with a jigsaw. Smooth the edges with attention.
REMEMBER that these measurements are only informational, so you actually need to take your own, so it suit your needs. The size of the 12 ox bottles vary extensively, so you need to make some small adjustments to make sure the end result will be neat.
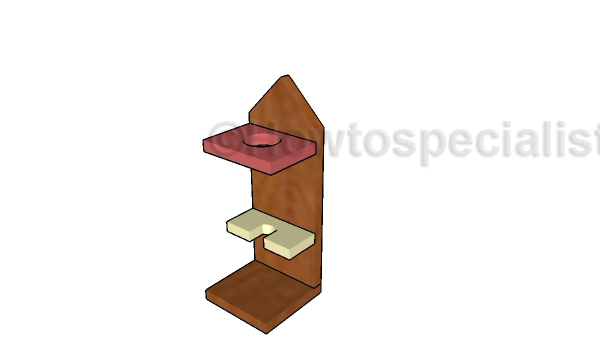
Fitting the supports
Fit the supports to the back of the bird feeder. Drill pilot holes through the back and insert 1 1/4″ screws into the supports. Start with the bottom supports, so you can fit the bottle so it sits 1″ from the bottom surface. Then install the top support in the same manner described above.
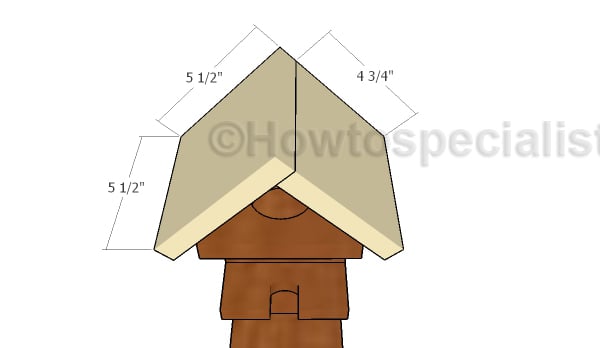
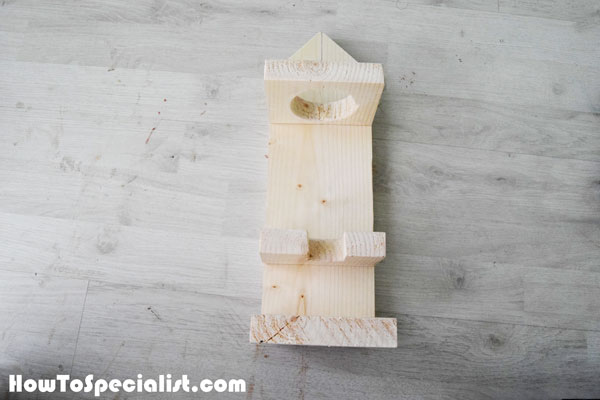
Fitting the roof
Build the roof for the bird feeder to keep the seeds protected from the elements. Cut the components from 1×6 lumber. As you can easily notice in the diagram, you need to adjust one side of the roof by cutting 3/4″ and making it narrower.
Fitting the trims
Fit the 1×2 trims to the bottom of the bird feeder. Use 1 1/4″ brad nails to secure the trims into place. Afterwards, install the perch to the front of the bird feeder. Use glue and 1 1/4″ brad nails to secure the 1/2″ dowel into place.
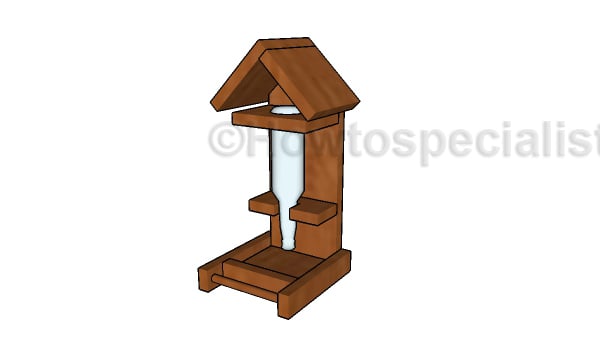
Bottle feeder plans
Last but not least, you need to take care of the finishing touches. Smooth the surface with sandpaper and then hang the feeder into place. You can attach it to a post or tree, or hang it using eye screws and chain/string.
How to build a bottle bird feeder
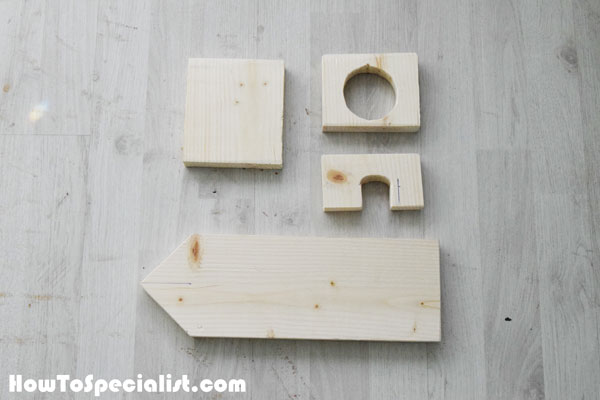
First of all, I built the main components for the bottle bird feeder. I designed these plans to suit the size of my 12 oz bottle, so I just cut the components according to the plans. I used my detail sander to smooth the cut edges and even out the surface.
I really recommend you to adjust the size of the supports to suit the dimensions of your bottle. Moreover, you can even use larger bottles, such as a wine bottle if you want to have more seeds stored so the bird feeder is on auto-pilot for a larger period of time.
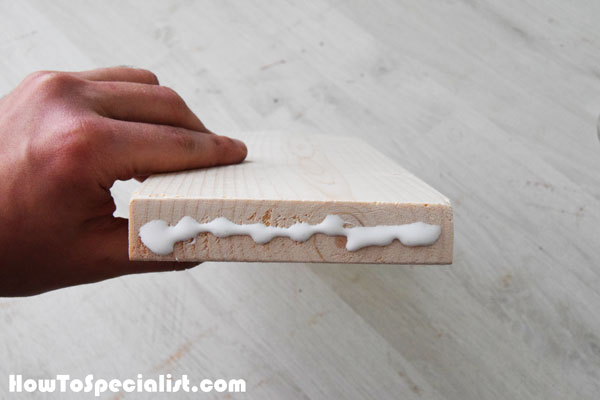
I added a generous amount of glue to the joint edges. Make sure you spread the glue evenly before joining the components together.
Fit the bottom support to the back of the bird feeder. Drill pilot holes through the back and insert 1 1/4″ screws into the support. Make sure the bottle will be about 1″ over the bottom’s surface, so the seeds can fall down and keep the tray full.
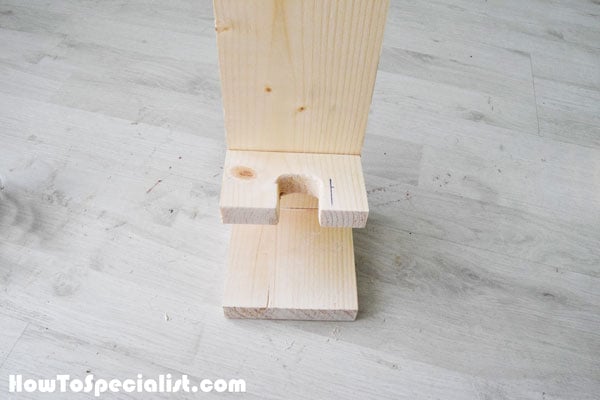
Fit the top support in the same manner described above. I used the bottle to determine the location for the top support, before inserting the screws.
After assembling the frame of the bird feeder I fitted the bottle into place, just to make sure everything work properly. The bottle feeder is starting to take shape and I couldn’t be more exited about installing the rest of the components.

Next, I framed the tray to the bottom of the feeder, so I can keep the seeds safely. I used 1×2 slats and 1 1/4″ brad nails.
Next, I attached the other piece of 1×2 lumber to the front of the tray. I also though it would be a great idea to install a 1/2″ dowel to the front of the feeder, so the birds could sit on it while eating the seeds.
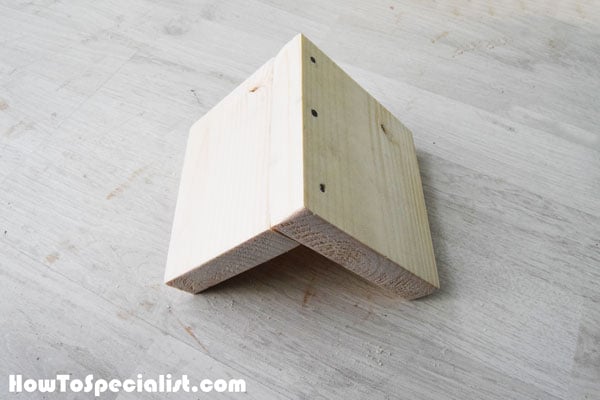
Assemble the roof for the bird feeder, as shown in the image. I aligned the edges flush, I added glue to the joints and drove a few 1 1/4″ brad nails in to lock them together. If you pay attention to the instructions the angle should have 90 degrees.

I attached the roof to the top of the feeder with 1 1/4″ brad nails, after aligning the edges with attention. I also fitted the bottom to the supports to make sure it fits easily and everything is working as planned. I drilled a pilot holes through the back of the feeder and used a 2 1/2″ screw to secure it to the wooden wall.

I decided not to paint the bird feeder, as food safety is my top priority. In addition, I really enjoy the natural look of the wood so I have no complaints. I used my detail sander to smooth all the edges thoroughly with 120 grit sandpaper.

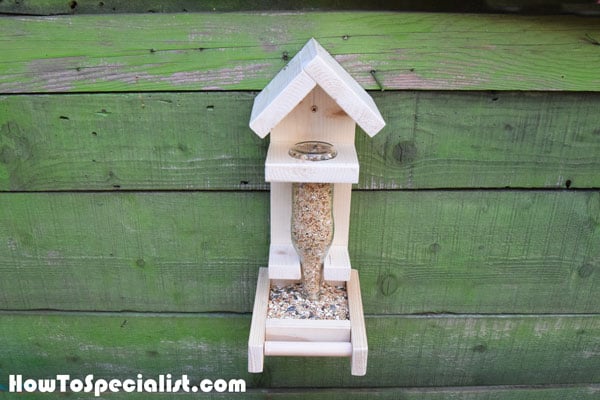
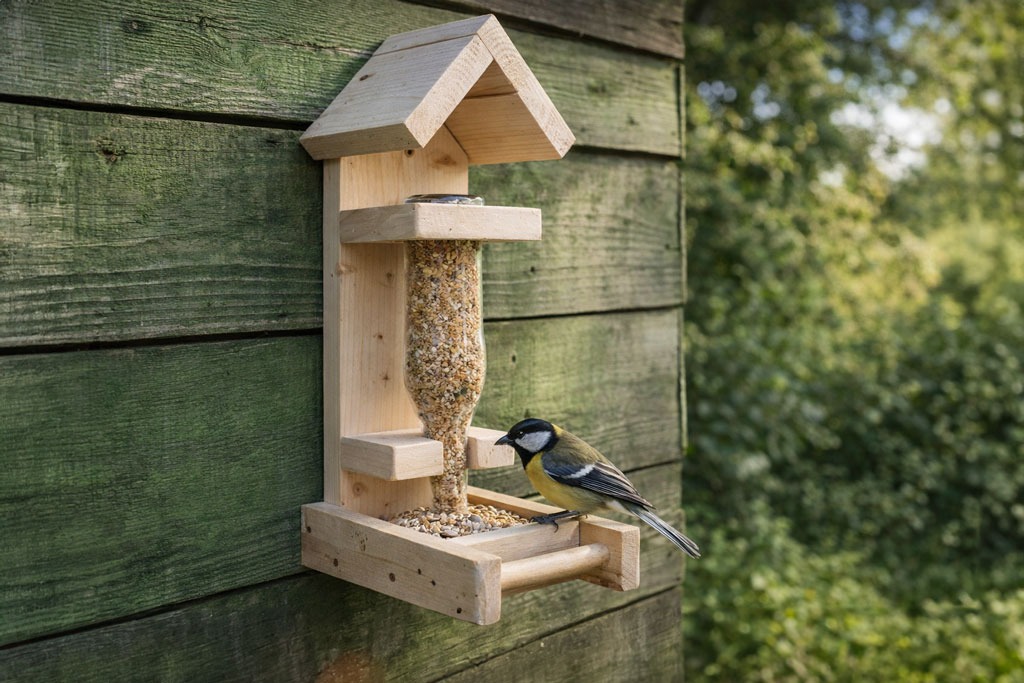
I filled the bottle with bird’s seeds and fitted it to the supports.

I am really pleased with how this woodworking project turned out and I am so eager to shoot a few birds… with my camera. If I spot anything extraordinary I will share it with you later on. For now, let’s see the bottle feeder from other angles so you can get an idea of the overall design.
All in all, this project only cost me 10 dollars to make, including the seeds and the good news is I also have a lot of scrap wood I can use for future projects. It was a great and fun project which challenged me to come up with a design unlike anything else out there. This is one of my favorite projects to date, as it looks awesome and it should keep all the bird visiting my garden happy. If you like it, don’t forget to SHARE it on Facebook and Pinterest.
Thank you for reading our project about how to build a bottle bird feeder and I recommend you to check out the rest of the projects. Don’t forget to LIKE and SHARE our projects with your friends, by using the social media widgets. SUBSCRIBE to be the first that gets our latest projects.
13 comments
There seems to have instruction incomplete. The text as listed: “Last but not least, you need to take care of the finishing touches. Smooth the surface with sandpaper and”. This is just below the last image and before the actual images. Would appreciate completing the text.
Thanks
Thank you for the feedback. I’ve added the missing info.
Really like this idea…great Mother’s Day gift idea. Thanks for sharing your imagination with us.
You’re welcome!
How do you get the bottle out to refill? It doesn’t appear to be an easy task once the roof is put on, if possible. Thank you!
It is actually easy to take it off and refill it. I built this and I can assure you it is not difficult.
It’s all good
Looks good. Looks easier than other versions to add seed. Do you have an issue with the bottle sliding out at the bottom prematurely ? Also, do you cut the top hole oval so the bottle can angle out?
No issues with it so far. It works great. The top hole is circular, a little oversize.
How do you recommend keeping the bird seed dry and how often do you clean the seed out?
The birds do the cleaning. I didn’t see any issue with the seeds getting wet. The roof keeps them pretty dry and the seeds in the bottle will cover them with a new layer.
I seem to need a video on how to load the bottle in full of seeds and not lose them all.😂
You just have to seal it with your finger until you slide the bottle into place. Once you release it, the seed spread excessively.