This step by step woodworking project is about free catio plans. I have designed this catio for you to create a cozy shelter for your favorite pets. Your cats will enjoy the fresh air and they will bath in the sunlight, while being protected from the predators and from cars. You can adjust the size of the catio to suit your needs. See my other DIY projects HERE.
We recommend you to invest in the best materials you could afford. Therefore, you should buy weather-resistant lumber, such as pine or cedar. Always take accurate measurements before adjusting the size of the components at the proper size. Drill pilot holes trough the components before inserting the wood screws, to prevent the wood from splitting. See all my Premium Plans HERE.
Made from this plan
Catio – Free DIY Plans
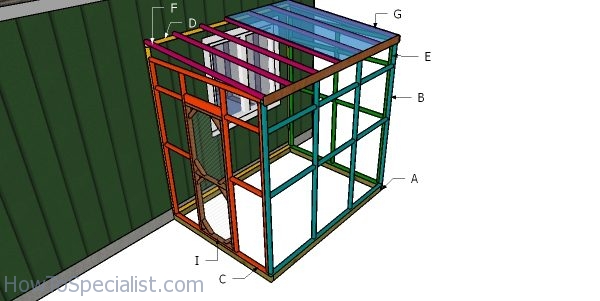
Building a catio with roof
Materials
- A – 2 pieces of 2×4 lumber – 72″ long, 2 pieces – 93″ long BASE
- B – 2 pieces of 2×2 lumber – 96″ long, 4 pieces – 85″ long, 6 pieces – 30″ long SIDE WALL
- C – 2 pieces of 2×2 lumber – 69″ long, 4 pieces – 85″ long, 4 pieces – 19 1/2″ long, 1 piece of 2×4 lumber – 24″ long FRONT WALL
- D – 2 pieces of 2×2 lumber – 96″ long, 1 pieces – 91 1/2″ long SIDE WALL
- E – 2 pieces of 2×2 lumber – 69″ long, 3 pieces – 85″ long, 4 pieces – 32 1/4″ long BACK WALL
- F – 7 pieces of 2×2 lumber – 72 1/2″ long RAFTERS
- G – 2 pieces of polycarbonate – 48″x72″ long ROOFING
- H – 2 pieces of 1×4 lumber – 73 1/4″ long, 1 piece – 96″ long TRIMS
- I – 2 pieces of 2×2 lumber – 69″ long, 2 pieces – 24″ long, 1 piece – 21″ long, 8 pieces – 8 3/4″ long DOOR
- 4 pieces of 2×4 lumber – 8′
- 34 pieces of 2×2 lumber – 8′
- 3 pieces of 1×4 lumber – 8′
- 2 pieces of polycarbonate – 48″x72″
- latch, hinges
- 200 pieces of 2 1/2″ screws
- 20 pieces of 3 1/2″ screws
- stain, wood filler, wood glue
- harware cloth
Tools
- Safety gloves, glasses
- Miter saw, jigsaw
- Chalk line, tape measure, spirit level, carpentry pencil
- Drill machinery and drill bits
Time
- One Weekend
How to build a 6×8 catio
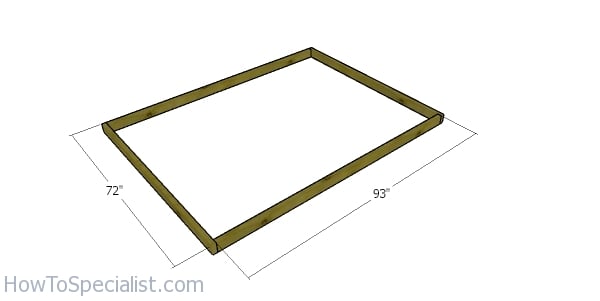
Building the base for the catio
The first step of the project is to assemble the base for the catio. Use 2×4 pressure treated lumber and assemble the base, as shown in the diagram. Drill pilot holes and insert 3 1/2″ screws to lock them together tightly. Make sure the corners are square and align the edges flush.
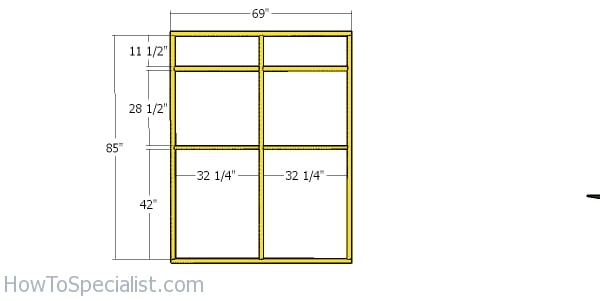
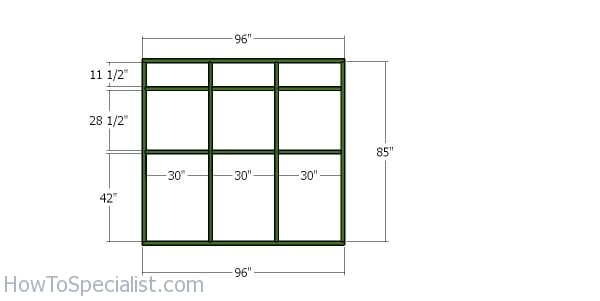
Back catio wall frame
Use 2×2 lumber for the wall frames. Cut all the components as shown in the diagram and in the cut list. Drill pilot holes and insert 2 1/2″ screws to assemble everything together tightly. Make sure the corners are square and the edges flush.
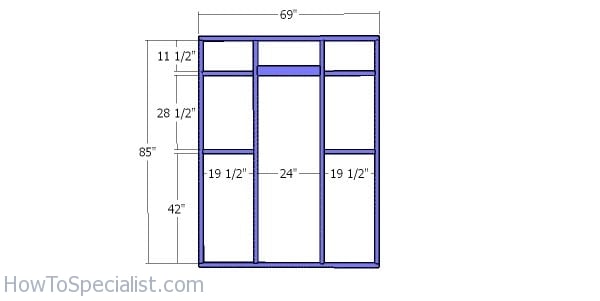
Front wall – 6×8 catio
Frame the front wall, as shown in the plans. Leave an opening for a door. Use 2×4 lumber for the header.
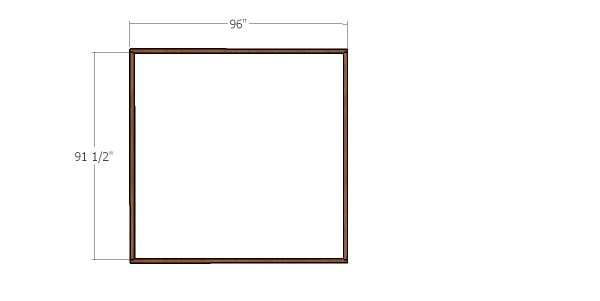
Side wall frame for 6×8 catio
Frame the side wall, as shown in the diagram. Use the same techniques described above.
Side wall – catio 6×8
Assemble the other side wall frame.

Assembling the catio frame
After assembling the 4 wall frames, you need to assemble everything together. Lay the wall frames to the base and align the edges flush. Drill pilot holes through the bottom plates and insert 3 1/2″ screws into the base. In addition, lock the adjacent wall together tightly with screws. Plumb the walls plumb.
Building the roof of the catio

Rafters for the catio
Use 2×2 lumber for the rafters. Use a saw to make the cuts, as shown in the plans.
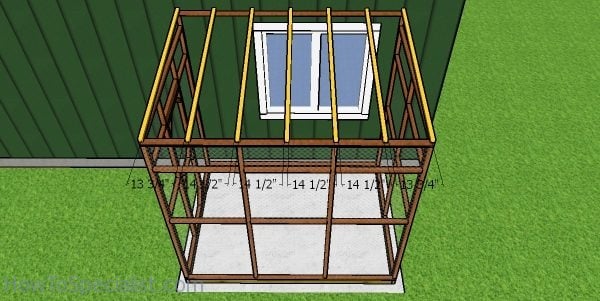
Fitting the rafters – catio plans
Place the rafters every 16″ on center and align the edges. Drill pilot holes and insert 3 1/2″ screws to lock the rafters into place tightly.
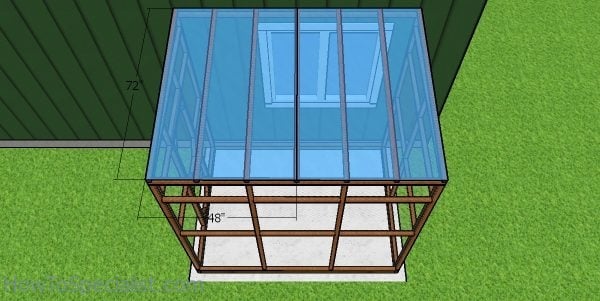
Fitting the roof sheets – 6×8 catio
Use polycarbonate sheets for the catio roof. Leave no gaps between the sheets so the roof is waterproof.
Building the door
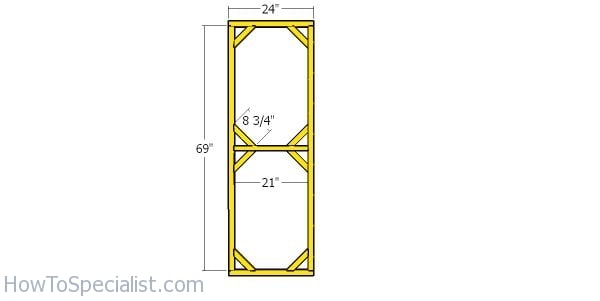
Door frame for catio
Use 2×2 lumber for the door frame. Cut all the components as shown in the diagram. Make 45 degree cuts at both ends of the braces. Drill pilot holes and use 3 1/2″ screws for the joints.
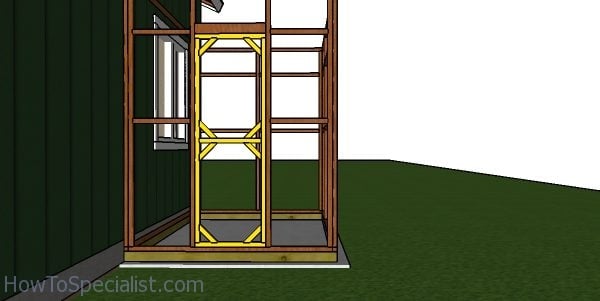
Fitting the door to the catio
Fit the door to the front of the catio. Align the edges flush and attach the hinges to secure the door to the frame of the catio. Install a latch to keep the door locked. This door is ideal, because you have access to the interior of the catio to clean it.

Roof trims for catio
Use 1×4 lumber for the roof trims. Use a miter saw and make the angle cuts to the trims.
Fit the trims to the top of the catio and align the edges flush. Insert 2 1/2″ screws to secure the trims into place tightly.
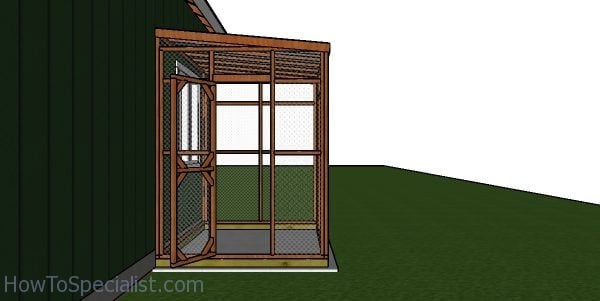
Free Covered Catio Plans – Side View
Last but not least, you need to take care of the finishing touches. Apply a few coats of paint / stain over the components to protect them from decay and to enhance the look of the catio. Take a look over my window catio plans HERE.
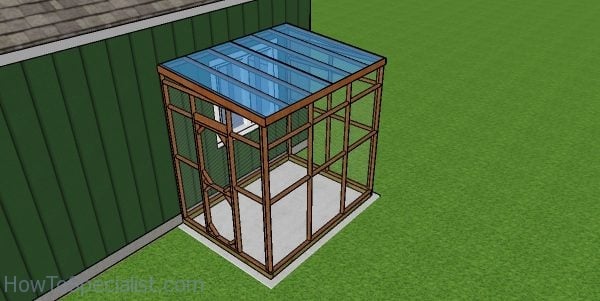
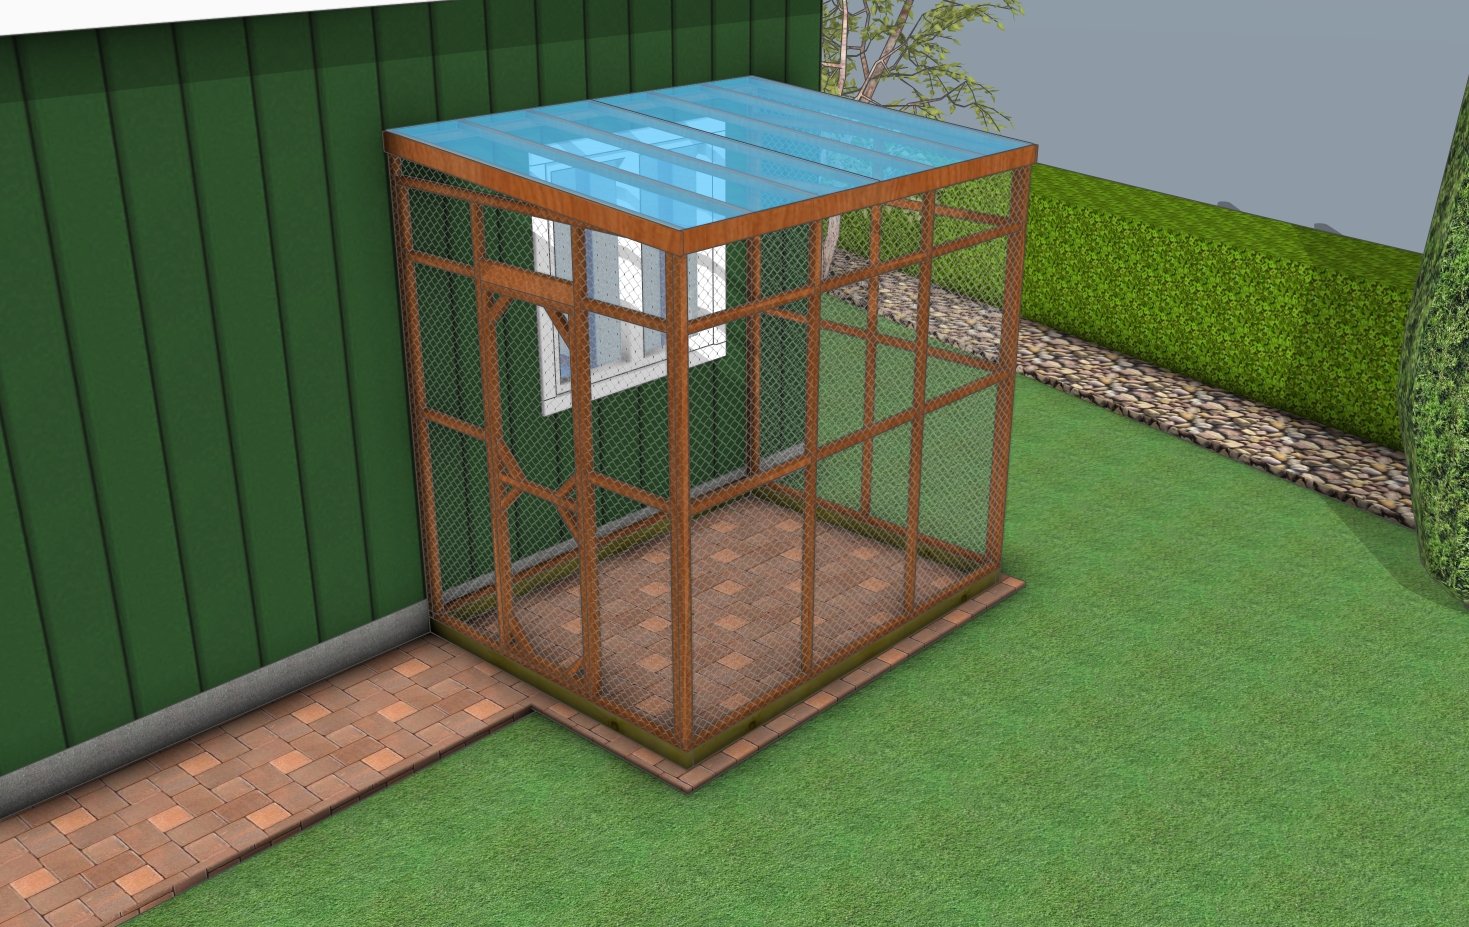
Free Covered Catio Plans
See all my cat plans HERE. If you like my project, don’t forget to SHARE it on Facebook and Pinterest. You can easily add shelves to the interior of the catio, so the pets can climb and have fun.
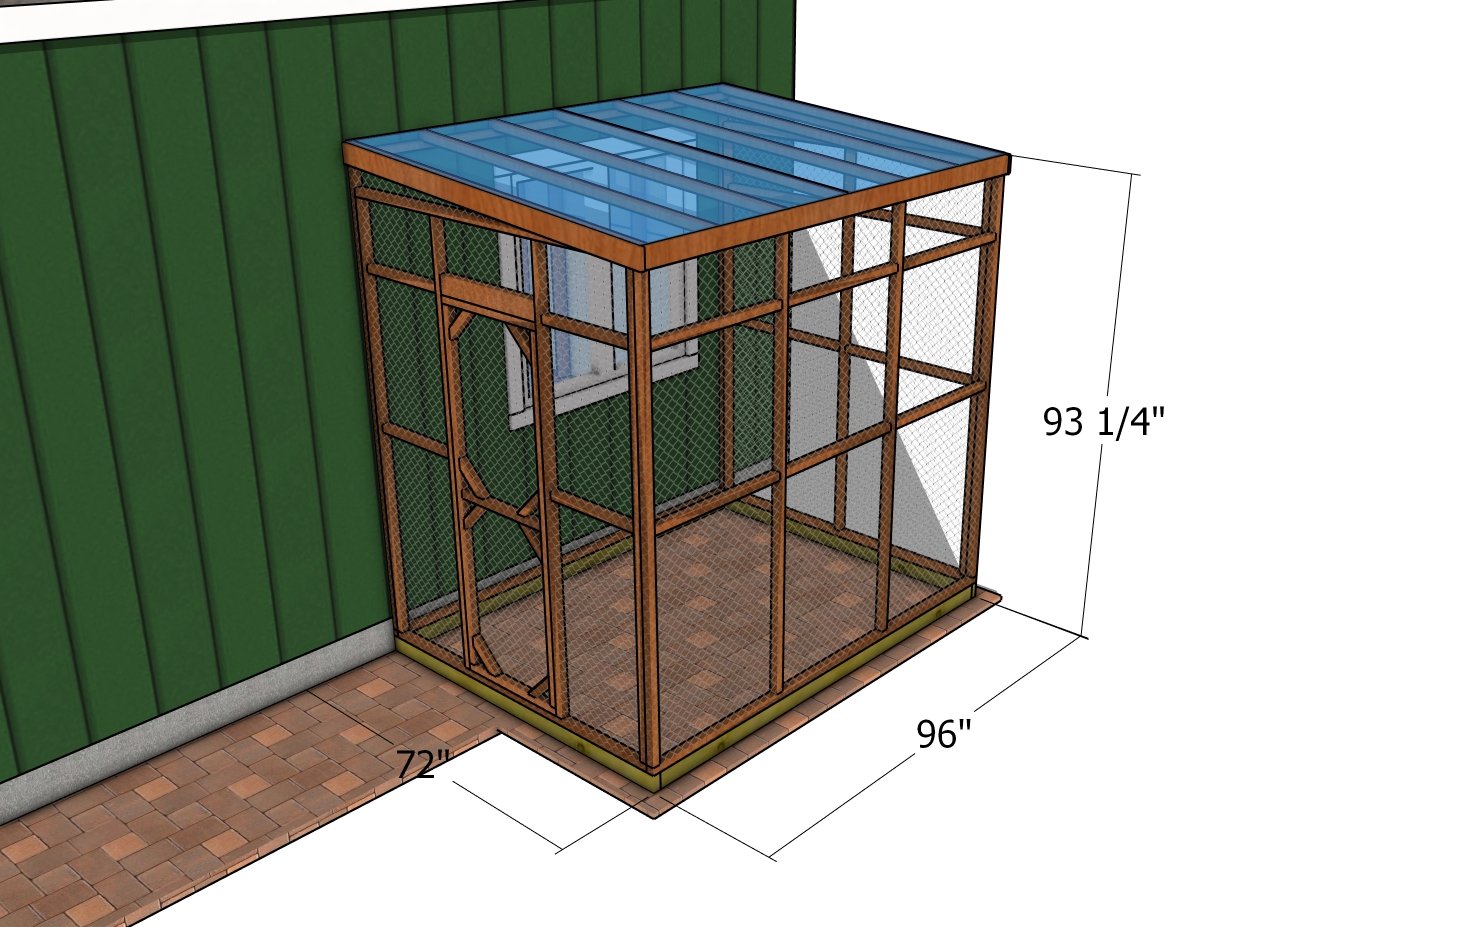
Free Covered Catio Plans – dimensions
How to build a catio – 6×8
My best tips for building an attached catio:
A catio (cat patio) is the perfect way to let your indoor cat experience the outdoors safely. Whether your goal is to provide fresh air, more stimulation, or just a cozy sunbathing spot, an attached catio can be a game-changer. If you’re thinking of building one, here are my top tips to ensure your project is a success.
1. Plan Your Location Wisely
Before you start building, choose the best spot for your catio. Typically, it’s attached to a window, door, or patio that your cat already enjoys. Pick a place where your cat will get a good view and some sun but isn’t exposed to heavy winds or rain. The more sheltered the location, the more comfortable your catio will be.
2. Measure Your Space
Once you’ve chosen the location, measure the space carefully. Whether you’re building a small catio or a large enclosure, getting the dimensions right ensures a perfect fit to your house. Keep in mind the size of your cat too—make sure there’s plenty of space for lounging, playing, and exploring.
3. Choose Sturdy Materials
Your catio needs to be built from sturdy, weatherproof materials that will hold up over time. Use pressure-treated lumber or cedar, which is naturally rot-resistant. For the sides, galvanized steel mesh or pet-safe wire is ideal, as it’s strong enough to keep your cat safe from predators and prevent escapes.
4. Incorporate Different Levels
Cats love to climb and perch, so make the most of vertical space by incorporating shelves, platforms, or even a ramp inside the catio. Having multiple levels gives your cat more opportunities to explore and makes the space more engaging. Add a few cozy hammocks or soft surfaces for lounging too.
5. Create a Safe Connection
Ensure a secure and safe connection between your home and the catio. If you’re attaching it to a window, a cat flap installed in the window frame or a sliding glass door insert is a great solution. Make sure the entry point is easy for your cat to access and well-constructed to avoid drafts or rain sneaking in.
6. Weatherproof for Year-Round Use
To make the catio usable year-round, take some time to weatherproof the design. For sunny spots, consider adding a roof or shade cloth to protect your cat from harsh UV rays. In rainy climates, a waterproof roof is essential. Tarps, corrugated roofing panels, or even plexiglass sheets can keep things dry without blocking your cat’s view of the outdoors.
7. Add Comfortable Flooring
Cats love to sunbathe and lounge, so make sure the floor is comfortable. Outdoor carpeting, astroturf, or even wooden planks provide a soft surface while also being easy to clean. For extra coziness, add a removable cushion or pet bed inside for your cat to snuggle into.
8. Ensure Ventilation and Security
While your catio needs to be secure, it’s also important to allow plenty of ventilation so your cat gets fresh air. Ensure that any mesh or screening you use allows for good airflow. Make sure the mesh is strong enough to prevent your cat from tearing it and secured tightly to the frame to prevent gaps.
9. Add Cat-Safe Plants and Toys
Make your catio an engaging space by adding cat-safe plants like catnip, wheatgrass, or lavender. You can even hang a few cat toys or include a scratching post to make the space feel more like a playground. Cats love sensory stimulation, so consider introducing bird feeders outside the catio to keep your feline entertained by passing wildlife.
Bonus Tip: Keep It Clean! To keep the catio enjoyable for both you and your cat, make sure you design it for easy cleaning. A removable roof or hinged door can make it easier to sweep out debris, replace bedding, or clean up after your pet.
By following these tips, you’ll be well on your way to building a functional and fun catio that your cat will love. Whether you go big or small, a well-built catio will provide your cat with fresh air, adventure, and a safe outdoor experience.
Thank you for reading our project about free catio plans and I recommend you to check out the rest of the projects. Don’t forget to LIKE and SHARE our projects with your friends, by using the social media widgets. SUBSCRIBE to be the first that gets our latest projects.
8 comments
Hi! Wondering what and how much you used to cover the walls? I don’t see that included in the plans. Thanks for this! Hoping to build it this weekend for our cat.
Hardware cloth
Thank you for plans! I was looking through instructions for when and how to apply hardware cloth. How to overlap joins? What type of fasteners (staples?) to attach hardware cloth to framing? How to cover wedge/gap between sidewalks and roof? Also, does this type of build trend to require a building permit?
Hardware cloth is typically sold in rolls either 24″ or 36″ tall. I would edit the plans in this posting so that you have the joists to match one of those two heights, then you don’t need to overlap the hardware cloth. Typically 24″ on center (for the 24″ hardware cloth) or 18″ on center for the 36″ cloth. Use staples or screws (with washers) to secure the cloth to your framework. I was planning to build my framework with 2×2’s but then double it up so the hardware cloth would be secured between the two sets of framing (essentially it would finish up as 2×4 framing with hardware cloth sandwiched in the middle).
Has anyone built this that I can see pictures?
To make this taller (my windows are very high up). Would the only adjustment I need to make be to get longer cuts for the vertical walls?
Yes
I’ve had this saved for years and I’m gunna try it. New to woodworking so here I go.
However, I’m making it out of 2×4’s exclusively. The sun and moisture here is too much for 2×2’s to survive. Anything special I’ll have to do?