This step by step woodworking project is about free shooting bench plans. I have designed these plans for a simple shooting bench, so that any person with basic skills and tools can build this in one weekend. You don’t have to be an expert and you don’t need to invest hundreds of dollars to build your own shooting bench. This bench is lightweight making it portable.
We recommend you to invest in the best materials you could afford. Therefore, you should buy quality lumber, such as pine. Always take accurate measurements before adjusting the size of the components at the proper size. Drill pilot holes trough the components before inserting the wood screws, to prevent the wood from splitting. PDF downloadable plans with premium features in the Store. See all my Premium Plans in the Shop.
Made from this plan

Building a shooting bench
Materials
- A – 4 pieces of 2×6 lumber – 30″ long, 1 piece – 16″ long LEGS
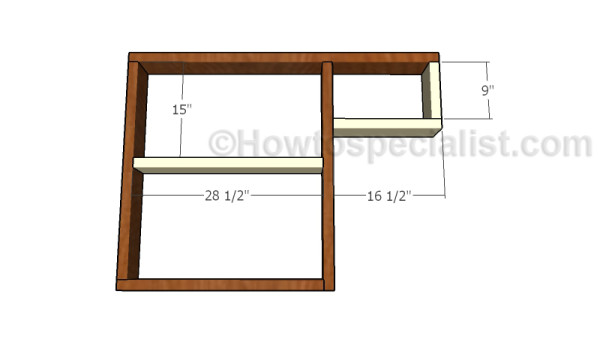
- B – 1 piece of 2×6 lumber – 30″ long, 1 piece – 33″ long, 1 piece – 34 1/2″ long, 1 piece – 48″ long, 1 piece – 28 1/2″ long, 1 piece – 9″ long, 1 piece – 16 1/2″ long FRAME
- C – 1 piece of 2×6 lumber – 48″ long, 3 pieces – 33″ long, BRACES
- D – 1 piece of 2×6 lumber – 32 1/2″ long BRACE
- E – 2 pieces of 3/4″ plywood – 36″x48″ long TABLETOP
- F – 2 pieces of 3/4″ plywood – 8 1/2″x24″ long SEAT
- 6 pieces of 2×6 lumber – 8′
- 1 piece of 3/4″ plywood – 4’x8′
- 500 pieces of 2″ brad nails
- 200 pieces of 2 1/2″ screws
- wood glue, stain
Tools
- Safety gloves, glasses
- Miter saw, jigsaw
- Chalk line, tape measure, spirit level, carpentry pencil
- Drill machinery and drill bits
Time
- One Weekend
Free Shooting Bench Plans
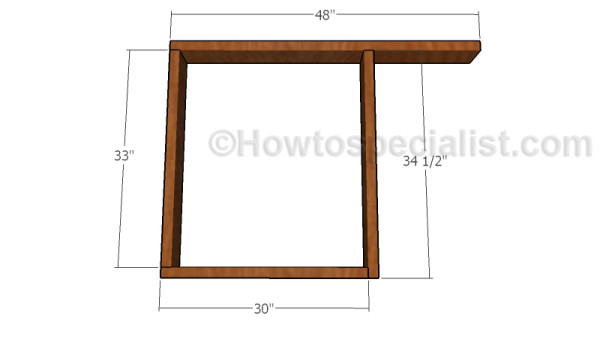
Building the top frame
The first step of the project is to build the frame for the tabletop. Cut the components from 2×6 lumber. Align the edges and make sure the corners are square. Drill pilot holes and insert 2 1/2″ screws to lock the components together. Add glue to the joints.
Top frame
Complete the tabletop frame by attaching the rest of the components. Drill pilot holes and insert 2 1/2″ screws to lock them into place.
Attaching the legs
Build the legs from 2×6 lumber. You can adjust the size of the legs according to suit your needs. Attach the legs to the frame, as shown in the diagram. Make sure the corners are square, drill pilot holes and insert 2 1/2″ screws to lock them into place.
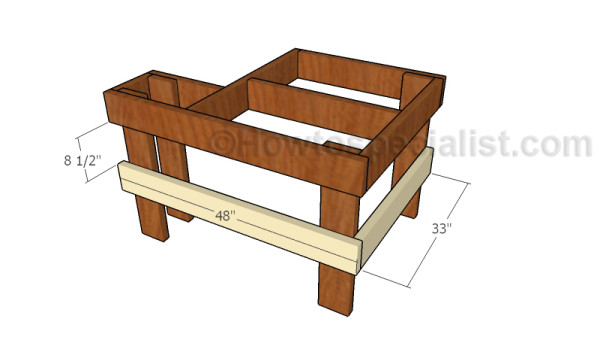
Fitting the base braces
Attach 2×6 braces to the bottom of the legs, as shown in the diagram. Drill pilot holes and insert 2 1/2″ screws to lock the braces to the legs.

Fitting the bench leg
Next, you have to assemble the seat frame. Cut the components from 2×6 lumber. Drill pilot holes and assemble everything with 2 1/2″ screws. Make sure the corners are square and add glue to the joints for a professional result.
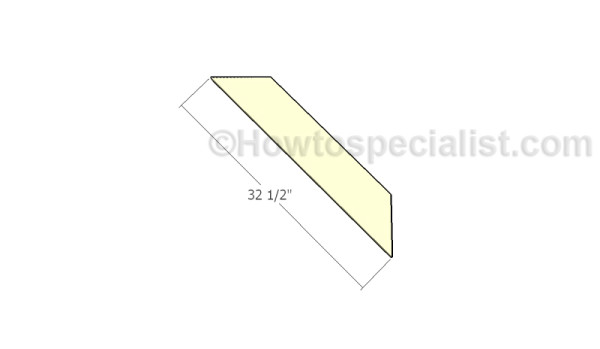
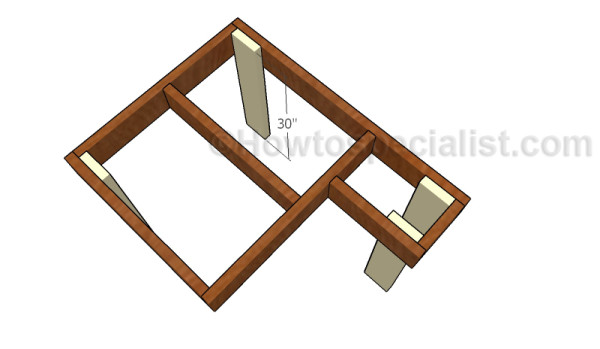
Building the diagonal brace
Build a diagonal brace for the shooting bench from 2×6 lumber. Cut both ends of the brace at 45 degrees. Make sure you follow the shooting bench plans for a professional result.
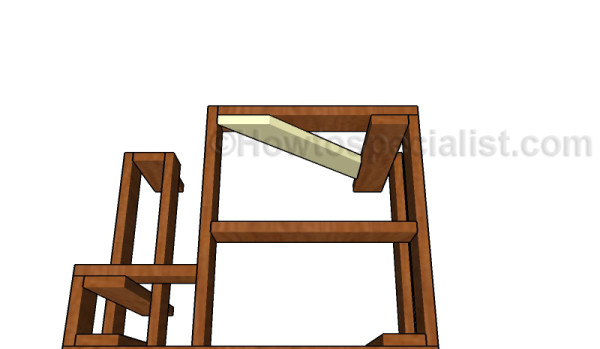
Fitting the diagonal brace
Fit the brace to the shooting bench, as shown in the diagram. Drill pilot holes through the brace and insert 2 1/2″ screws into the frame.

Building the tabletop
Use 3/4″ plywood for the tabletop of the shooting bench. Mark the cut lines on the pieces of plywood and make the cuts with a circular saw. Smooth the edges with sandpaper. Glue together two pieces of 3/4″ plywood to add some thickness to the tabletop. Use many clamps to lock the pieces together tightly.
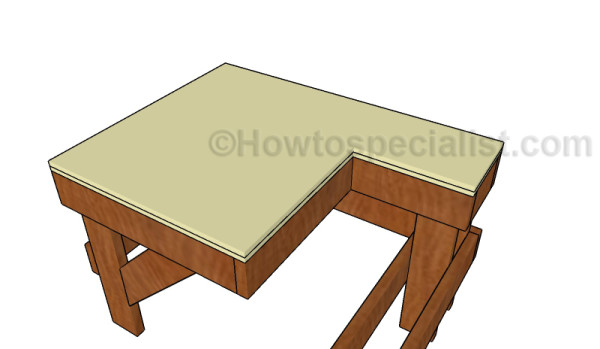
Fitting the tabletop
Fit the tabletop to the frame of the shooting bench and align the edges with attention. Use 2″ brad nails to lock the tabletop into place tightly.

Fitting the bench seat
Build the bench seat in the same manner as the tabletop. Cut two pieces of plywood and glue them together. Fit the seat to the frame and lock it into place with 2″ brad nails.

Shooting table plans
Next, you need to take care of the finishing touches. Fill the holes with wood putty and let it dry out for a couple of hours. Smooth the surface with 120-220 grit sandpaper. Apply a few coats of stain or paint to prevent the wood from the elements. This light structure makes for a simple portable shooting bench. So even if you are inexperienced DIY-er you can build this project in one weekend.

Shooting bench plans

Thank you for reading our project about free shooting bench plans and we recommend you to check out the rest of the projects. Don’t forget to LIKE and SHARE our projects with your friends, by using the social media widgets. SUBSCRIBE to be the first that gets our latest projects.

EXPLORE MORE IDEAS:
 |
 |
 |
 |
 |
10 comments
cheers for the shooting items well done
Hey thanks for the free plans ice been hunting for this plan forever.my buddy is a lefty and I’m a righty.ill be making two.thanks again.
You’re very welcome! Good luck and let me know how it comes out.
The shooting bench plans were very easy to follow and very well designed. I really enjoyed working on the project. I usually take my time when I build anything. Your measurements were perfect, and every piece of lumber was precisely used with little or no waste. I try to do the best job possible on whatever I’m making. The bench looks like a nice item of furniture when completed.
Thank you
It would be awesome if you sent a few pics here: http://howtospecialist.com/give-back/
How many linear ft
The bench is 4′ long.
Thanks for the plans. I modified it a litle because I used wood I already had on hand. I used 1×6 for the top. 4 pieces at 31 1\2″ and two at 48″. Worked perfect. I also used 1×6 for the supports. My 1×6’s are rough cut so they are a true 1″ thick though. I used 1 piece for the seat. Two ply was a little tight for me at 6″ 220lbs. I was really impressed the cuts matched so well even with my slightly warped wood.
Awesome. Thank you for the feedback.
I used your plans as the basis for a shooting bench I made from left-over lumber from another project. Front and 4 foot side are 2×12. 4 legs are 4×6. I added a leg in place of the angle brace. Top is composite decking. Used 3-1/4 ” nails with a nail gun for frame and screws for the top. I built two benches, left and right hand in about 3 hours. I put some scrap decking under the leg to help prevent rot where they contact the ground. Left off the seats for now. Instead I put a piece of plywood down and use and height adjustable stool from Harbor Freight. This allows easy access and the height is variable for when the lead sled or other fixtures are in use. Different seat high is needed for bi-pods. Steady as a rock. Thanks for the design.