This step by step article is about how to build a concrete retaining wall with natural stone finish. This retaining wall project started because of the natural slope of the land at my countryside property. The backyard had a significant level difference, which made the area difficult to use properly as a clean lawn or outdoor space. After thinking about several options, I decided to build a concrete retaining wall that would hold the soil in place and create a large flat grass surface above it.
Once the structure was finished, I didn’t want the wall to look cold or overly industrial. The goal was to make it feel natural and integrated into the landscape, especially with all the mature trees and greenery surrounding the property. That’s why I chose to cover the front face with irregular natural stone and finish the top with brick caps and accent pillars for a more rustic countryside appearance. Since you are here, you should also take a look over my tutorial on how to build a brick garage.
How to Build a Concrete Retaining Wall with Natural Stone Finish
Beyond appearance, this project was also about durability. Since the retaining wall constantly holds back soil and moisture, I added waterproofing on the interior side before backfilling the area. Proper drainage and waterproofing are extremely important for projects like this, especially in climates with heavy rain and freeze-thaw cycles throughout the year.
In this tutorial, I’ll show you the full process I used to build and finish this retaining wall, from preparing the foundation and pouring the concrete structure to waterproofing the back side, installing the natural stone veneer, and creating the finished landscape around it. This project completely changed the usability of my backyard and turned a sloped area into a clean, level green space that blends naturally into the countryside setting. You should also take a look over my tutorial on how to build a brick pizza oven.
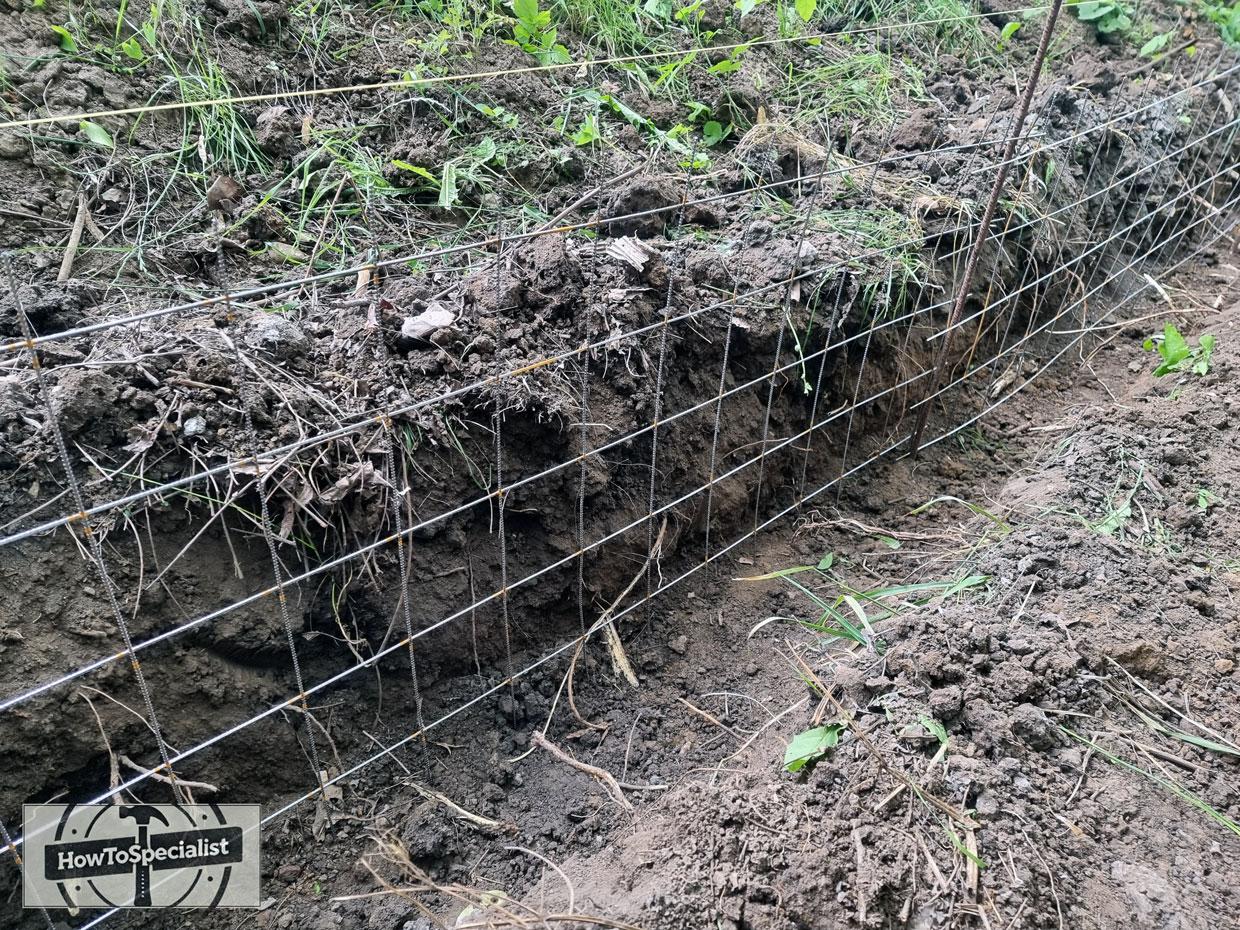
Digging the foundation
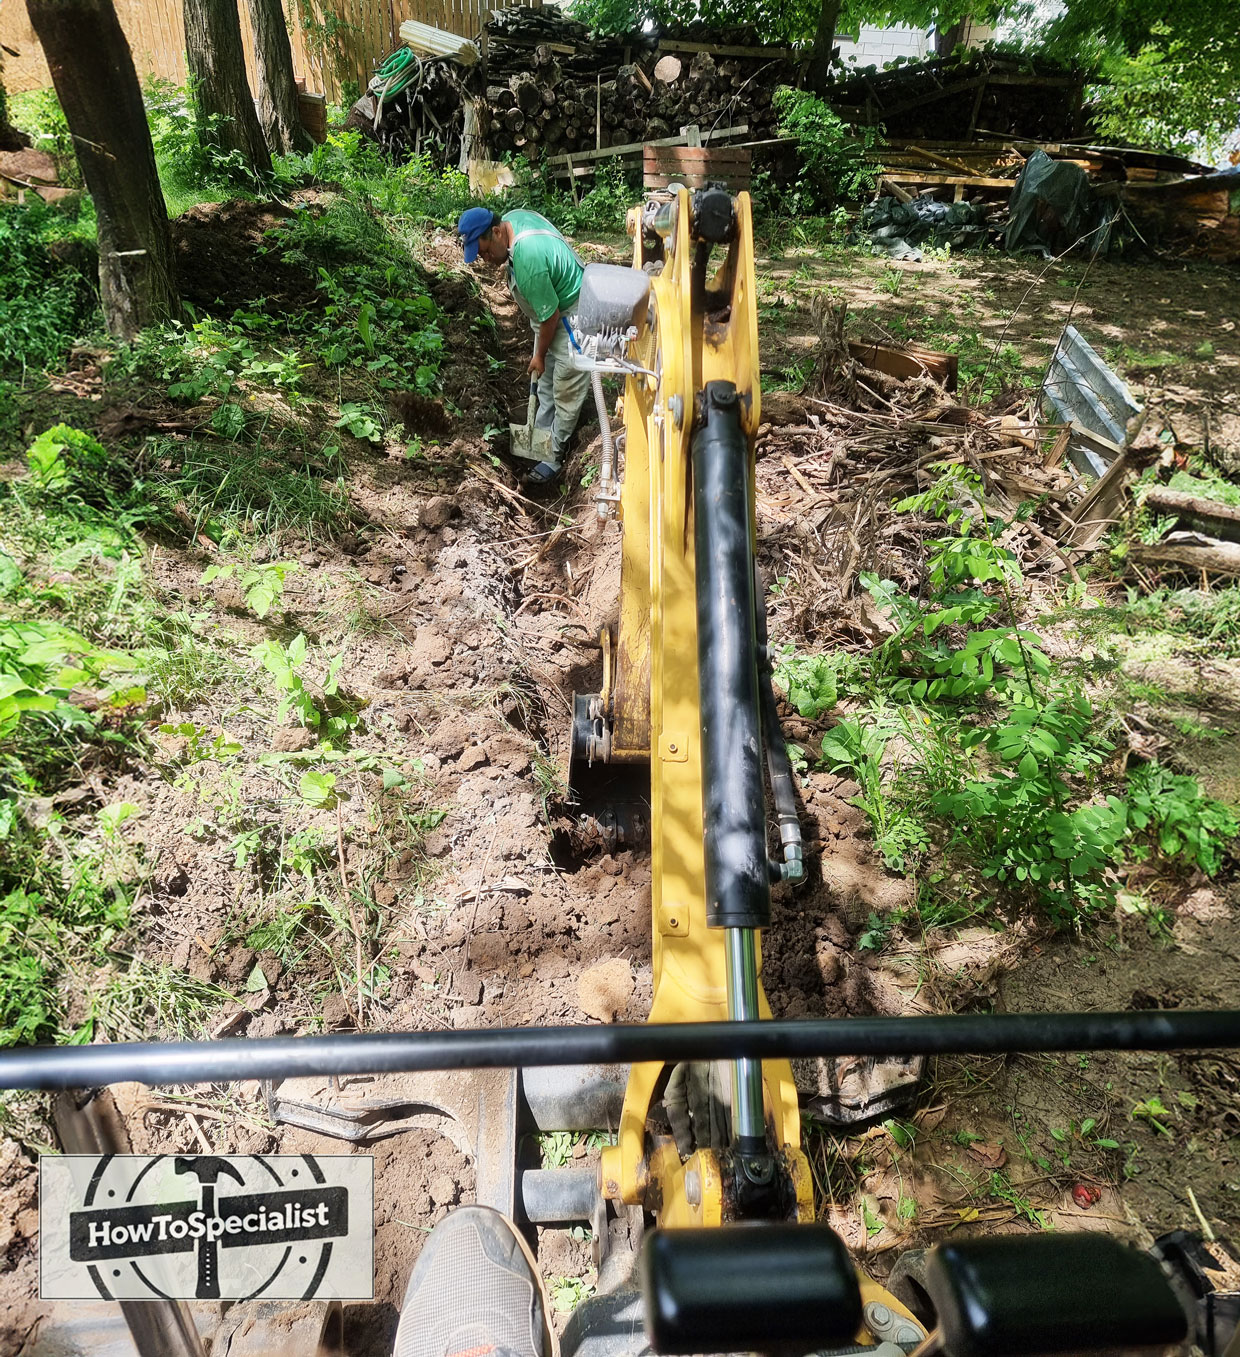
Digging-the-trench
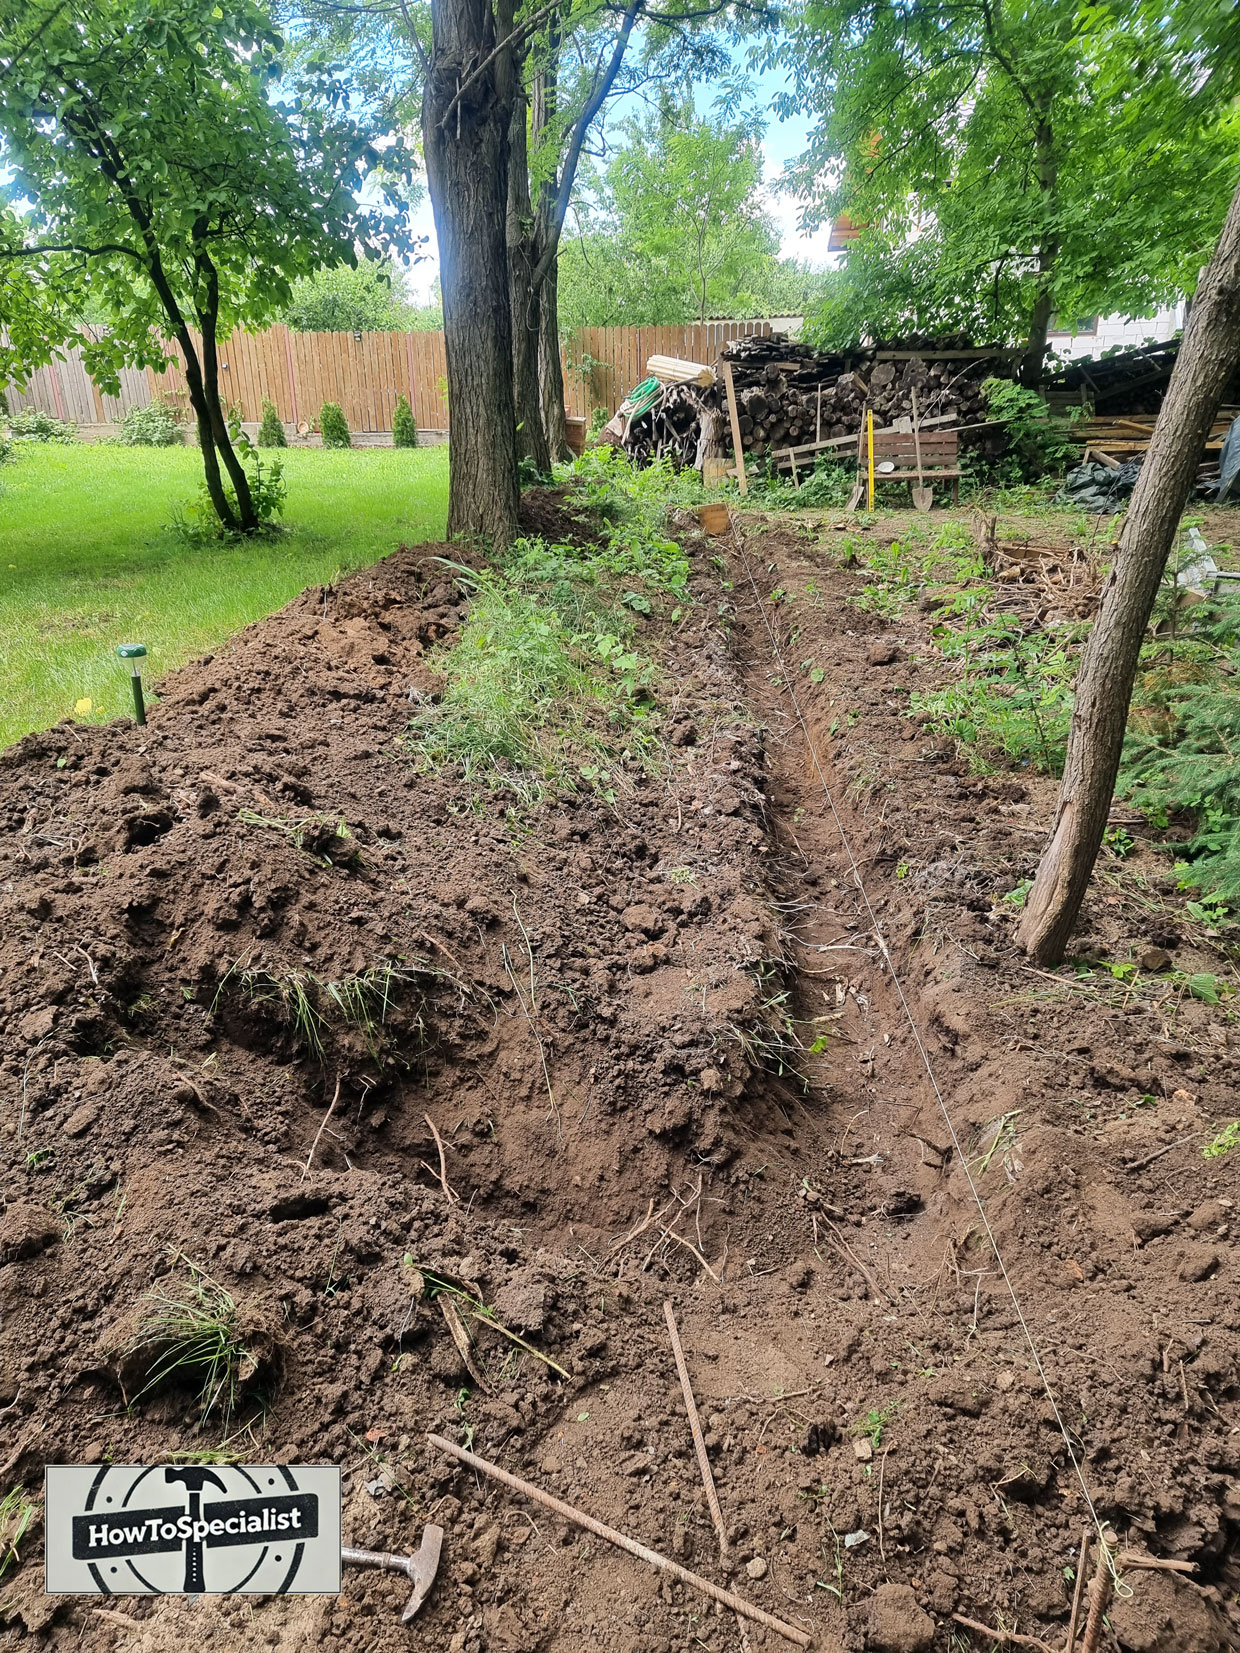
Laying-out-the-trench
The first step of the project was marking the layout for the retaining wall. I used stakes and string lines to establish the exact position of the wall and to visualize the future level of the backyard. Since the property has a natural slope, careful planning at this stage was important to create a clean and consistent grass surface once everything was finished. I also checked the alignment several times to make sure the wall followed the shape of the landscape naturally.
After marking the line, I used my mini excavator to dig the trench for the foundation. I excavated approximately 2 feet deep along the entire length of the wall to create a solid base for the reinforced concrete footing. Using the mini excavator made the work much faster and allowed me to shape the trench accurately, especially on the uneven terrain. Once the digging was complete, I cleaned and compacted the bottom of the trench before moving on to the reinforcement and concrete work.
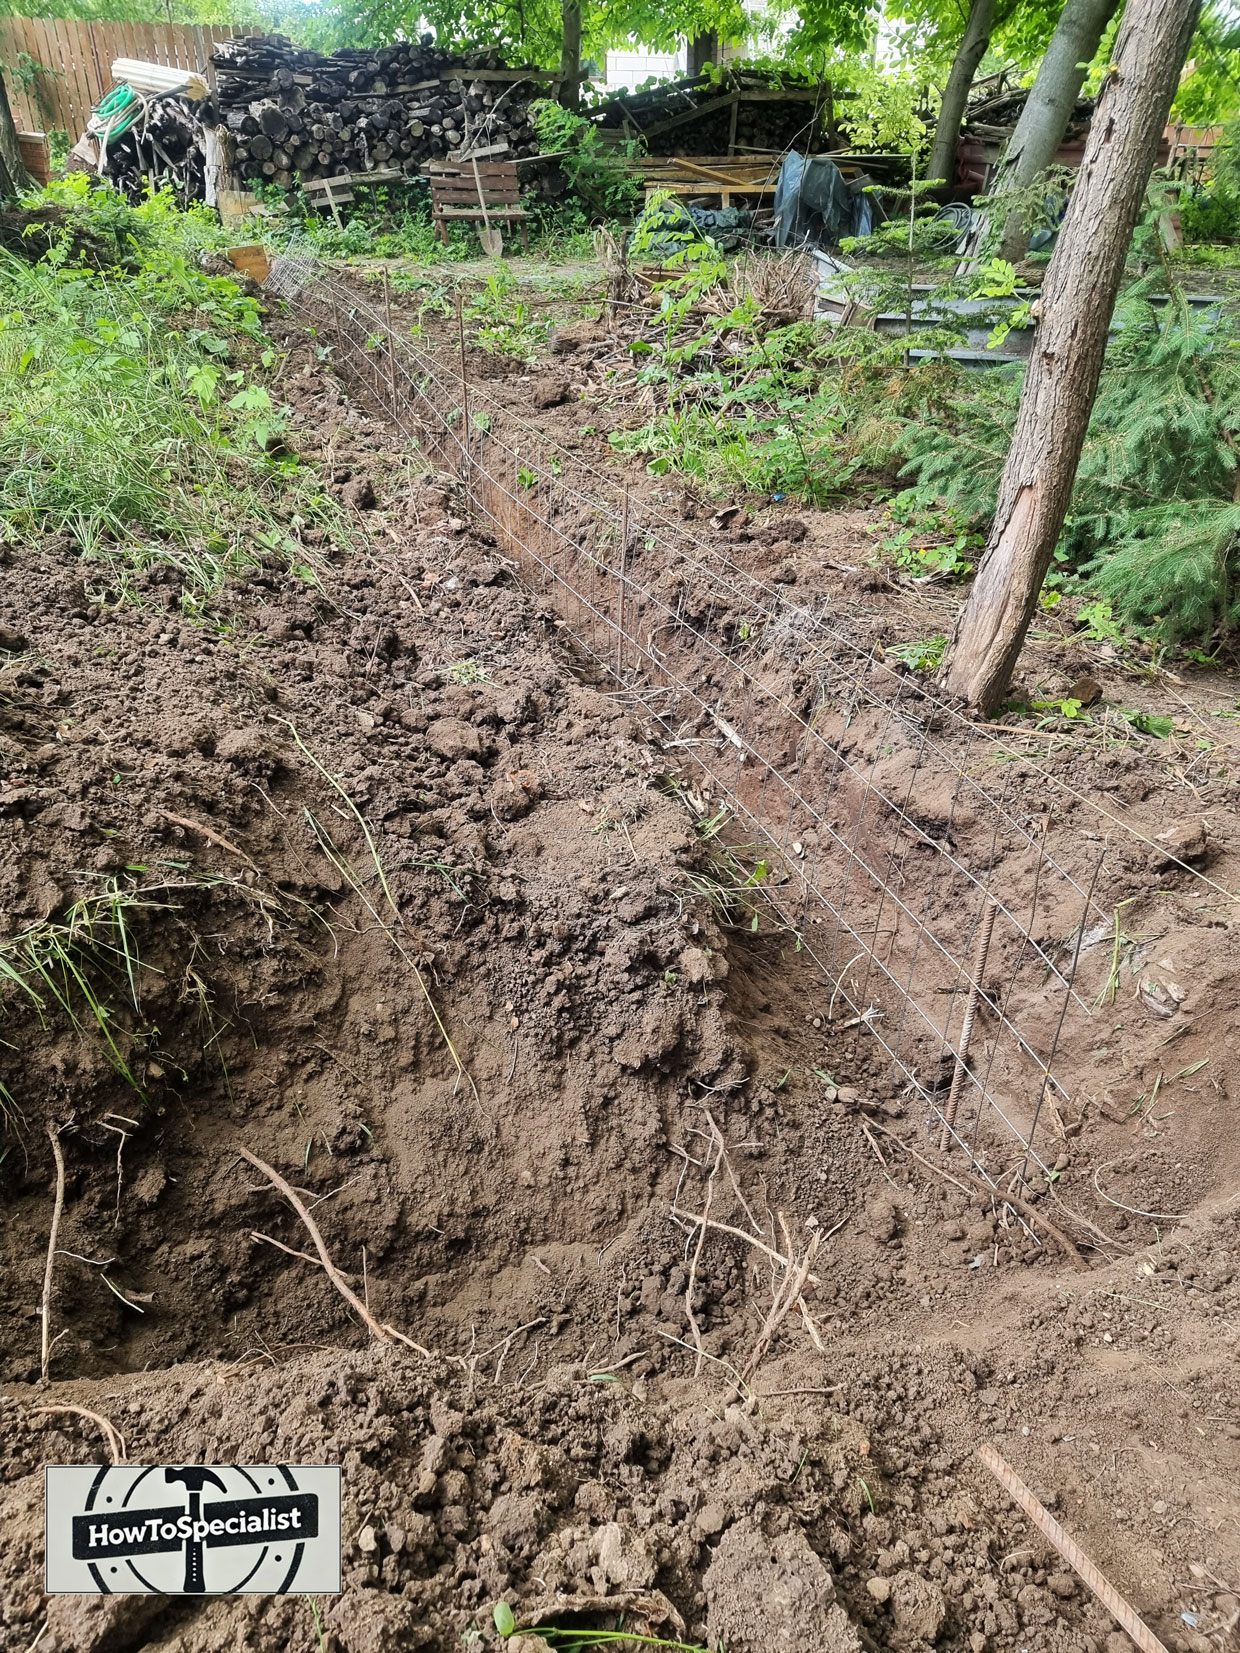
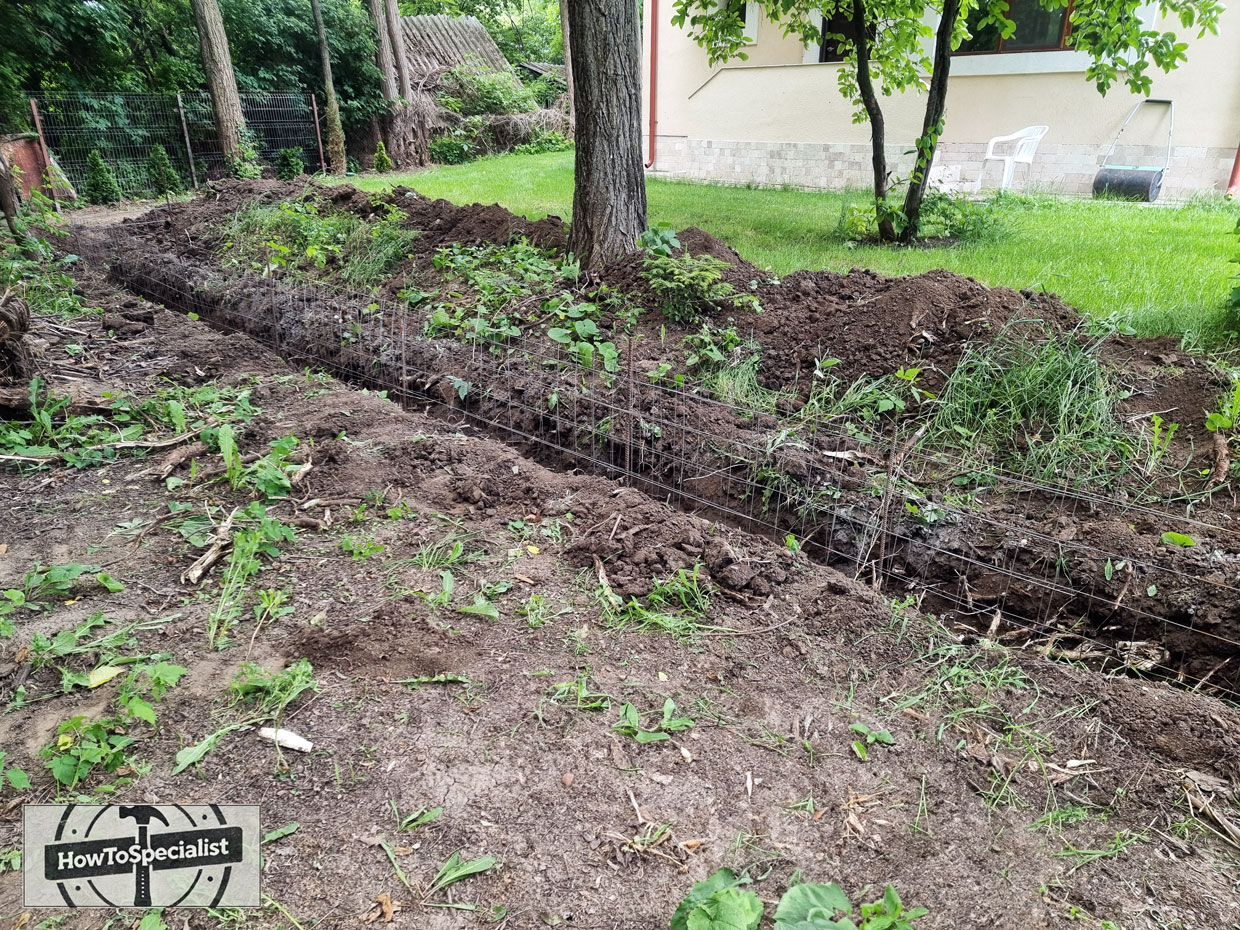
Rebars-for-retaining-wall

Aligning-the-rebar-mesh
Building-the-retaining-wall
Rebar-mesh-for-retaining-wall
Before pouring the concrete, I installed a rebar mesh in the middle of the trench to reinforce the foundation and add structural strength to the retaining wall. I supported the reinforcement slightly above the bottom of the trench so the concrete could fully surround the steel. This step is very important because the retaining wall will constantly resist the pressure of the soil behind it, especially after heavy rain or during freeze-thaw cycles.
I also used the string line as a reference to keep everything straight and properly aligned before continuing the build. Taking the time to align the reinforcement and footing correctly helps create a cleaner and stronger final result. The steel reinforcement will tie the entire concrete structure together and significantly improve the durability and stability of the retaining wall over time.
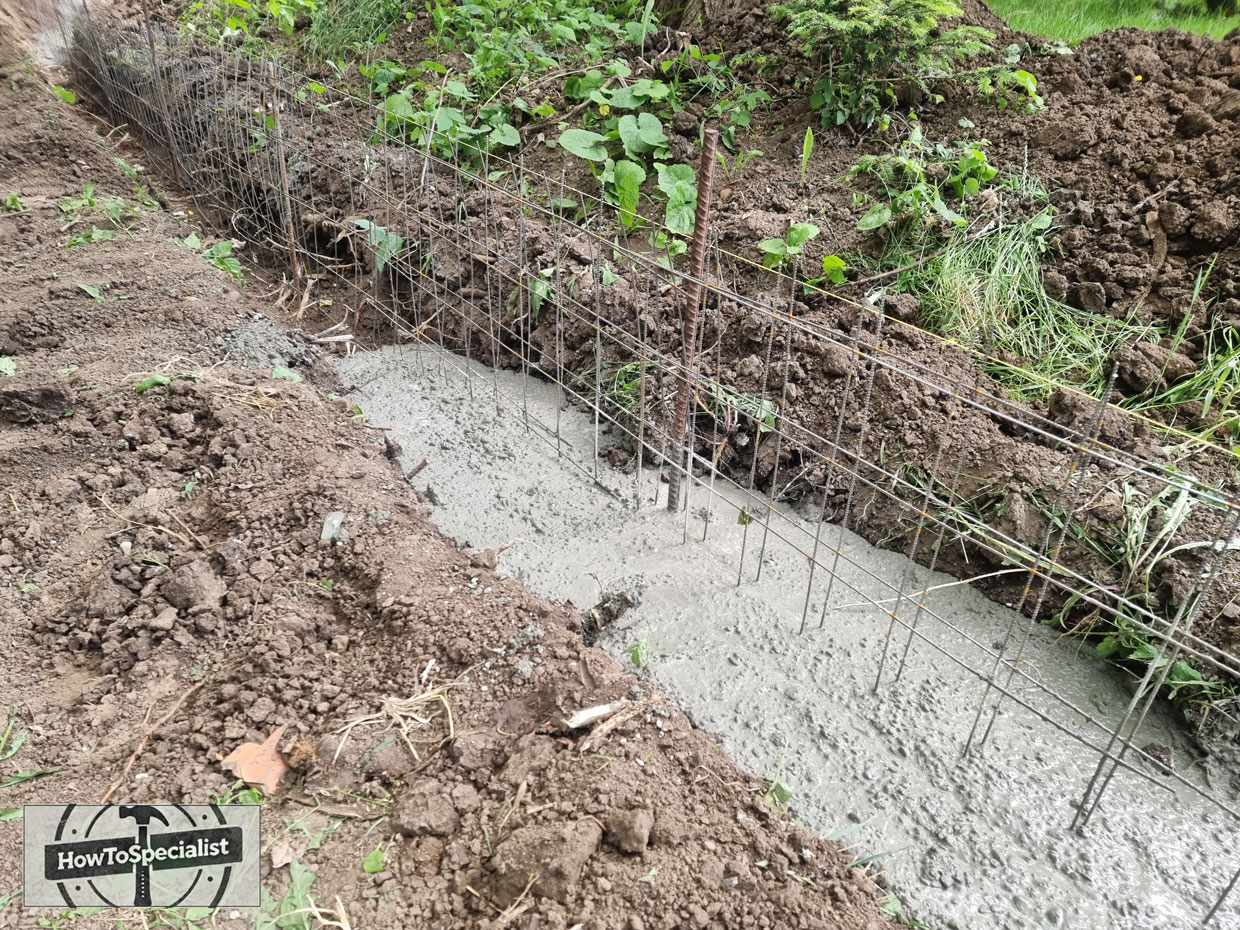
Concrete-inside-the-trench
Once the trench and reinforcement were ready, I started mixing the concrete directly on site and gradually filled the entire foundation trench. I worked in sections to keep a consistent mix and used a shovel to spread and compact the concrete properly around the rebar mesh. The goal at this stage was to create a strong and continuous footing that would support the entire retaining wall structure for many years.
After the concrete was poured, I allowed the footing to cure properly before moving to the next step. Once hardened, the foundation created a stable and level base for installing the wall formwork. Taking the time to build a solid footing is one of the most important parts of a retaining wall project, because the entire structure depends on the strength and stability of this concrete base.
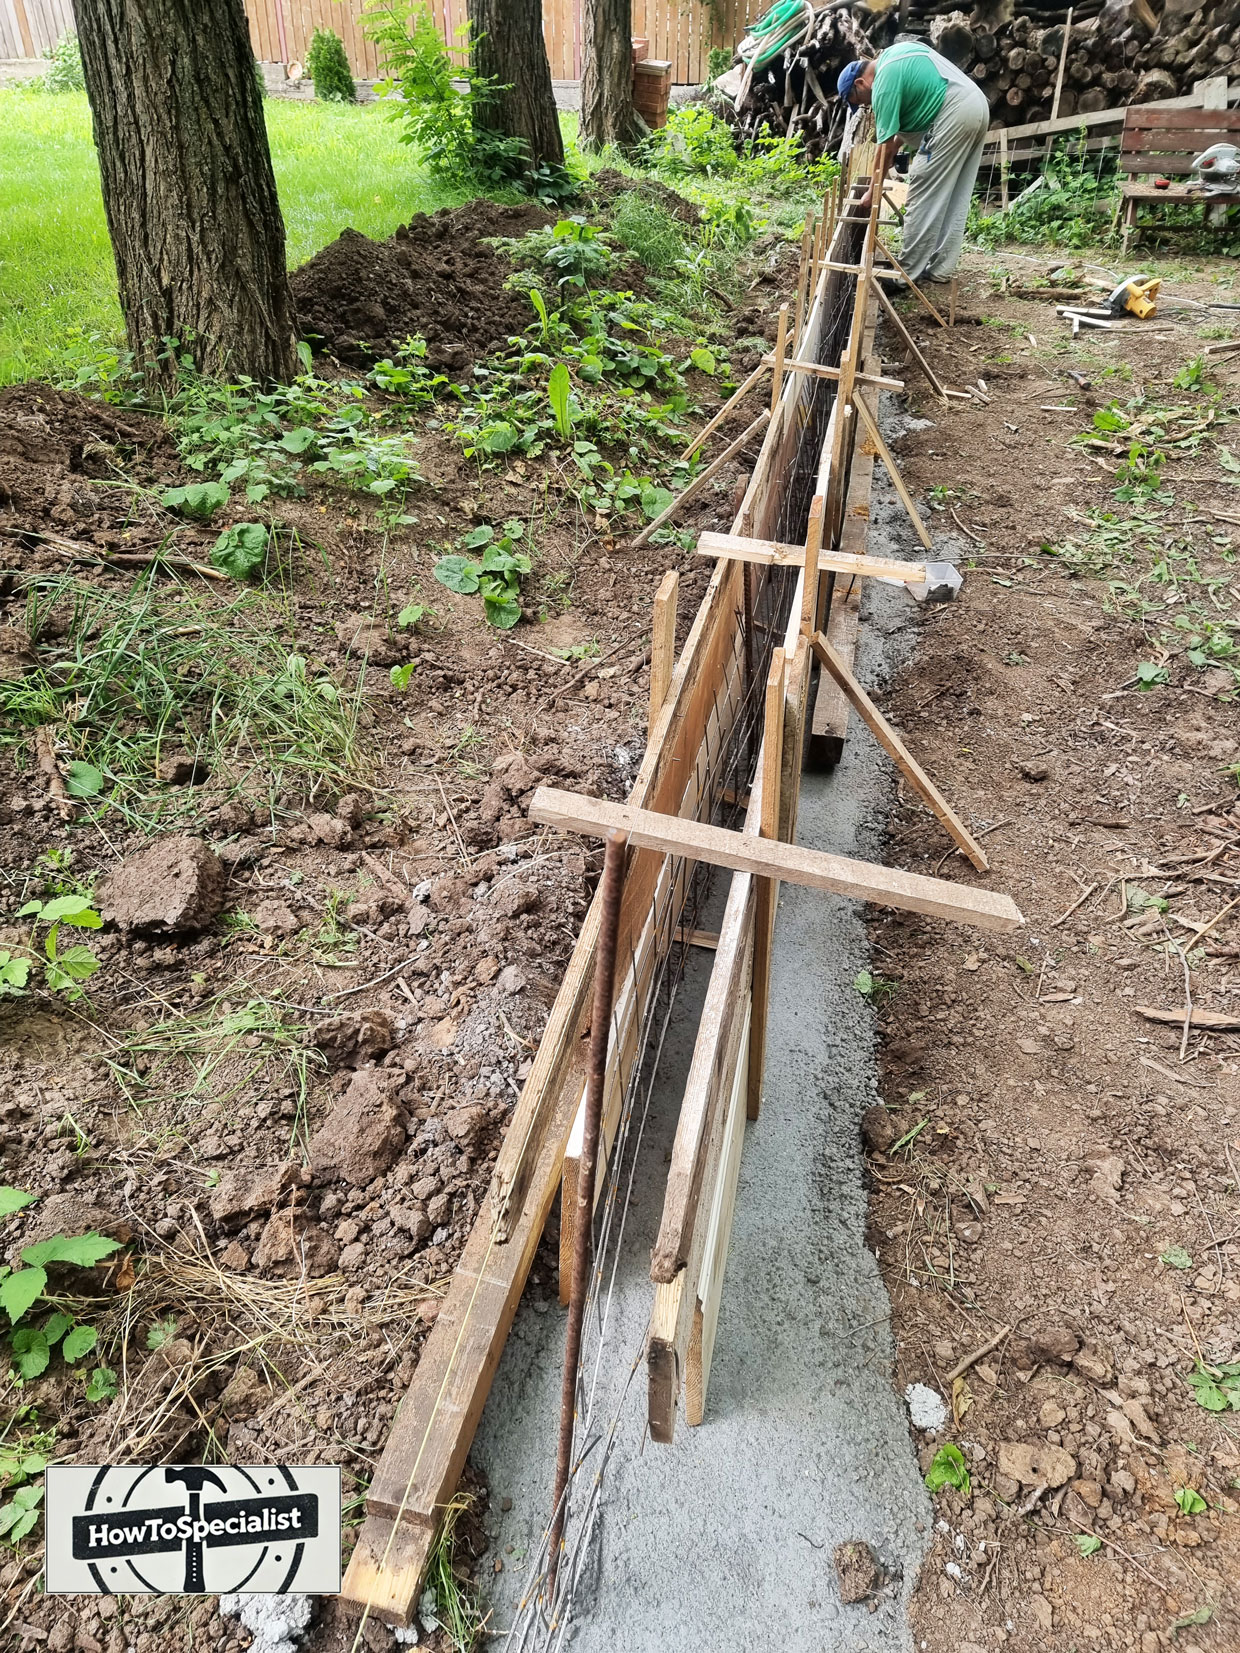
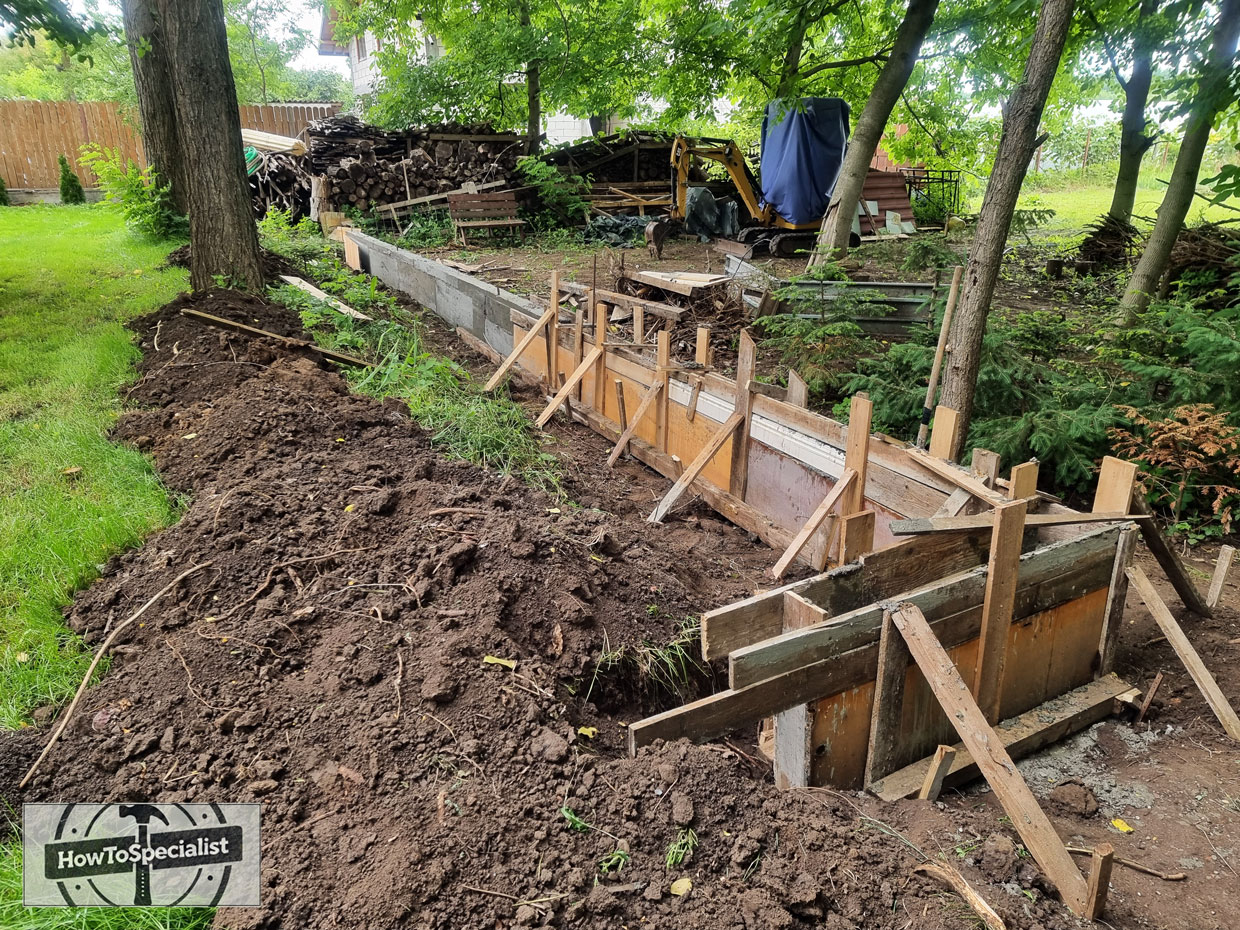
Building the wooden formwork
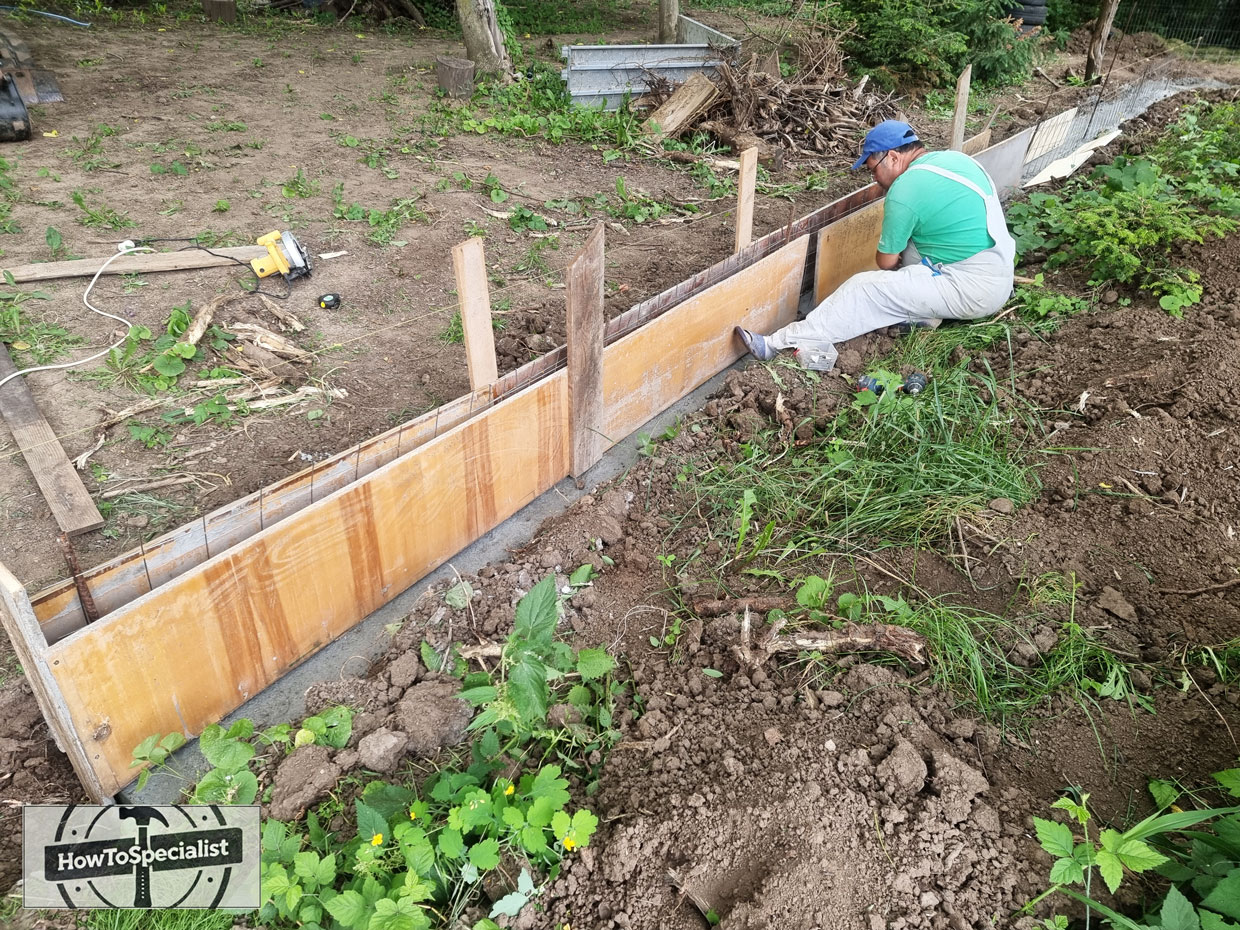
Fitting-the-formwork-panels
Wooden-formwork-for-concrete-retaining-wall
Detail—wooden-formwork
Formwork-ready
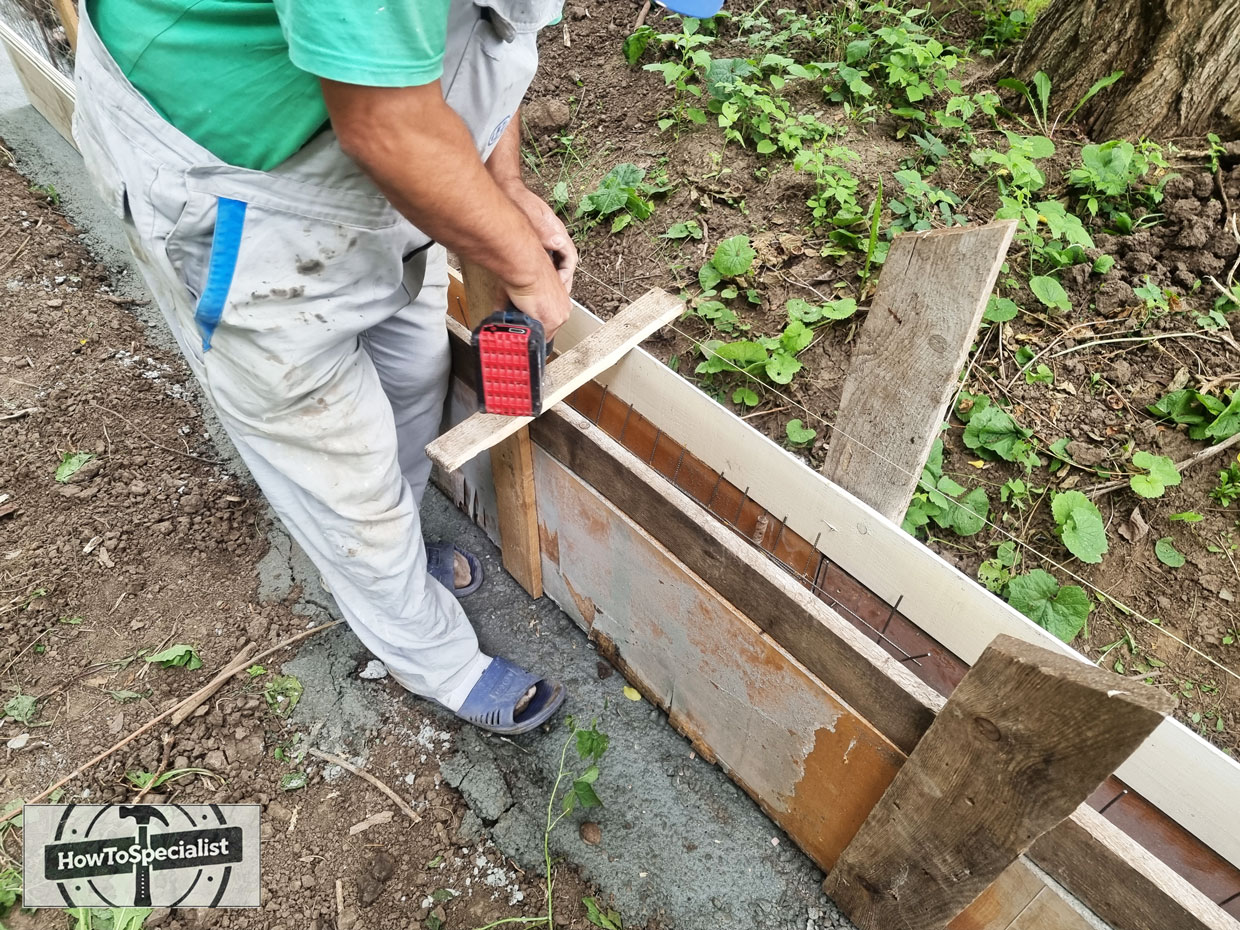
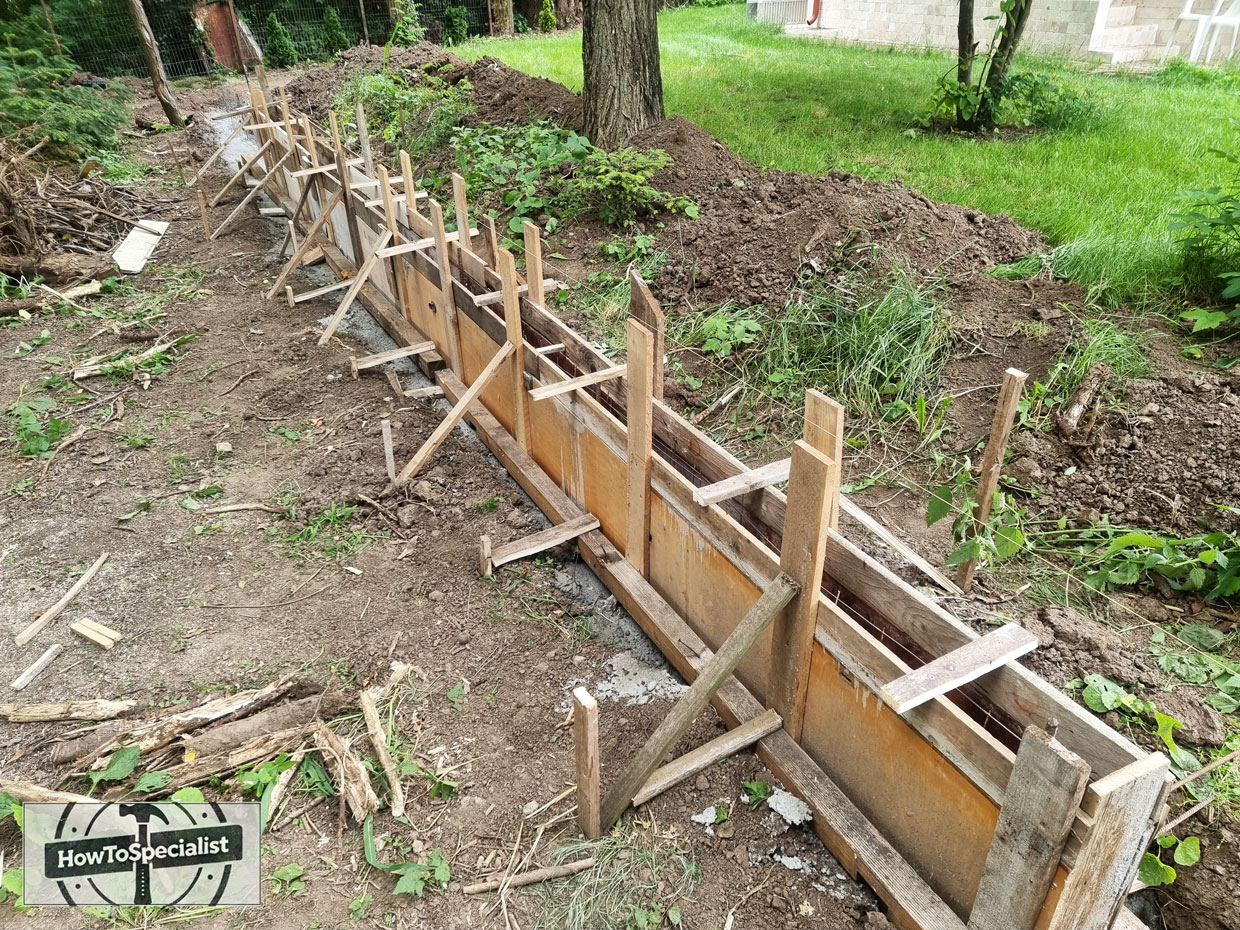
After the concrete footing cured properly, I started building the formwork for the retaining wall. I used plywood panels supported by vertical stakes and diagonal braces to keep everything rigid and aligned during the concrete pour. The retaining wall is 7 inches thick, which provides a strong and durable structure for holding back the soil and supporting the upper lawn area. Since the wall follows a long straight section of the backyard, I constantly checked the alignment using a string line and a level to make sure the forms stayed perfectly straight from one end to the other.
Building strong formwork is extremely important for a retaining wall because fresh concrete creates a lot of pressure against the panels. I added multiple braces and supports along the entire length of the wall to prevent movement or deformation during the pour. Even though this step takes time, a properly reinforced formwork system helps create clean concrete surfaces and reduces the risk of shifting while the concrete is still wet.
At this stage, the project finally started to take shape visually. After days of excavation, reinforcement, and foundation work, seeing the wall layout standing above ground gave me a much better perspective of the future backyard transformation. Once the formwork was complete and securely braced, everything was ready for pouring the 6-inch thick concrete retaining wall itself.
Pouring the concrete retaining wall
Mixing-concrete
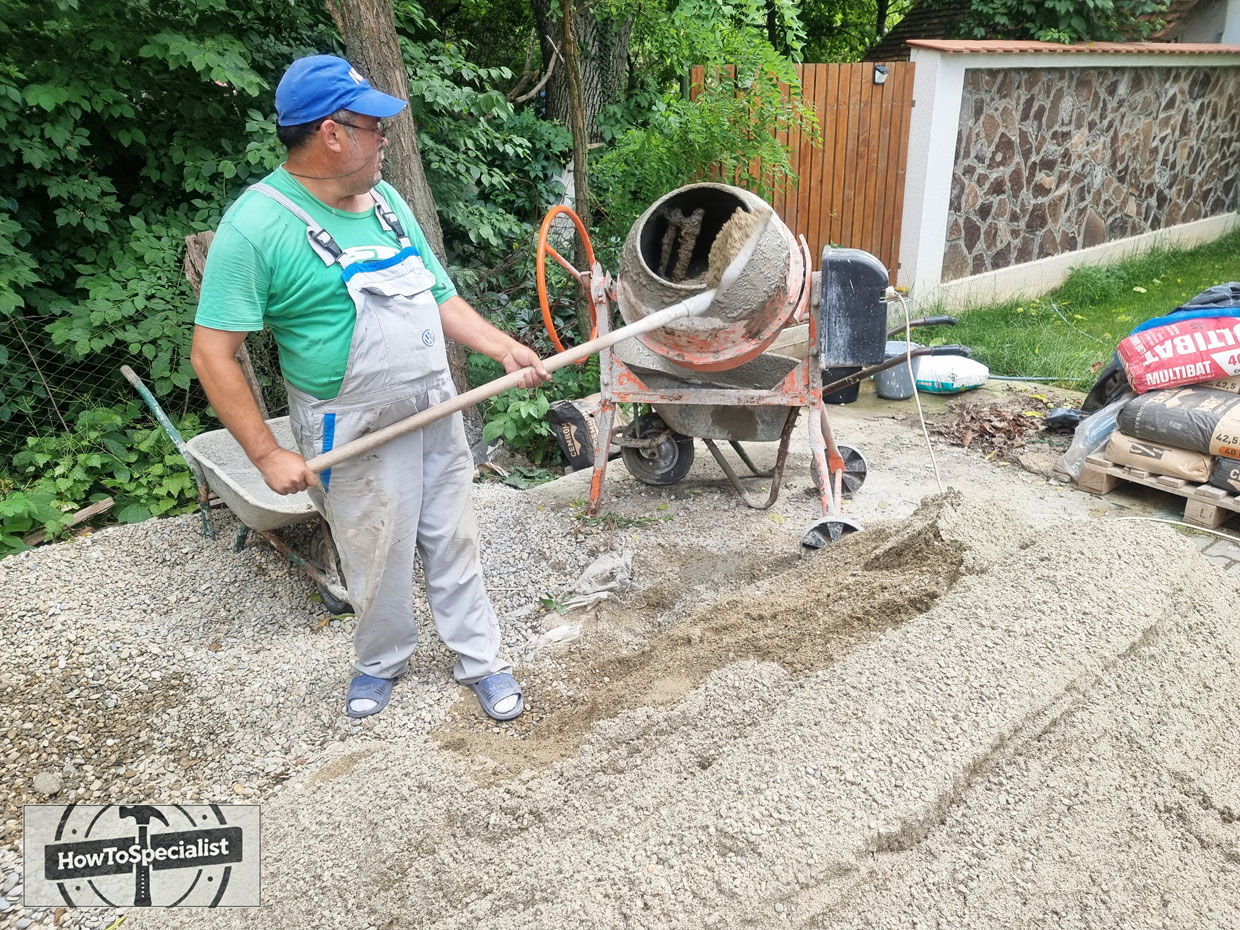
For this project, we mixed the concrete directly on site using a small concrete mixer, which made the process much faster and more consistent. We used a balanced mix of cement, sand, and gravel to achieve a strong concrete suitable for structural retaining walls. Since the wall is long and fairly thick, preparing the concrete in batches allowed me to maintain a steady workflow while keeping the mix uniform throughout the entire pour.
For the retaining wall, I used a B250 concrete mix prepared on site using approximately 1 part cement, 2 parts sand, and 3 parts gravel, with enough water to achieve a workable but not overly wet consistency. This type of mix provides good strength and durability for residential retaining wall projects, especially when combined with proper reinforcement and a solid foundation.
Pouring-concrete-in-the–formwork
Formwork-part-2
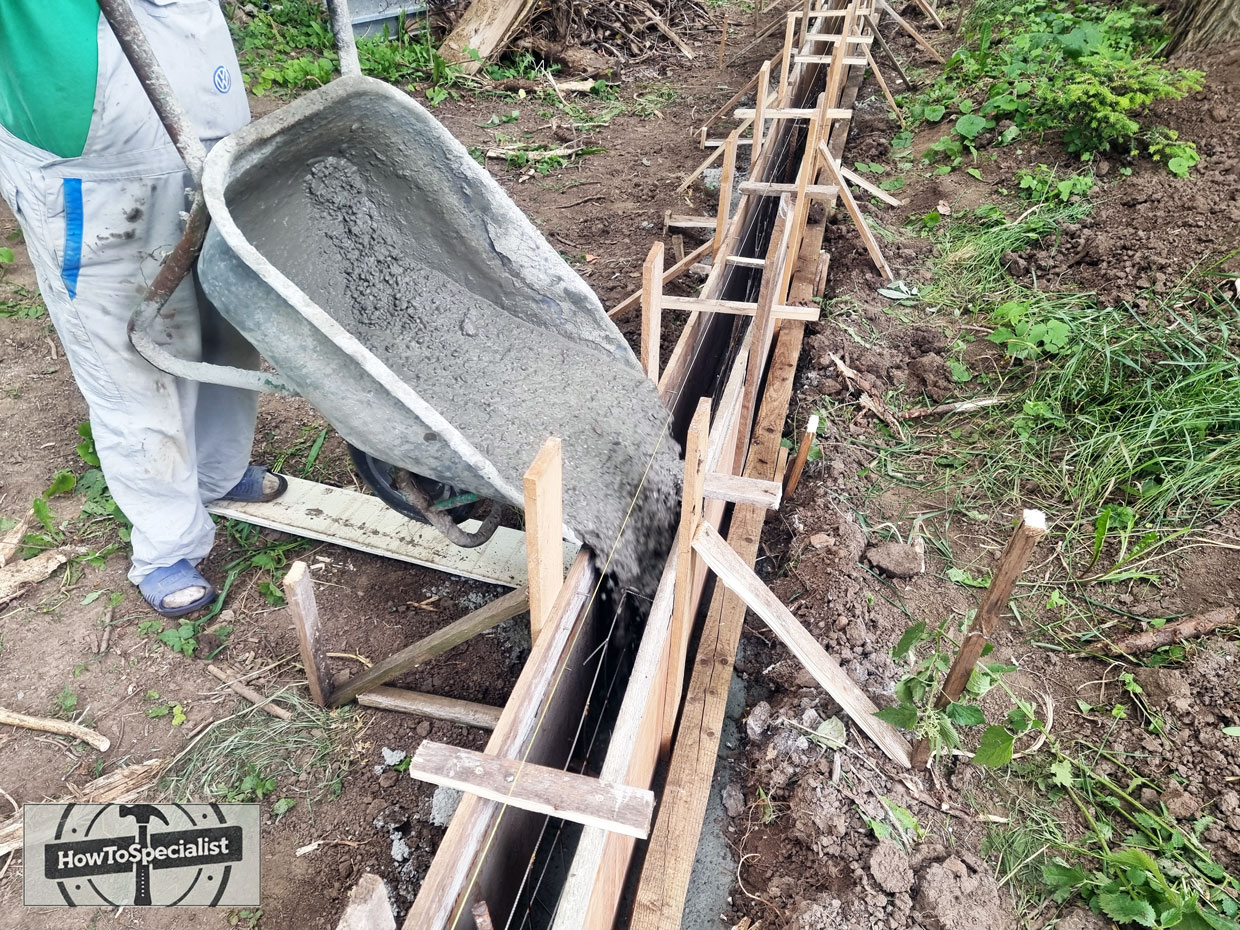
Once the concrete was mixed, we started filling the formwork gradually along the entire length of the retaining wall. I poured the concrete in multiple sections and used a shovel and metal rod to spread and compact the mix inside the forms. This helped eliminate air pockets and ensured the concrete fully surrounded the reinforcement for maximum strength and durability.
As the formwork filled up, I constantly checked the alignment and monitored the pressure on the plywood panels and braces. Since the wall is 7 inches thick, keeping the concrete evenly distributed was important to avoid deforming the forms during the pour. After filling the forms completely, I leveled the top edge carefully and allowed the retaining wall to cure properly before removing the formwork.
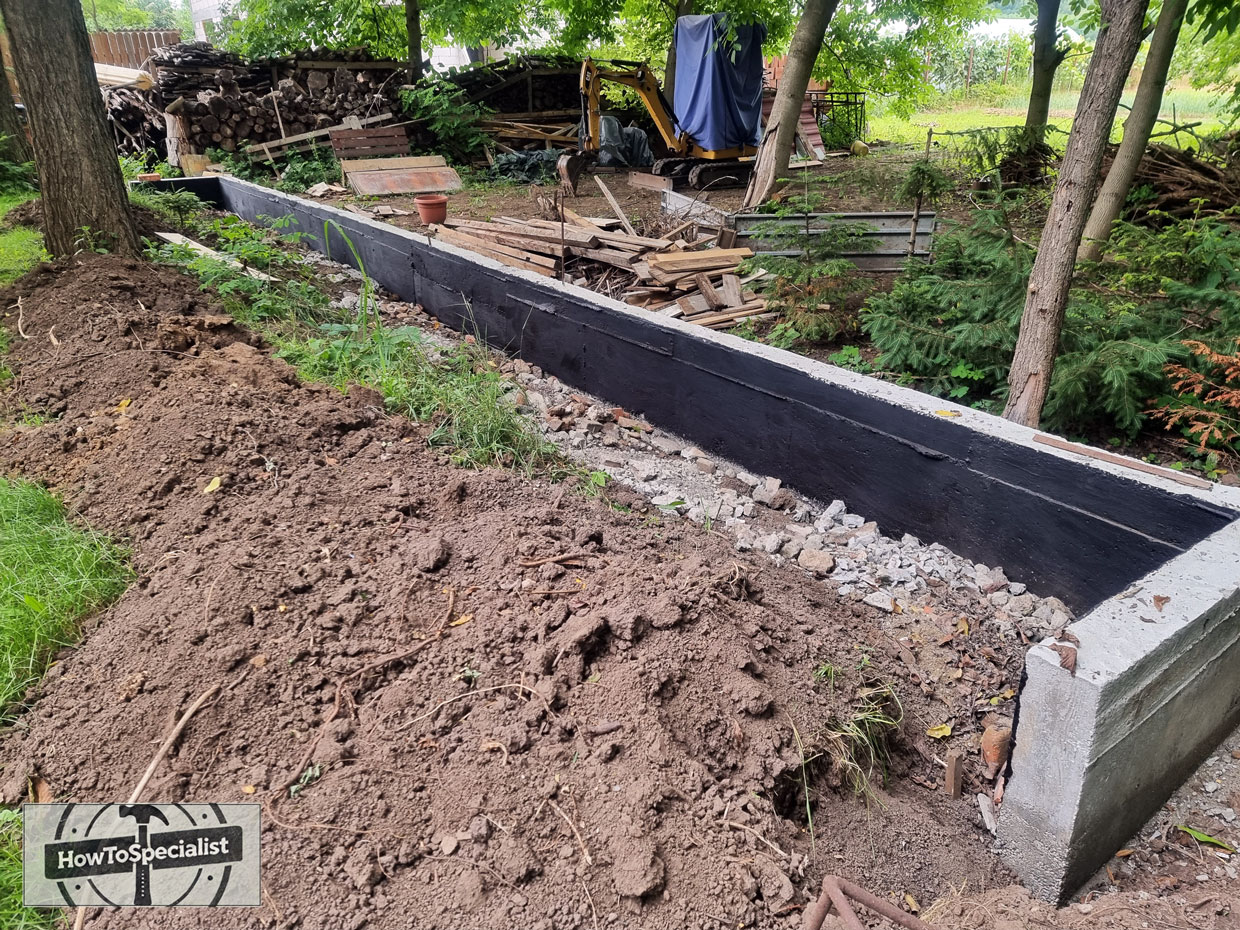
Interior-waterproofing-for-concrete-wall
After the concrete cured properly, I carefully removed the formwork panels and braces from both sides of the retaining wall. This is always one of the most satisfying moments of the project because the final shape of the wall becomes visible for the first time. Fortunately, the formwork held perfectly during the pour, resulting in straight concrete surfaces and clean edges along the entire length of the wall.
Once the forms were removed, I cleaned the interior side of the retaining wall thoroughly to prepare it for waterproofing. Since this side would remain in direct contact with the soil, protecting the concrete against moisture penetration was extremely important. I applied a paintable bitumen-based waterproofing coating evenly across the entire interior surface using a large brush and roller, making sure to cover all corners and joints properly.
The bitumen waterproofing creates a protective barrier that helps prevent water infiltration through the concrete over time. Combined with proper drainage behind the wall, this additional protection significantly improves the long-term durability of the retaining structure, especially in areas exposed to heavy rain and freeze-thaw conditions. Taking the time to waterproof the wall correctly before backfilling is one of the best investments you can make in a project like this.
Installing the bricks and natural stone
Bricks-over-the-retaining-wall
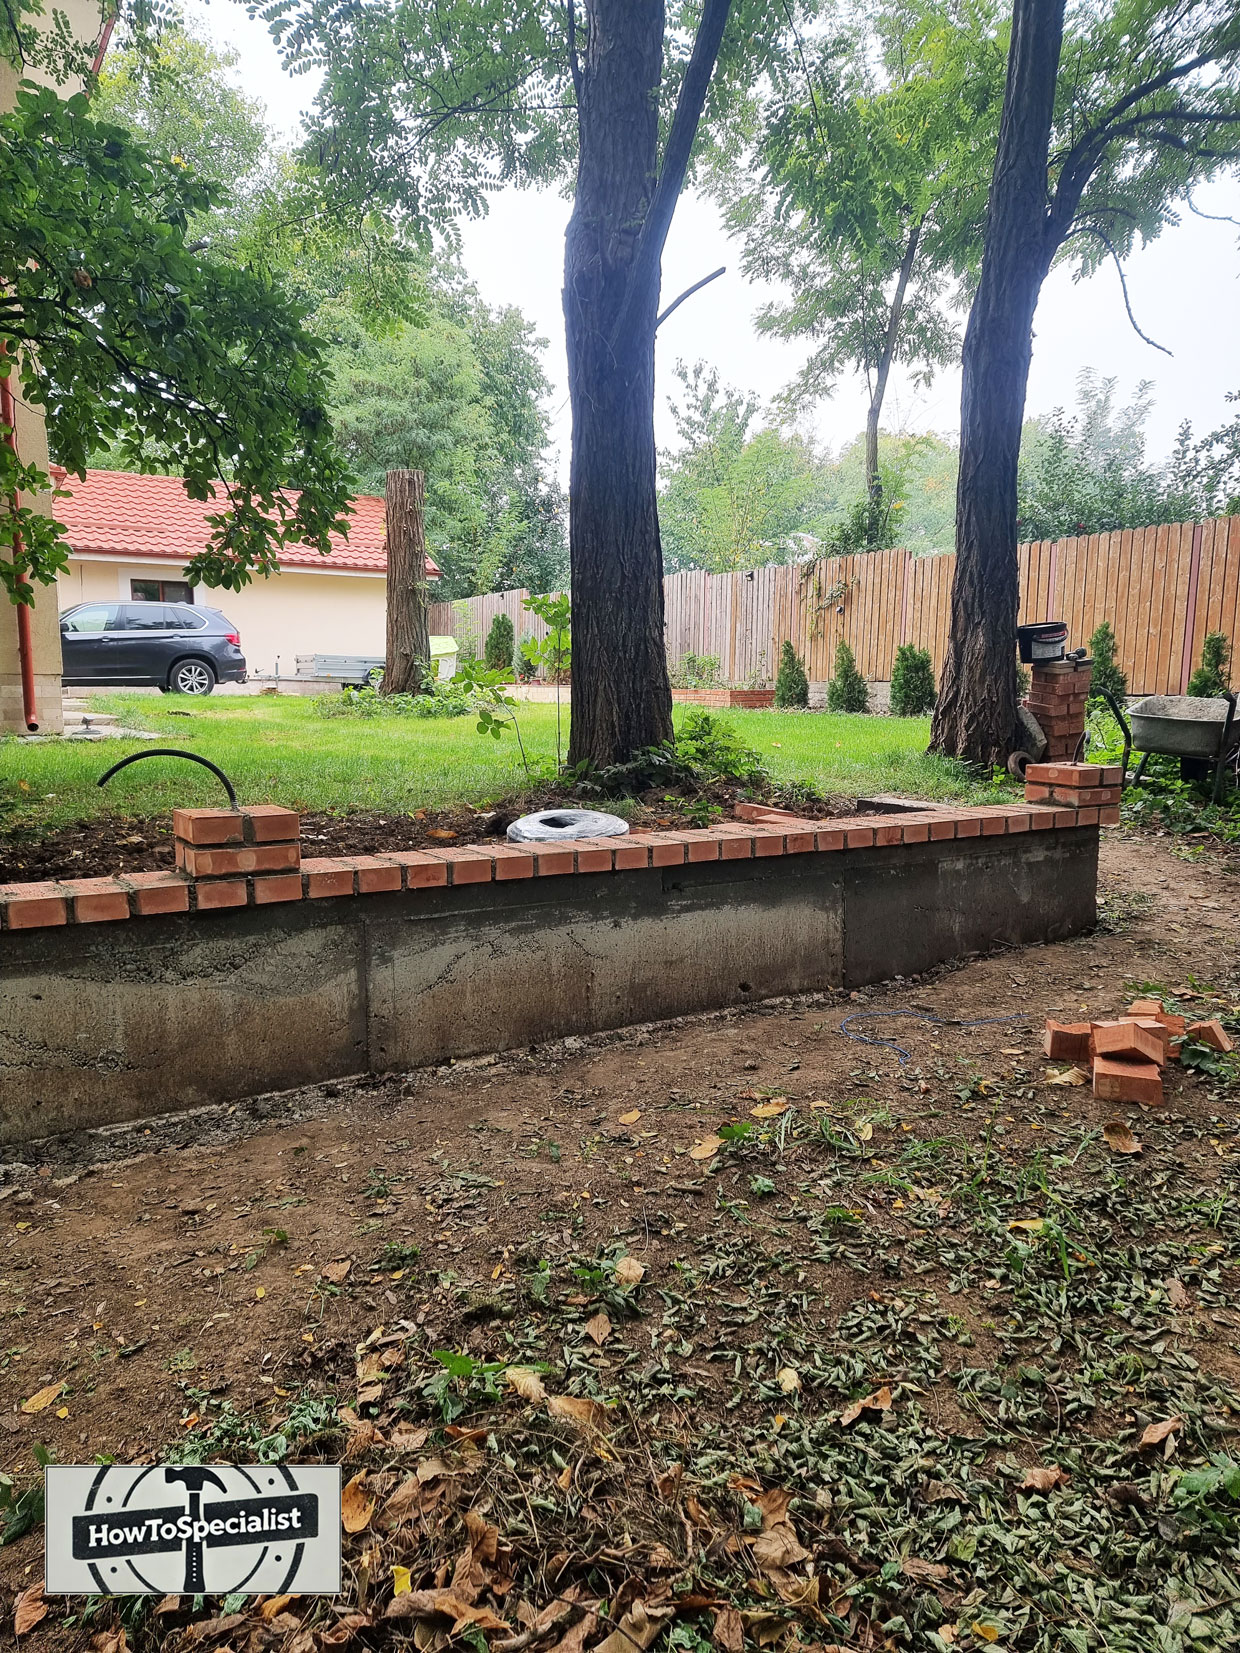
After the retaining wall cured completely, I started installing the brick coping along the top edge of the concrete wall. Besides improving the appearance, the bricks also help protect the top surface of the concrete from direct water exposure over time. I used mortar to secure the bricks in place and carefully aligned them to create a straight and consistent finish along the entire length of the wall. Small brick accent pillars were also added at intervals to give the structure more character and a classic garden-style appearance.
The warm color of the bricks contrasts beautifully with the gray concrete and works perfectly with the natural surroundings of the countryside property. Even before installing the natural stone veneer on the front face, the retaining wall already started looking much more refined and integrated into the landscape. This simple brick detail added a traditional touch that completely changed the visual appearance of the structure.
Installing-natural-stone-on-a-concrete-wall
Natural-stone-over-the-concrete-retaining-wall
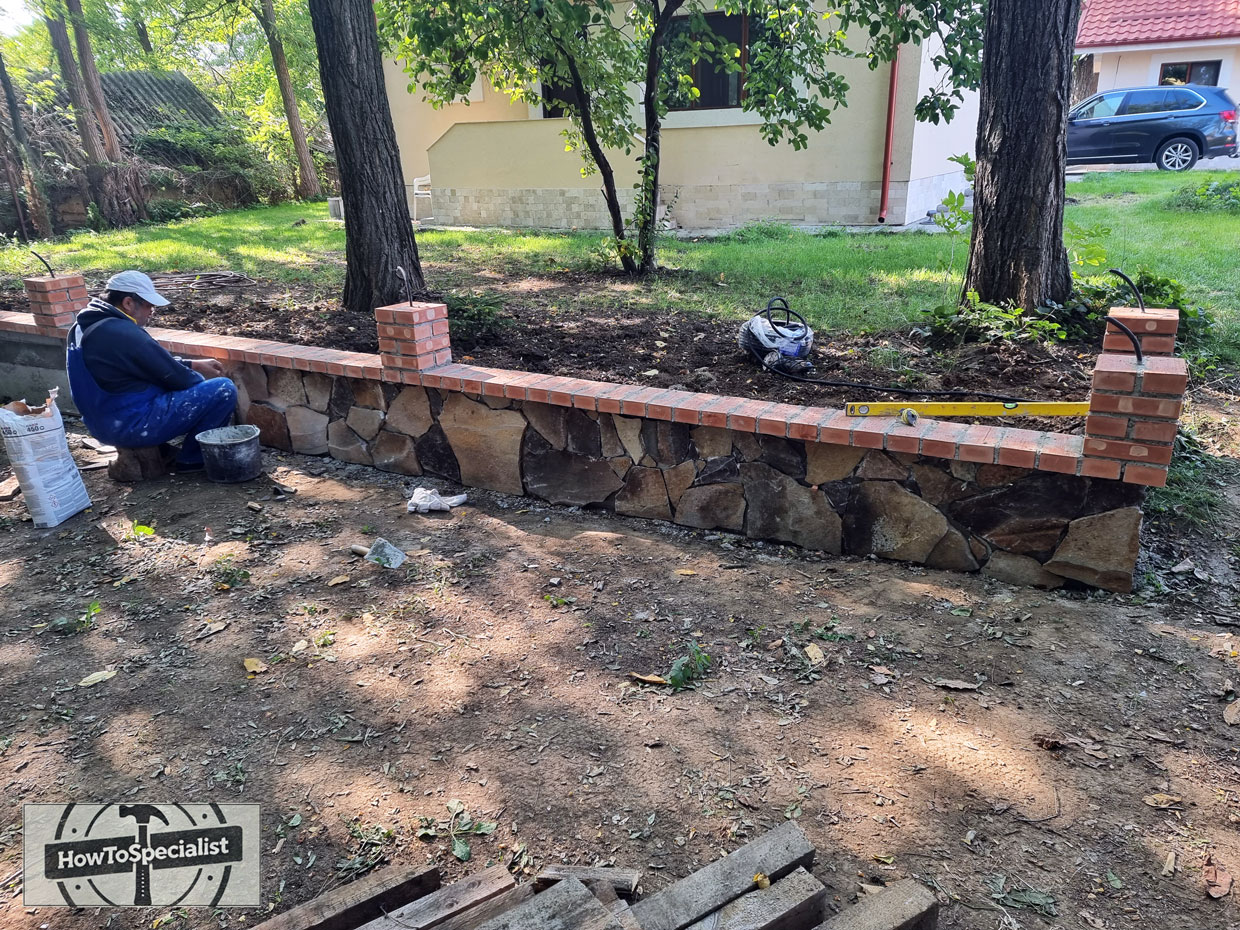
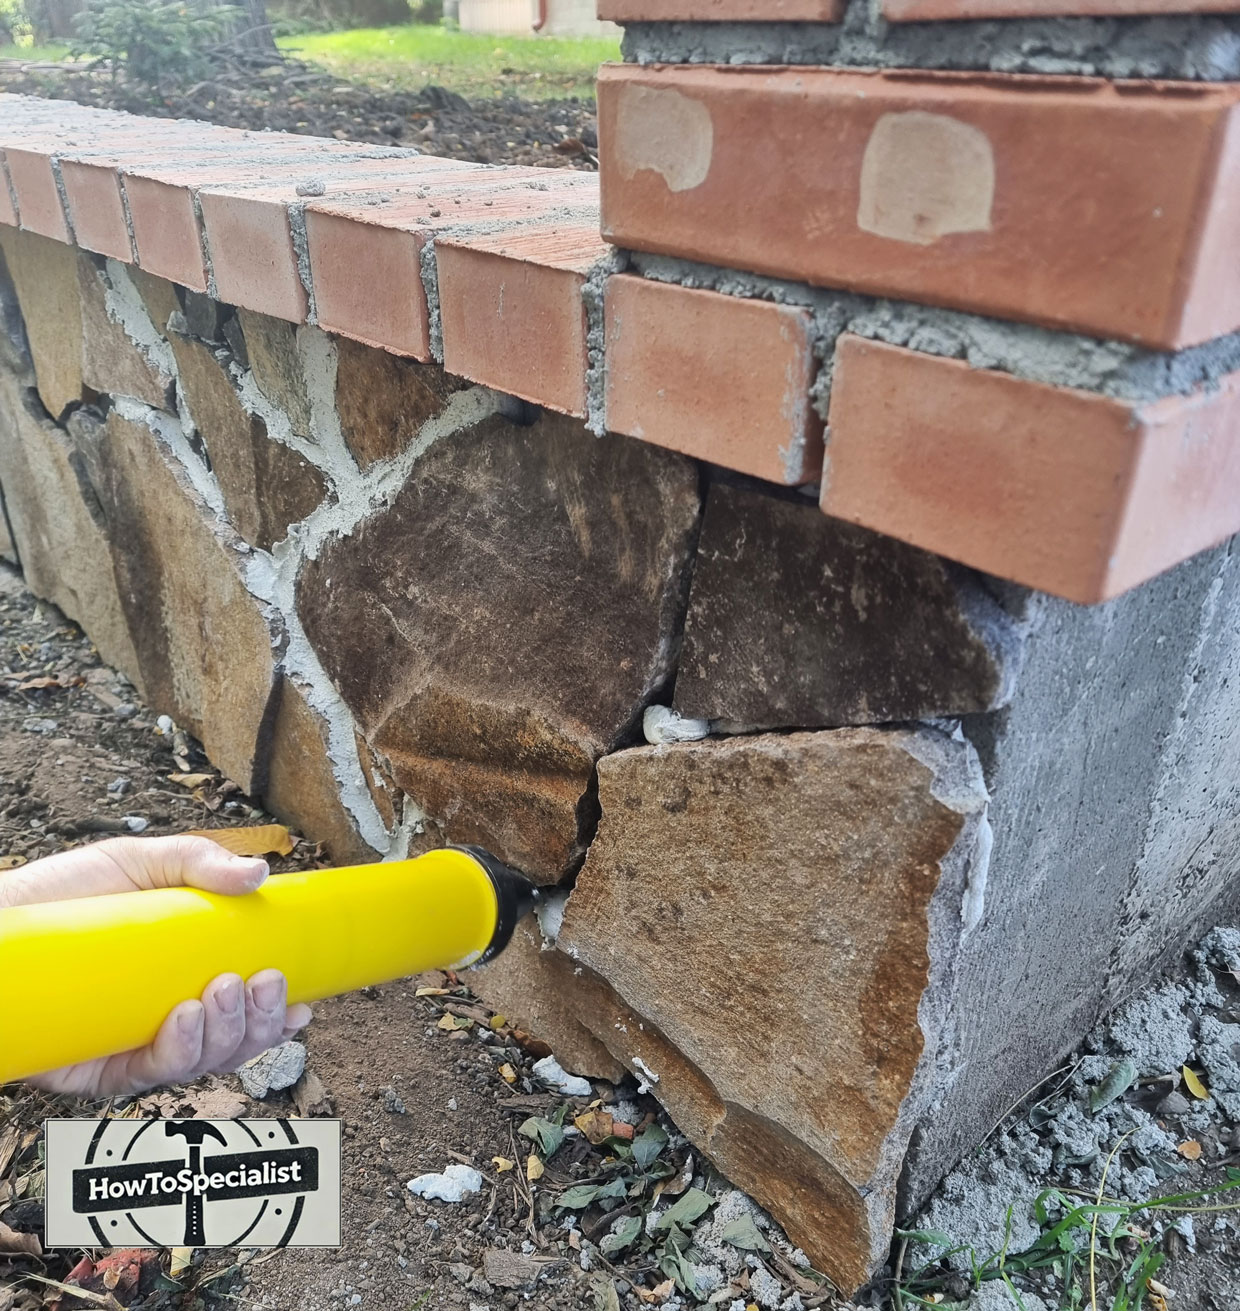
With the concrete structure complete, I moved on to one of the most rewarding parts of the project: installing the natural stone veneer on the front face of the retaining wall. I selected irregular natural stones with different sizes and shapes to create a more organic and rustic appearance that matched the countryside setting of the property. Each stone was installed individually using a strong mortar mix, while constantly adjusting the layout to keep a balanced and natural-looking pattern across the wall.
Installing the stone required patience because every piece needed small adjustments to fit properly with the surrounding stones. I started from the bottom of the wall and gradually worked upward, making sure each stone had good contact with the concrete surface and mortar bed. The variation in color and texture gave the retaining wall a timeless appearance that blends beautifully with the mature trees, lawn, and natural landscape around the backyard.
After the stones were installed and the mortar cured slightly, I filled the joints between the stones using grout to lock everything together and create a finished appearance. I compacted the grout carefully into all gaps and then cleaned the excess mortar from the stone surface using a brush and sponge. Proper grouting not only improves the final appearance of the wall, but also helps protect the installation against water penetration and long-term weather exposure.

How to build a concrete retaining wall with natural stone finish
For the finishing touches, I applied a protective waterproofing sealer over the natural stone surface and grout lines. This type of impermeabilizing helps repel water while still allowing the stone to breathe naturally. Applying the sealer is especially important for exterior stone walls because it helps reduce moisture absorption, staining, moss buildup, and damage caused by freeze-thaw cycles over time.
Once the protective treatment dried, the entire retaining wall gained a richer and cleaner appearance while being much better protected against the elements. Combined with the brick coping, waterproofed concrete structure, and natural stone veneer, the project completely transformed this sloped section of the backyard into a durable and visually appealing landscape feature that fits perfectly with the countryside atmosphere of the property.
Best tips for a beginner
One of the best tips for beginners is to spend extra time on the foundation and layout before moving to the visible parts of the project. A retaining wall depends heavily on a solid footing, proper reinforcement, and accurate alignment. Use string lines, a level, and measure multiple times during each stage of the build. Even small alignment mistakes at the beginning can become very noticeable once the wall and stone finish are complete.
Another important tip is not to rush the concrete and stone installation process. Build strong formwork with plenty of braces because wet concrete creates a lot of pressure during the pour. When installing the natural stone, start with larger stones first and test-fit each piece before applying mortar. Taking your time with the stone layout will create a much more natural and professional-looking result in the end.
Finally, pay close attention to waterproofing and drainage behind the retaining wall. Many beginners focus only on the appearance, but long-term durability is just as important. Apply a quality waterproofing membrane on the interior side of the concrete wall and make sure water can drain properly behind the structure. These extra steps may not be visible once the project is finished, but they will greatly improve the lifespan and performance of the retaining wall over time.