If you’re looking for a practical and stylish way to store and transport firewood, this DIY fireplace log holder plans is the perfect project! Measuring 24″ x 48″, it’s compact enough to fit in your home or outdoor space while offering plenty of room to stack logs. Built from sturdy materials, this cart is designed to handle the weight of heavy firewood, and its caster wheels make it easy to move wherever you need it. Whether you’re preparing for cozy nights by the fireplace or hosting outdoor gatherings around a firepit, this cart will keep your logs organized and within reach. Plus, it’s a fun and rewarding project for any DIY enthusiast! Let’s get started.
This DIY firewood cart is an affordable and rewarding weekend project that takes about 4–6 hours to complete, depending on your experience. The total cost ranges from $50–$100, with expenses for materials like 2×4 and 1×4 lumber, caster wheels, screws, and optional wood stain or paint. It’s a budget-friendly way to create a functional, durable, and stylish solution for storing and transporting firewood. Perfect for both beginners and seasoned DIYers, this project offers great value and utility for your home!
We recommend you to invest in the best materials you could afford. Therefore, you should buy weather-resistant lumber, such as pine or cedar. Always take accurate measurements before adjusting the size of the components at the proper size. Drill pilot holes trough the components before inserting the wood screws, to prevent the wood from splitting. My plans come with a full cut / shopping list and they are PDF Download and Print friendly. See all my Premium Plans HERE.
Made from this plan
Pin it for Later!

DIY Fireplace Log Holder
Building-a-firewood-cart
Materials
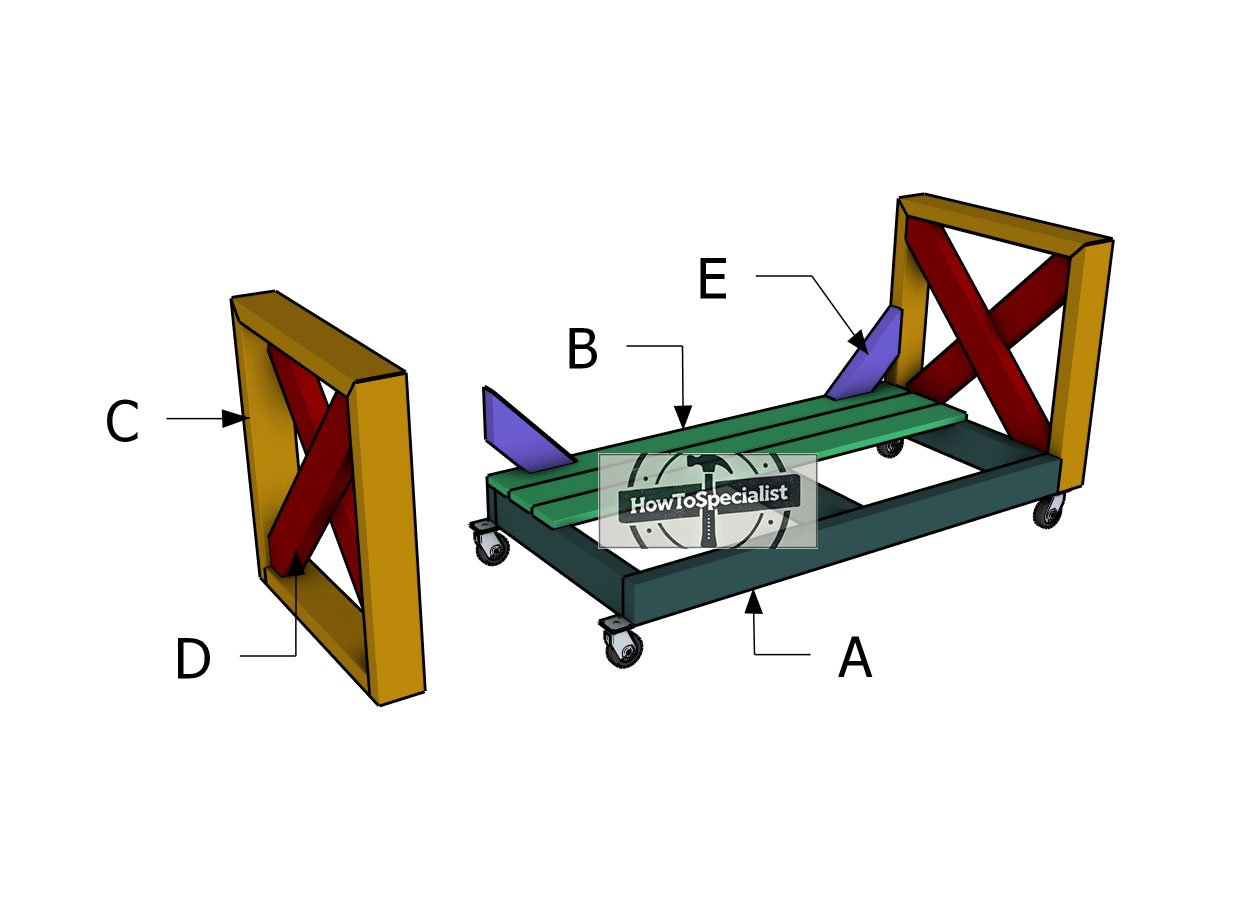
A – FRAME – 2×4 lumber 48″ – 2 pieces
A – FRAME – 2×4 lumber 21″ – 3 pieces
B – FLOOR – 1×4 lumber 46″ – 6 pieces
C – SIDE FRAME – 2×4 lumber 21″ – 2 pieces
C – SIDE FRAME – 2×4 lumber 24″ – 6 pieces
D – X-TRIMS – 2×4 lumber 29 3/4″ – 4 pieces
E – BRACES – 2×4 lumber 12″ – 4 pieces
- 2×4 lumber 8 ft – 3 pieces
- 2×4 lumber 10 ft – 2 pieces
- 1×4 lumber 8 ft – 3 pieces
- 30 pieces of 2 1/2″ screws
- 40 pieces of 1 5/8″ screws
- 50 pieces of 3 1/2″ screws
- 2″ caster wheel – 4 pieces
- Stain / paint – 1 piece
- Glue – 1 piece
Tools
- Miter saw, Pocket hole jig
- Drill machinery, Drill bits, Jigsaw
- Safety gloves, Glasses
- Chalk line, tape measure, spirit level, carpentry pencil
Time
- One week
Related
Cut layout diagram
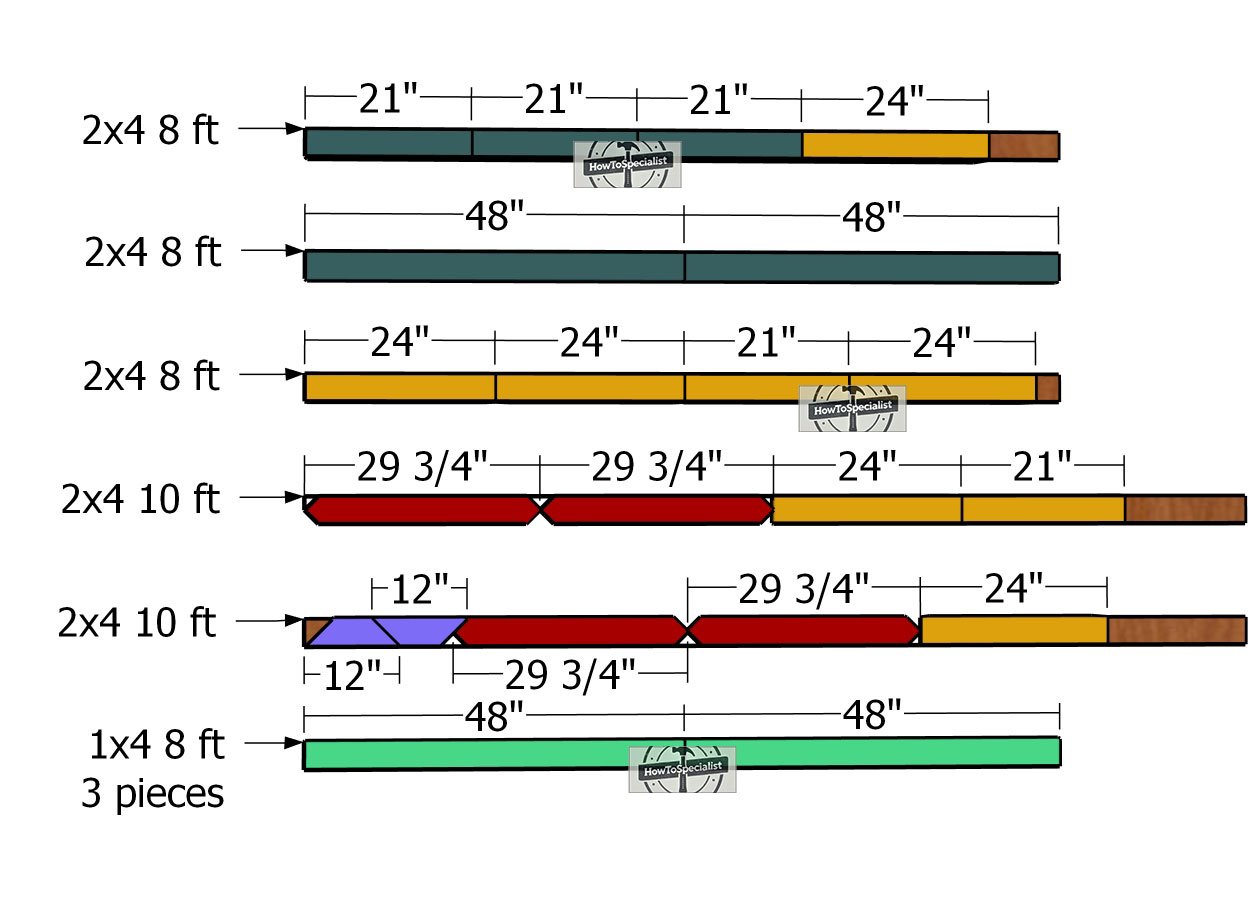
Step 1: Building the sides
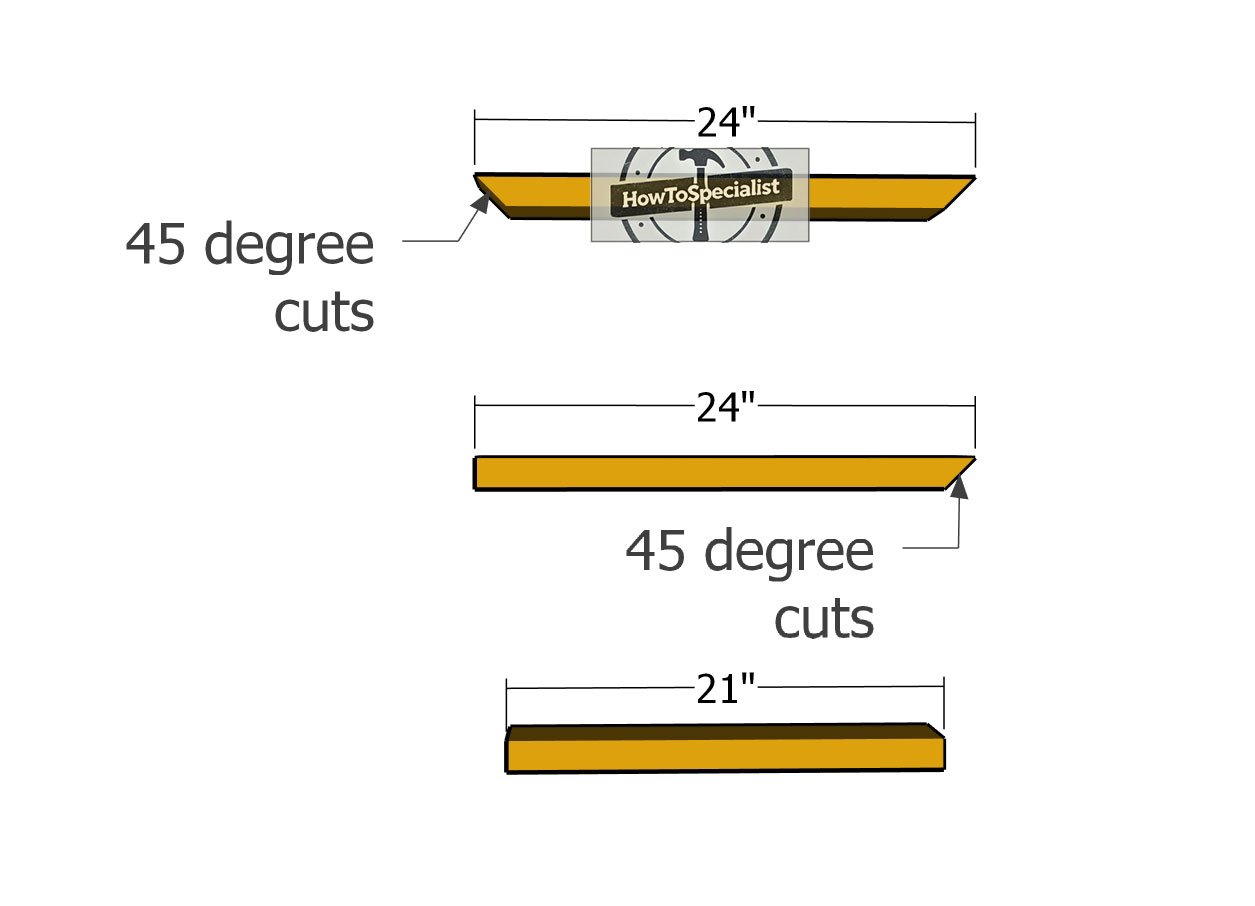
Side-frame-components
The first step in this project is building the side frames for the log holder. Grab your miter saw and cut the 2×4 boards to the angles shown in the diagram. We’re using 2x4s here because we’re all about durability—this log holder is built to last! Take your time with those cuts to keep everything clean and precise. Let’s get started!
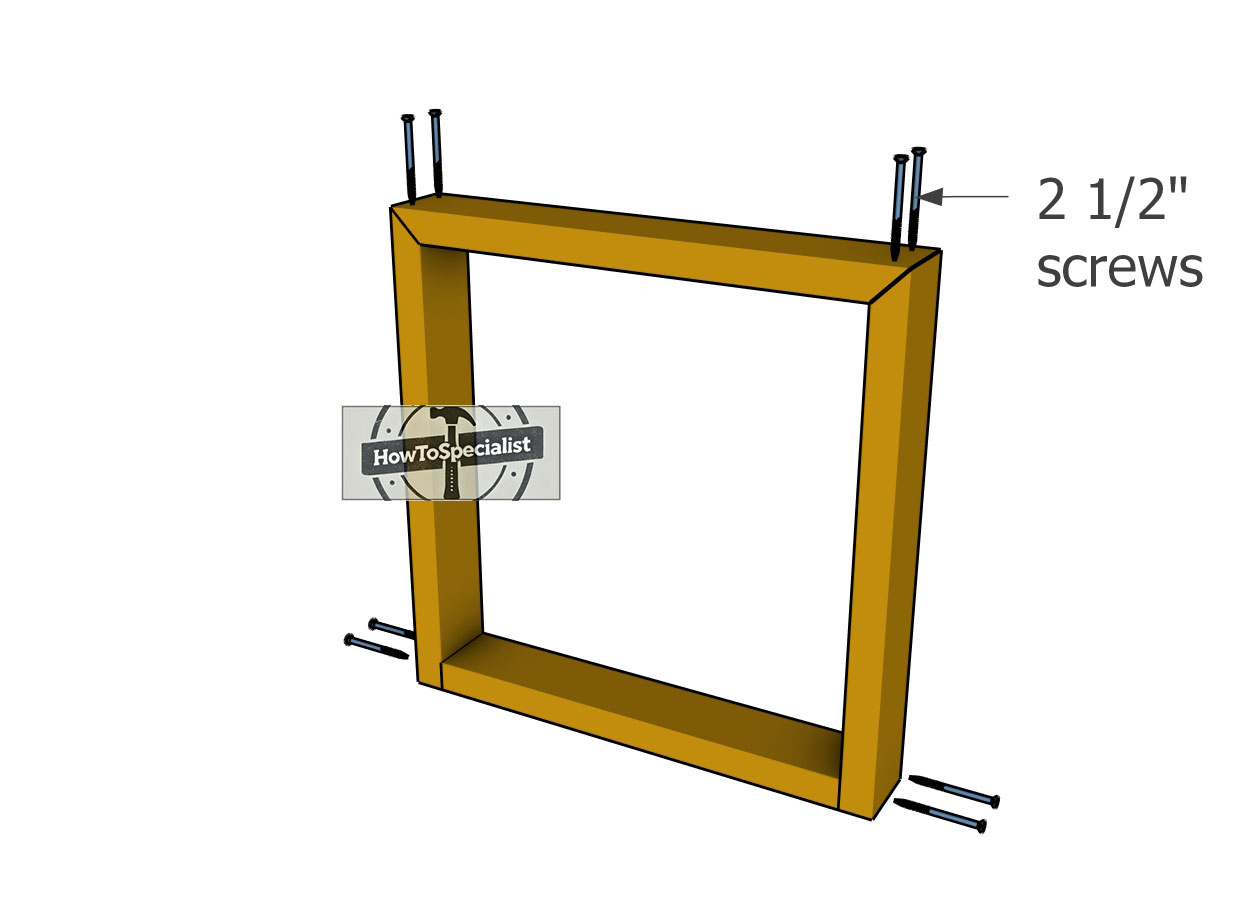
Assembling-the-side-frames
Lay out the components on a flat, level surface and align the edges so they’re nice and flush—just like in the diagram. Double-check that those corners are square (no one wants a wobbly frame!), then drill pilot holes to prevent splitting. Secure everything with 2 1/2″ screws, and just like that, your two frames are assembled and ready for the next step!
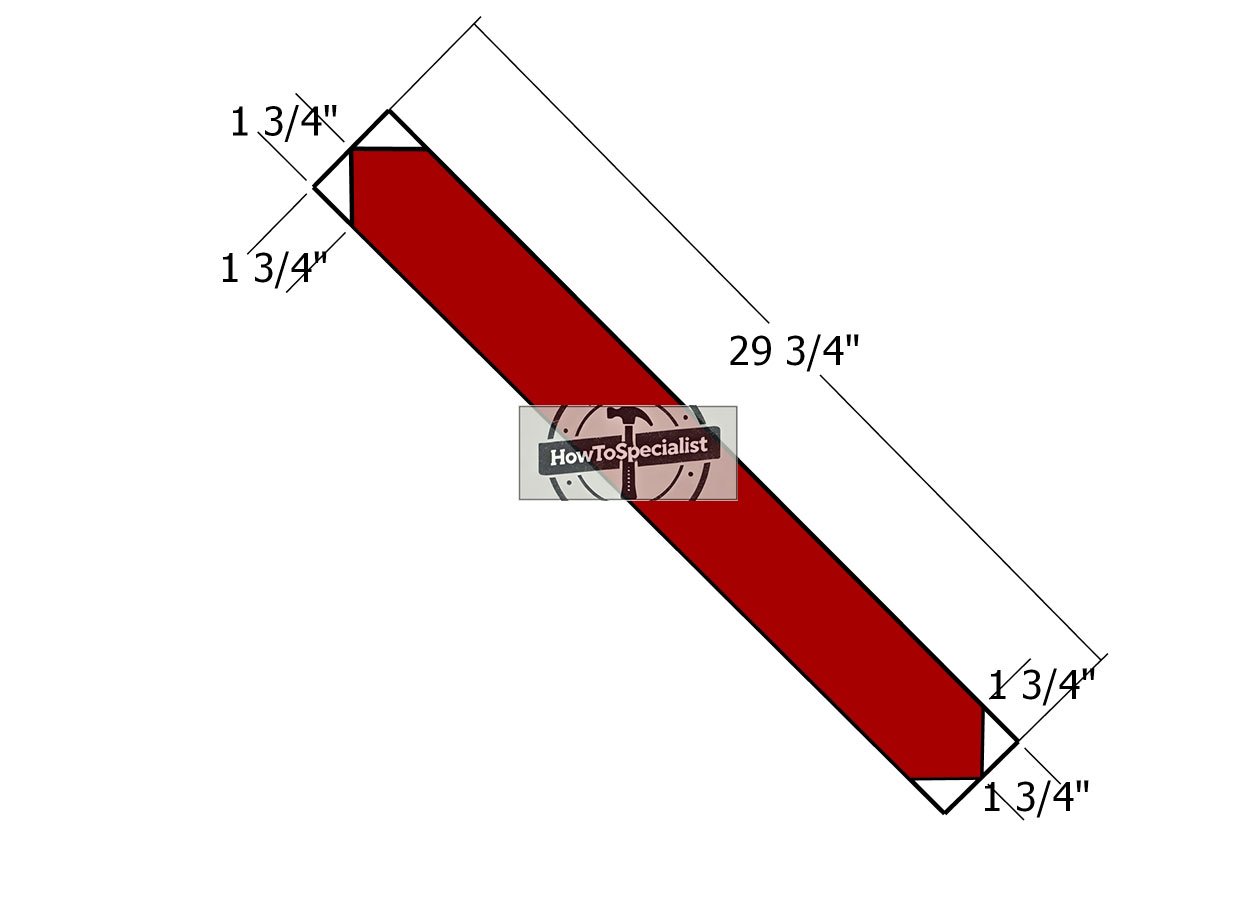
X-trims
Next up, it’s time to tackle the X-trims for the side frames. Grab your boards, mark those cut lines carefully, and fire up your circular saw. Precision is key here—these trims are going to give the project that extra bit of style and structure. Let’s make it happen!
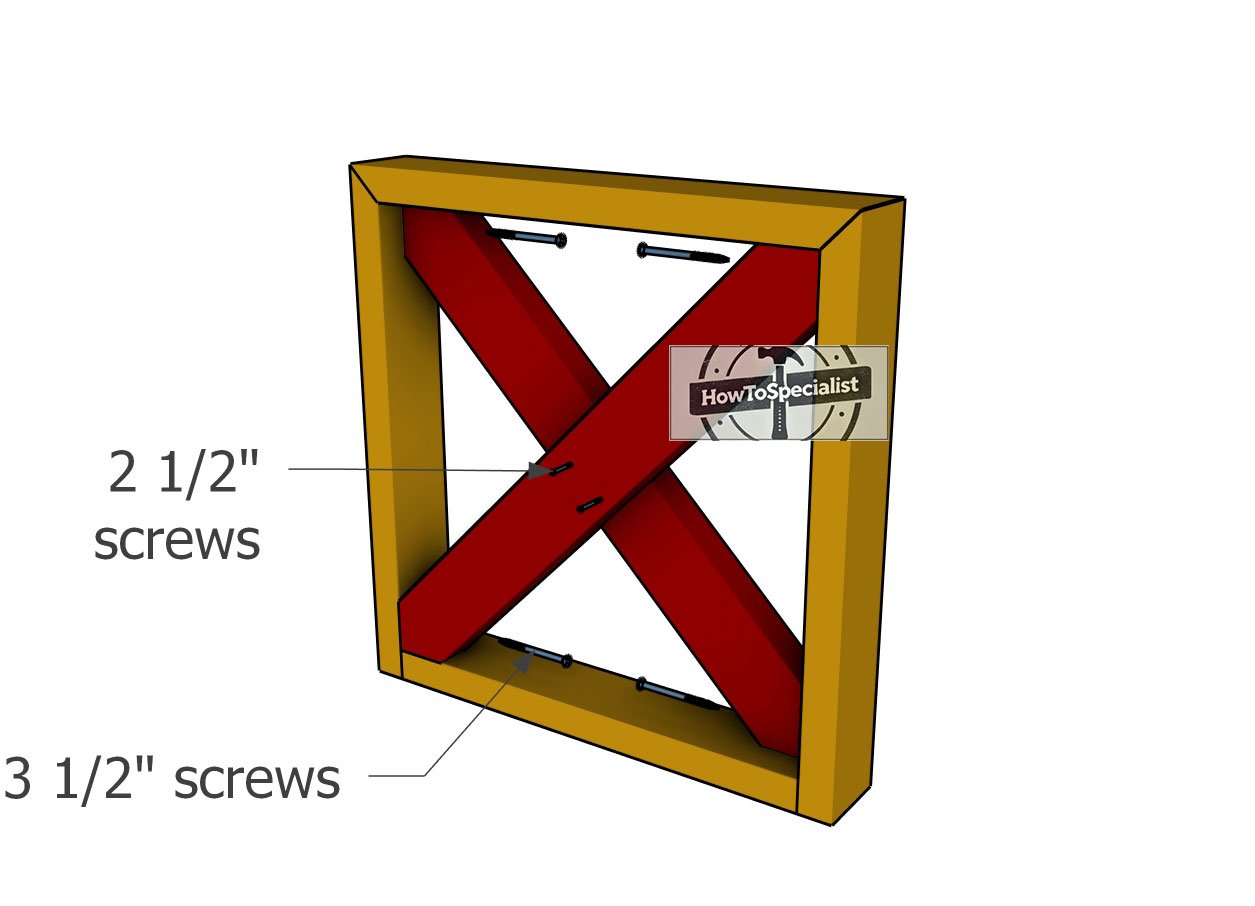
Attaching-the-X-trims
Now it’s time to fit the X-trims onto the side frames. Align the interior trim so the edges are flush, just like in the diagram, and secure it with 3 1/2″ screws. Don’t forget to drill pilot holes and countersink the screws for a clean, professional finish.
Next, fit the other trim in place using the same technique. To lock the two trims together at the center, drive in two 2 1/2″ screws for a strong, tight joint. This step is where the structure really starts to take shape!
Step 2: Assembling the floor frame
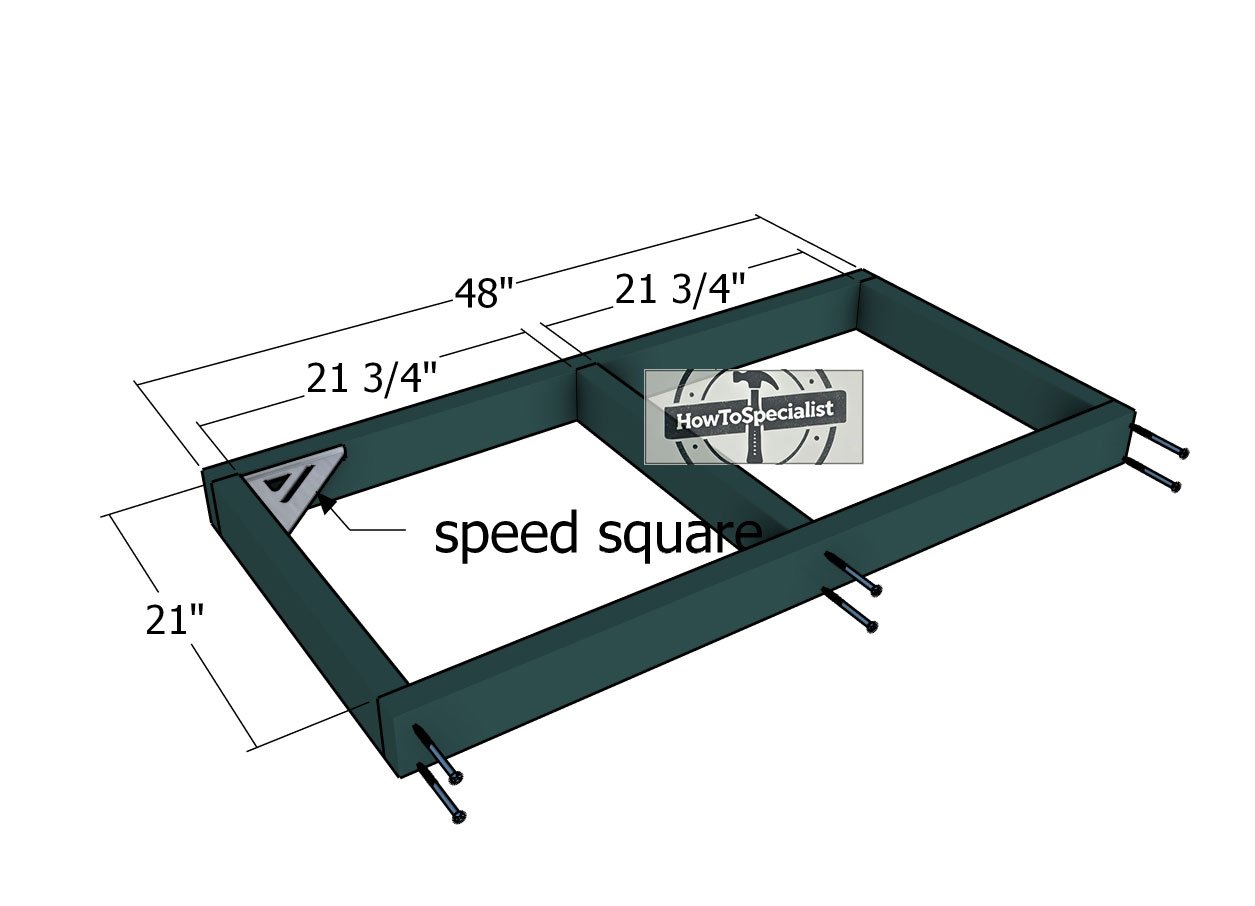
Floor-frame
Let’s move on to building the floor frame using 2×4 lumber. Cut the boards to 21″ and 48″ as per the plan, then lay everything out on a level surface. Drill pilot holes through the front and back boards, and secure them to the perpendicular pieces using 3 1/2″ screws.
Be sure those corners are square, and leave no gaps between the components, it’s all about a snug, sturdy fit. Use two screws per joint to lock everything down tight. This frame is going to be the backbone of the project!
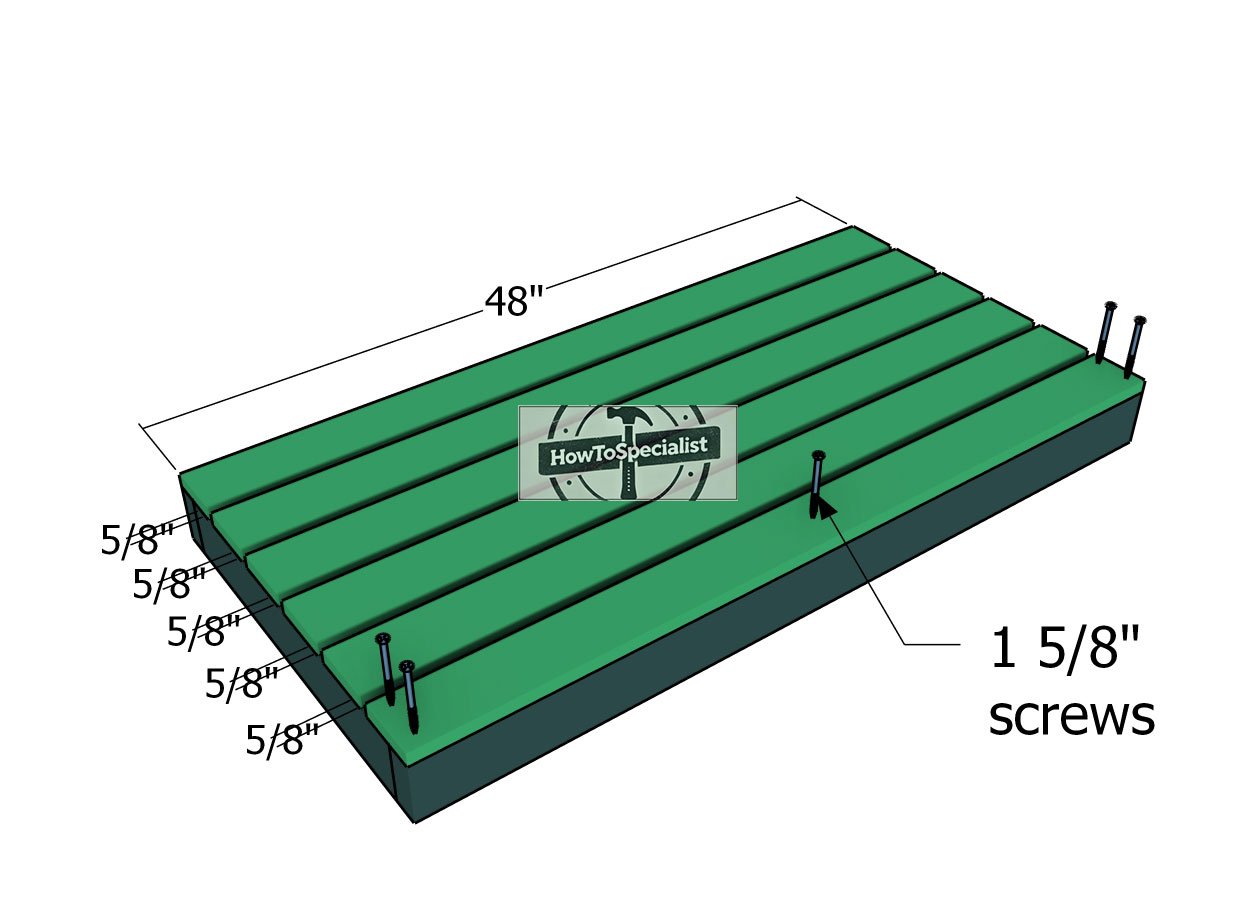
Fitting-the-floor-slats
Time to add the 1×4 slats to the floor frame! Use 5/8″ spacers between the boards to get those gaps perfectly even. Align the edges so they’re flush with the frame, then drill pilot holes to prevent splitting. Secure the slats tightly in place with 1 5/8″ screws, and just like that, the floor frame is ready to shine. It’s coming together beautifully!
Step 3: Assembling the log holder
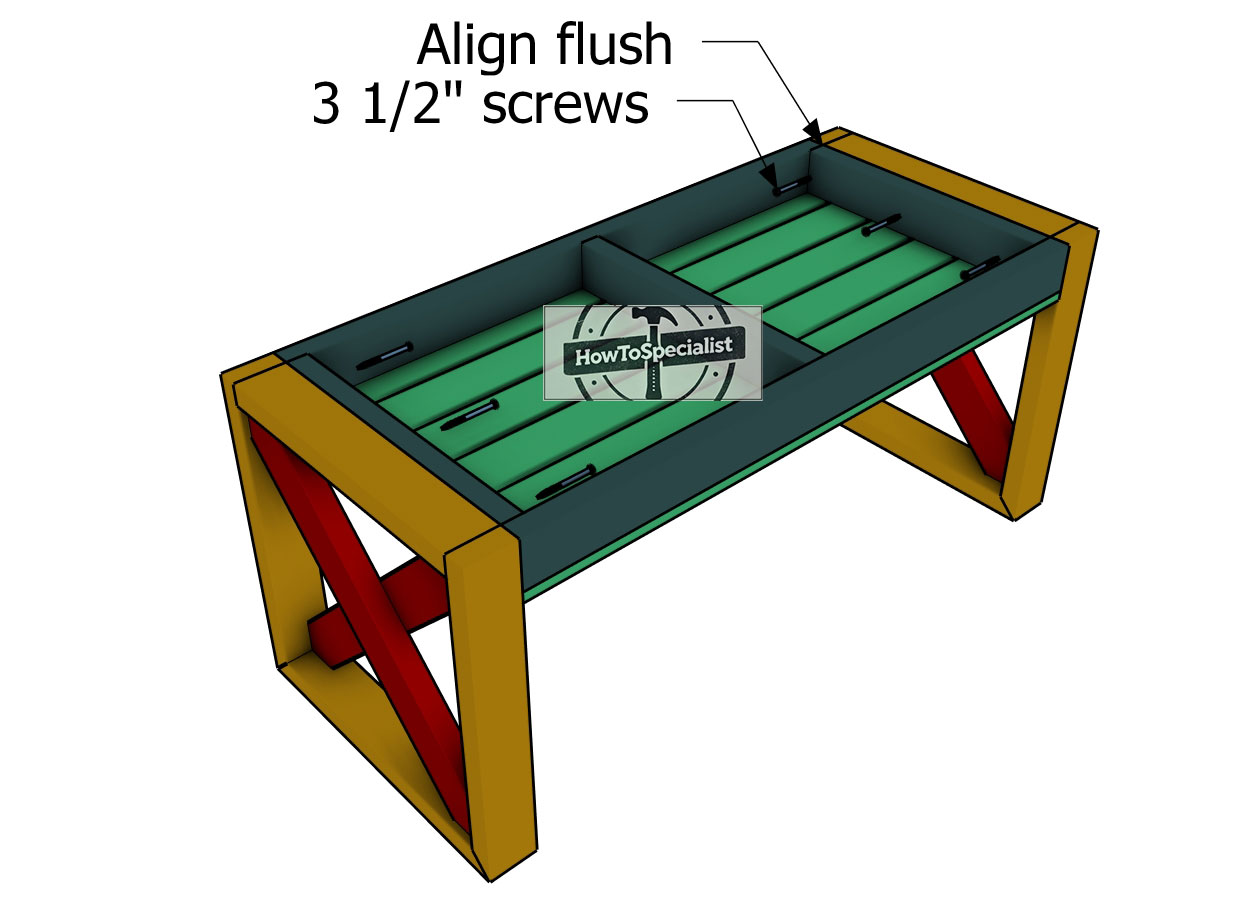
Assembling-the-cart
With all the frames ready, it’s time to assemble the firewood cart! Start by attaching the two side frames to the floor frame. Align the edges nice and flush, ensuring everything fits perfectly. Drill pilot holes through the floor frame to prevent splitting, then secure the sides using 3 1/2″ screws. Use at least three screws on each side and make sure there are no gaps between the components. This step locks the whole structure together and sets the foundation for a sturdy cart!
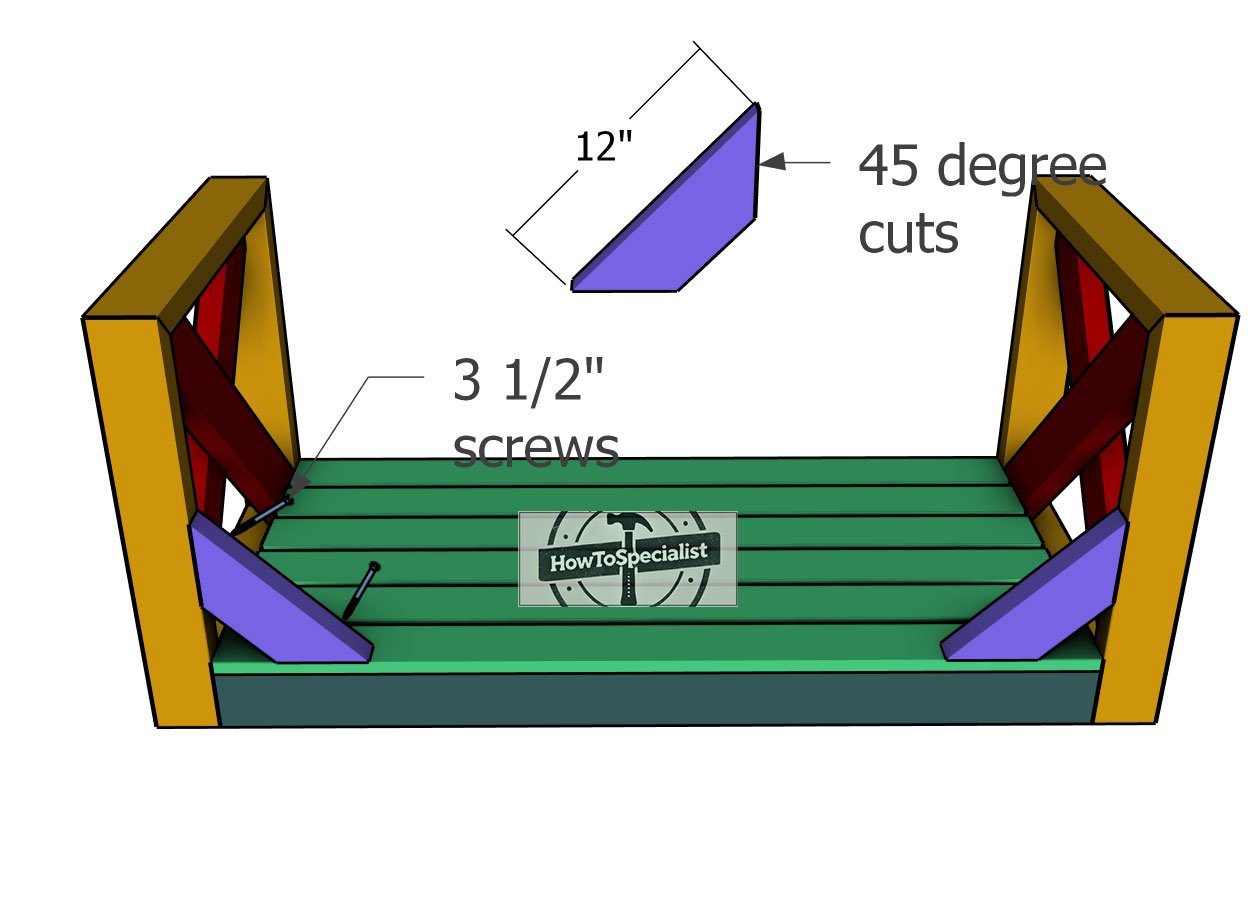
Fitting-the-back-braces
Let’s add some strength to the structure by building the braces for the rack using 2×4 lumber. Cut both ends of the braces at a 45-degree angle for a clean, snug fit. Once cut, secure the braces to the structure with 3 1/2″ screws. Don’t forget to drill pilot holes first—this prevents the wood from splitting and ensures a solid connection. These braces will keep your rack rock-solid and ready for action!
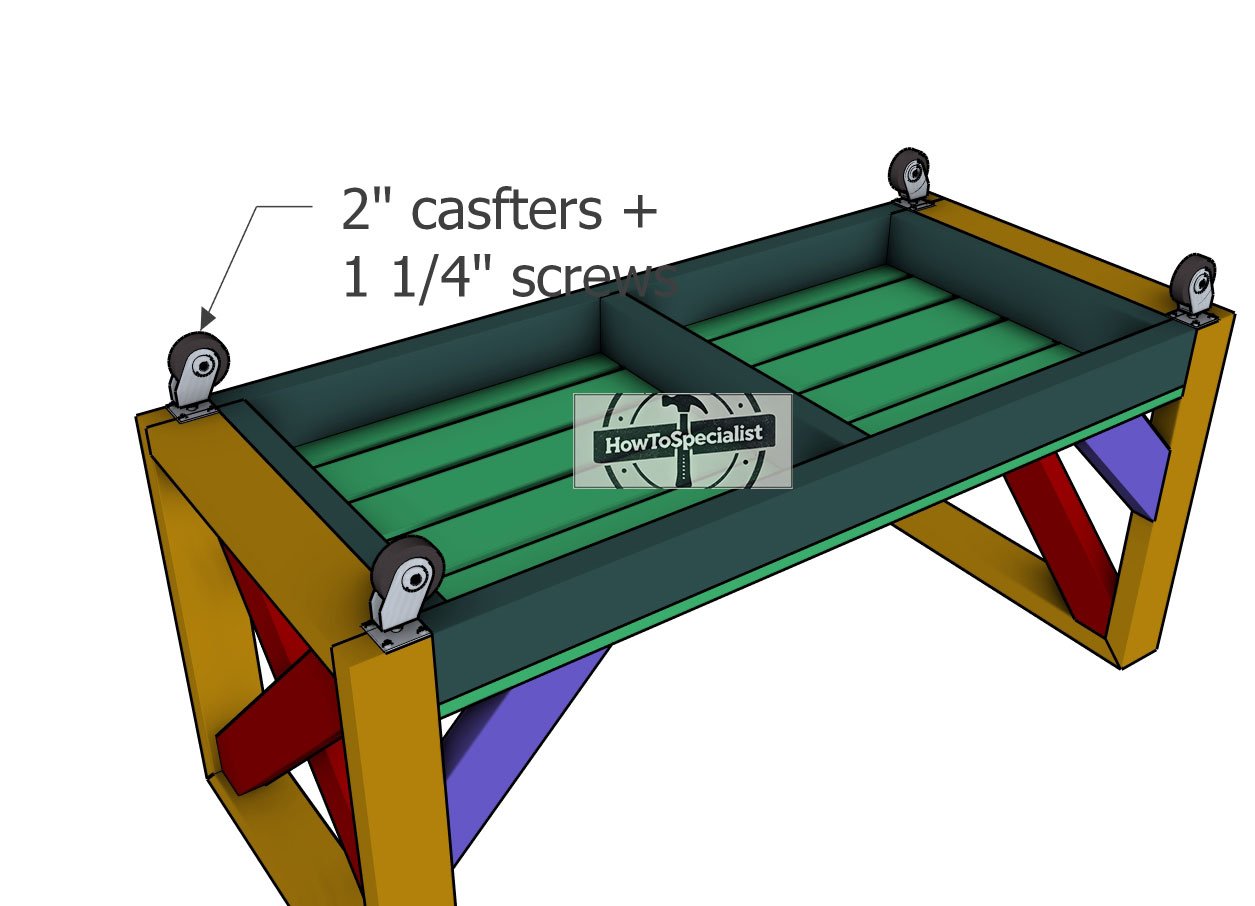
Fitting-the-caster-wheels
Now let’s make your DIY fireplace log holder mobile by fitting the 2″ caster wheels to the floor frame. Position the casters evenly at each corner, ensuring they’re aligned properly. Secure them with 1 1/4″ screws, tightening them firmly so they can handle the weight of the logs. With these wheels in place, moving your log holder around will be a breeze!
Step 4: Finishing touches
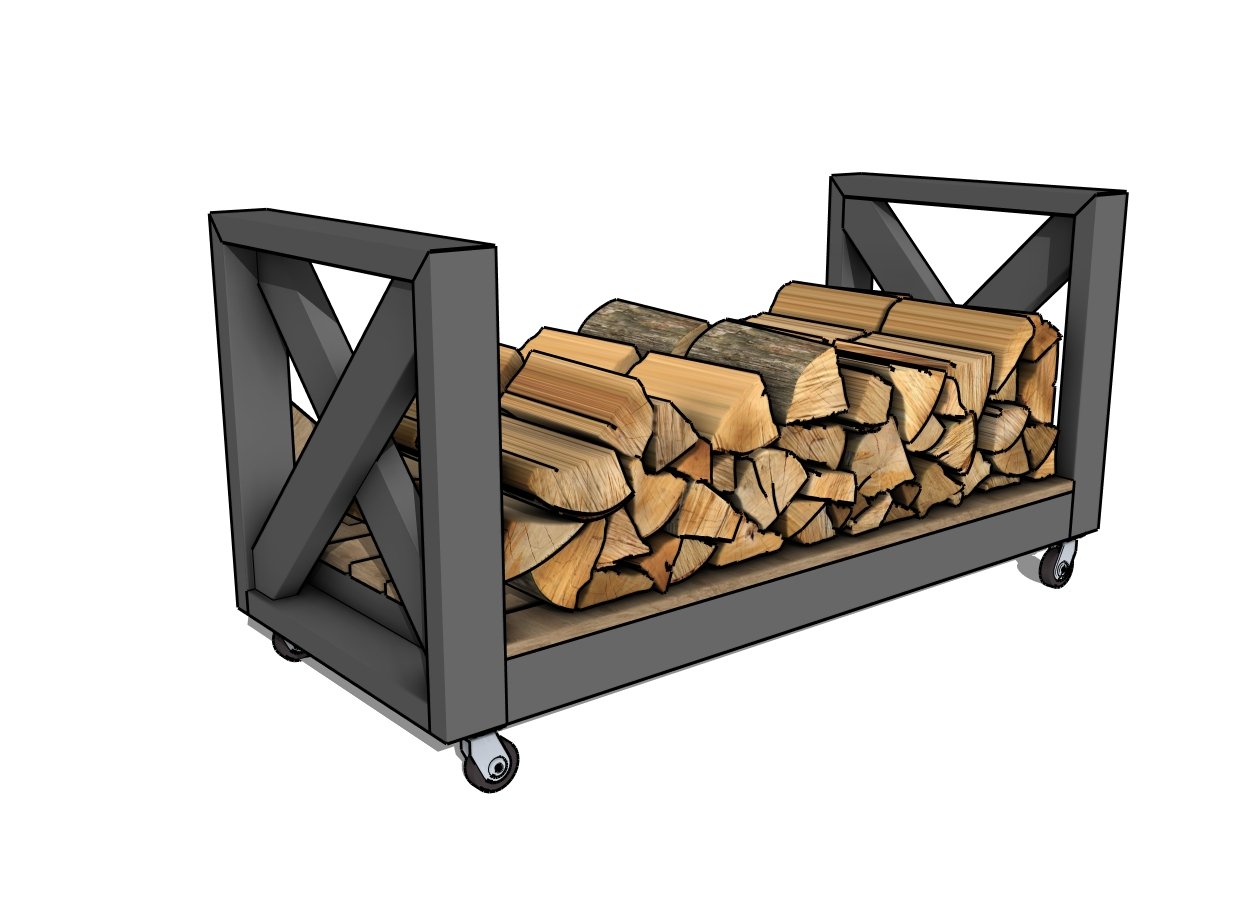
Firewood cart plans
For the finishing touches, sand down all the surfaces to remove any rough edges and ensure a smooth, splinter-free finish. If you’re keeping it indoors, consider applying a wood stain or paint to match your decor, followed by a clear sealant for protection.

How to build a wood cart
If it’s for outdoor use, go with an exterior-grade finish to withstand the elements. You can also add a personal touch with decorative hardware, stencils, or even a custom paint job. These final steps will not only enhance the look but also extend the lifespan of your firewood cart!

DIY Firewood cart plans
This DIY firewood cart is the perfect blend of practicality and style, making it an essential addition to your home. Whether you’re storing logs for your indoor fireplace or keeping them ready for an outdoor firepit, this cart helps you organize and transport firewood effortlessly. Its sturdy construction ensures it can handle heavy loads, while the caster wheels make it easy to move around, even when fully loaded. Plus, its sleek, customizable design means it doesn’t just serve a purpose—it adds charm to any space. It’s a project that’s as functional as it is satisfying to build!
Thanks for checking out my DIY mobile firewood cart plans! Be sure to explore my other projects for more fantastic ideas. Don’t forget to hit the LIKE button and SHARE with your friends using the social media links below.

