This step by step project is about potato bin plans. If you want to store the root vegetables in a proper manner, building these bins is the right decision. You can easily adjust the size of the project to suit your needs. Moreover, I truly recommend you to check out the rest of the plans on my site, for even more building ideas.
There are many designs and plans you could choose from, so you should take a look on more projects before starting the actual project. Nevertheless, if you are looking for a simple but sturdy design, this project might be the solution to your needs. Moreover, you could build all the components from 2×4 lumber, as to save both time and money. Make sure you check all the dimensions before making the cuts, otherwise the components might not fit together easily. See all my Premium Plans in the Shop.
Made from this plan
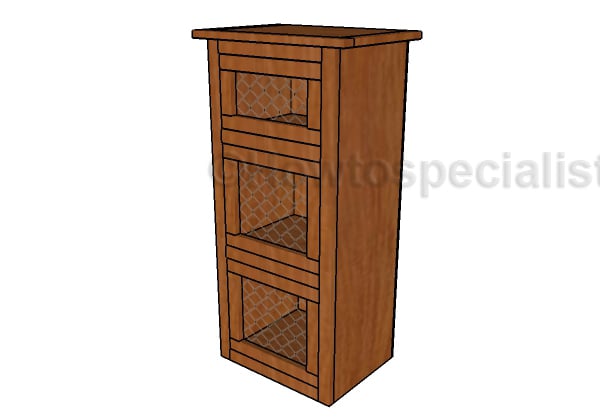
Potato Bin Plans
Building a potato bin
Materials
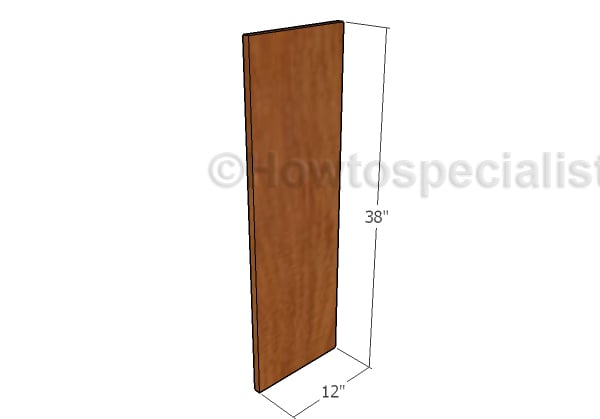
- A – 2 pieces of 3/4″ plywood – 12”x38″ long SIDES
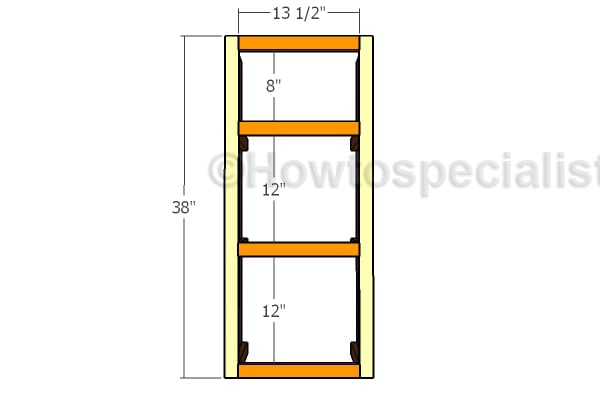
- B – 2 pieces of 1×2 lumber – 38″ long, 4 pieces – 13 1/2″ long FRONT
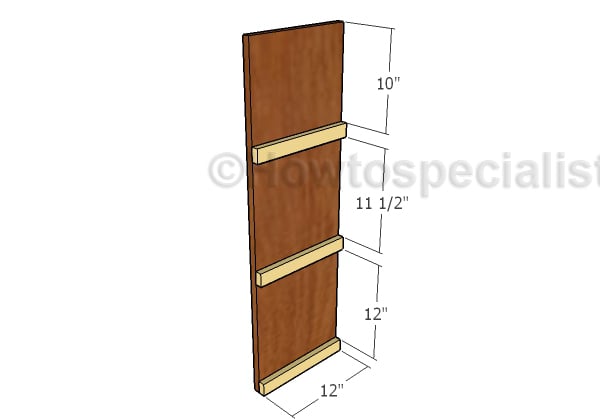
- C – 6 pieces of 1×2 lumber – 12″ long CLEATS
- D – 1 piece of 3/4′ plywood – 12″x15″ long SHELF
- E – 2 pieces of 1×2 lumber – 12 1/4″ long, 1 piece – 19 1/2″ long, 1 piece of 3/4″ plywood – 12 1/4″x16 1/2″ long TOP
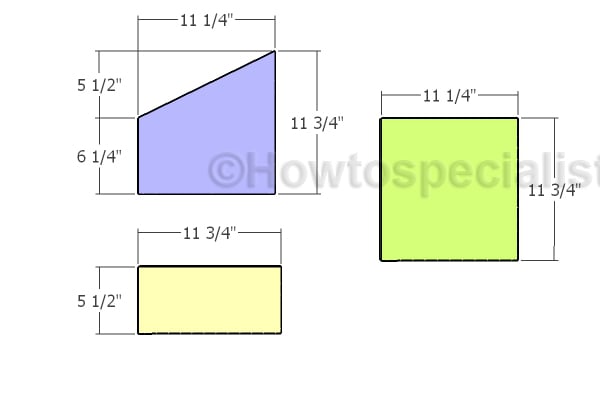
- F – 2 pieces of 1×2 lumber – 8 3/4″ long, 2 pieces – 13 1/4″ long, 3 pieces – 11 1/4″x11 3/4″ long, 1 piece – 5 1/2″x11 3/4″ long 2xBIN
- G – 2 pieces of 1×2 lumber – 13 1/4″ long, 2 pieces – 4 3/4″ long DOOR
Tools
- Safety gloves, glasses
- Miter saw, jigsaw
- Chalk line, tape measure, spirit level, carpentry pencil
- Drill machinery and drill bits
Tips
- Pre-drill holes in the wooden components, before driving in the screws
- Use a good miter saw to make the angle cuts
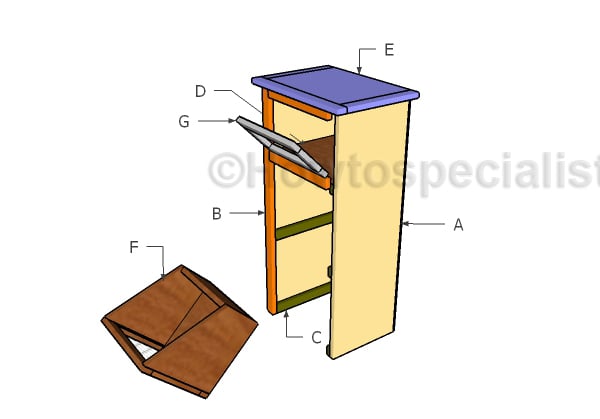
How to build a potato bin
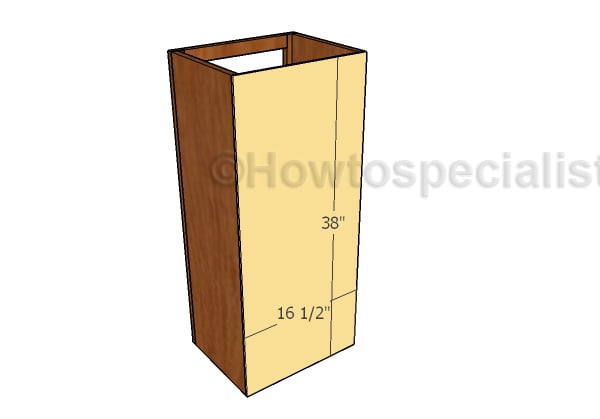
Side panels
The first step of the project is to build the sides for the potato bin. Mark the cut lines on the 3/4″ sheet and get the job done with a circular saw. Smooth the edges with sandpaper.
Fitting the cleats
Fit the 1×2 cleats to the interior of the sides, using glue and 1 1/4″ screws. Drill pilot holes before inserting the screws, to prevent the wood from splitting.
Building the front face
Assemble the front face for the bin from 1×2 lumber. Drill pocket holes at both ends of the horizontal supports and insert 1 1/4″ screws into the vertical supports. Make sure the edges are flush and check if the corners are square. Fit the front trims to the sides, align the edges flush, add glue to the joints and insert 2″ brad nails to lock them into place tightly.
Attaching the back
Fit the 1/4″ plywood panel to the back of the cabinet. Align the edges flush and insert 1 1/4″ brad nails to secure them into place tightly. Insert the nails every 8″ along the side panels.
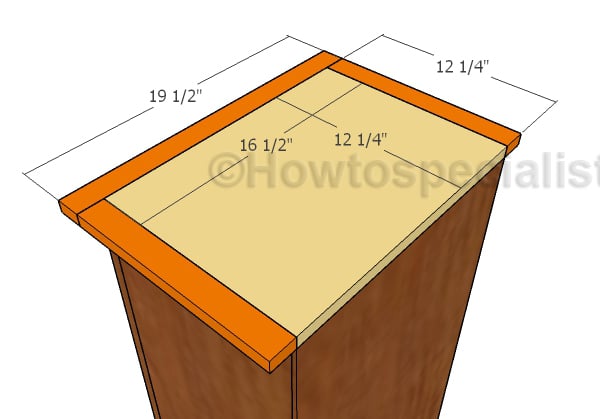
Fitting the top
Fit the 3/4″ plywood top to the cabinet. Align the edges flush and insert 2″ brad nails to secure them into place tightly. Add glue to the joints and attach the 1×2 trims.
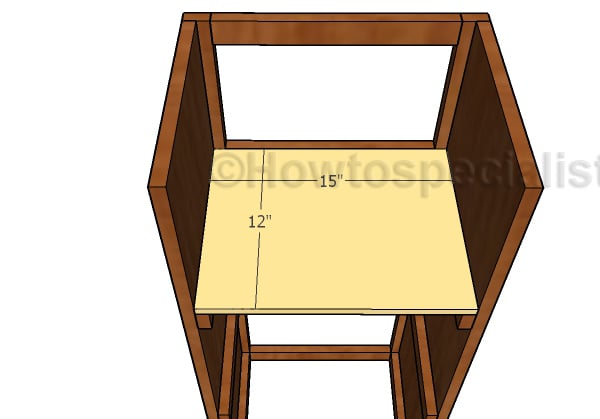
Top shelf
Cut a piece of 3/4″ plywood at 12″x15″ and attach it to the top cleats. Use 1 1/4″ nails to secure the panel into place tightly.

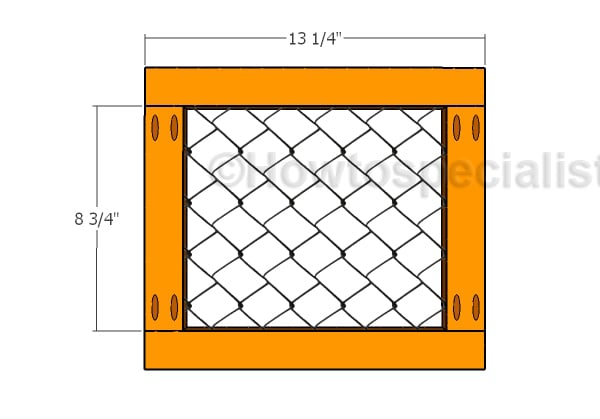
Build the top door
The next step of the project is to build the door for the top shelf. Cut the components for the frame from 1×2 lumber and drill the pocket holes, as shown in the plans. Align the edges with attention and insert 1 1/4″ screws to make sure the corners are square. Add glue to the joints. Staple wire mesh to the frame.
Bin front face
Next, you need to build the front frames for the potato bins. Cut the pieces from 1×2 lumber and drill the pocket holes, as described in the diagram. Align the edges with attention and insert 1 1/4″ screws, to lock everything tightly. Add glue to the joints for a professional result.
Cutting the components for the bins
Cut the rest of the components for the bins from 3/4″ plywood. Mark the cut lines on the plywood sheet and get the job done with a circular saw. Smooth the edges flush.
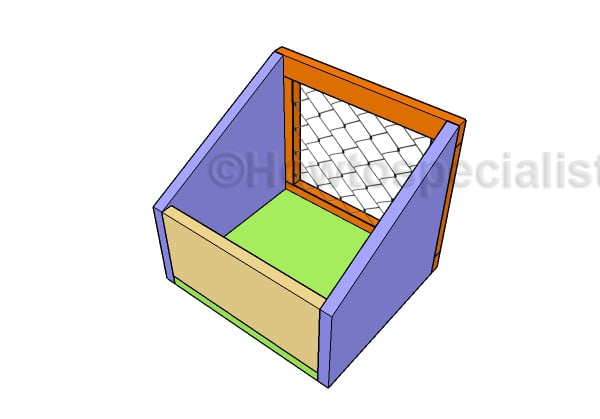
Assembling the bins
Assemble the bins for the potatoes using glue and 1 1/4″ nails or screws. Align the edges flush and leave no gaps between the components.
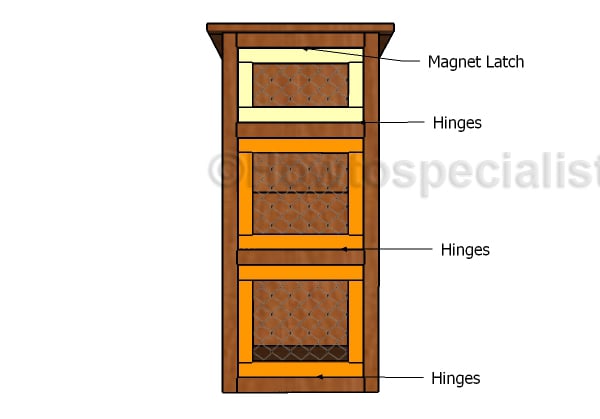
Fitting the boxes
Fit the bins and the top door to the openings. Use hinges and a magnet latch to secure the bins into place, after centering them into the openings. In addition, you need to fit pulls, so you can open and close the bins properly.
Potato Bin Plans
Last but not least, you need to take care of the finishing touches. Drill the holes with wood putty and smooth the surface with 120-220 grit sandpaper. Apply a few coats of paint or stain to enhance the look of the potato bin cabinet. Make sure you don’t stain the surfaces where the potatoes will stay.
Potato Bin Building Plans

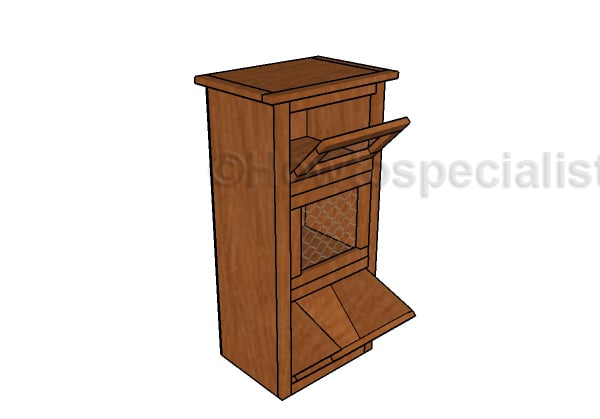
This project was about building a wood potato bin. This potato bin is the ideal choice if you want to combine utility with the looks, as the cupboard has a beautiful design. You can use these bins for onions or other vegetables, as well.

Thank you for reading our project about potato bin plans and we recommend you to check out the rest of the articles. Don’t forget to share our projects with your friends, by using the social media widgets.