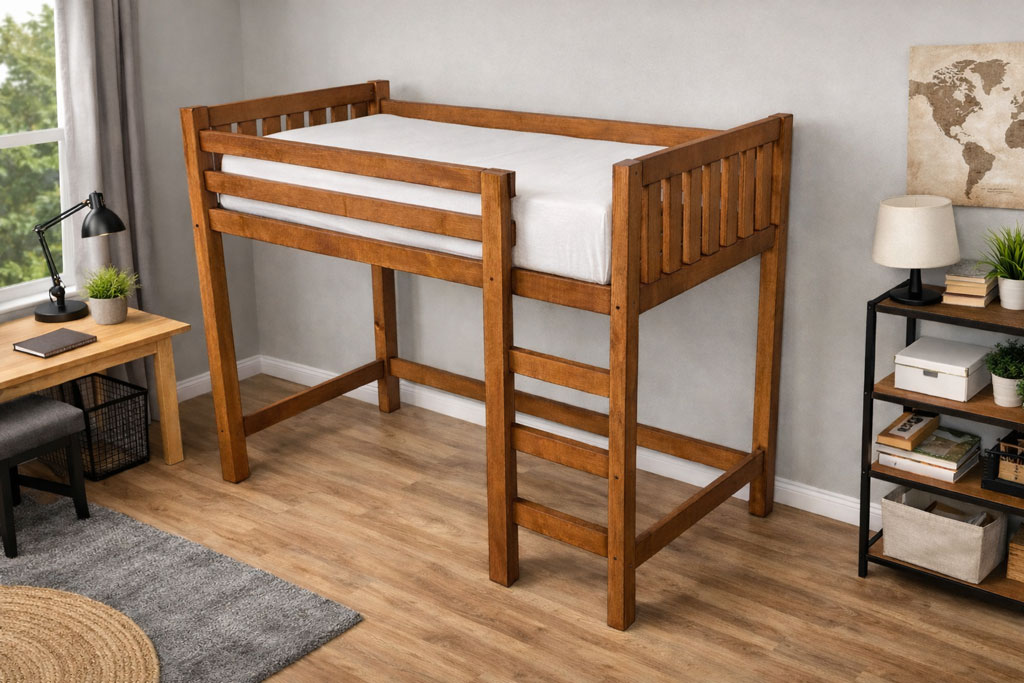
This step by step diy article is about 2×4 loft bed plans. This is a very simple modification of my 2×4 bunk bed plans. So, if you have a small roof and you want to fit both a bed and a study desk, these plans will come handy to you. Make sure you check all the joints so the bed frame will be very sturdy. This project has been designed for a twin mattress so make sure you make adjustments, if you need other size.
Always aligned the components before locking them together with screws. In addition, we recommend you to pre-drill the lumber, otherwise the wood might easily split. Add glue to the joints, if you want to enhance their bond. Smooth the cut edges with fine grit sandpaper and remove the residues using a vacuum cleaner. Make sure you take a look over the related plans to get an idea about what you can build for your home. See all my Premium Plans HERE.
Made from this plan
2×4 Loft Bed Plans – Free PDF Download
Building a loft bed from 2x4s
Materials
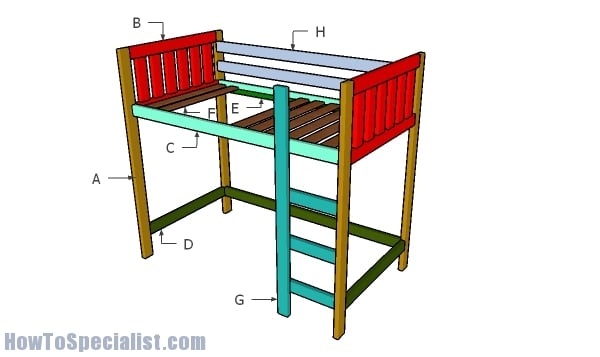
- A – 4 pieces of 2×4 lumber – 72″ long LEGS
- B – 4 pieces of 2×4 lumber – 39″ long, 6 pieces – 14″ long 2xHEADBOARD
- C – 2 piece of 2×4 lumber – 76” long SIDE SUPPORTS
- D – 2 pieces of 2×4 lumber – 39″ long, 1 piece – 76″ long BOTTOM FRAME
- E – 2 pieces of 1×2 lumber – 76″ long CLEATS
- F – 13 pieces of 1×4 lumber – 39” long SLATS
- G – 1 piece of 2×4 lumber – 68 1/2″ long, 3 pieces – 19 1/2 long LADDER
- H – 2 pieces of 2×4 lumber – 76″ long, 2 pieces – 60″ long GUARD RAILS
- 7 pieces of 1×4 lumber – 8′
- 17 pieces of 2×4 lumber – 8′
- 2 pieces of 1×2 lumber – 8′
- 2 1/2″ screws, 2 1/2″ pocket screws
- 1 5/8″ screws
- putty, glue, stain
- twin mattress
Tools
- Safety gloves, glasses
- Miter saw, jigsaw
- Chalk line, tape measure, spirit level, carpentry pencil
- Drill machinery and drill bits
Tips
- Pre-drill holes in the wooden components, before driving in the screws
- Smooth the exposed edges, by using a router with a 1/4” bit
Time
- One day
Related
- How to build a toddler bed
- How to build a storage bed frame
- How to build a crib
- Queen platform bed plans
Building a 2×4 loft bed
Building the frames for the headboards
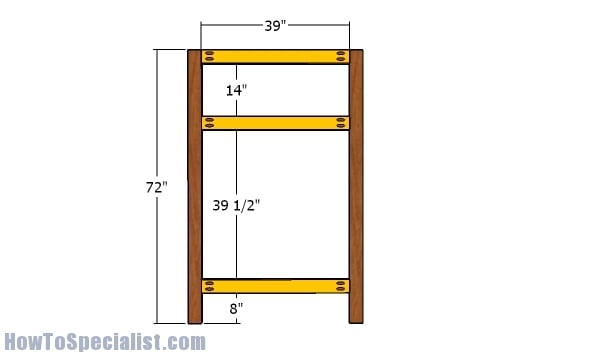
First of all, you need to assemble the headboards. Therefore, start by assembling the frame from 2x4s. Drill pocket holes at both ends of the horizontal supports and insert 2 1/2″ screws to lock everything together tightly. Align the edges flush and make sure the corners are square.
Fitting the headboard slats
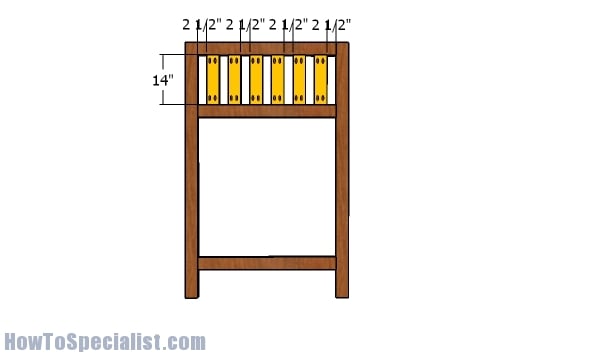
Next, fit the 2×4 slats to the panel. Cut a wood block at 2 1/2″ and fit it between the slats to create even gaps. Drill pocket holes at both ends of the slats and insert 2 1/2″ screws to lock everything together tightly.
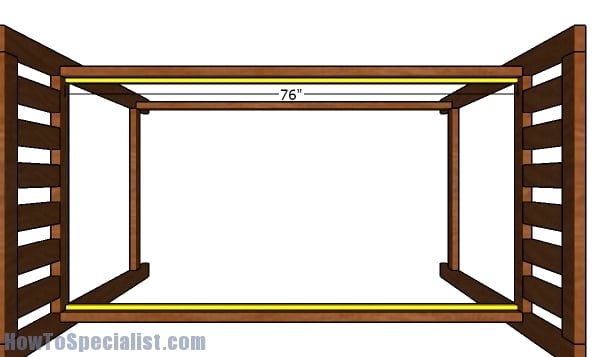
Assembling the loft bed frame
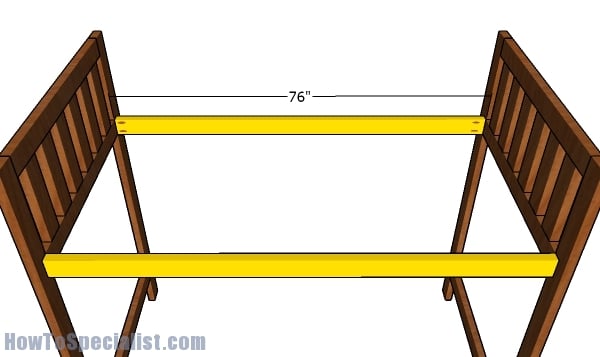
Next, join the headboards to the footboards by attaching the 2×4 side rails. Drill pocket holes at both ends of the rails and lock them into place with 2 1/2″ screws. Make sure the corners are square and leave no gaps between the components. Use a spirit level to check if the rails are horizontal.
Fitting the cleats
Fit 1×2 cleats to the interior faces of the side rails. Align the cleats with attention, drill pilot holes and insert 1 5/8″ screws to lock them into place tightly. Add glue to the joints and align them flush with the bottom edge.
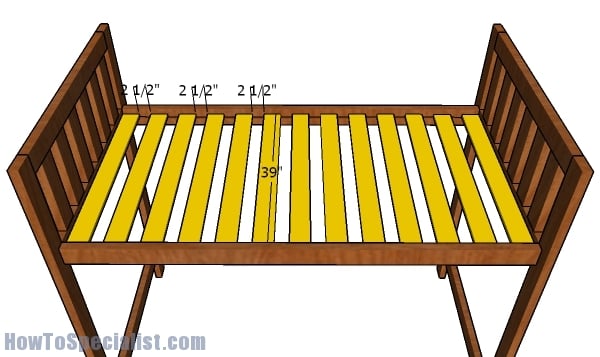
Fitting the support slats
Fit the 1×4 slats to the cleats, every 2 1/2″, as shown in the diagram. Place a scrap piece of 1×3 lumber between the slats to create even gaps. Drill pilot holes through the slats and insert 1 5/8″ screws to lock them into place tightly. Cut the slats at 39″ long.
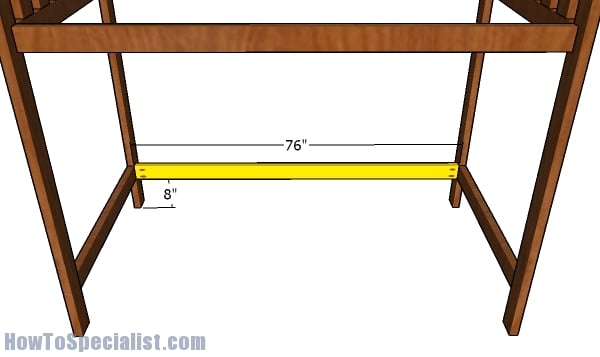
Fitting the bottom support
Fit the support to the lower section of the loft bed. Drill pocket holes at both ends of the support and then lock it to the legs with 2 1/2″ screws. Make sure the corners are square and align the edges flush. This support will really add strength to the structure.
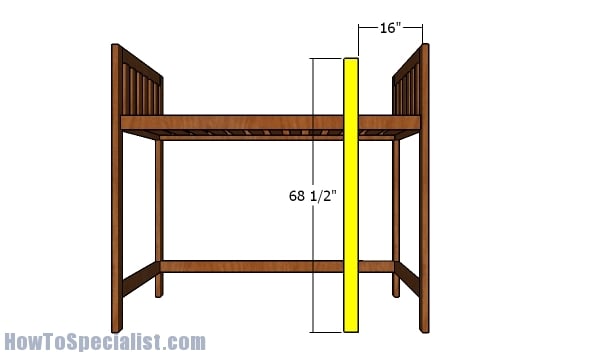
Fitting the ladder supports
Fit the 2×4 ladder support to the front of the bunk bed. Plumb the support, drill pilot holes and insert 2 1/2″ screws to lock them into place tightly.
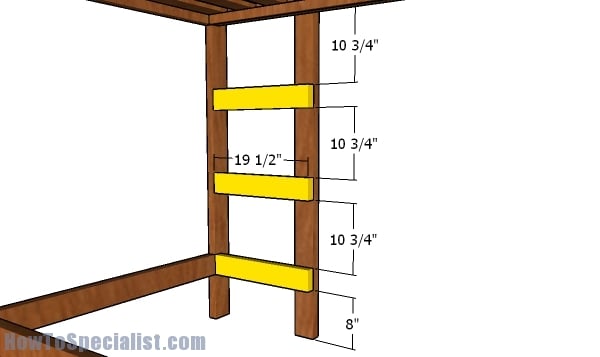
Fitting the steps
Fit the steps to the interior of the bunk bed and lock them into place with screws.
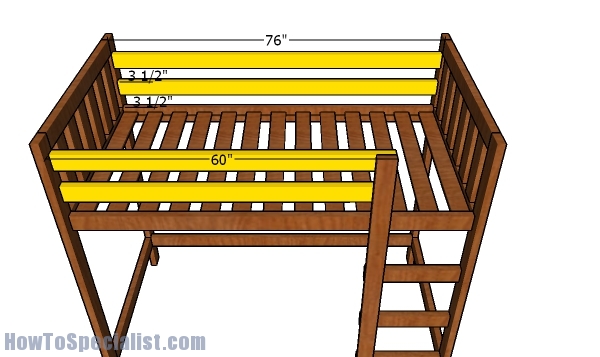
Fitting the guard rails
Next, attach the 2×4 rails to the twin size loft bed. Place a scrap piece of 2×4 lumber between the rails to create even gaps. Drill pilot holes and insert 2 1/2″ screws to lock the rails into place tightly.

2×4 Twin Loft Bed Plans
Last but not least, you need to take care of the finishing touches. Fill the holes with wood putty and then smooth the surface with 120-220 grit sandpaper. Apply a few coats of paint to enhance the look of the wood. Take a look over my 2×4 queen size bed plans and over my 2×4 bunk bed plans.
Thank you for reading our article about 2×4 loft bed plans and we recommend you to check out the rest of our home improvement projects. Don’t forget to share this projects to your friends, using the social media widgets, if you’ve found it useful. Like us on Facebook to be the first that gets the latest updates and to help us create more free plans for you.
1 comment
Thank you for your idea. I plan on some modifications to your plans, however I appreciate the basic fundamentals of the bed, it is extremely important to my build.