This step by step diy article is about how to build a 12×16 shed. If you need a large storage shed for various reasons, you should take a look on this project. In addition, if you want to keep the expenditure under control, a shed with a gable roof is a natural choice, as you can get the job done quickly and get an accurate result. Work with great attention and plan everything from the very beginning, to prevent unexpected issues. PDF downloadable plans, for this project, with premium features in the Store.
Work on a level surface, otherwise the wall frames will not have the corners square. Make sure you double-check all the measurements and align the components at both ends, before locking them tightly with wood screws. Use a spirit level to plumb all the walls and to check if the top plates are horizontal. In addition, place the floor of the shed on several 4×4 skids, to distribute the weight efficiently.
Buy quality materials for you shed if you want to build a durable construction. From our own experience, we recommend you to buy pressure-treated lumber and 5/8” grooved plywood, as these materials will provide a good compromise between the appearance and durability. Pre-drill the wooden components before driving in the galvanized screws, to prevent the lumber from splitting. You really need to check out my new 12×16 shed plans, as well, as they come with lots of improvements. See all my Premium Plans in the Shop.
Made from this plan
Materials
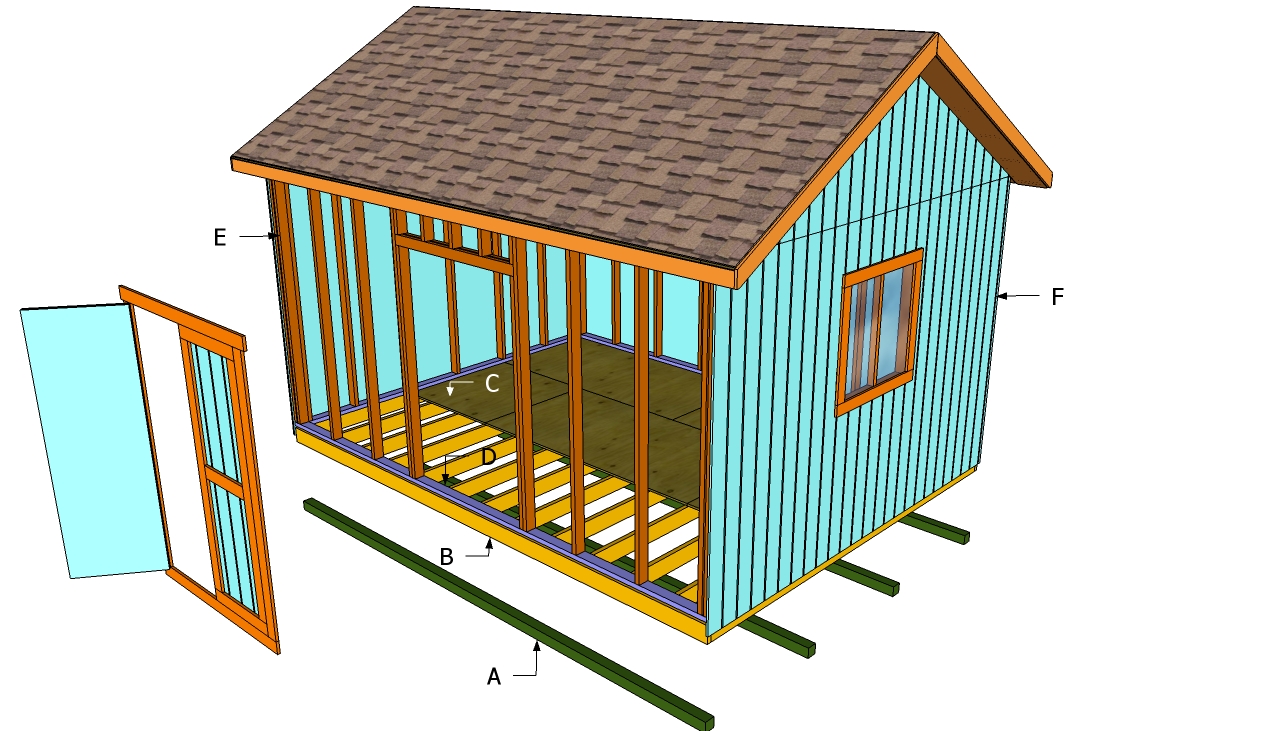
- A – 4 pieces of 4×4 lumber – 192” long SKIDS
- B – 2 pieces of 2×6” lumber – 192” long, 13 pieces of 2×6 lumber – 141” long JOISTS
- C – 6 sheets of 3/4” tongue and groove plywood, 48 x 96” FLOORING
- D – 2 pieces of 2×4 lumber – 192” long, 2 pieces of 2×4 lumber – 137” long BOTTTOM PLATES
- D – 2 pieces of 2×4 lumber – 192”, 2 pieces – 185”, 2 pieces – 144”, 2 pieces – 137” TOP PLATES
- E – 36 pieces of 2×4 lumber – 90”, 2 pieces – 40”, 2 pieces – 36”, 2 pieces – 76 1/2” STUDS
- E – 5 pieces of 2×4 lumber – 9”, 5 pieces of 10 1/4”, 3 pieces – 39”, 2 pieces – 53” CRIPPLE STUDS
- F – 14 sheets of 5/8” T1-11 – 48×96” SIDING
- shed hinges + latch
- 2 1/2″ screws, 3″ screws, 1 5/8″ screws, 4d nails
- construction glue
- joist hanger
- structural nails for ties
Tools
- Miter saw
- Circular saw
- Drill machinery, drill bits
- Safety gloves, glasses
- Chalk line, tape measure, spirit level, carpentry pencil
Tips
- Pre-drill holes in the wooden components, before driving in the screws
- Check the corners for squareness, using a corner square
Related
- Part 1: How to build a 12×16 shed
- Part 2: How to build a roof fora a 12×16 shed
- Part 3: How to build double shed doors
Building a large shed
Building a 12×16 shed will add value to any property and make your life a lot easier. Having a beautiful construction in your garden with lots of storage space doesn’t have to be an expensive wish, as you can get the job done by yourself easily.
How to build a 12×16 shed
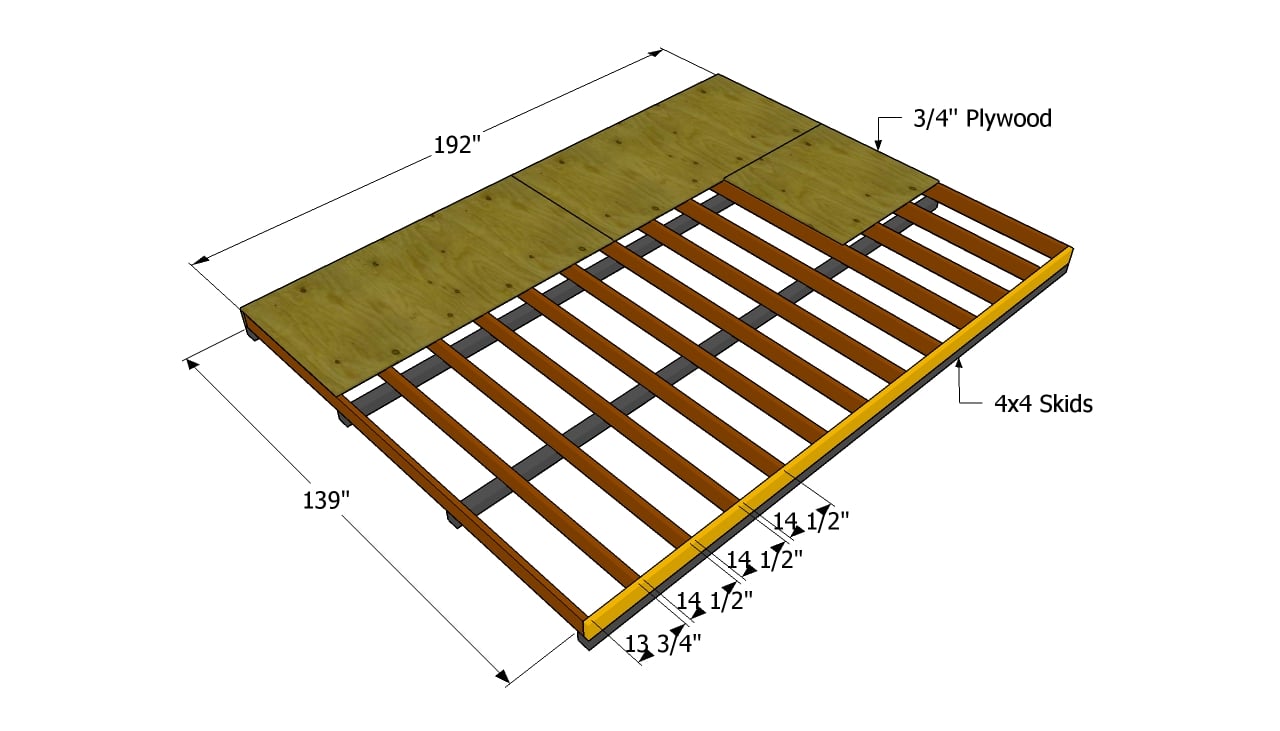
Building the floor of the shed
First, build the base of the shed. In order to get a durable storage construction, we recommend you to place the joists on several 4×4 skids. Build the floor frame out of 2×6 joists, making sure you place them equally spaced. Drill pilot holes trough the rim joists, before driving in the 3” screws.

Wall with window plans
Building the side wall with window is a complex job, provided you use the right plans. As you can notice in the image, you need to leave enough space to fit a 3×3′ shed window. In addition, the wooden studs should be spaced about 24” on center, to provide a good support.
Assemble the frames on a level surface. Check the corners for squareness every time to fit a wooden component.

Back wall plans
Building the plain back wall is a straight forward task, as you just have to fit the studs and drive 3” galvanized screws trough the plans. Use a tape measure to make sure all the studs are placed equally spaced. In addition, check the corners of the frame for squareness regularly, using a square.
Place 1/2” plywood pieces between the two studs placed at both ends of the frame, to increase the rigidity of the shed.

Side wall plans
Similarly, the other side of the shed should be built in the same manner. Therefore, pay attention to the blueprints and use the right materials to get the job done as a professional. Make sure the ends of the to plate stick out 3 1/2” on both sides of the wall. Use a good circular saw to make the cuts, after measuring the components several times.

Wall with door plans
Continue the project by installing the front wall of the 12×16 shed. In order to have a proper access to the shed, you need to frame a large door opening. In addition, fit a double header and cripple studs to provide extra-support to the frame. Adjust the width of the opening, according to your needs.

Installing the shed walls
After building the wall frames, you should attach them into place properly. As you can see in the plans, you need to lay the walls on the floor and make sure they are flush with the edges. Use 2×4 braces to lock the frames into place, after plumbing them with a spirit level.
Drive in 3 1/2” screws trough the plates into the joists. Next, fit the side walls and lock them into place in the same manner.

Installing the wall frames
After fitting the wall frames on top of the floor, you need to make sure they are perfectly plumb. Use a spirit level to set the wall frames properly. In addition, drive in 3” screws trough the overhang of the plates in the adjacent walls. If you want something smaller, check out these plans for a 10×14 gable shed.
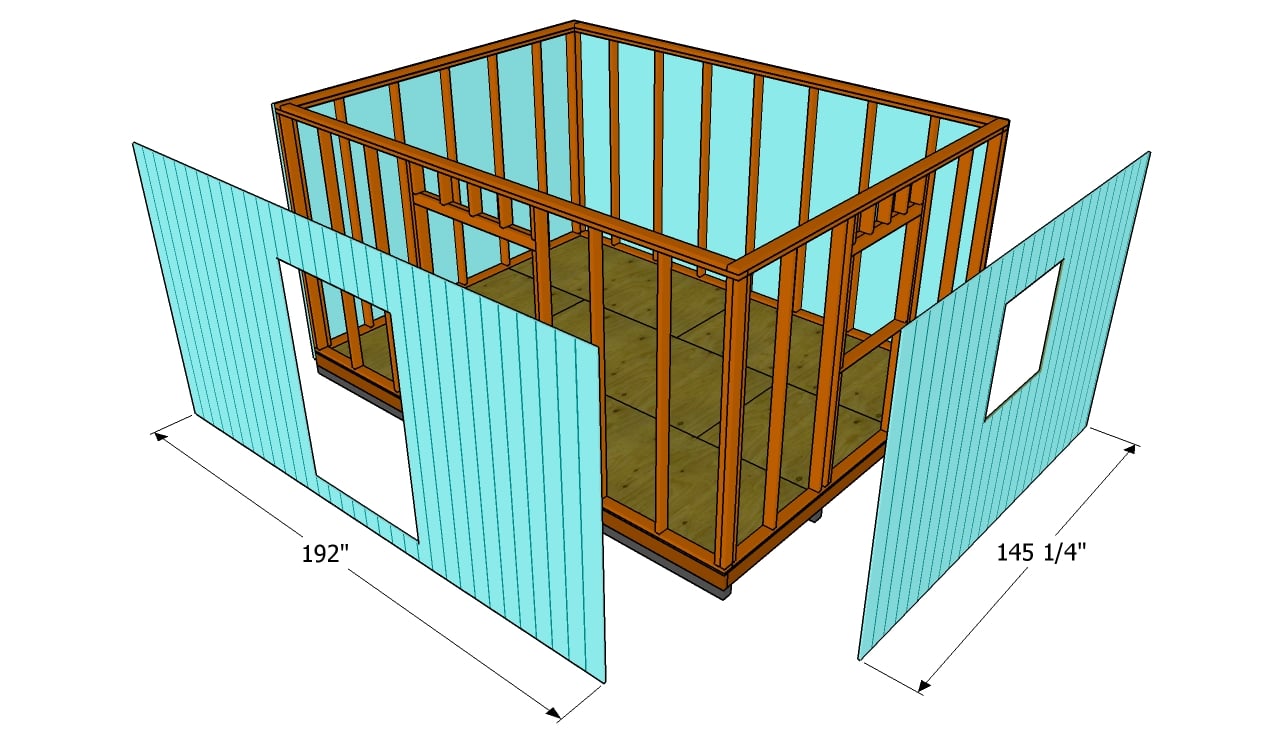
Attaching the exterior siding
Last but not last, you have to attach the exterior siding. Therefore, use 5/8” grooved plywood (T1-11 siding), as the sheets are weather-resistant and have a nice appearance. Drive in 4d nails trough the siding into the studs, every 6”. Make sure you check out the rest of my shed designs, from firewood sheds to barn shed, HERE. Check out my new 12×16 shed plans HERE.
Thank you for reading our article about how to build a 12×16 shed and we recommend you to check out the rest of our projects. Don’t forget to share our projects with your friends, by using the social media widgets.
<< Previous | Next >>
EXPLORE MORE IDEAS:






31 comments
I didn’t see it in your instructions. Is the weight of the shed sufficient to hold it in place without the need for anchors in windy areas?
Home Depot says you don’t need them. The sheds they sell and install in my area are not anchored, but other sources say one should anchor them.
What’s your opinion?
If you live in a very windy area, using the anchors can’t harm. But probably the guys from HD know what they are talking about, so at the end of the day is your choice.
Very interesting and straightforward plans. I may have missed it, but I didn’t see anything about doing the side window that’s shown.
The plans show you how to frame the wall opening for the window. You have to buy a window. A 35.5″ x 35.5″ PVC window will be ideal for the project.
I’m actually gonna use these plans to build a tiny tea parlor. It will have 8 windows, 4 consecutively. they are bout 2foot by 4foot each. could you tell me how I would correctly butt these us against each other. also. the front door will be a glass door. but I’m using a used door so there is no door jam. can I buy one or is it easy to build one? one more thing. id like to offset the front wall a bit to create a 4’x8 porch. do I basically just add a small side wall? obviously I’m a girl and ive never built a shed. Thanks for any advice
Considering the distance between the studs is 22 1/2″, then you would have to change their position, having in mind that you need to fit one stud between the windows, so you can hang them to the framing. Regarding the door, you should buy the jamb but make sure it will fit inside the opening first. This shed is 12×16, so if you want a 4×8 porch it would mean to recess just a corner. It is a significant modification and without any prior experience in the field I recommend you to stick to minor changes or just ask the help of the professional.
I like these plans but I have a question about the stud length. You list the studs as 90″. When you add this to the thickness of the bottom and top plates the overall wall height is 94.5″. Is there a reason for this rather than 96″? Thanks for posting these plans.
You can adjust the size of the studs to suit your needs, so you can make the overall wall height at 96″.
After following these plans to completely build the shed how much do you think you spent? Trying to decide how much money we will save building our own.
Thanks
$1000 to $1500, probably. Usually is half the cost of what a 12×16 shed is retailed for.
These are great plans. I didn’t see anything added about hurricane clips. Here in Florida, we have to have clips. That was the only other added expense. At this point, I have 1300 in the shed. They are 3k in my area for the same thing.
Thanks for the feedback. Looking forward to seeing your project completed.
The ground I’m buiding this on is sloped, so I will need to put it on 4×4 posts to keep it level (notched and bolted to the rim joists)–4×4 skids won’t do. What size lumber should I be using for the (1) joists and (2) rim joists? What spacing should I use between the posts? Thanks.
I recommend you to check the local building codes first. I would use 2×6 lumber and larger for the joists and I would place the 4×4 posts about every 3′.
I was thinking about using this plan, but I was wondering if it would still work if I put two of these together to make it a 12’x32′ with a 4′ porch. So, 12’x36′ finished. Any suggestion on how to do this or if it would even work. Thanks you.
If you go larger, definitely put it on a slab. Even at 12×16 it should be on a slab. Otherwise, unless you’re really good at footings, it’s going to start sagging and moving.
It would work, but I would personally frame the floor in one section.
Thank you for these plans. I would love to build it but where are the plans for the roof?
Here: http://howtospecialist.com/outdoor/shed/how-to-build-a-roof-for-a-12×16-shed/ You have the NEXT button at the bottom of my articles.
These plans seem to be very well laid out and very helpful with the provided measurements and illustrations.
Maybe I am missing something, but are the 13 floor joists supposed to be 141″ and not 139″..?
Wouldn’t this make the floor 192″ x 142″ (including the 3″ width of the outer 2x6x16 (139″ + 3″)..?
The side wall top plate shows 144″.
Thank You
Do you have any plans to show a plan like this for something like a 12×30 buidling? I only have 15 ft i can go wide but 40 ft i can go back.
No. I only have 12×24 shed plans here: http://myoutdoorplans.com/shed/12×24-shed-plans/
Is there a download to these plans in PDF format?
Yes. Please read the FAQs: http://howtospecialist.com/faq/
Would the 12×16 shed floor support two 4-wheelers? They are 500 to 600 lbs each. Plus the weight of other storage items. I want the shed to be movable so need a wood floor.
I will also be putting a door on the gable end big enough for the wheelers to get through.
I would use 2x10s or even 2×12 for the joists.
Can you put a material list together instead of having to go by the cut list? Also, if you want to make it 20ft instead of 16ft do you buy a 16ft and just put mending plates or nail plates for the remaining 4ft on the 4×4 and 2×6?
If you want a material list, you should check my other plans here: http://howtospecialist.com/outdoor/shed/free-12×16-garden-shed-plans/ For a 12×20 shed, you should take a look here: http://howtospecialist.com/outdoor/shed/12×20-shed-plans-free/
With standard construction and all other shed plans I have seen placing studs at 16″ centers, why did you go with 24″ centers (other than the obvious cost reduction)? It doesn’t seem that this would pass code or provide the expected strength. You also only have (3) 4×4″ skids as opposed to the (4) that all other plans I have seen use.
I will be using this 12×16 shed for an office and drum recording studio in SoCal. The lot is not level. The shed is placed perpendicular to the slope. The low side is supported by a 4×4 under the bottom plate which will get pavers installed under it (the 4×4). Curious what size lumber you would suggest for the frame. and what size and how many 4×4’s or 6×6′ to build the modified post and beam frame support. The high side (right side of the shed is about 3.5 feet above grade (thinking 10″ sonatube piers 33″ deep/ four piers/ 12 to 24 ” in from either end and the remaining two will be spaced evenly between the end piers) but I am of course open to suggestions. Thank you for the great plans :)
I bought a 12×16 building now I want to put it on a frame. Got any ideas. Please help