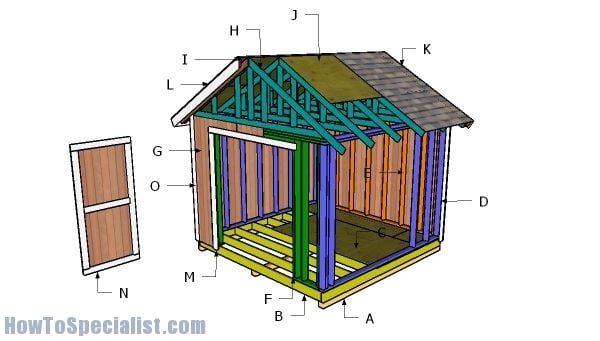
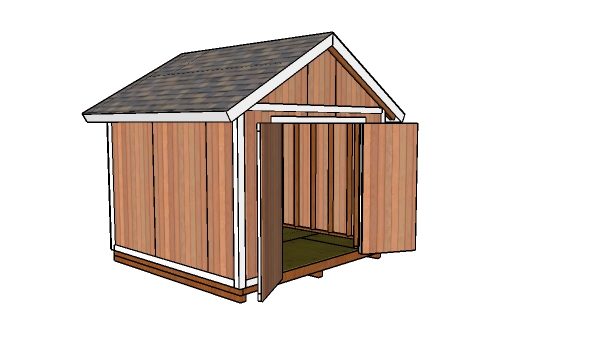
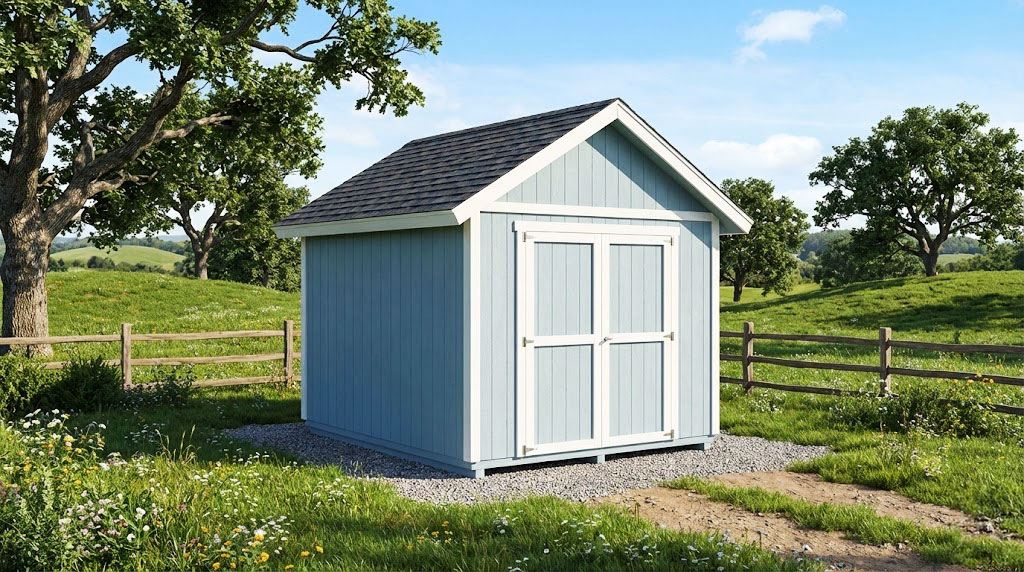
This step by step diy woodworking project is about 10x10 shed plans. If you are a homeowner like me, you probably know how tough it is to organize all the tools, bicycles, skis and all other small toys we all want and have. This storage shed is compact but still roomy enough to shelter all your items. Remember that you need to read the local building codes before starting the construction, so you comply with the legal requirements. See my other shed plans HERE. Premium Plans available in the SHOP.
Fit the door inside the opening and lock it to the 1×4 jambs with metal hinges. After you check if the door opens properly, you should install the hinges, as well as a strong latch. Work with attention and with great attention, if you want to get the job done as a professional and to prevent costly mistakes. Last but not least, apply a few coats of exterior paint to enhance the look of the shed and to protect the components from decay. See HERE how to build double shed doors. See all my Premium Plans in the Shop.
Made from this plan
10×10 Shed Plans
Building a 10×10 gable shed
Materials
Tools
- Safety gloves, glasses
- Miter saw, jigsaw
- Chalk line, tape measure, spirit level, carpentry pencil
- Drill machinery and drill bits
Time
- One Day
Related
10×10 DIY Shed Plans
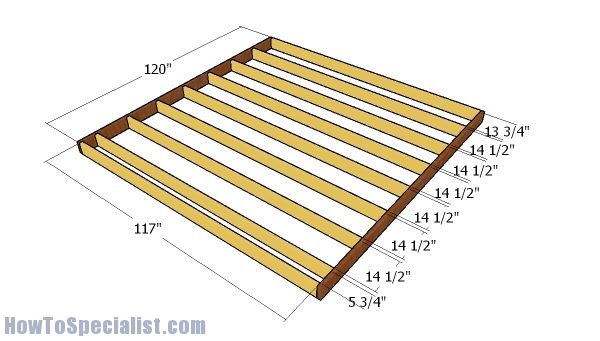
Building the floor frame
The first step of this step by step shed guide is to make the floor frame. Therefore, you need to cut the joists from 2×6 lumber at the dimensions shown in the diagram. Lay the joists on a level surface and then fit them every 16″ on center. Make sure the edges are flush and check if the corners are square. Drill pilot holes through the rim joists and insert 3 1/2″ screws into the joists.
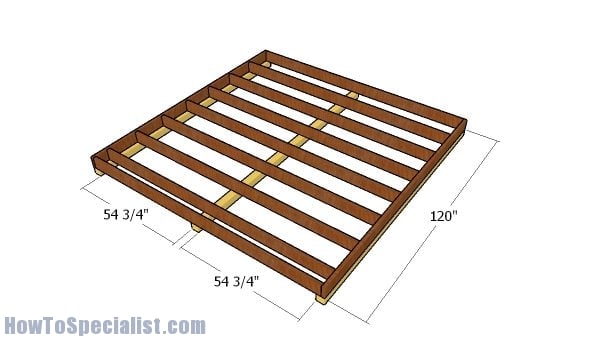
Fitting the skids
Next, you need to select the final location for the gable storage shed. Level the ground evenly and then compact a thick layer of gravel. Lay the 4×4 skids into place and the fit the floor frame. Use a spirit level to make sure the frame is horizontal. Toenail the frame to the skids or you could use rafter ties. The skids will raise the floor frame from the ground for a couple of inches, thus protecting the components from moisture.
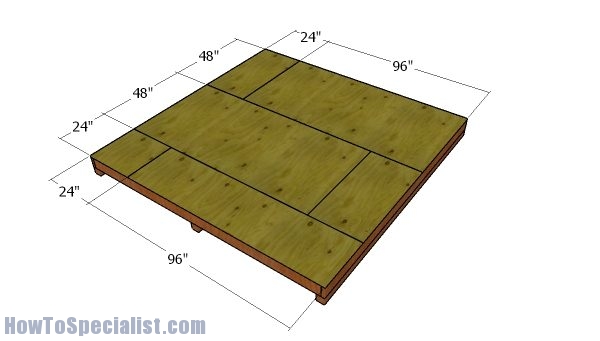
Fitting the floor sheets
Lay the 3/4″ plywood sheets to the floor frame and align the edges flush. Leave no gaps between the components and insert 1 5/8″ screws every 8″ along the joists.
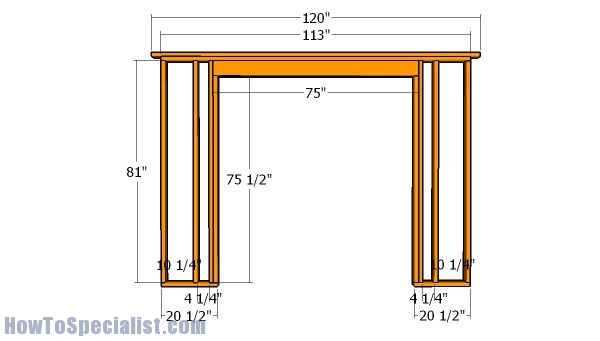
Front wall – Frame
Continue the 10×10 shed project by assembling the front wall. You need to use 2×4 lumber for the studs and plates, while the double header is made from 2×6 lumber and 1/2″ plywood. Drill pilot holes through the 2×6 beams and insert 2 1/2″ screws into the plywood, on both sides of the double header. Toenail the header to the front of the wall frame, as shown in the free plans.
You can adjust the height of the wall frames so it suits your needs. Drill pilot holes through the plates and insert 3 1/2″ screws into the studs .
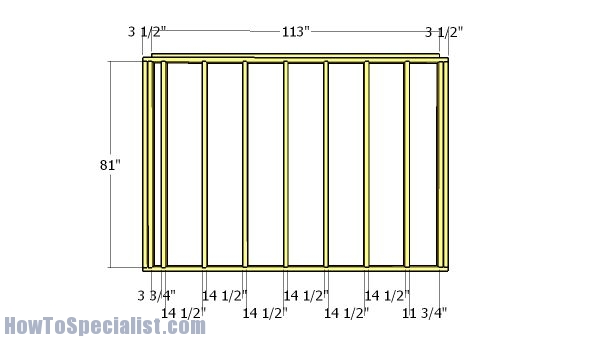
Back wall – Frame
Assemble the back wall for the storage shed from 2×4 lumber. Place the studs every 16″ or 24″ on center. Drill pilot holes through the plates and insert 3 1/2″ screws into the studs. Align the edges flush and make sure the corners are square.
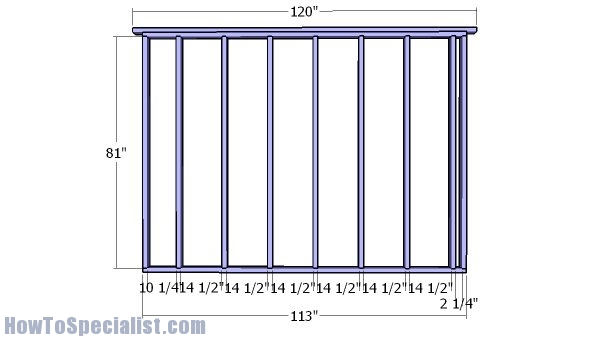
Side wall – Frame
The next step of the shed project is to build the side wall frames. Use 2×4 lumber for the components and then lay them on a level surface. Drill pilot holes through the plates and insert 3 1/2″” screws into the studs.
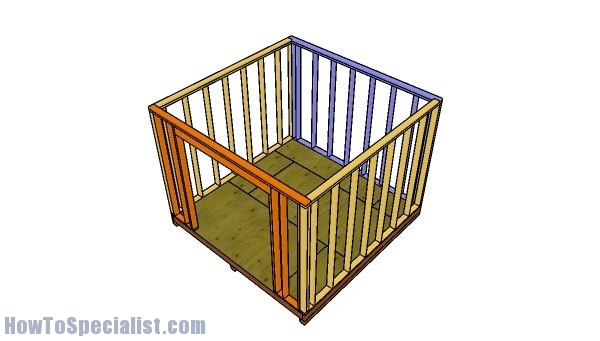
Assembling the shed frame
After assembling the 4 wall frames you need to lift and lay them over the floor. Align the edges flush and use a spirit level to make sure the wall frames are plumb. Drill pilot holes through the bottom plates and insert 3 1/2″ screws into the floor. Moreover, you need to lock the adjacent walls together tightly by using 3 1/2″ screws.
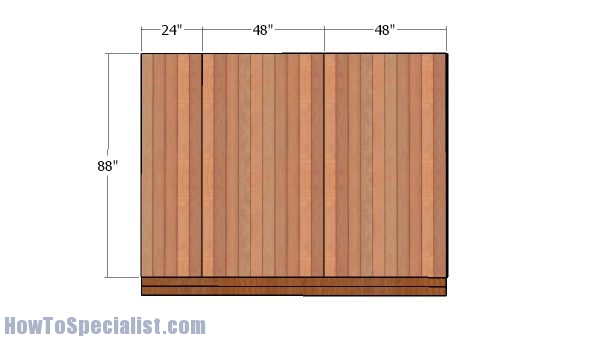
Side wall – siding
Fit the T1-11 siding sheets to the back and side walls of the shed. Cut the sheets as shown in the diagram and then align them to the wall framing. Use 6-8d nails to secure the sheets into place tightly. Insert the nails every 8″ along the framing.
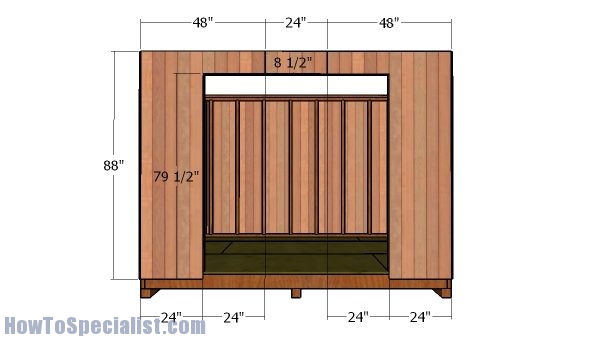
Front wall – Siding
For the front wall, you need to make cuts so the panels fit around the door opening. Mark the cut lines on the panels and then get the job done with a circular saw. Smooth the edges flush and secure the sheets into place with 6-8d nails.
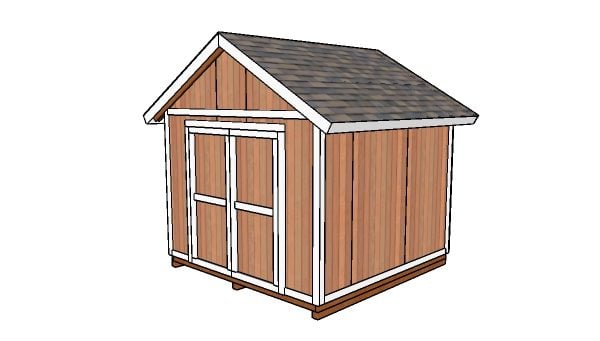
10×10 shed – Free DIY Plans
If you like this shed project, you need to take a look over PART 2 and PART 3 of the shed, so you learn how to build the gable roof and the double front doors.
10×10 shed plans
I have designed this 10×10 gable shed because I am a homeowner myself and I know how much more storage space we need every year. Moreover, if you have some hobbies (woodworking, bicycles and so on) you add up to the need for proper storage space. This 10×10 shed is compact but also roomy enough for the needs of a modern family. If you like my project, don’t forget to SHARE it on Facebook and Pinterest.
If you want to download the plans. just click on the GET PREMIUM PLANS button bellow.

Thank you for reading our project about free 10×10 gable shed plans and I recommend you to check out the rest of the projects. Don’t forget to LIKE and SHARE our projects with your friends, by using the social media widgets. SUBSCRIBE to be the first that gets our latest projects.
<< Previous | Next >>
16 comments
why do you use 2×6 on the floor joists instead of 2x4s? Just curious
Because the 2x4s will bend under the weight of the structure. The 2x6s are much more rigid and you can store heavy items on the floor shed.
This Is Great! Thanks for taking the time to make this!
You’re welcome. I’m glad it helps!
What’s the interior height of the shed? Looking to build a sturdy shed for a home gym and need a minimum 9’ interior height.
It’s 7 ft high, because we have bottom rafters for the trusses.
I found these instructions to be very helpful. There is one omission that slowed me down. The door header calls for a piece of 1/2″ playwood. I didn’t see 1/2″ plywood on the materials list, just 3/4″.
Thanks. I’ve added that to the list. Looking forward to seeing your shed. It would be great if you took pics during the built. That would be very helpful for other builders
what is the height from peek to floor? we live in a HOA community and can’t go over 8 1/2ft height?
It’s 10 ft
Hi,
Possible typo. On the side wall stud spacing, the right-most “gap” measurement reads 11 3/4″ but I keep getting 12 3/4″. Or I’m off on my Visio skills. (I’ve got to start learning Sketchup!)
Thanks for this page! It’s a real inspiration and I’m so grateful for it.
Regards,
Jim
That’s because you don’t add up the 1/2″ gap that is between both double studs. 2×1/2″ and that’s how you have the 11 3/4″
Just curious, did you install some sort of soffit once it was complete? I love this plan and I will be building it once the ground thaws! Thanks for making this
Side note:
Your illustrations show the flooring plywood running parallel to the floor joist. They should run perpendicular to the joists for strength.
Also, I didn’t notice any exterior trim boards.
Seems like a waste of 3/4” ply for one 24+24
Is there a wind rating on these shed plans?