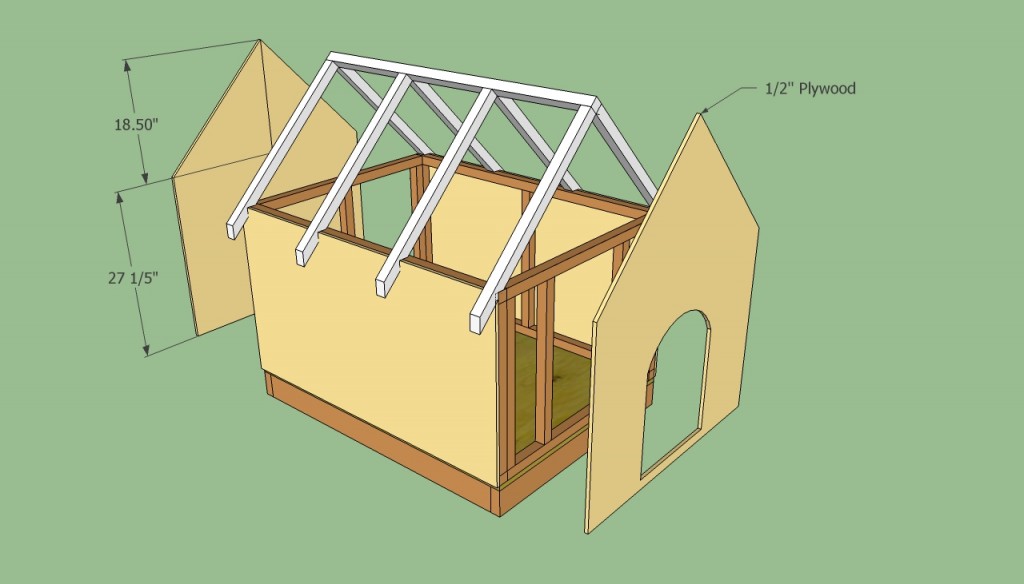
This diy step by step article is about dog house plans free. Building a dog house is a fun project, as it is a great opportunity to use several woodworking techniques, while constructing something useful and decorative. As you probably know, you can choose from many designs, sizes and shapes, therefore you should select the plans that fit your needs and tastes perfectly. In this article, we show you how to build a small dog house, made from 2×2 wooden studs and 1/2” plywood, along with all the materials, tools and techniques needed to get the job done in a professional manner. Although you can also buy a doghouse kit, you can save a significant amount of money, if you choose to undertake the project by yourself.
Determining the size of the dog house is tricky, in most of the cases, therefore we recommend you to study this problem thoroughly from the very beginning. Basically, you should design the dog house, making sure there is enough room for your dog to turn around and sit properly. Therefore, if you use the wrong plans free, the dog house might be too small or too large for your needs.
You have to remember that the pressure treated lumber is treated with toxic substances that might harm the animals that come in contact with it. Therefore, you should use lumber that is not treated with these kind of substances, when building the frame and the walls of the doghouse. This aspect is essential, therefore read carefully the specifications of the wood you buy, as to avoid any potential issues.
Made from this plan
In order to build a dog house, you need the following:
Materials
- 2×2 pressure treated lumber
- 2”, 4” nails / screws
- 1/2” and 3/4 plywood
- Asphalt shingles
Tools
- Safety gloves, glasses
- Circular saw
- Hammer, spirit level, carpentry pencil
Tips
- Measure attentively the lumber, before making the cuts
- Toenail the side panels to the floor, in order to get a rigid structure
Time
- One weekend
Dog house plans free
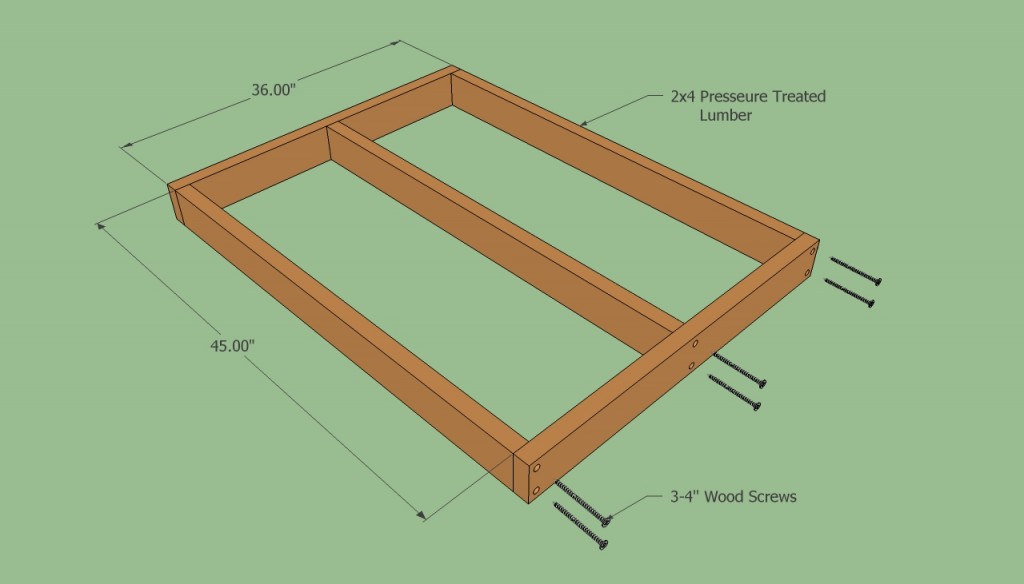
Dog house base plans
First of all, we have to build the base of the dog house. Therefore, you have to cut 3 joists ( 45” long – 2×4 pressure treated lumber) and 2 beams (36” long – 2×4). Align the components properly and use a framing square to make sure the corners are right-angled.
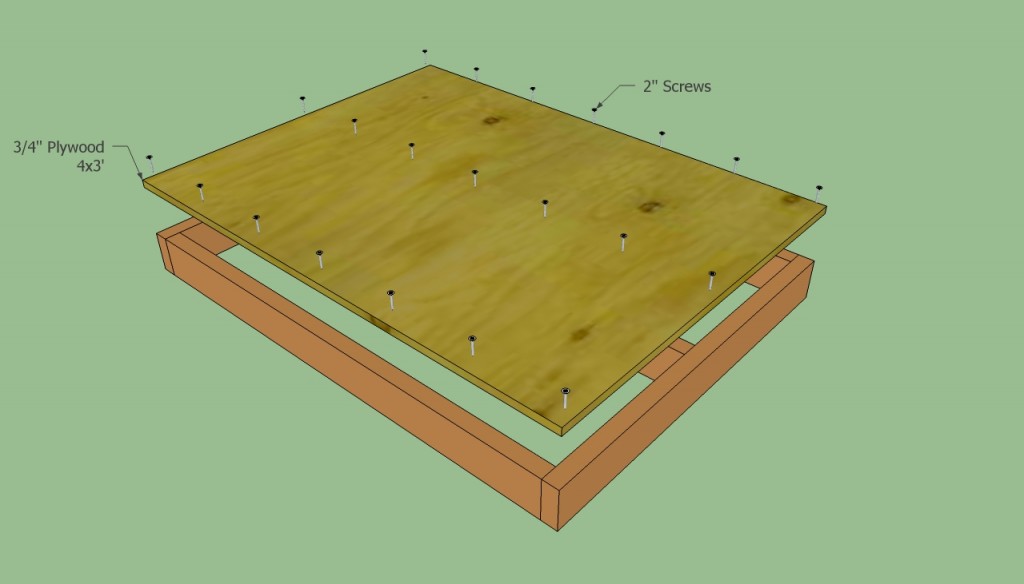
Building the base of the dog house
Next, you have to attach the flooring of the dog house, as in the image. Cut a 3×4′ rectangle from 1/2 – 3/4” thick plywood and install it over the frame. Insert 2” screws every 10”, or drive in nails with a nail gun.
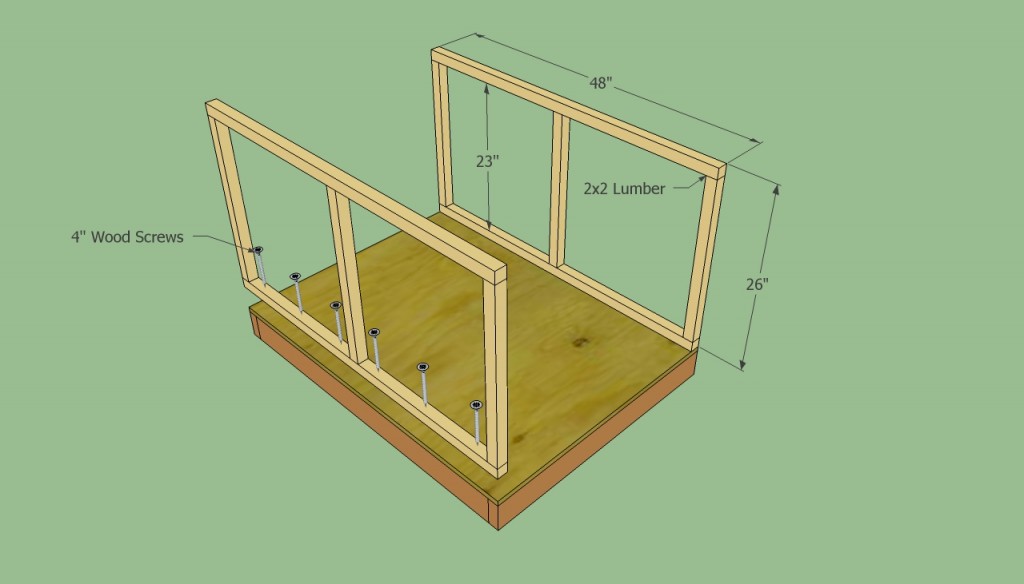
Installing the side walls
Build the side walls of the wooden dog house, using 2×2 lumber, as in the image. Measure and cut the components with a circular saw, before building the frames. If you want to obtain a rigid structure, you should also install a center 2×2 stud.
After you have build the side walls, you should attach them into position, by inserting several 4” screws. Plumb the frames with a spirit level, before driving in the nails.

Dog house entrance plans
Continue the project by building the front and rear ends according to our free plans, from 2x2s. Install the frames into position by inserting 4” screws through the bottom plates.
As you can notice in the image, you should place two studs in the frame of the front end. The distance between these studs represents the actual opening of the entrance, therefore make sure your dog passes through easily.
Dog house roof plans
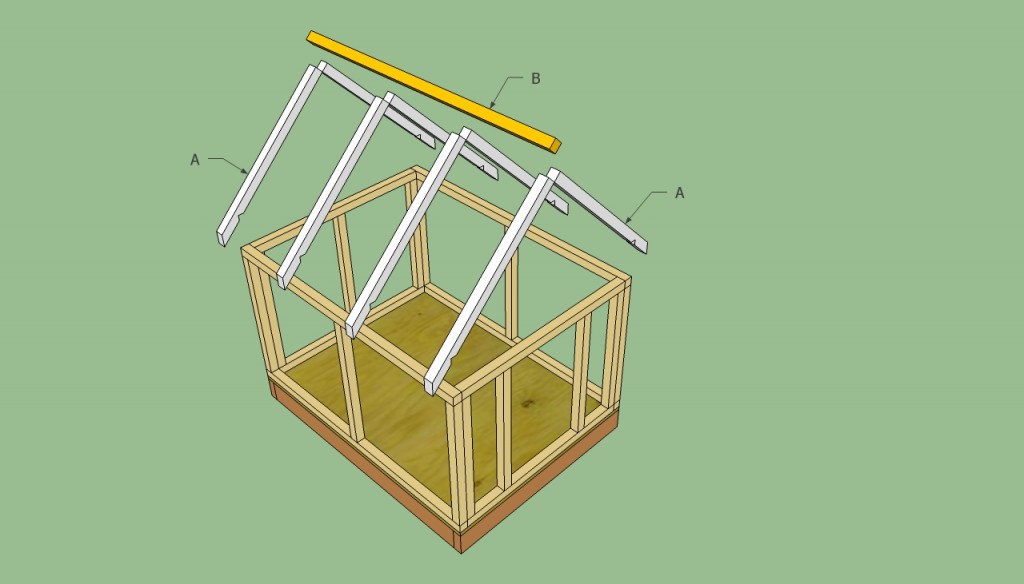
Next, you should construct the roof of the dog house. From design and efficiency considerations, we recommend you to build a 45º roof. Therefore cut the rafters and the ridge at the needed dimensions and install them into place as in the image.
Cut the ends of the rafters at 45º, to facilitate the installation of the fascia. Plumb the rafters and insert 4” screws trough them in the top plates.
Dog house roof elements
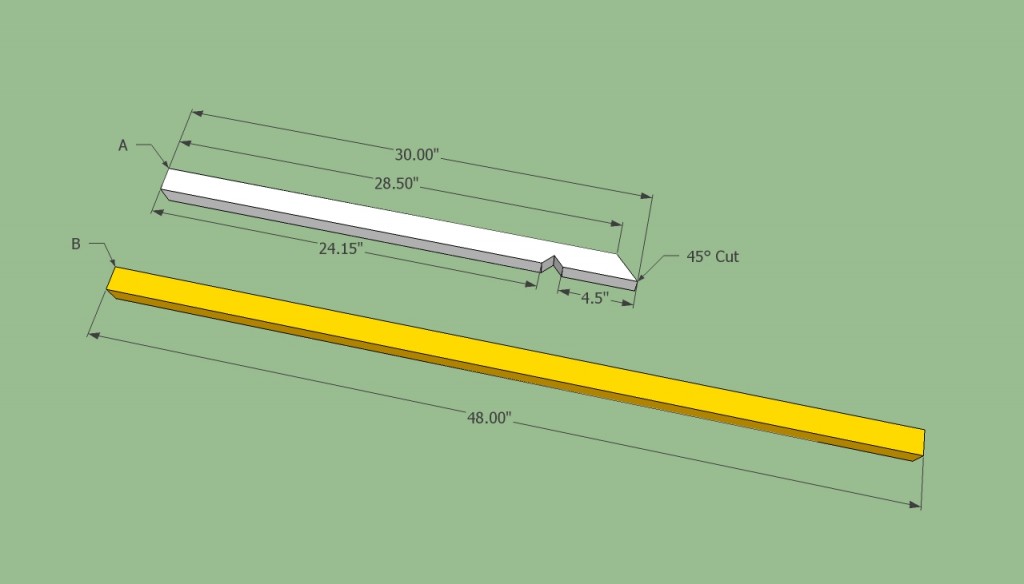
Building the components of the roof is easy if you follow or step by step guide and cut the rafters at the right size. In order to cut the notches of the rafters, you have to use the corners of the doghouse, as template.
After cutting the first two rafters, you should ensure they fit perfectly into place. Otherwise, you need to make a few adjustments before building the rest of them.
Free doghouse plans
Use 1/2” plywood to build the exterior components of the walls. This process is straight forward, as you should measure attentively the sides and the front end of the dog house, before making the cuts with a jigsaw.
As you can see in the image, you have to cut the entrance in a nice shape. Just draw the contour of the entrance, drill a starting hole and cut along the lines with a jigsaw.
Dog house plans free
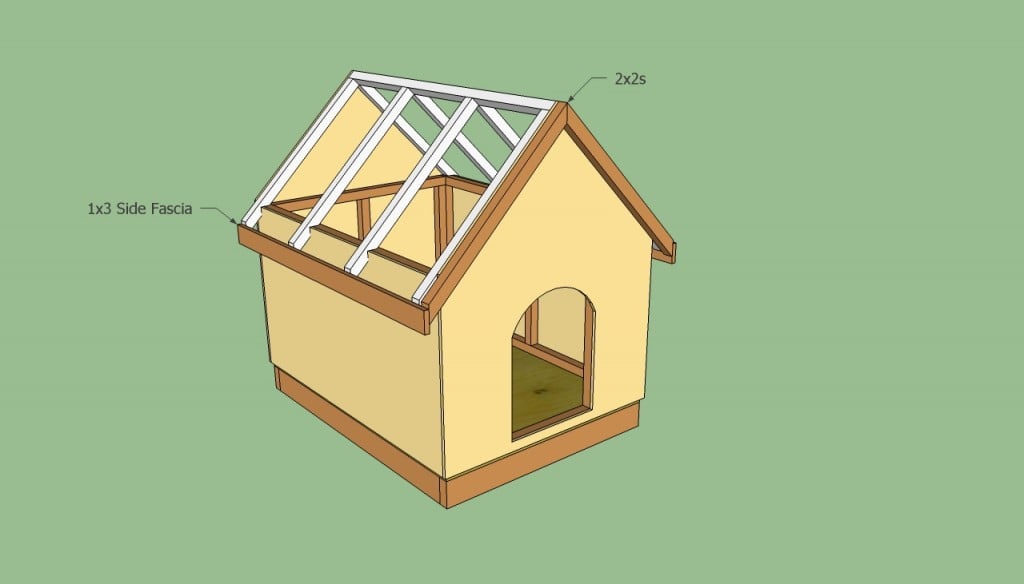
Install the 1×3 fascia along the rafters with finishing nails. As you can see in the image, the roof of the doghouse should overhang at least 2” on the front and back of the construction, therefore install another pair of rafters (or 2 on each side) to the front and back ends.
Attaching plywood to the roof
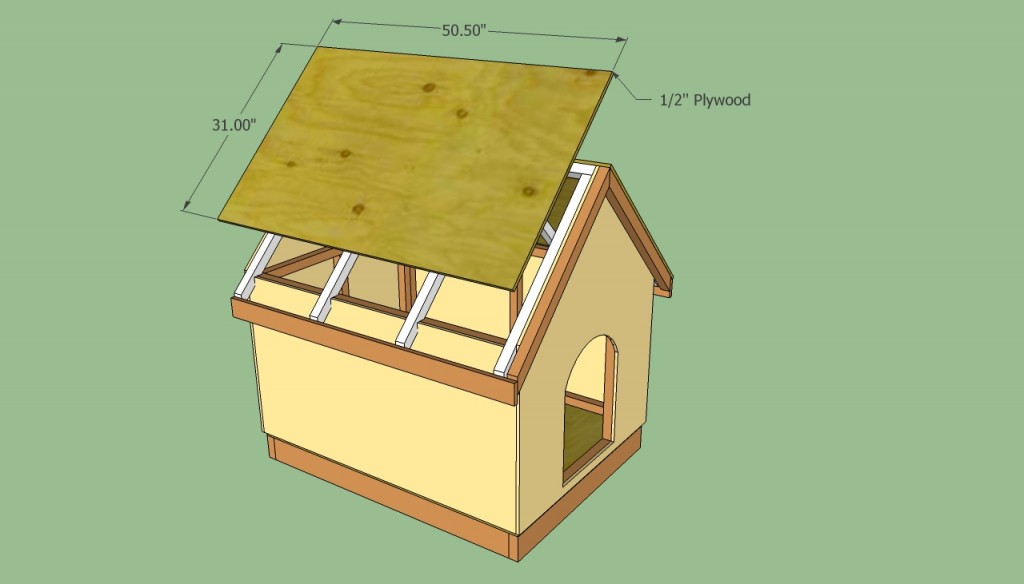
Next, you have to cut two sheets of 1/2 plywood and install them into place. Drive in 2” screws or nails through the plywood sheets every 10” along each rafter and in the ridge.
Work with great care, making sure you align the roofing sheets properly, before securing them into place with screws / nails. Fill the gaps between the top plate and the roof by installing several pieces of plywood.
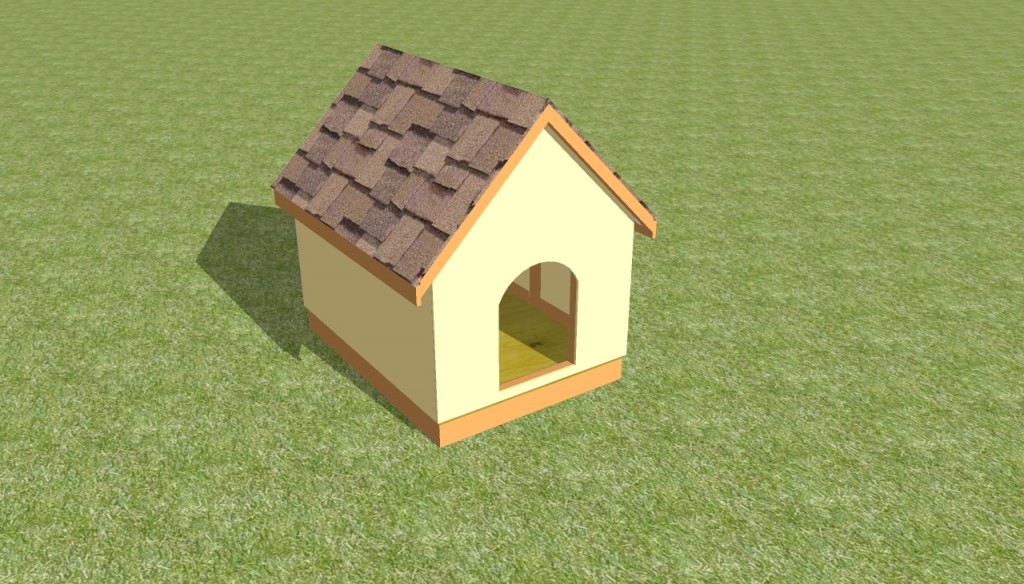
Free dog house plans
Install the asphalt shingles on the roof of the dog house, starting with the bottom. Use a chalk line to draw several horizontal lines, to serve you as guidelines, when installing the shingles.Nail the shingles into place with appropriate nails.
Don’t forget that the asphalt shingles should overhang at least 1” on all directions, to drain the water properly. Cut single shingles and install them over the ridge of the roof.
Thank you for reading our article about dog house plans free and we recommend you to check out the rest of our projects. Don’t forget to share our articles with your friends, by using the social media widgets.

