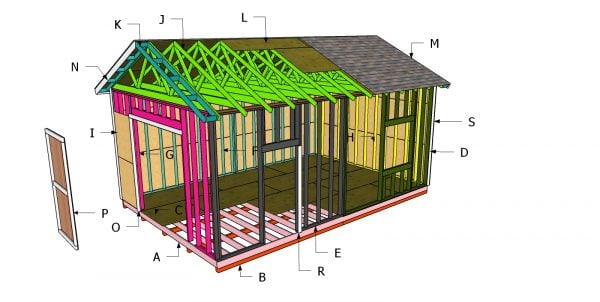
This step by step woodworking project is about free 16×24 gable shed roof plans. This is PART 2 of the large shed project, where I show you how to build the gable shaped roof and how to make the double doors. Check out the rest of the projects for detailed instructions on how to make the frame for the shed. Read the local codes and make sure you comply with the regulations. See my other DIY projects HERE.
We recommend you to invest in the best materials you could afford. Therefore, you should buy weather-resistant lumber, such as pine or cedar. Always take accurate measurements before adjusting the size of the components at the proper size. Drill pilot holes trough the components before inserting the wood screws, to prevent the wood from splitting. See all my Premium Plans HERE.
Made from this plan
16×24 Gable Roof Plans
Building a 16×24 shed
Materials
- I – 4 pieces of 1/2″ OSB – 48″x48″ long, 8 pieces – 48″x96″ long, 4 pieces – 24″x52 3/4″ long, SIDING
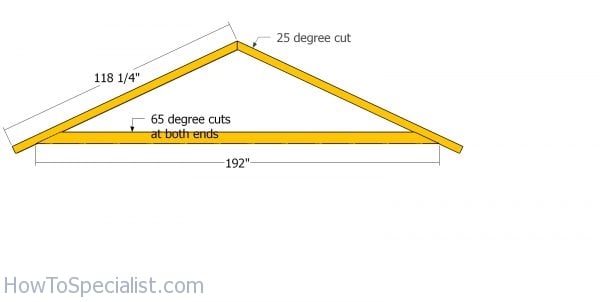
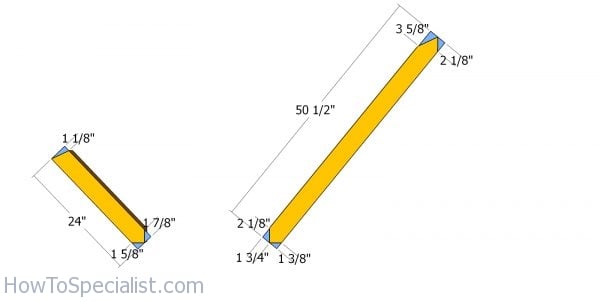
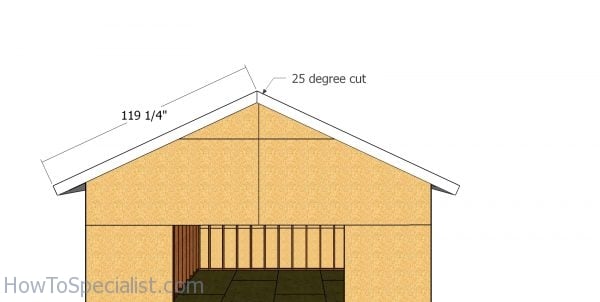
- J – 2 pieces of 2×4 lumber – 118 1/4″ long, 2 pieces – 24″ long, 2 piece – 50 1/2″ long, 1 piece of 2×6 lumber – 192″long, 13xTRUSSES
- K – 4 pieces of 2×4 lumber – 118 1/4″ long, 5 pieces – 8 1/2″long 2xOVERHANG
- L – 8 pieces of 1/2″ plywood – 48″x96″ long, 4 pieces – 48″x84″ long, 4 pieces – 36″x48″ long, 4 pieces – 22 1/4″x96″ long, 2 pieces – 22 1/4″x36″ long, 2 pieces – 22 1/4″x84″ long ROOF
- M – 550 sq ft of tar paper, 550 sq ft of asphalt shingles ROOFING
- N – 4 pieces of 1×6 lumber – 119 1/4″ long, 4 pieces – 108″ long, 2 pieces – 96″ long TRIMS
- O – 2 pieces of 2×4 lumber – 96″ long, 1 piece – 103″ long JAMBS
- P – 1 piece of T1-11 siding – 4’x8′ long, 2 pieces of 2×4 lumber – 89″ long, 2 pieces – 48″ long, 1 piece – 41″ long 2xDOOR
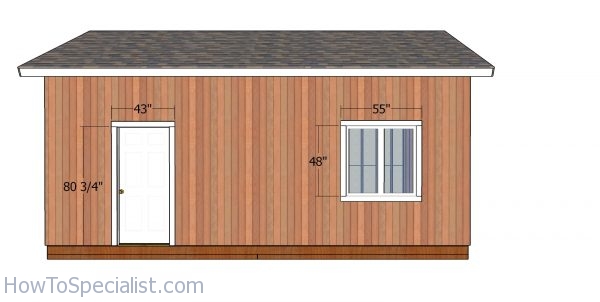
- R – 2 pieces of 1×4 lumber – 80 3/4″ long, 1 piece – 43″ long, 2 pieces – 48″ long, 2 pieces – 55″ long TRIMS
- S – 4 pieces of 1×4 lumber – 120″ long, 4 pieces – 119 1/4″ long TRIMS
- 13 pieces of 2×6 lumber – 16′
- 68 pieces of 2×4 lumber – 10′
- 8 pieces of 1×6 lumber – 10′
- 2 pieces of 1×6 lumber – 8′
- 18 pieces of 1/2″ plywood – 4’x8′
- 6 pieces of 1/2″ OSB – 4’x8′
- 2 pieces of T1-11 siding – 4’x8′
- 550 sq ft of tar paper, 550 sq ft of asphalt shingles
- 1 window – 4’x4′
- 12 pieces of 1×4 lumber – 10′
- rafter ties
- 1 5/8″ screws, 2 1/2″ screws, 3 1/2″ screws
- 2″ nails
- wood filler , wood glue, stain/paint
- shed hinges
- shed storage system
- tie plate
- tie plate
- strong tie nails
Tools
- Safety gloves, glasses
- Miter saw, jigsaw
- Chalk line, tape measure, spirit level, carpentry pencil
- Drill machinery and drill bits
Time
- One Day
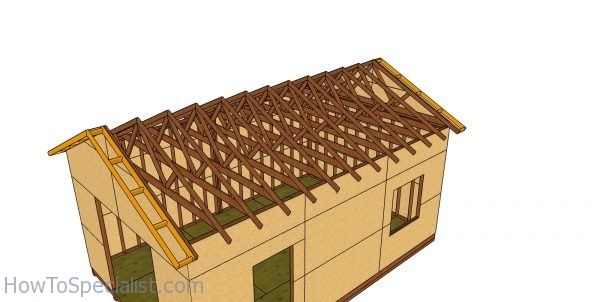
Building a gable roof for a 16×24 shed
Assembling the truss
The first step of the project is to build the rafters for the 16×24 gable shed roof. Use a miter saw to make the angle cuts to the rafters, as shown in the diagram. Use 2×4 lumber for the rafters. Use 2×6 lumber for the bottom rafter.
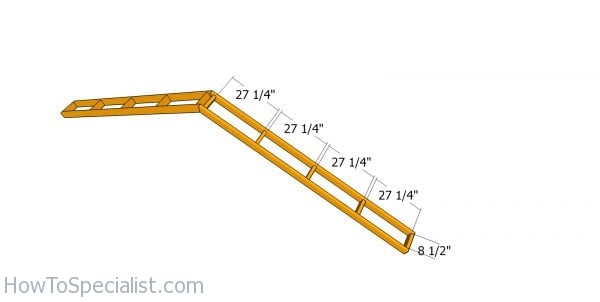
W truss supports – 16×24
Use 2×4 lumber for the W shaped supports. Mark the cut lines on the supports and get the job done with a circular saw.
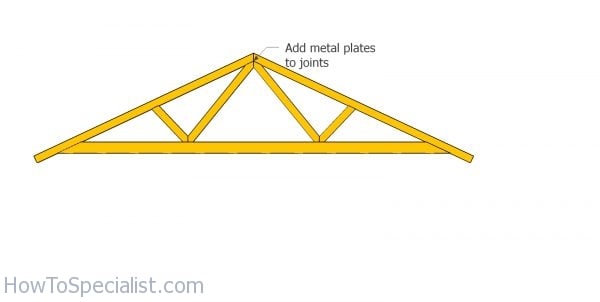
Assembling the w trusses to the 16×24 shed
Fit the supports to the trusses. Align the edges flush and leave no gaps between the components. Use strong tie plates to join the components together tightly.
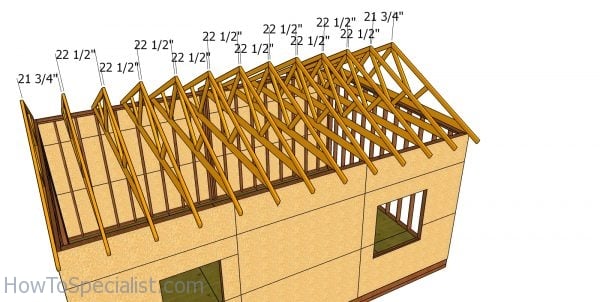
Fitting the trusses
Fit the trusses to the top of the storage shed. Place the trusses every 24″ on center and use a spirit level to plumb them. Use rafter ties to secure the rafters into place tightly.
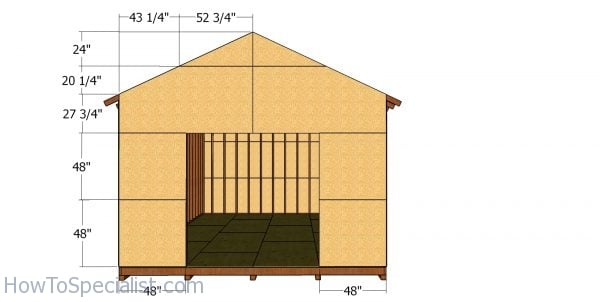
Front wall panels
Use 1/2″ OSB sheets to cover the front and the back of the storage shed. Align the edges flush and leave no gaps between the sheets. Insert 8d nails to secure the sheets into place tightly.
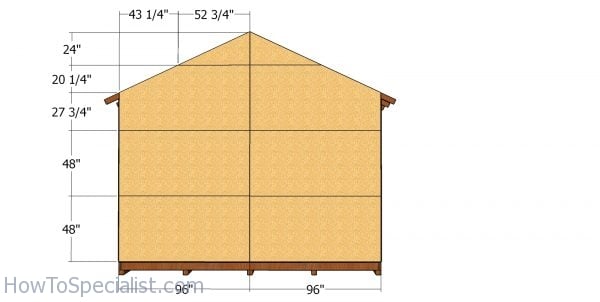
Back wall panels
Attach the OSB sheets to the back of the shed. Make the cuts to the sheets, so you can fit them along the gable roof.
Overhangs
Use 2×4 lumber for the overhangs. Drill pilot holes through the rafters and insert 3 1/2″ screws into the blockings.
Fitting overhangs – 16×24 shed
Fit the overhangs to the front and back of the shed. You can adjust the size of the overhangs by modifying the size of the blockings.
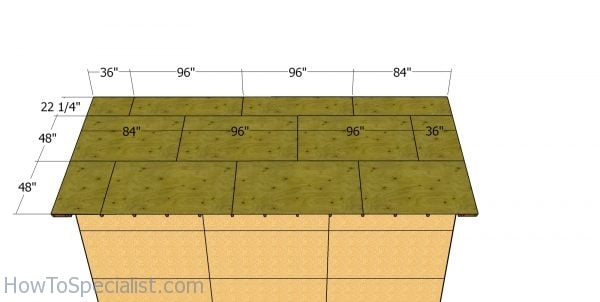
16×24 Shed Plans – roof sheets
The next step of the project is to attach the 1/2″ plywood sheets to the top of the roof. Align the edges flush and then lock them to the rafters, every 8″, using 1 5/8″ screws. Make sure you leave no gaps between the sheets for a nest result. You can use other patterns for laying the sheets, as well.
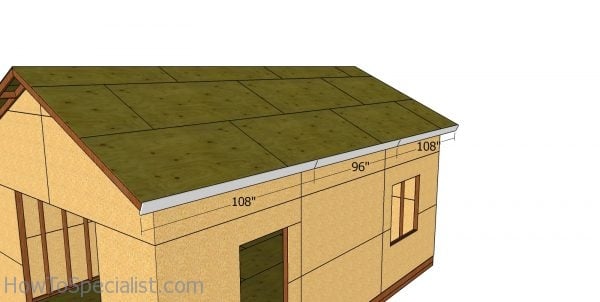
Side trims – 16×24 shed
Fit the 1×6 trims to the sides of the roof. Use 8d nails to lock the trims into place tightly.
Front and Back roof trims
Use 1×6 lumber for the front and back roof trims. Make 25 degree cuts to one end of the trims. Align the edges and insert 2″ nails to secure the trims into place tightly.
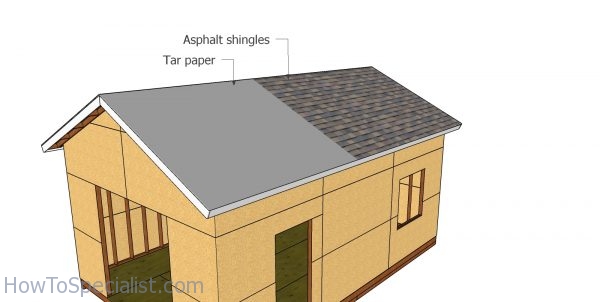
Fitting the roofing – 16×24 shed
The next step of the woodworking project is to cover the roof with felt. As you can see in the image, you need to make sure the strips of roofing felt overlap at least 2”. In addition, you have to lock the tar paper to the plywood sheets with staples. Next, you should install the shingles to the roof of the large shed. Start with the bottom of the roof, by fitting the first course, as in the image. Use roofing tacks to secure the shingles to the roofing sheets.
Start the first course with a full tab, the second with 2 1/2 tabs, the third with 2 tabs, the forth with 1 1/2 tabs, the fifth with 1 tab, the sixth with half tab and the seventh with a 3 tabs. Secure the shingles with roofing tacks.
Double door jambs
Use 2×4 lumber for the door jambs. Attach the trims around the opening and align the edges flush. Insert 2 1/2″ screws to lock the jambs into place tightly.
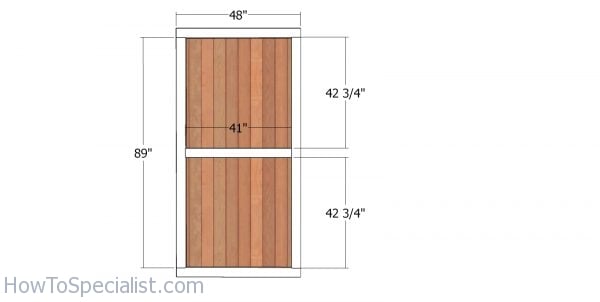
Building the shed door
Build the double doors from T1-11 siding and from 2×4 lumber. First, you need to assemble the door frame using pocket holes and 2 1/2″ screws. Make sure the corners are square and align the edges with attention. Fit the panels to the door frames and secure them into place with 2″ brad nails.
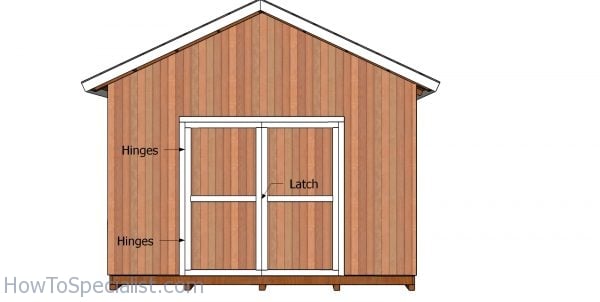
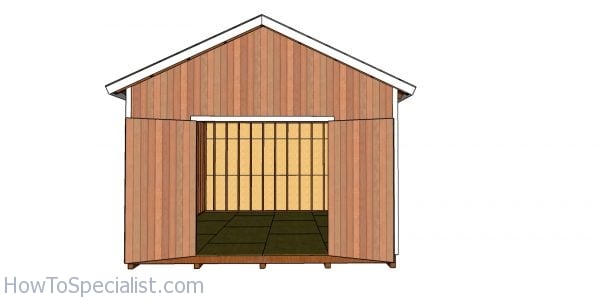
Fitting the double doors – 16×24 shed
Fit the doors to the opening and secure them to the jambs with hinges. Install a door latch so you can keep the shed locked up and your belongings safe.
Side door and window – shed installation
Fit the window and the side door into place.
Fitting the corner trims
Fit the 1×4 trims to the sides of the shed. Align the edges flush. Insert 8d nails to lock the trims to the walls. Install the siding sheets to the exterior of the shed. But first, you need to cover the shed with house wrap. You can choose from several types of siding.
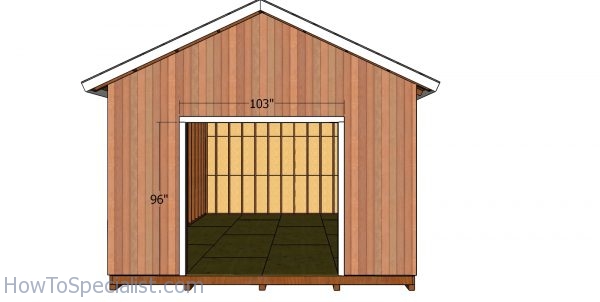
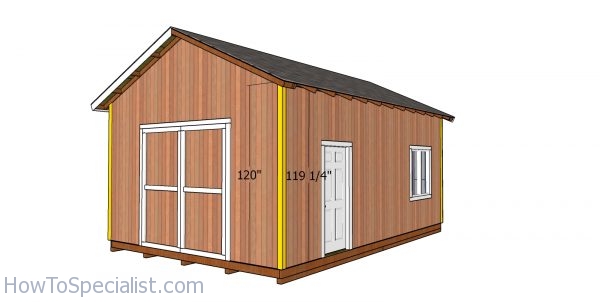
Front view – 16×24 Shed Plans
If you want to build the frame for this gable storage shed, you should check out PART 1 of the project. If you like my project, don’t forget to SHARE it on Facebook and Pinterest. Since you are already here, you might as well take a look over my 16×20 pole barn plans. A pole bars has numerous advantages over a shed framing, so that will be an useful read.
Thank you for reading our project about free 16×24 gable shed roof shed plans and I recommend you to check out the rest of the projects. Don’t forget to LIKE and SHARE our projects with your friends, by using the social media widgets. SUBSCRIBE to be the first that gets our latest projects.
<< Previous | Next >>
4 comments
Well,do not know yet how to comment,but I sure want to try and make this shed.I guessthe proper thing is to build it large enough to park a car for the winter.However I build dog houses for a hobby,thats the reason I will be building .However because of cost,I think I will go ahead and build the 16 X 24 size shed.Need room for saws and stock.Never done this before,but am willing to give it atry.Finances O.K. cause my pension money will cover costs.
That good to hear. I’m sure you do great and save a ton of money by building it by yourself. It will be really sturdy! Let me know how it goes, I’m looking forward to your updates.
Hello,
Would the 12×24 attached lean to work with this plan?
It appears this plan is much taller than the other gable plans and didn’t know if a 2×8 or 2×12 would fit above the door/window.
Thanks.
It will work with this.