This step by step woodworking project is about free 12×24 garden shed plans. This is PART 2 of the large shed project, where I show you how to build the gable shaped roof. Cut all the components and then lock them to the top of the shed for a professional result. Check out the rest of the projects for detailed instructions on how to make the frame for the shed. Please read the local codes so you make sure the truss complies with your regulations. See my other DIY projects HERE.
We recommend you to invest in the best materials you could afford. Therefore, you should buy weather-resistant lumber, such as pine or cedar. Always take accurate measurements before adjusting the size of the components at the proper size. Drill pilot holes trough the components before inserting the wood screws, to prevent the wood from splitting. See all my Premium Plans HERE.
Made from this plan
12×24 Gable Roof Free – PDF Download
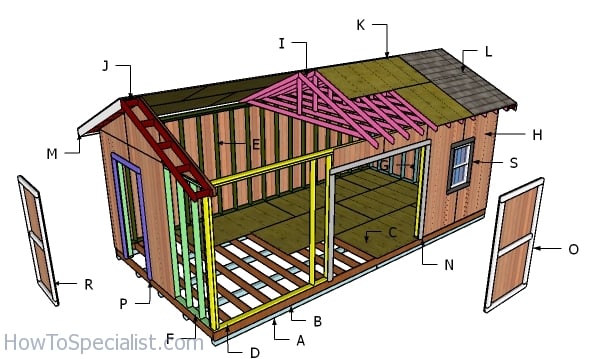
Building a 12×24 gable shed
Materials
- H – 6 pieces of T1-11 siding – 48″x96″ long, 4 pieces – 48″x25 1/4″ long, 2 pieces – 48″x36″ long SIDING
- I – 2 pieces of 2×4 lumber – 90″ long, 1 piece – 144″long, 1 piece – 28 3/4″ long 19xTRUSSES
- J – 4 pieces of 2×4 lumber – 90″ long, 10 pieces – 8 1/2″ long 2xOVERHNAG
- K – 4 pieces of 1/2″ plywood – 48″x88 1/2″ long, 6 pieces – 48″x96″ long, 4 pieces – 40 1/2″x48″ long, 4 pieces – 40 1/2″x96″ long ROOF
- L – 430 sq ft of tar paper, 430 sq ft of asphalt shingles ROOFING
- M – 4 pieces of 1×6 lumber – 91 3/4″ long, 4 pieces – 108″ long, 2 pieces – 96″ long TRIMS
- N – 2 pieces of 2×4 lumber – 80″ long, 1 piece – 103″ long JAMBS
- O – 2 pieces of 2×4 lumber – 73″ long, 1 piece – 48″ long, 1 piece – 41″ long, 1 piece of T1-11 siding – 48″x80″ long 2xDOOR
- P – 2 pieces of 2×4 lumber – 80″ long, 1 piece – 36″ long JAMBS
- R – 2 pieces of 2×4 lumber – 73″ long, 1 piece – 36″ long, 1 piece – 29″ long, 1 piece of T1-11 siding – 36″x80″ long DOOR
- 19 pieces of 2×4 lumber – 12 ft
- 70 pieces of 2×4 lumber – 8 ft
- 1 piece of 2×4 lumber – 10 ft
- 15 pieces of 1/2″ plywood – 4’x8′
- 6 pieces of 1×6 lumber – 8 ft
- 4 pieces of 1×6 lumber – 10 ft
- 11 pieces of T1-11 siding – 4’x8′
- 430 sq ft of tar paper, 430 sq ft of asphalt shingles
- rafter ties
- 1 1/2″ nails for ties
- plates
- 6d nails
- shed hinges
- 1 5/8″ screws, 2 1/2″ screws, 3 1/2″ screws
- wood filler , wood glue, stain/paint
- 24″x36″ window – 2 pieces
Tools
- Safety gloves, glasses
- Miter saw, jigsaw
- Chalk line, tape measure, spirit level, carpentry pencil
- Drill machinery and drill bits
- Roofing nailer
Time
- One Day
Building a gable roof for a 12×24 shed
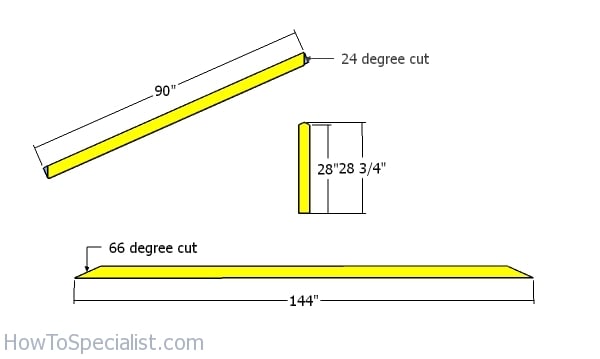
Rafters – 12 ft truss
The first step of the project is to build the rafters for the 12×24 gable shed. Use a miter saw to make cuts to both ends of the rafters. You can also buy engineered trusses, if you find that time and money saving. However, I share in this plan a quick way to make the 12′ trusses using 2x4s and plywood. Remember to check if that complies with the local codes. This truss has a 6:12 pitch.
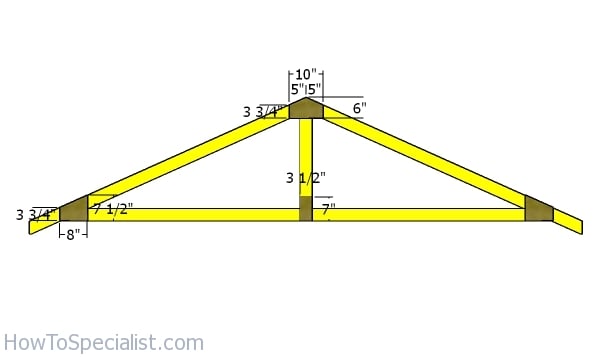
Fitting the gussets
Lay the rafters on a level surface, such as the shed floor. Align the edges at both ends and leave no gaps between the components. Use 1/2″ plywood for the gussets. Attach the gussets to the joints. Drill pilot holes and insert 1 5/8″ screws to lock the gussets into place tightly. Add construction glue to the joints. Alternatively, you can use plates instead of the plywood gussets.
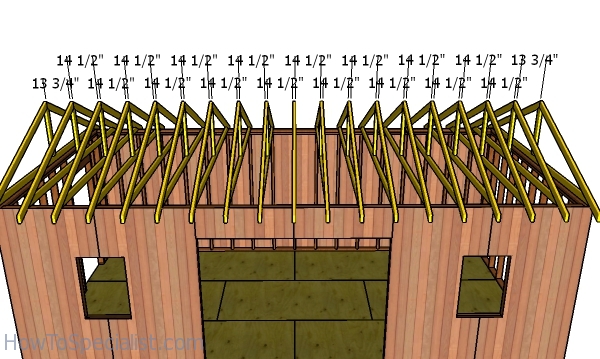
Fitting the trusses – 12×24 shed
Fit the trusses to the top of the 12×24 storage shed. Place the trusses every 16″ on center and use a spirit level to plumb them. Use rafter ties and 1 1/2″ structural nails / screws to secure the rafters into place tightly.
Attaching the siding sheets
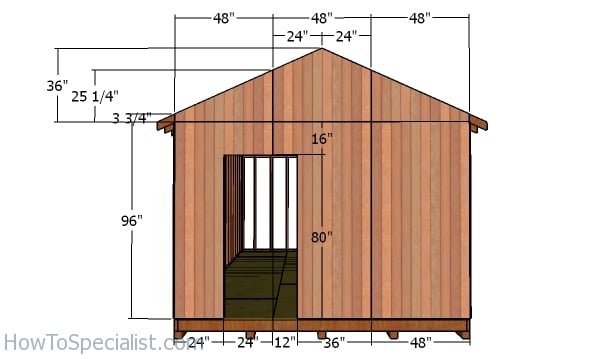
Side wall with door panels
Use 5/8″ T1-11 siding sheets to the sides of the large backyard shed. Align the edges flush and leave no gaps between the sheets. Insert 6d nails every 8″ along the framing to secure the panels into place. Use a saw to make the cuts around the gable ends. Use the saw to make the cuts around the side door opening, as well.
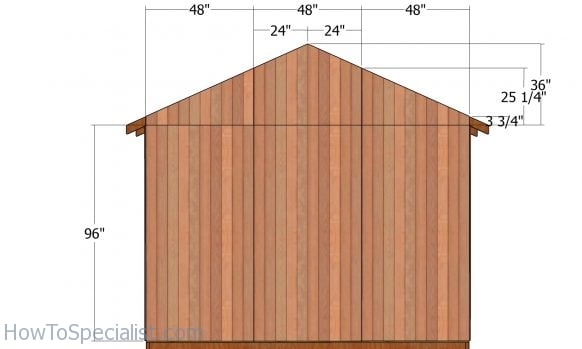
Side wall panels – large storage shed
Fit the panels to the opposite side of the shed, as well.
Building the overhangs
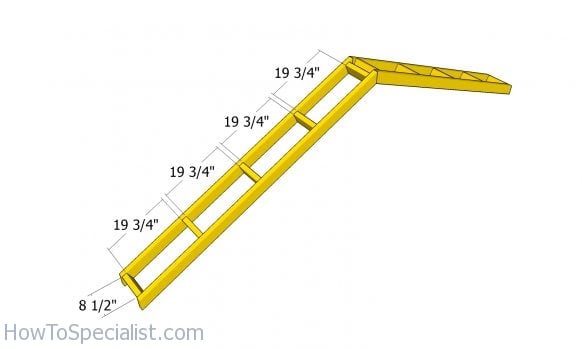
Overhangs – 12×24 gable roof
Assemble the overhangs for the storage shed using 2×4 lumber. Drill pilot holes through the rafters and insert 3 1/2″ screws into the blockings. You can adjust the size of the overhangs to suit your needs.
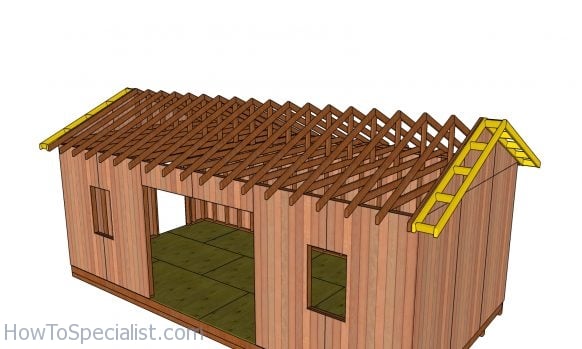
Fitting the overhangs – 12×24 shed
Fit the overhangs to the front and back of the shed. Align the edges flush, drill pilot holes and insert 3 1/2″ screws into the gable ends.
Fitting the roofing
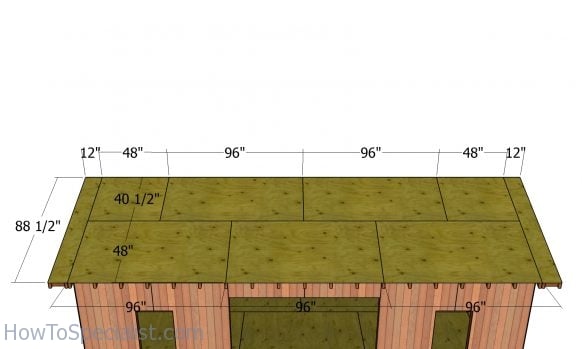
Roof sheets – 12×24 shed
The next step of the project is to attach the 1/2″ plywood sheets to the top of the roof. Align the edges flush and then lock them to the rafters, every 8″, using 1 5/8″ screws. Make sure you leave no gaps between the sheets for a nest result.
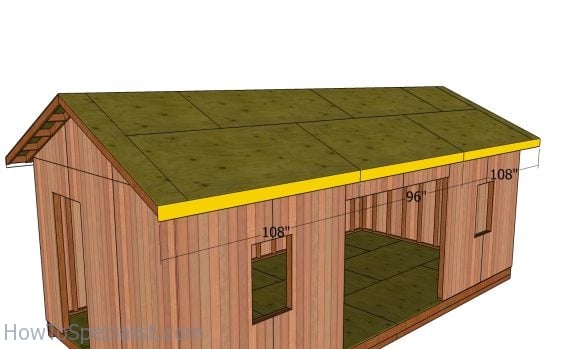
Front and Back roof trims
Use 1×6 lumber for the roof trims. Align the trims and lock them to the rafters with 6d nails.
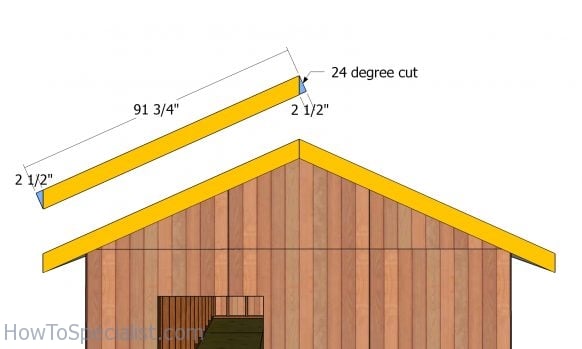
Side roof trims
Fit the trims to the front of the roof. Use a miter saw to make the angle cuts to both ends of the trims. Use 6d nails to lock the trims into place tightly.
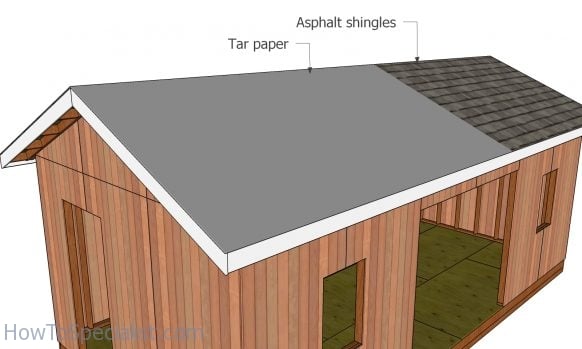
Fitting the roofing – 12×24 gable shed
The next step of the woodworking project is to cover the roof with underlayment. As you can see in the image, you need to make sure the strips of roofing felt overlap at least 2”. In addition, you have to lock the tar paper to the plywood sheets with staples.
Next, you should install the shingles to the roof of the large shed. Start with the bottom of the roof, by fitting the first course, as in the image. Use roofing tacks to secure the shingles to the roofing sheets.
Start the first course with a full tab, the second with 2 1/2 tabs, the third with 2 tabs, the forth with 1 1/2 tabs, the fifth with 1 tab, the sixth with half tab and the seventh with a 3 tabs. Secure the shingles with roofing tacks.
How to build shed doors – Free DIY Plans
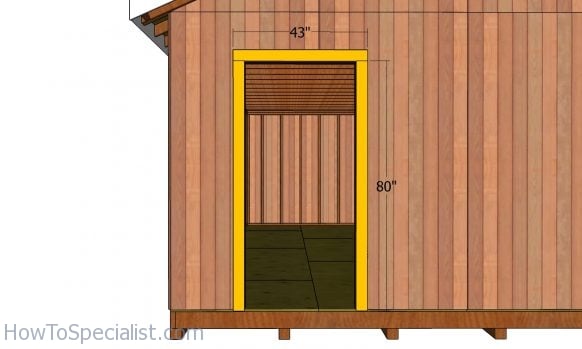
Side door jambs
Use 2×4 lumber for the door jambs. Cut and fit the boards around the side door opening. Align the edges flush and insert 3 1/2″ screws to lock the jambs into place tightly, after drilling pilot holes.
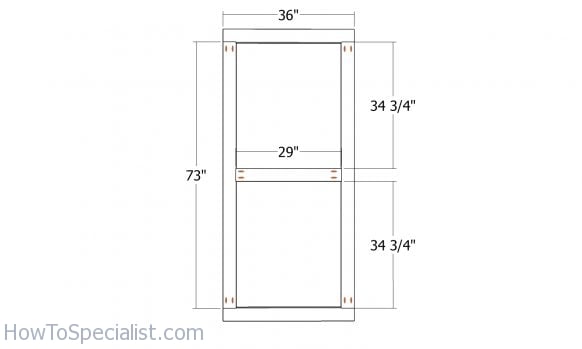
Side door frame
Next, we have to assemble the doors frame from 2x4s. Cut the components as shown in the diagram and drill pocket holes. Lay the components on a level surface, align the edges flush and make sure the corners are square. Insert 2 1/2″ screws to lock the frame together tightly.
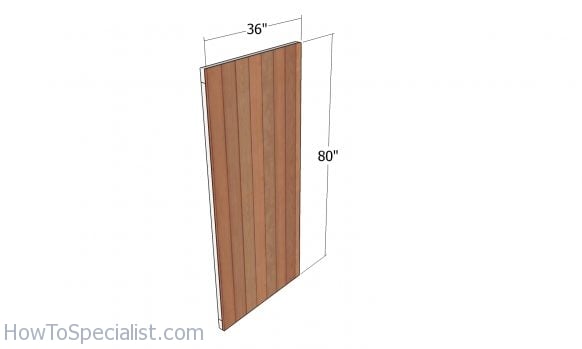
Side door panel
Use T1-11 siding for the door panel. Attach the panel to the frame with construction glue. Insert 1 5/8″ screws to lock the panel to the frame.
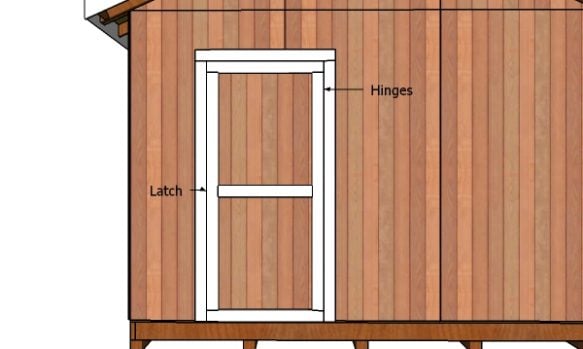
Fitting the side shed door
Fit the door to the side opening. Use hinges to lock the door to the jambs. Install a door latch to secure the tools you have inside. In addition, you can also install a door stop. Remember that you can skip this and just install a prehung door.
Building the double shed doors
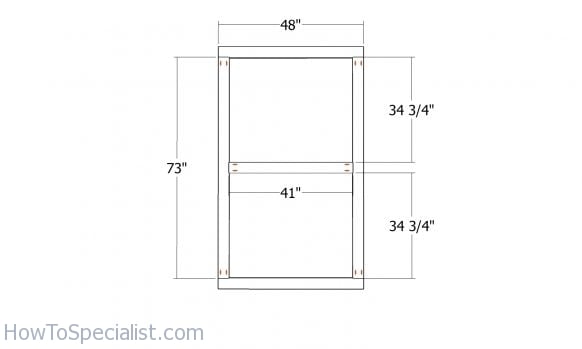
Double doors frame
We will repeat the process for the double doors that come to the front of the storage shed. Assemble the door frame with 2 1/2″ screws.
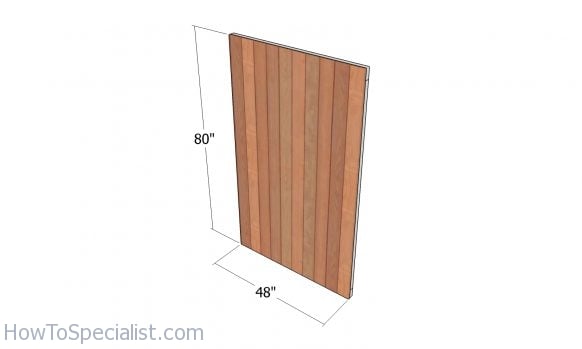
Double door panels
Attach the panels to the back of the frames.
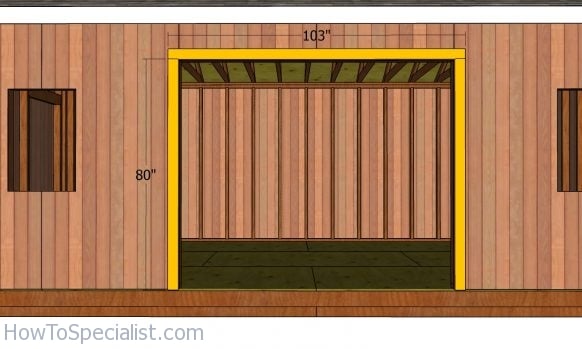
Double door jambs – 12×24 gable shed
Fit the jambs for the double doors.
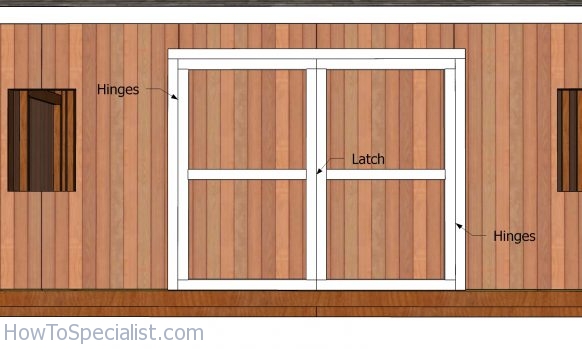
Fitting the double doors
Fit the double doors to the opening. Align the edges flush and use hinges to secure the doors to the frames. Install a latch to keep the door locked when needed.
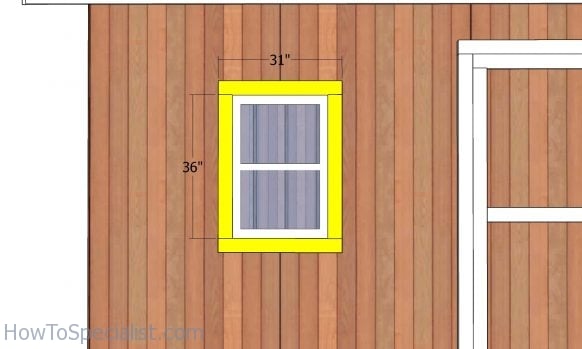
Window trims
Fit the windows to the front of the shed. Align the edges and secure the windows to the frame. Install 1×4 trims around the windows and insert 6d nails.
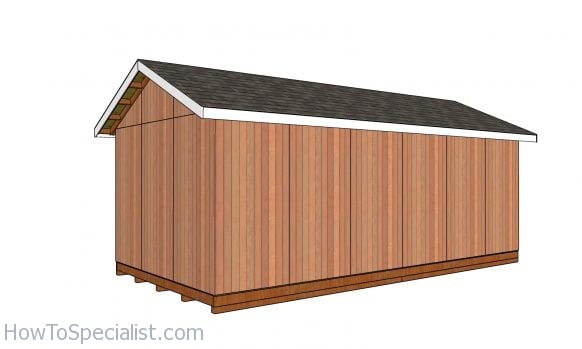
12×24 Shed Plans – back view
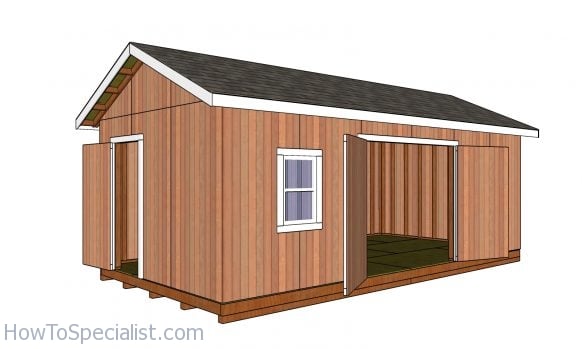
How to build a 12×24 garden shed
Last but not least, you need to take care of the finishing touches. Therefore, fill the holes with wood putty and then smooth the surface with sandpaper. Apply a few coats of paint or stain over the components to enhance the look of the shed and to protect the components from decay.
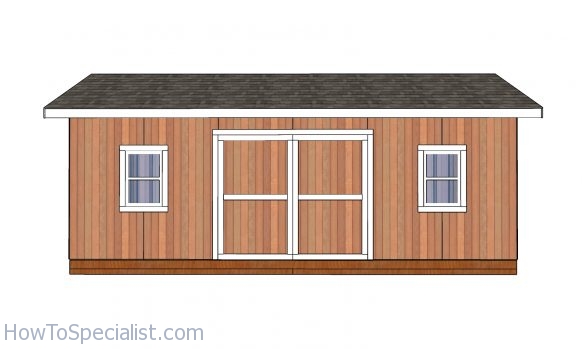
12×24 Shed Plans – side view
If you want to build the frame for this gable storage shed, you should check out PART 1 of the project. If you like my project, don’t forget to SHARE it on Facebook and Pinterest. If you are already here, you might as well take a look over my 12×20 gable shed plans.
Thank you for reading our project about free 12×24 garden shed plans and I recommend you to check out the rest of the projects. Don’t forget to LIKE and SHARE our projects with your friends, by using the social media widgets. SUBSCRIBE to be the first that gets our latest projects.
<< Previous | Next >>


5 comments
wheres the PDF file?
These are ads to download PDF software.
Please read the FAQs: https://howtospecialist.com/faq/
I am interested in buying the detail plans for this one and see that the plans are labeled under the my outdoor plans brand. When looking on that website there is also a 12×24 gable shed but has a slightly different layout. My concern is that the materials list is pretty different on each site, is one plan more accurate then the other?
It’s the plans from HTS you will buy. You can clearly see in the feature image, that it’s this plans with this layout.
So long shot, just bought the lean to shed plans 12×24 and realized I’m going to need to build it with a gable roof not the lean to. Any chance I could swap my plans for the gable 12×24? I realize it’s my fault so no worries if not, just figured it couldn’t hurt to ask. Thanks!