This step by step woodworking project is about free 12×20 garden shed plans. I have designed this large shed with a gable roof so you can have a basic workshop in your backyard. In addition, due to the easy access to the interior, you can use this shed for storing an ATV or your motorbikes. See my other DIY projects HERE.
We recommend you to invest in the best materials you could afford. Therefore, you should buy weather-resistant lumber, such as pine or cedar. Always take accurate measurements before adjusting the size of the components at the proper size. Drill pilot holes trough the components before inserting the wood screws, to prevent the wood from splitting. See all my Premium Plans in the Shop.
Made from this plan
12×20 Shed Plans Free
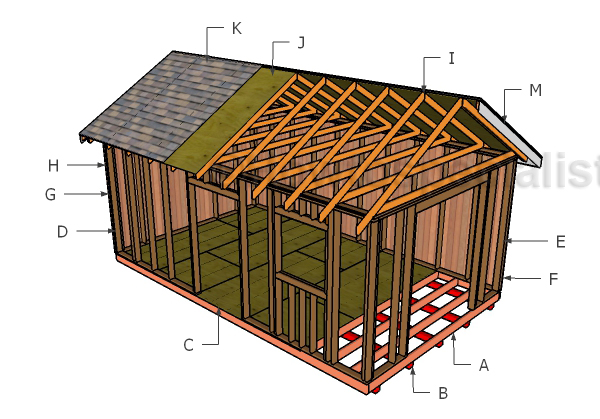
Building a 12×20 shed
Materials
- A – 5 pieces of 4×4 lumber – 240″ long SKIDS
- B – 2 pieces of 2×6 lumber – 240″ long, 16 pieces – 141″long FLOOR FRAME
- C – 5 pieces of 3/4″ plywood – 48″x96″ long, 5 pieces – 48″x48″ long FLOOR
- D – 2 pieces of 2×4 lumber – 97 1/2″ long, 1 piece – 240″ long, 1 piece – 233″ long, 13 pieces – 90″ long, 2 pieces – 48″ long, 4 pieces – 39″ long, 4 pieces – 10″ long, 2 pieces – 76 1/2″ long, 5 pieces – 9 1/2″ long, 5 pieces – 37 1/2″ long SIDE WALL
- E – 2 pieces of 2×4 lumber – 240″ long, 1 piece – 233″ long, 13 pieces – 90″ long SIDE WALL
- F – 1 piece of 2×4 lumber – 144″ long, 2 pieces – 31″ long, 1 piece – 137″ long, 6 pieces – 90″ long, 2 pieces – 86″ long, 2 pieces of 2×6 lumber – 75″ long FRONT WALL
- G – 2 pieces of 2×4 lumber – 137″ long, 1 piece – 144″ long, 7 pieces – 90″ long BACK WALL
- H – 16 pieces of T1-11 siding – 48″x84 1/2″ long SIDING
- 5 pieces of 4×4 lumber – 20′
- 16 pieces of 2×6 lumber – 12′
- 2 pieces of 2×6 lumber – 20′
- 8 pieces of 3/4″ plywood – 4’x8′
- 6 pieces of 2×4 lumber – 20′
- 6 pieces of 2×4 lumber – 12′
- 16 pieces of T1-11 siding – 4’x8′
- 2 pieces of 2×6 lumber – 8′
- 51 pieces of 2×4 lumber – 8′
- 1 5/8″ screws, 2 1/2″ screws, 3 1/2″ screws
- wood filler , wood glue, stain/paint
- joist hanger
- structural nails for ties
Tools
- Safety gloves, glasses
- Miter saw, jigsaw
- Chalk line, tape measure, spirit level, carpentry pencil
- Drill machinery and drill bits
Time
- One Day
How to build a 12×20 shed
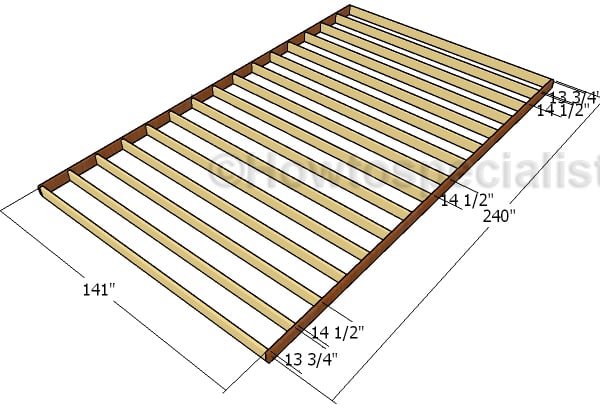
Building the floor frame
The first step of the project is to frame the floor for the 12×20 shed. Cut the joists from 2×6 or 2×8 lumber. Drill pilot holes through the rim joists and insert 3 1/2″ screws into the perpendicular components. Make sure the corners are square and align the edges flush.
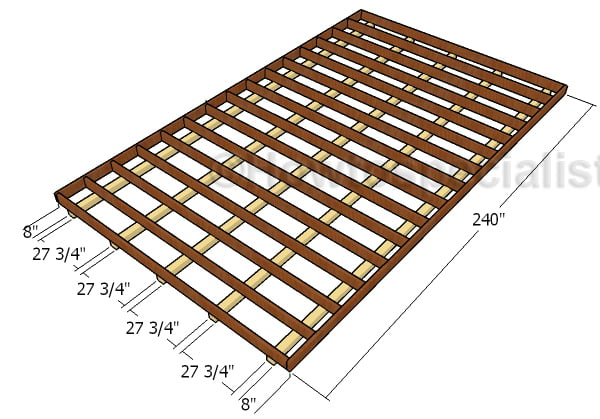
Fitting the skids
Lay 4×4 skids on a level surface and then attach the floor frame. Make sure you place the skids equally spaced, so they can support the weight of the structure properly. Use rafter ties to lock the skids to the floor frame. In addition, drill pilot holes through the joists and insert 3 1/2″ screws into the skids.
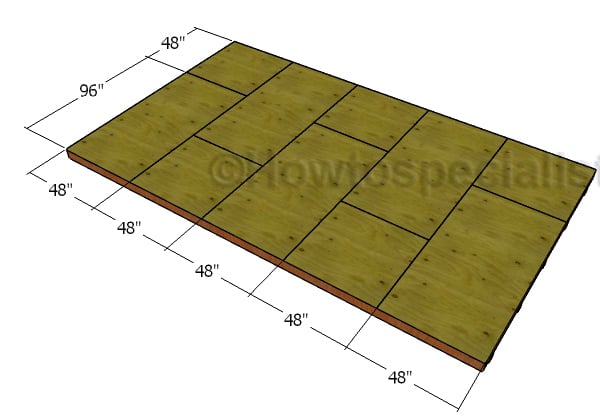
Attaching the floor sheets
Attach the 3/4′ plywood sheets to the floor frame. Align the edges with attention, drill pilot holes and insert 1 5/8″ screws every 8″ along the joists. Leave no gaps between the sheets for a professional result.
Front wall
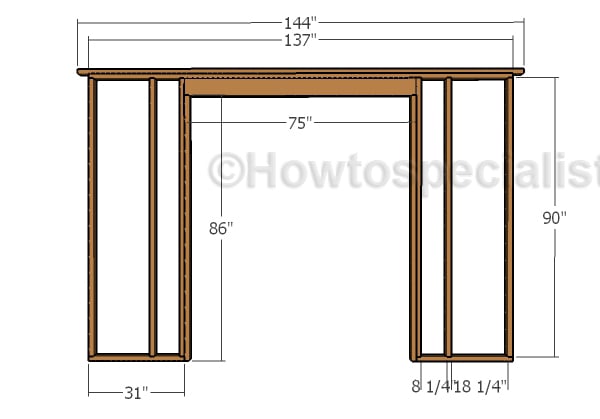
Assemble the front wall for the shed from 2×4 lumber. Make sure you use 2×6 lumber for the double header. After cutting all the components at the right dimensions, you need to assemble them together tightly. Drill pilot holes through the plates and insert 3 1/2″ screws into the studs.
You can adjust the size of the double door opening to suit your needs. In addition, you can make the necessarily modifications for fitting even a garage door.
Double headers
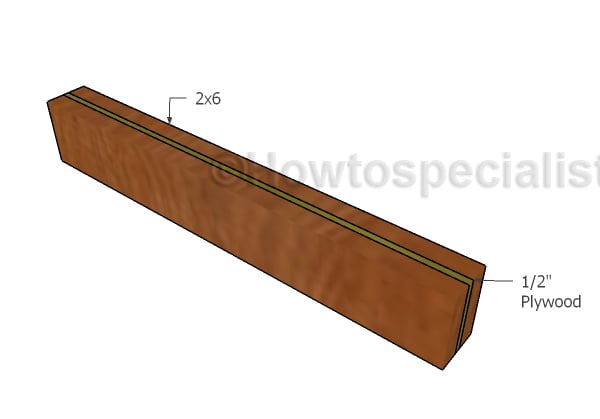
Building the double headers is a straight forward job. Drill pilot holes through the beams and insert 2 1/2″ screws. Add glue to the joints and add a 1/2″ plywood piece for strength.
Side wall with siding
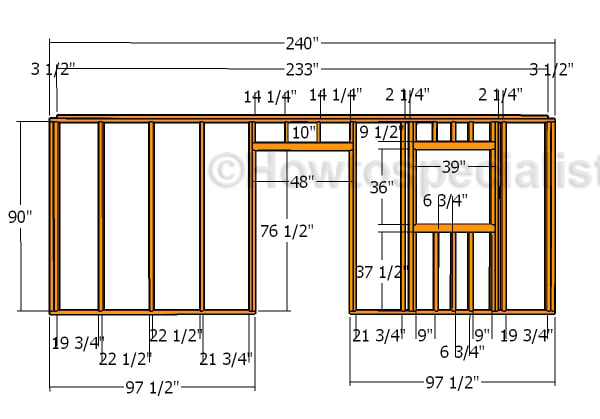
Continue the project by framing the wall with the small door and with the window. Cut all the components from 2×4 lumber, as shown in the free plans. Drill pilot holes through the plates and insert 3 1/2″ screws into the plates. Align the edges flush, make sure the corners are square and then insert the screws.
You can easily adjust the size of the door and of the window, so it suits your needs.
Side wall
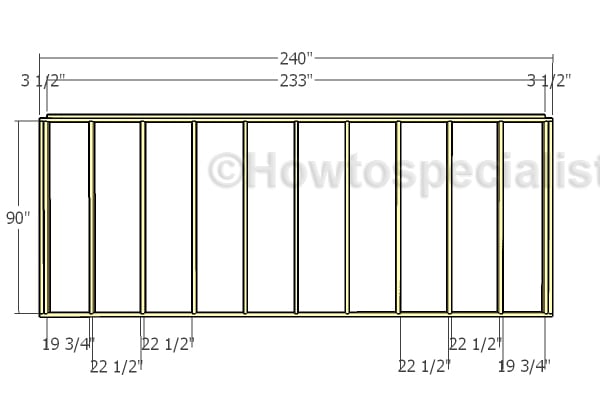
Frame the opposite side wall using the same techniques described above.
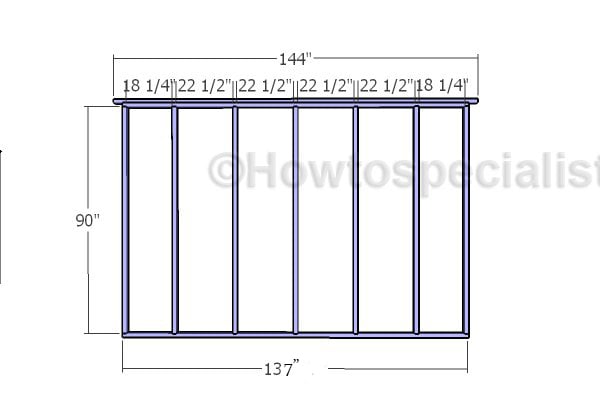
Back-wall
Last but not least, frame the back wall for the 12×20 shed.
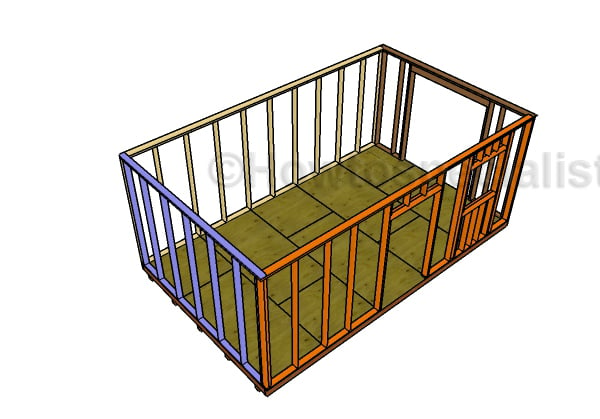
Assembling the 12×20 shed frame
Fit the wall frames to the floor of the shed. Align the edges flush, drill pilot holes through the bottom plates and insert 3 1/2″ screws into the floor. Make sure you lock the adjacent walls together tightly. Drill pilot holes and insert 2 1/2″ screws to lock everything together tightly.
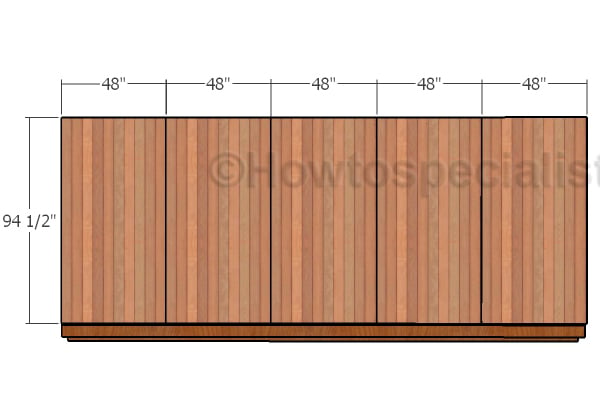
Side wall – Siding
Attach the T1-11 siding sheets to the wall frames of the shed. Align the edges with attention and use 6-8d nails to lock them into place tightly. Leave no gaps between the sheets for a professional result.
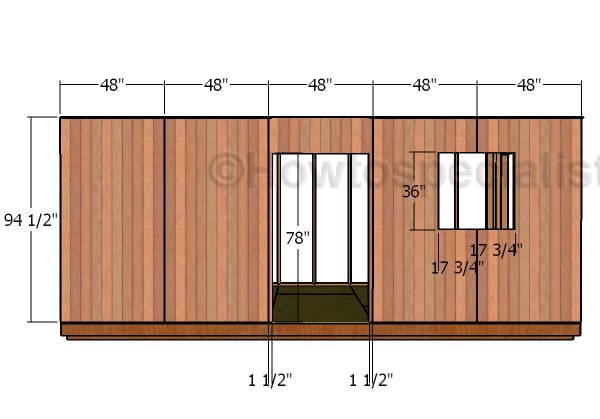
Side wall with window – Siding
Attach the T1-11 siding to the wall with window, as well. Make a few cuts around the door opening and around the window opening. Smooth the edges with sandpaper, before locking them into place with 6-8d nails. Insert the nails every 8″ along the framing.
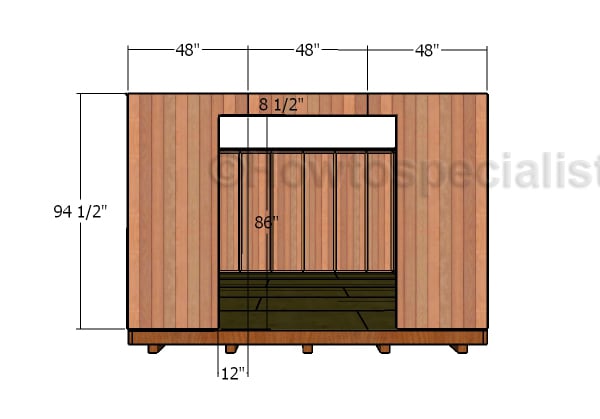
Front wall – Siding
Fit the siding sheets to the front wall as well. As you can notice in the diagram, you need to cut the sheets so you can install them around the opening for the double doors.
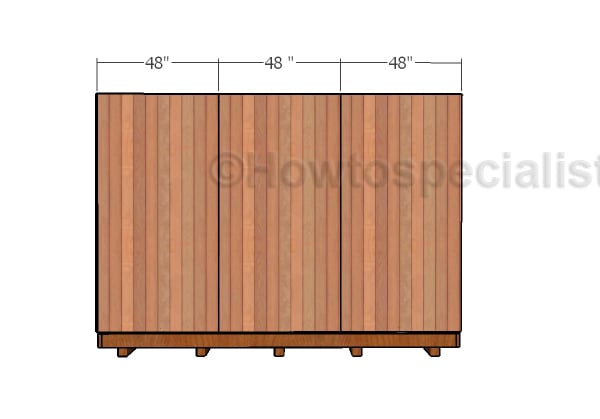
Back wall – Siding
Attach the siding to the back wall, in the same manner described above. Use 6-8d nails.
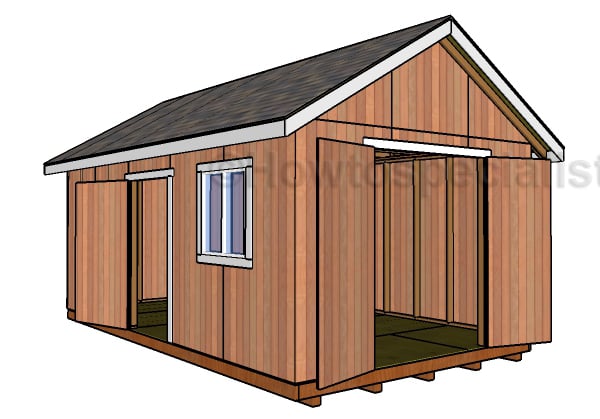
Free 12×20 Shed Plans
Check out PART 2 and PART 3 of the project to learn how to build the gable roof and the doors for this 12×20 backyard shed. You can easily use this shed as a workshop or for storing your bikes and other motorized toys.
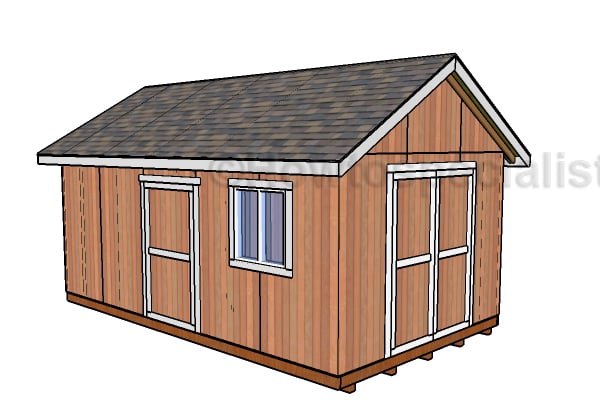
12×20 Shed Plans
If you want to build the gable roof for this large storage shed, you should check out PART 2 of the project. In PART 3 you will see how to build the double doors. If you like my project, don’t forget to SHARE it on Facebook and Pinterest.
If you want to download the plans. just click on the GET PDF PLANS button bellow.
Thank you for reading our project about free 12×20 garden shed plans and I recommend you to check out the rest of the projects. Don’t forget to LIKE and SHARE our projects with your friends, by using the social media widgets. SUBSCRIBE to be the first that gets our latest projects.
<< Previous | Next >>


28 comments
Great plan! We live near the ocean and must build especially braced for this seaward area, do you have the specs to make the 12 x 20 plan compliant for our area? Our previous storage building was destroyed by hurricane Harvey. Thanks for your help!
No. I don’t have plans for that. You should install diagonal braces inset in the wall frames.
These are awesome! Do you have a link to download the plans without all the ads, etc? I need to submit to my HOA for approval.
Yes. Please read the FAQs: http://howtospecialist.com/faq/
Awesome, Thanks for sharing.
Would it be necessary that the lumber inside the shed has to be pressure treated?
No, only the lumber exposed to the elements.
Why are side panels 94.5 inches and not standard 96? Seems like extra cuts, could over lap floor or lengthen wall studs?
Yes, you can do each one of that, if you don’t want to cut the sheets.
I live in a area where we get a fair amount of snow will this hold up to the weight on the roof? Thank you
Make sure you set the trusses every 16″ on center and reinforce the roof with some diagonal braces for added strength. Use rafter ties. In addition, you can increase the slope of the roof.
Do you have planes for a 10’x20’ firewood shed
No. But you can find plans for a 8×20 firewood shed here: https://myoutdoorplans.com/shed/8×20-firewood-shed-free-diy-plans/
how much does it cos to build this shed?
I would say in the range of 2500 usd
Today is 9\22/2021. How much would you think it would cost at the current price of building material?
are you serious? Call the freaking lumber yard. I bet this is the furthest you’re going to go with this. Do you need someone to do literally all the work for you too?! Come on! Sheesh
I am in the process of building this now. 7/23/2022. You would be looking at roughly $5,000.
Hello,
I am curious if these plans include EVERYTHING to build this 12×20 she’s because the illustrations look to me to only include the framing of the floor and walls. I’m curious what materials would be included/needed to finish the roof etc. thank you.
Disabled Vet
Plans include all parts of the shed from start to finish.
Can these plans be modified into a greenhouse. Would it still be sturdy if I don’t build the floor part? It would sit on the ground with a stone floor.
No. It needs at lest 4×4 skids under the wall frames.
Hi Jack,
Thank you for the amazing plans. Could I nail most of this together instead of screwing?
Thanks
Sure
Hello Jack,
Great to see your plans and you are willing to share with us all. Just a quick question. I could also built this without the floor i guess hey? I want to store a oldtimer tractor in there. I was thinking of just using big treated wood underneath all the walls. Do you think that will work?
Thanks again,
Pascal
That should work, but you would need to anchor somehow the skids to the ground. Also, a middle cross skid might be needed to keep everything sturdy.
How would you create external joist of 20 feet if you don’t have access to 20 feet 2×6? I’d be using deck blocks for support.
Do you fasten two 2x6x10’s together to get the 20’ runs for the floor frame? And same for the underlying skids? They seem to come in 8 ft pieces.