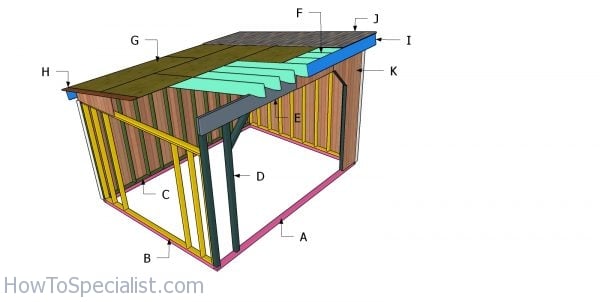
This step by step woodworking project is about building a roof for a 12×16 run in shed. This is PART 2 of the run in shed project, where I show you how to frame the lean to roof. This is a simple to follow project, because I show you step by step diagrams with instructions. My plans come with step by step instructions and you can easily adjust all the dimensions to suit your needs. See my other DIY projects HERE.
We recommend you to invest in the best materials you could afford. Therefore, you should buy weather-resistant lumber, such as pine or cedar. Always take accurate measurements before adjusting the size of the components at the proper size. Drill pilot holes trough the components before inserting the wood screws, to prevent the wood from splitting. See all my Premium Plans HERE.
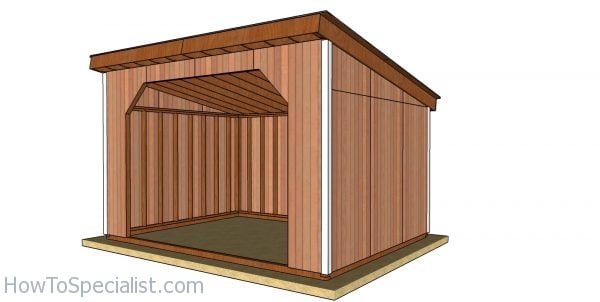
Made from this plan
12×16 Run In Shed Roof Plans
Building a 12×16 run in shed
Materials
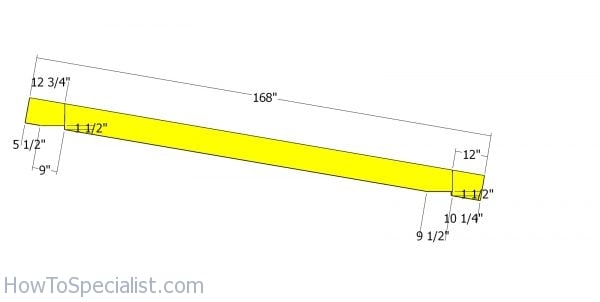
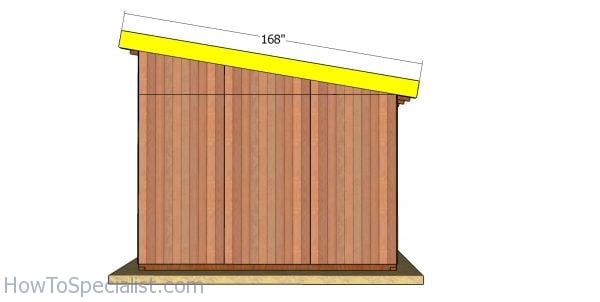
- F – 13 pieces of 2×10 lumber – 168″ long RAFTERS
- G – 5 pieces of 3/4″ plywood – 48″x96″ long, 2 pieces – 48″x48″ long, 1 piece – 24″x96″ long, 2 pieces – 24″x48″ long ROOF
- H – 2 pieces of 1×6 lumber – 96″ long, 2 pieces – 72″ long OVERHANGS
- I – 2 pieces of 2×10 lumber – 168″ long, 4 pieces of 1×0 lumber – 98″ long ROOF TRIMS
- J – 250 sq ft of tar paper, 250 sq ft of shingles ROOFING
- K – 6 pieces of 5/8″ T1-11 siding – 4’x94 1/2″ long, 4 pieces – 4’x8′ long, 2 pieces – 4’x10′ long, 2 pieces – 11 1/4″x48″ long, 2 pieces – 34″x48″ long, 2 pieces – 25 3/4″x48″ long, 2 pieces – 17 1/2″x48″ long SIDING
- L – 4 pieces of 1×4 lumber – 94 3/4″ long, 4 pieces – 119 1/4″ long TRIMS
- 7 pieces of 1/2″ plywood – 4’x8′
- 15 pieces of 2×10 lumber – 14 ft
- 4 pieces of 1×10 lumber – 10 ft
- 4 pieces of 1×6 lumber – 8 ft
- 4 pieces of 1×4 lumber – 10 ft
- 4 pieces of 1×4 lumber – 8 ft
- 2 pieces of T1-11 5/8″ siding – 4’x10′
- 12 pieces of T1-11 5/8″ siding – 4’x8′
- 250 sq ft of tar paper, 250 sq ft of shingles
- 2 1/2″ screws, 3 1/2″ screws, 1 5/8″ screws
- 2″ brad nails
- wood filler , wood glue, stain/paint
- rafter ties
- nails for rafter ties
Tools
- Safety gloves, glasses
- Miter saw, jigsaw
- Chalk line, tape measure, spirit level, carpentry pencil
- Drill machinery and drill bits
Time
- One Day
Building a run in shed roof
Front wall panels
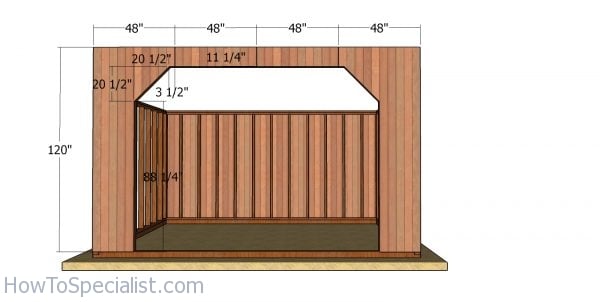
Cut the panels for the exterior of the shed from 5/8″ T1-11 siding. Attach the panels to the front of the run in shed and align the edges flush with the top. Insert 6d nails, every 8″ along the framing.
Back wall siding panels
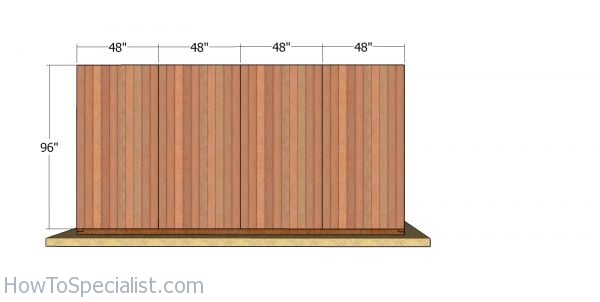
Fit the siding sheets to the back of the shed, as well. Leave no gaps between the sheets and align them to the top edge. Insert the 6d nails to secure the panels into place tightly.
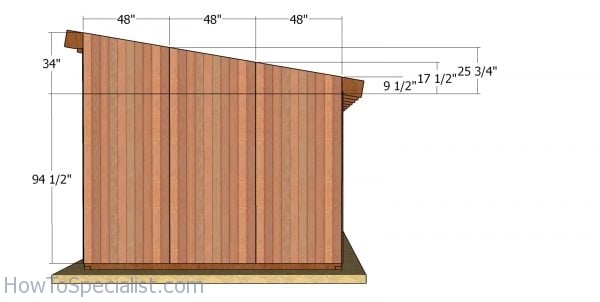
Rafters – lean to 12×126 shed
Use 2×6 lumber for the rafters. As you can easily notice in the diagram, you need to make birdsmouth cuts to the rafters. Mark the cut lines on the beams and then get the job done with a saw.
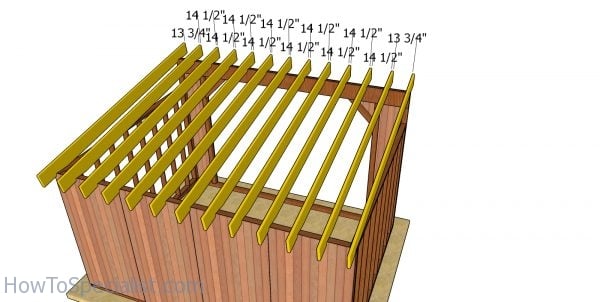
Fitting the rafters – 12×16 run in shed
Fit the rafters to the top of the run in shed, every 16″ on center. Use rafter ties to lock the rafters to the top plates of the walls.
Side wall panels
Use T1-11 siding for the sides of the shed. Cut the sheets to the fit into place and insert 6d nails to secure them to the frame of the shed. Leave no gaps between the sheets for a professional result.

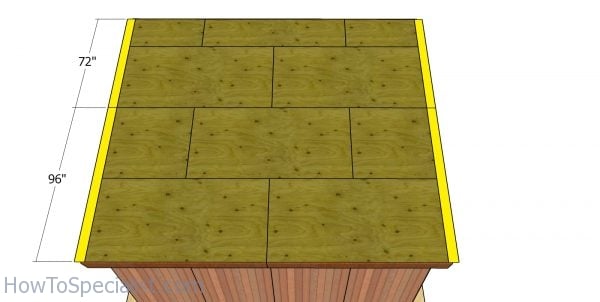
Roof sheets
Fit the 1/2″ plywood or OSB sheets to the top of the run in shed. Align the edges flush and then lock the sheets to the rafters, every 8″. Leave no gaps between the sheets and the drill pilot holes before inserting the 1 5/8″ screws, to prevent the wood from splitting.
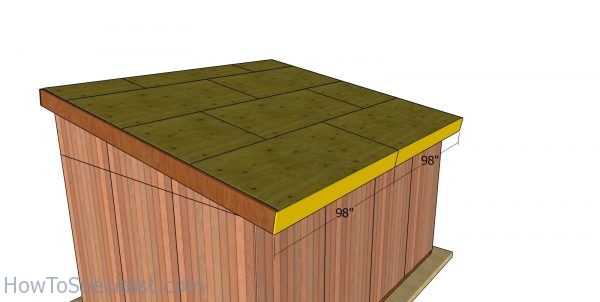
Side roof trims
Attach the 2×8 trims to the side of the run in shed. Use 3 1/2″ screws to secure the beams to the shed structure.
Front and back roof trims
Fit the 1×8 trims to the front and back of the shed roof. Align the edges flush and insert 2″ nails to lock them into place tightly. Align the edges flush and leave no gaps between them.
Side overhangs
Use 1×6 boards for the side overhangs. You can skip this step, but I think this will give the shed a more beautiful look and protect the side walls from the elements.
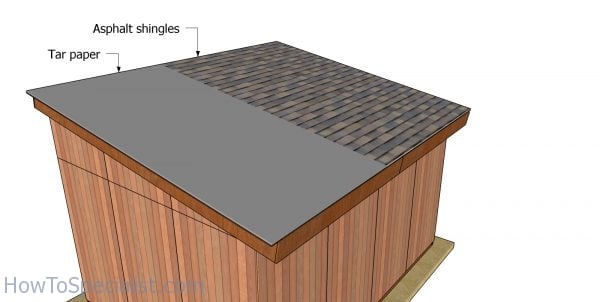
Fitting the roofing – 12×16 run in shed
You could fit asphalt shingles to protect the shed, as it is a straight forward solution. Therefore, install roofing felt over the roofing sheets, making sure the strips overlap at least 2″. Secure the tar paper to the plywood sheets with roofing staples. Fit the side drip edges over the roofing felt, while the bottom drip edges should be fit under. Place a starting course at the bottom of the roof, before installing the asphalt shingles. Always read the manufacturing instructions before starting the installation, as there are several aspects that differ.
Smart Tip: The first course should star with a 3 tab shingle, the second course with a 2 1/2 tab , the third course with a 2 tab, the forth course with a 1 1/2 tab, the fifth course with a 1 tab, the sixth course with a 1/2 tab. Repeat the process from the beginning, starting with the seventh course. Don’t forget that the shingles should overhang from the drip edge about a 1/4″. In addition, secure the asphalt shingles to the roof decking with tacks.
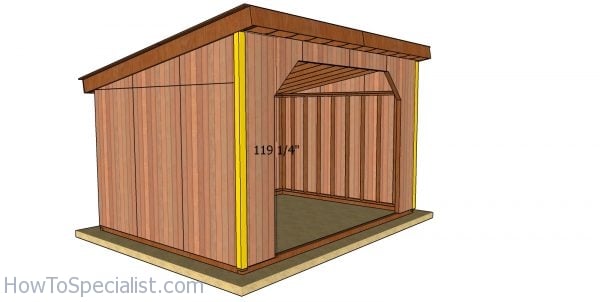
Front wall trims
Fit 1×4 trims to the front of the shed. Align the edges and insert 2″ nails to lock them into place.
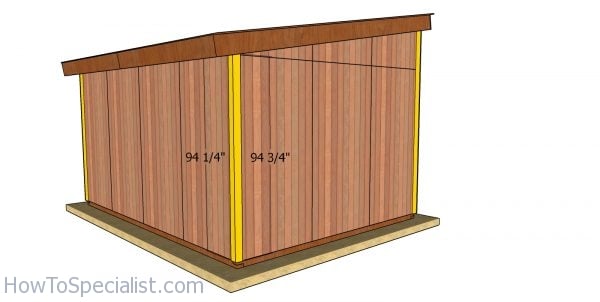
Back wall trims
Fit the 1×4 trims to the back of the shed, as well. If you want something bigger, I have free plans for a 16×24 loafing shed.
How to build a 12×16 run in shed
If you want to build the frame for this run in shed, make sure you take a look over PART 1. I am sure this 12×16 run in shed will serve you well for many, many years in a row. This shelter is extremely versatile, as you can use it for many purposes. If you like my project, don’t forget to SHARE it on Facebook and Pinterest.
Thank you for reading our project about 12×16 run in shed roof plans and I recommend you to check out the rest of the projects. Don’t forget to LIKE and SHARE our projects with your friends, by using the social media widgets. SUBSCRIBE to be the first that gets our latest projects.
<< Previous | Next >>
 |
 |