This step by step woodworking project is about 10×20 gable shed plans. This shed features a gable roof and two large side windows, a side door and double front doors. This shed works best for any backyard, if you want to create a lot of storage space and also compact workshop for your woodworking projects. Read the local codes before starting the project, so you comply with the requirements. See my other DIY projects HERE. Premium Plans for this shed available in the SHOP.
We recommend you to invest in the best materials you could afford. Therefore, you should buy weather-resistant lumber, such as pine or cedar. Always take accurate measurements before adjusting the size of the components at the proper size. Drill pilot holes trough the components before inserting the wood screws, to prevent the wood from splitting. My plans come with a full cut / shopping list and they are PDF Download and Print friendly. See all my Premium Plans HERE.
Made from this plan
10×20 Shed Plans – DIY Gable Shed
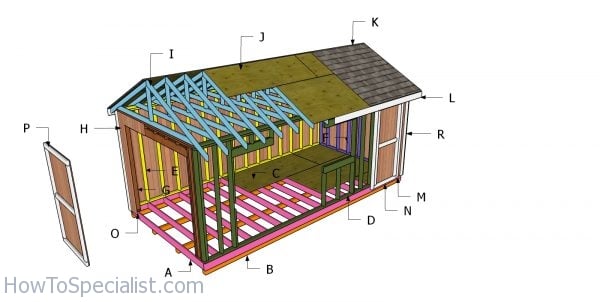
Building a 10×20 gable shed
Materials
- A – 2 pieces of 2×6 lumber – 240″ long, 16 pieces – 117″ long FLOOR FRAME
- B – 8 pieces of 4×4 lumber – 120″ long SKIDS
- C – 4 pieces of 3/4″ plywood – 48″x96″ long, 2 pieces – 48″x48″ long, 2 pieces – 24″x96″ long, 1 piece – 24″x48″ long FLOOR
- D – 1 piece of 2×4 lumber – 240″ long, 1 piece – 233″ long, 1 piece – ” long, 1 piece – ” long, 15 pieces – 86 1/2″ long, 6 pieces – 7 1/2″ long, 4 pieces – 36″ long, 6 pieces – 32″ long, 3 pieces – 2 1/2″ long, 2 pieces – 78 1/2″ long, 1 piece – 192″ long, 1 piece – 12″ long, 10 pieces of 2×6 lumber – 39″ long SIDE WALL
- E – 2 pieces of 2×4 lumber – 240″ long, 1 piece – 233″ long, 18 pieces – 86 1/2″ long SIDE WALL
- F – 2 pieces of 2×4 lumber – 113″ long, 1 piece – 120″ long, 9 pieces – 86 1/2″ long BACK WALL
- G – 1 piece of 2×4 lumber – 240″ long, 1 piece – 233″ long, 2 pieces – 72″ long, 2 pieces – 78 1/2″ long, 8 pieces – 2 1/2″ long, 2 pieces of 2×6 lumber – 99″ long FRONT WALL
- H – 9 pieces of 5/8″ T1-11 siding – 48″x94″ long, 4 pieces – 48″x92 1/2″ long, 1 piece – 24″x92 1/2″ long, 1 piece – 24″x9 1/2″ long SIDING
- 2 pieces of 2×6 lumber – 20′
- 18 pieces of 2×6 lumber – 10′
- 7 pieces of 3/4″ plywood – 4’x8′
- 8 pieces of 4×4 lumber – 10′
- 5 pieces of 2×4 lumber – 10′
- 5 pieces of 2×4 lumber – 20′
- 1 piece of 2×4 lumber – 16′
- 5 pieces of 2×6 lumber – 8′
- 2 pieces of 2×6 lumber – 10′
- 56 pieces of 2×4 lumber – 8′
- 14 pieces of 5/8″ T1-11 siding – 4’x8′
- 2 1/2″ screws, 3 1/2″ screws, 1 5/8″ screws
- 8d nails
- rafter ties
- joist hangers
- wood filler , wood glue, stain/paint
Tools
- Miter saw
- Circular saw
- Drill machinery, drill bits
- Safety gloves, glasses
- Chalk line, tape measure, spirit level, carpentry pencil
Time
- One week
10×20 Gable Shed Roof – DIY Plans
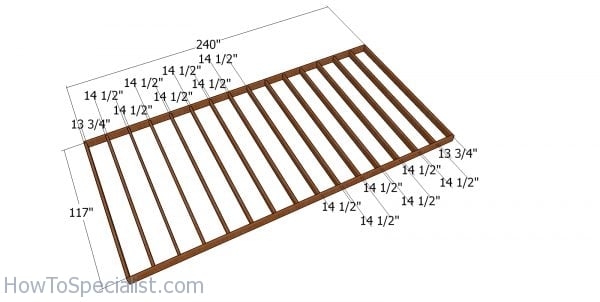
Floor frame
The first step of the project is to build the floor frame. Cut the joists from 2×6 lumber. Align the edges flush and make sure the corners are square. Place the joists every 16″ on center. Drill pilot holes and insert 3 1/2″ screws. Alternatively, you can use joist hangers. Measure the diagonals and make adjustments until they are equal.
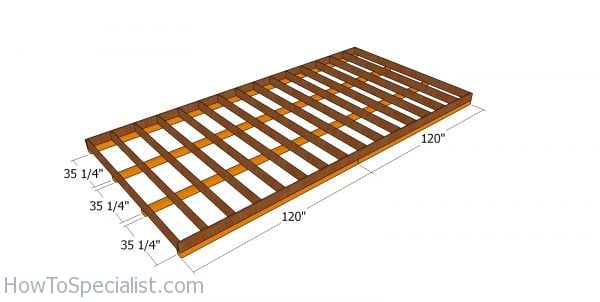
Fitting the skids
Use 4×4 lumber for the skids. Place the skids under the floor frame. Use rafter ties to secure the skids to the floor frame.
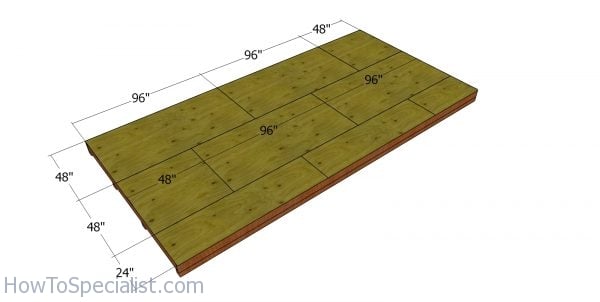
Floor sheets
Use 3/4″ tongue and groove plywood sheets. Invest in pressure treated plywood, because the floor sheets will be exposed to moisture. Cut the sheets at the dimensions shown in the diagram and in the cut list. Leave no gaps between the sheets and align the edges flush. Drill pilot holes and insert 1 5/8″ screws every 8″ along the framing, to secure the sheets into place.
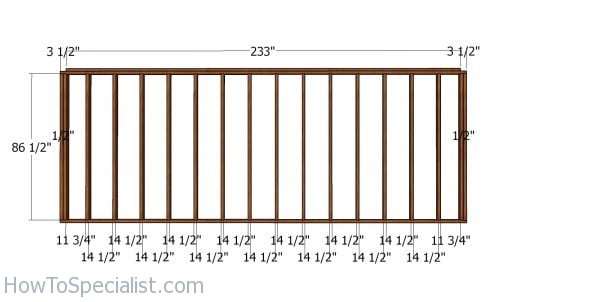
Back wall frame – 10×20 shed
Use 2×4 lumber for the back wall frame. Cut the components at the right dimensions, as shown in the diagram. Drill pilot holes through the plates and insert 3 1/2″ screws to assemble the wall frame. Make sure the corners are square and align the edges flush. Place the studs every 16″ on center.
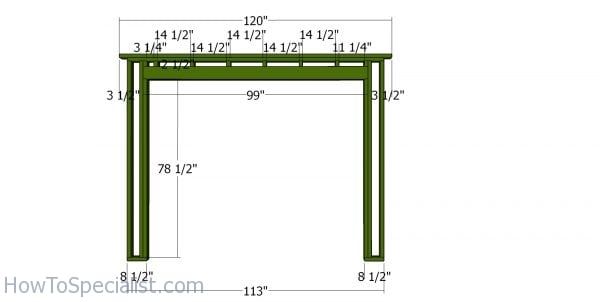
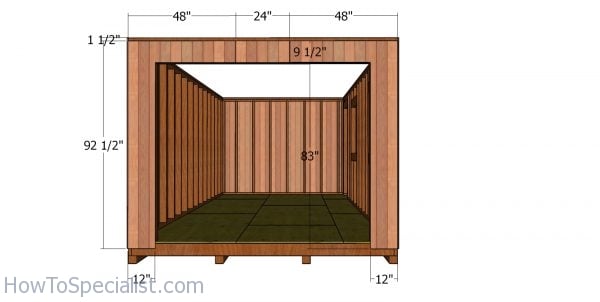
Front wall frame
Next, assemble the front wall frame for the 10×20 garden shed. As you can see in the diagram, you need to leave a 96″ opening so you can install double 4 ft doors. Use 2×6 lumber for the double header. Fit a piece of 1/2″ plywood between the 2x6s so you can make it 3 1/2″ thick. You can adjust the size of the opening and make it suit your needs.

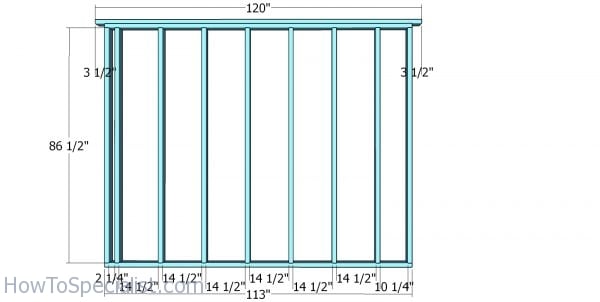
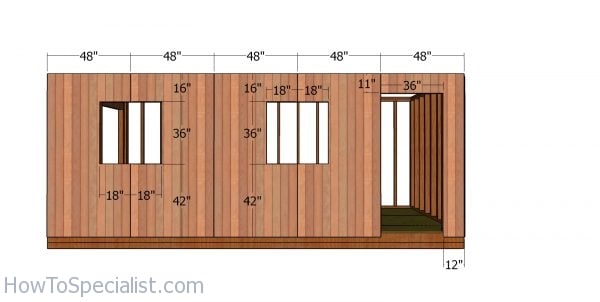
Side wall with window frame
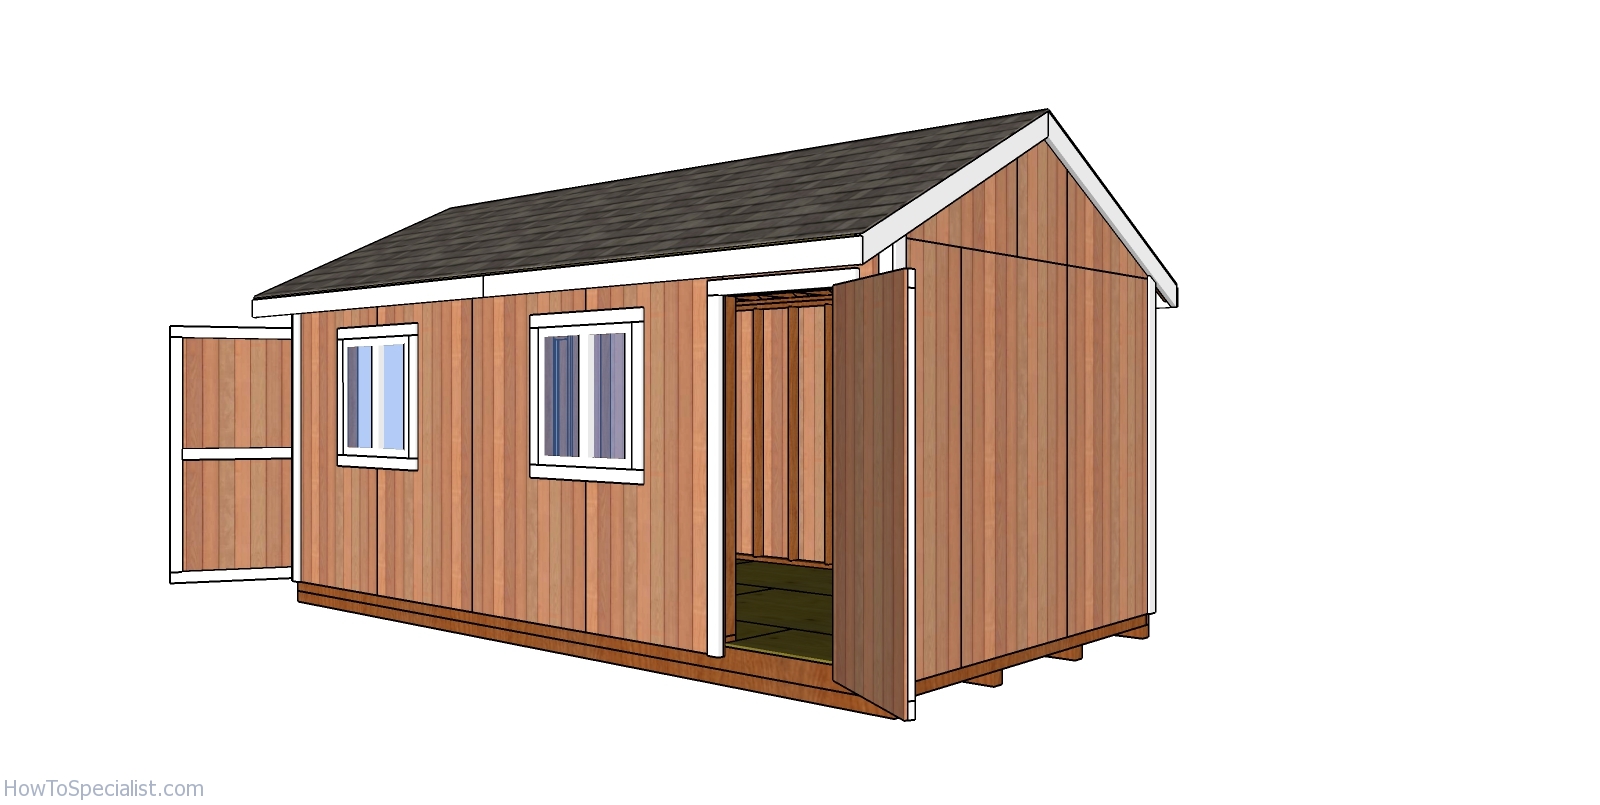
Next, assemble the side wall frame with door and windows. Having a second door to the side of the shed will help you access the interior without having to operate the front double doors. Inn addition, I have added two 3’x3′ windows to the wall so you can get a lot of light inside the shed. Use 2×4 lumber for the components. Use 2×6 lumber for the double door header. You can adjust the size of the door to suit your needs.
Drill pilot holes through the plates and insert 3 1/2″ screws into the studs. Place the studs every 16 “on center. Use double headers for the windows, as well.
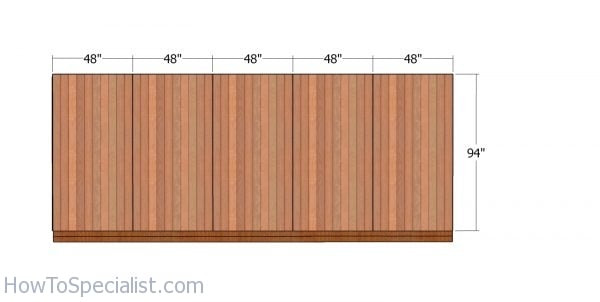
Side wall frame
Build the opposite site wall using the same techniques described above. Place the studs every 16″ on center. Use double studs at both ends of the frame.
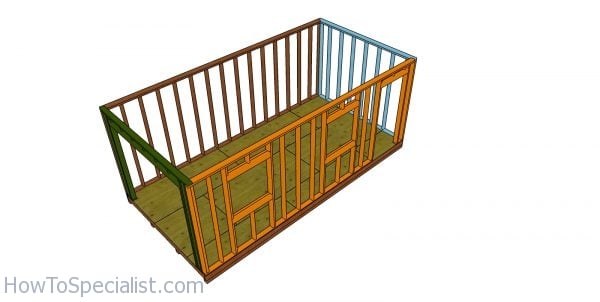
Assembling the frame of the 10×20 shed
Fit the wall frames to the floor of the shed. Align the edges flush and plumb them vertically with a spirit level. Drill pilot holes and insert 3 1/2″ screws through the bottom plates into the floor frame. Check if the corners are square and lock the adjacent wall together tightly with 3 1/2″ screws.
Side wall with windows panels
Use 5/8″ T1-11 siding sheets for the exterior wall panels. Attach the siding sheets to the side wall and align the edges flush. Insert 8d nails along the wall frames, every 8″. Use a saw to cut out the openings for the door and windows.
Side wall panels
Attach the siding sheets to the other side of shed, as well. Leave no gaps between the sheets and align the edges flush.
Front wall panels
Fit the T1-11 siding panels to the front of the shed. Notice the 1 1/2″ inset from the top plate. Make the cuts around the opening.

Back wall panels
Fit the T1-11 siding panels to the back of the shed. Notice the 1 1/2″ inset from the top plate.
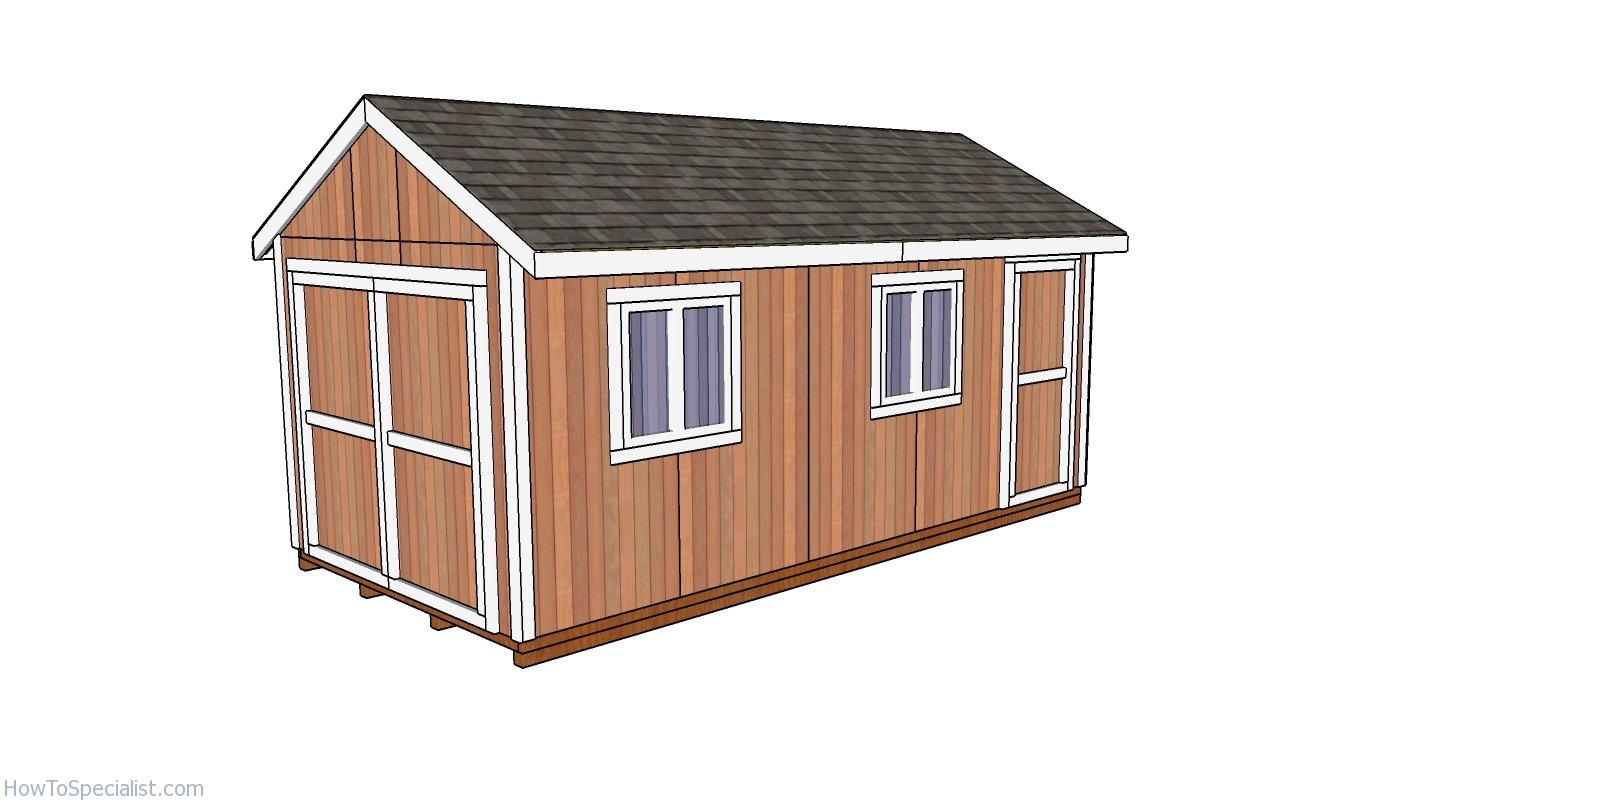
10×20 Gable Shed Plans
This storage shed features double front doors for easy access and a side window, so you have some light inside. You can add more features to the shed, such as a loft or a shed ramp.
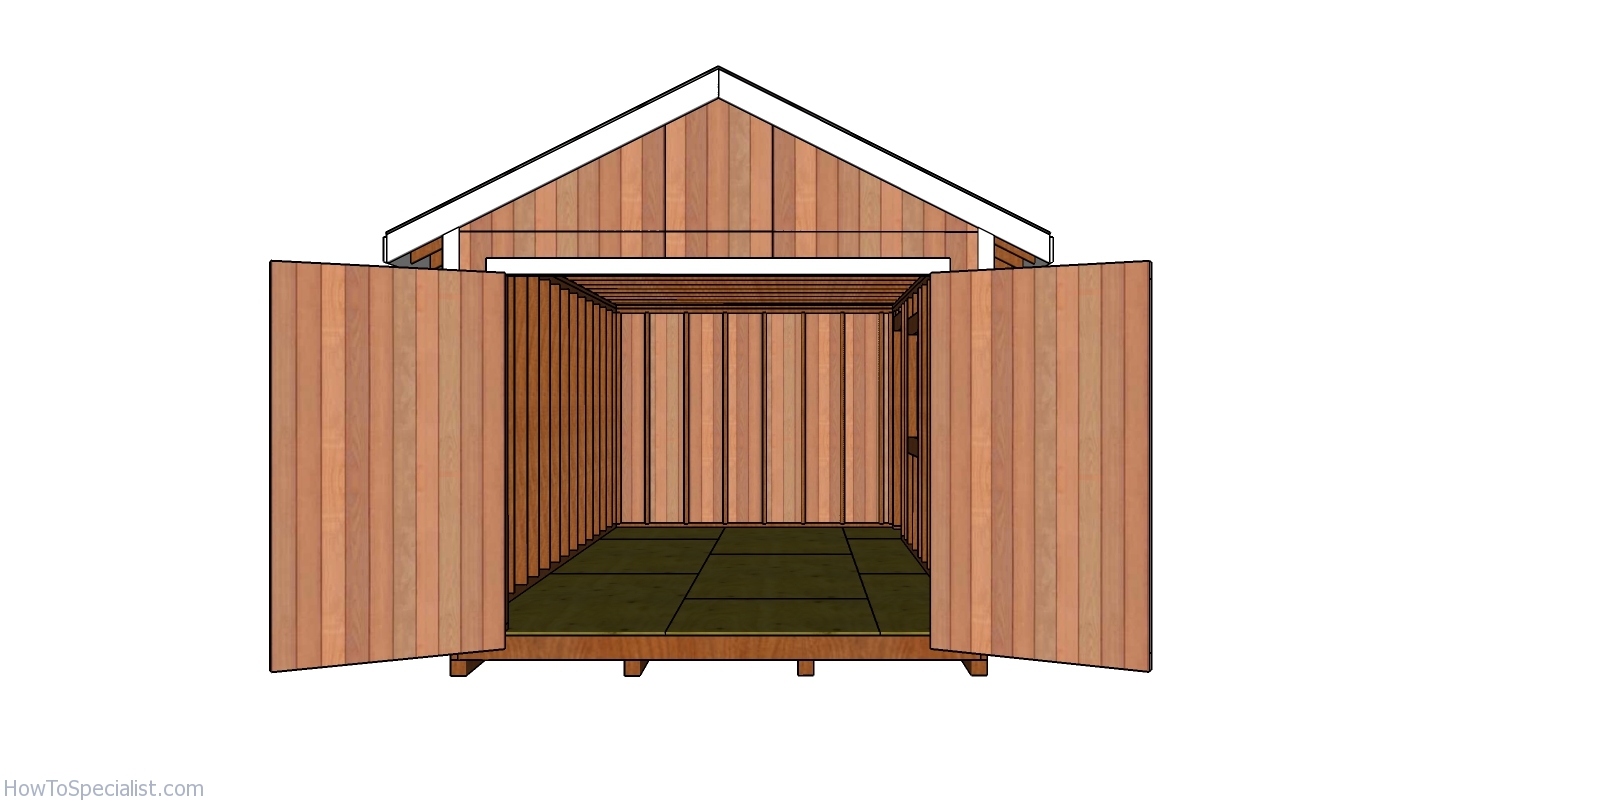
10×20 Gable Shed Plans – front view
This shed is sturdy and in the same time friendly with the budget. The shed is large enough for the needs of a family.
10×20 Gable Shed Plans – back view
Make sure you take a look over PART 2 of the project, so you learn how to build the frame and how to build the front doors. I also have plans for a 10×20 shed with a lean to roof, so you might as well take a look over them. Premium Plans for this shed available in the SHOP.
If you want to download the plans. just click on the GET PDF PLANS button bellow.

Thank you for reading our project about free 10×20 gable shed plans and I recommend you to check out the rest of the projects. Don’t forget to LIKE and SHARE our projects with your friends, by using the social media widgets. SUBSCRIBE to be the first that gets our latest projects.
<< Previous | Next >>
4 comments
Why studs at 86-1/2″ Makes both inside and out wall panels need to be cut at 91″?
That’s why normal studs are 92″ so walls are 96″
You can cut them at any size you want. That was my choice when designing these plans.
How much did all of the materials cost?
Love your site and plans. Previously used your plans for a 8×10 shed that worked out very well. I’m interested in your 10×20 gable roof plan shed but, due to where I live (lots of downpours) and the configuration of the 10×26 concrete slab in my yard, I’d like to substitute the gable roof for a lean to roof (from your 10×20 lean to plans) and flip flop the back wall and front wall and reverse the side panel with the door and window, essentially turning the side panel with window and door into the front wall, and the front panel with the opening into a side panel. Do you see any issues?