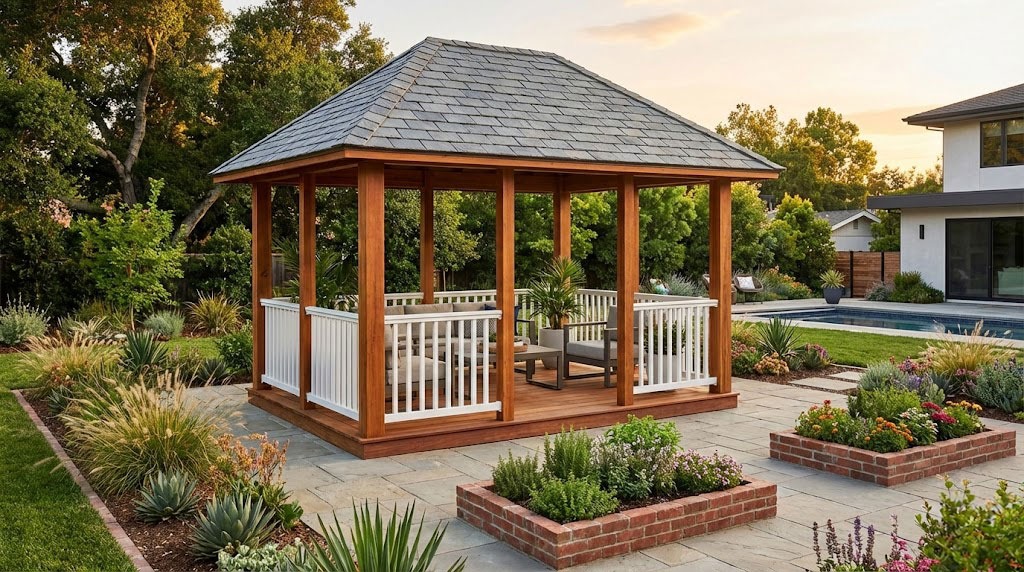
This article is about rectangular gazebo plans. A rectangular gazebo is a nice addition to your backyard, as is has both a functional and aesthetic purpose. If you choose to build a large wooden gazebo, you could spend your weekends together with your family and friends, talking and reflecting about your passions. In addition, if the flooring is large enough, you could even set a table and several chairs to take dinner. Building a wooden gazebo is easy, provided you use the right plans, materials and techniques for the job. If you want to obtain a professional result and to save money by doing the job by yourself, we recommend you to use our step by step plans. Nevertheless, if the dimensions of our rectangular gazebo don’t fit your needs and tastes, you have to scale them up or down, but don’t forget to follow our instructions.
The location of your gazebo is essential for the success of your project. Therefore, we recommend you to read the local building codes before deciding the place where you want to build the gazebo. In most of the cases, it would be nice to build it in the middle of you garden, to be able to admire the flowers, trees and your kids playing on the grass. If you already have a barbeque and a large patio, you should consider building a rectangular gazebo and use it as a place to take dinner.
Although this project is not difficult, you have to work with great care and good judgement, if you want to obtain a neat look. From our own experience, we remind you that any error of measurement or alignment could compromise the whole project, therefore, if you are new to diy projects, use our step by step instructions and plan the rectangular gazebo from the very beginning. If you haven’t built s construction as complex as a rectangular gazebo before, we recommend you to write down on a piece of paper, all the material you are going to use, together with the dimensions and design of your gazebo.
In order to layout the rectangular gazebo on the construction site, you have to use several batter boards and string. In order to make sure the corners of the gazebo will be right angled, we recommend you to use the well-known 3-4-5 rule. In addition, you could also try to measure the diagonals of the rectangular gazebo. If the lengths of the diagonals don’t match, you have to redo the whole procedure, otherwise your gazebo won’t look too good.
Made from this plan
In order to build a rectangular gazebo, you need the following:*
Materials
- 7′ long 4×4 wooden posts
- 6” long nails / screws
- Tube form
- 2×6 wooden boards
- 2×2 balusters
- Cement, sand, gravel
Tools
- Safety gloves, glasses
- Circular saw
- Hammer, spirit level, carpentry pencil
- Ladder, posthole digger
- Power mixer
Tips
- Lay out the outline of the gazebo is a professional manner, using batter boards and string
- Plumb the posts using post level clips (a level that reads in both directions simultaneously)
- Use adjustable post anchors
Time
- One weekend
Related
My best tips on building a rectangular gazebo:
A rectangular gazebo is a great addition to any backyard, providing a comfortable outdoor space for relaxing, entertaining, or dining. Its straightforward shape makes it easier to build than more complex structures, while still offering plenty of design options. Here are my best tips for building a sturdy and stylish rectangular gazebo.
1. Plan Your Design
Before you start building, carefully plan the size, style, and materials for your gazebo:
- Size: A standard rectangular gazebo can be 10×12 feet or 12×16 feet, but you can adjust the size based on the available space and how you intend to use it.
- Height: Consider a roof height of around 8-10 feet for a spacious feel. Make sure the roof design allows for good airflow and shade.
- Roof type: Decide on the type of roof you want. A gable roof is common for rectangular gazebos, providing good water runoff and a classic look. You could also opt for a hip roof or flat roof, depending on your style.
- Material: Choose pressure-treated lumber for the frame for durability, or go for cedar or redwood for a natural, weather-resistant option. You can use metal roofing, shingles, or even a polycarbonate roof for added light.
Planning the design helps ensure the finished gazebo fits your space and style needs perfectly.
2. Prepare the Ground
Preparing the foundation is essential to the stability and longevity of your gazebo:
- Clear and level the area: Mark out the area where the gazebo will sit, and clear away any grass, roots, or debris. Use a level to ensure the ground is flat.
- Concrete footings: For a solid, permanent foundation, dig holes at least 18-24 inches deep at each corner for the posts. Pour concrete footings in these holes to provide a sturdy base for the gazebo.
- Paver or gravel base: If you don’t want to pour concrete, you can create a base using pavers or gravel. This gives the gazebo a solid, level foundation while still allowing for drainage.
A well-prepared base ensures that your gazebo remains stable and level for years to come.
3. Build the Frame
The frame is the backbone of your gazebo, so it needs to be strong and properly constructed:
- Install the corner posts: Use 4×4 or 6×6 posts for the corners of the gazebo. Secure the posts into the concrete footings or post brackets on a paver base. Make sure the posts are level and plumb.
- Add the horizontal beams: Attach 2×6 or 2×8 beams between the corner posts, forming the rectangular frame of the gazebo. These beams support the roof structure, so make sure they are level and securely fastened with lag bolts or heavy-duty screws.
- Add cross supports: For added stability, install cross supports diagonally between the corner posts and the beams. This helps keep the structure rigid and strong, especially in windy conditions.
Ensure the frame is level and sturdy before moving on to the roof.
4. Construct the Roof
The roof is a key element of the gazebo, providing shade and protection from the elements:
- Install the roof supports: Depending on the roof style, install rafters (for a gable roof) or trusses (for a hip roof). Use 2x4s or 2x6s for the rafters or trusses, spacing them about 16-24 inches apart.
- Add the roof sheathing: Once the rafters or trusses are in place, attach plywood sheathing to the roof frame. The sheathing provides a solid surface for the roofing material to be installed on.
- Install the roofing material: Add the roofing material of your choice, whether it’s shingles, metal panels, or polycarbonate sheets. Ensure the roof is watertight and properly vented to prevent heat buildup underneath.
For a professional finish, use drip edges and roofing nails to secure the material, and add ridge caps if necessary.
5. Add Flooring (Optional)
Depending on your design, you may want to add flooring to your rectangular gazebo:
- Wooden deck: Build a decking floor using pressure-treated wood or composite decking for a clean, natural look. Attach the decking to a frame of 2×6 joists spaced about 16 inches apart, secured to the base of the gazebo.
- Pavers: For a more permanent and low-maintenance option, you can lay pavers or stone directly on the ground or over a compacted gravel base.
- Concrete slab: A concrete slab is another durable option that can be left as is or covered with tiles or stone for a more finished look.
A floor can add a polished look to the gazebo and make the space more comfortable and usable.
6. Install Railings (Optional)
If you want to add safety or decoration to your gazebo, railings are a great addition:
- Install railings: Use 2×2 balusters or pre-made railing sections to add railings between the posts. You can leave an open space for an entrance or add a gate for a more enclosed look.
- Height: Ensure the railings are at least 36-42 inches high, depending on local building codes for safety.
Railings can give the gazebo a more finished and formal look while adding safety, especially if the gazebo is raised off the ground.
7. Add Finishing Touches
Once the structure is complete, it’s time to add the finishing touches:
- Paint or stain: Protect the wood by applying a weather-resistant stain or exterior paint. This not only enhances the look of the gazebo but also protects it from moisture, sun, and insects.
- Lighting: Add outdoor-rated lighting such as string lights, lanterns, or LED strips to create a cozy atmosphere for evening use.
- Furniture: Furnish the gazebo with outdoor furniture, like a dining set, sofa, or lounging chairs to create a comfortable space for relaxation or entertaining.
- Curtains or screens: For added privacy or to keep insects out, install curtains or screens around the sides of the gazebo. These can be easily opened or closed depending on your needs.
Finishing touches can turn a simple structure into a stylish and functional outdoor retreat.
Bonus Tip: Consider Adding Built-In Seating or Planters To make your gazebo even more functional and stylish, consider adding built-in seating along the edges or planter boxes to bring greenery into the space.
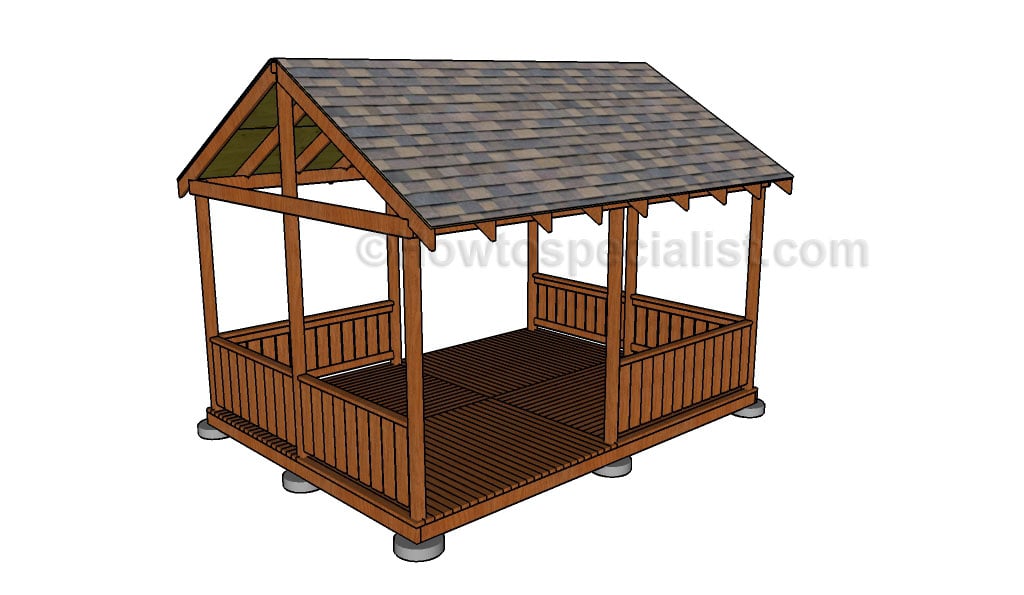
Rectangular gazebo plans

Gazebo footings
First of all, you have to build footings for the rectangular gazebo, as to make sure the posts will be secured properly. Therefore, you have to dig 10-15” in diameter holes (6” below the frost line – at least 3′), fill 3” with gravel and insert tube forms (or build square forms using 2x4s ).
Mix concrete, fill the forms and install the adjustable post anchors. Use a straight edge and a level, to make sure all four footings are horizontal.

Installing gazebo post
After the concrete has dried out completely (about 48 hours), you have to install the four posts into place. Therefore, you have to use decay resistant wooden posts (redwood, construction posts) and adjust their dimension to about 8-9′. Nevertheless, you can change their height according to your needs.

Installing gazebo posts
Continue installing the rest of the posts into place, in the same way described above. Under any circumstances do not drive in the screws, without plumbing the posts or without locking them into position with two braces.

Rectangular gazebo floor plans
After you have installed the four posts into place, you have to build the deck frame of your rectangular gazebo. Therefore, use 2×6 joists and lock them into position, by inserting 3” screws.
As you can see in the image, you have to fasten the joists to the exterior of the posts and locks them with several screws. In addition, you have to install intermediate joists every 2′ and secure them into position by using metal joists hangers.

Rectangular gazebo plans
Next, you have to attach 4×4 posts to the deck joists, as in the image: two posts on the front face and one on the middle of the other sides of the gazebo. These posts have a structural role, as they will support the weight of the roof, therefore make sure you follow our instructions.

Gazebo flooring plans
Installing the decking is not difficult, if you have followed our instructions and rectangular gazebo plans up to this stage.
Wooden gazebo roof plans free

Rectangular gazebo frame plans
Next, install the top plate, using 2x4s or 4x4s. The installation process is straight forward, but you have to remember several tips, to get the job done as a professional. We recommend you to cut out the ends of the post in a L-shape and then, join them together. Insert several 6” screws, after you ensure the top plates are perfectly level.

Rectangular gazebo roof plans
After you have built the main frame of the rectangular gazebo, you should start the construction of the roof. Therefore, you have to use 2×6 hip rafters and secure the ridge board with several screws.
Use a spirit level to ensure the ridge board is level, otherwise the roof of your gazebo won’t be symmetrical. Work with great care and ask a friend to assist you, as you need someone to hold the components into place, while you insert the screws.

Rectangular gazebo roof plans
Install the intermediate rafters as in the image, making sure you lock them into place with 3-4” screws. It is essential to use a tape measurement when installing the rafters, otherwise they won’t be equally spaced.
Work with great care and cut their ends, as to be perfectly aligned one with another. If the rafters are longer than 7′, we recommend you to install 2×6 purlins.

Rectangular gazebo roof plans
Continue installing the rest of the rafters, as in the image. Work with patience and with great care, to get the job done in a professional manner.
From our experience, we recommend you to place the rafters every 1′, otherwise the roof won’t be rigid enough and might collapse during winter storms. Use long screws to secure the rafters, after you drill pilot holes.

Rectangular gazebo roof
There are many roofing options but we recommend you to use asphalt singles, as they are both durable and have a neat look. Before installing the shingles, you have to cover the frame either with 2×6 wooden slats or with plywood.
Each of these options is viable, but if you choose the plywood, we recommend you to leave 1/8” expansion gaps between the sheets.
Rectangular gazebo railing plans

Installing gazebo bottom rail
First of all, you have to install 2×6 wooden boards, about 4” above the decking. Installing the bottom rail is not difficult, if you use the right techniques and materials.
Therefore, you have two main alternatives: on one hand, you could use corner brackets to support the bottom rail, while on the other hand you could toenail the lumber with 4” screws. Use a spirit level to make sure the bottom rail is horizontal.

Rectangular gazebo railings plans
Next, choose the baluster designs that fit your needs and tastes, before installing them into place. Choosing their design is a complex task, as there are many options, from 1×8 slats up to 2×2 balusters. Drive screws through the bottom rain in the bottom of the balusters and toenail their top to the head rail.
Cover the roof with roofing paper and install the asphalt shingles. Pay attention to the ridges, otherwise the water might damage your roof.
Afterwards, you have to protect the wooden posts and the railings with substances designed for outside use. Don’t forget that you have to refresh the paint coats every 2-3 years, otherwise the water would damage the frame of the gazebo.
Don’t forget to take a look over these rectangular gazebo plans, as there are much more complete and include a full cut list of the materials required for the job. This gazebo is easier to build, as it has a simpler shape.
By following these tips, you’ll be able to build a beautiful and sturdy rectangular gazebo that enhances your outdoor space. Whether you’re using it for dining, relaxing, or entertaining, a well-designed gazebo adds both style and functionality to your backyard.
Thank you for reading our article about rectangular gazebo plans and we recommend you to check out the rest of our projects. Don’t forget to share our projects with your friends, by using the social media widgets.
1 comment
I would like to build a rectangular gazebo 10×12 similar to the one on your site however there is no button to click on to download a PDF for the plans. Is it possible that you could send them to my email address I have provided. Thanks