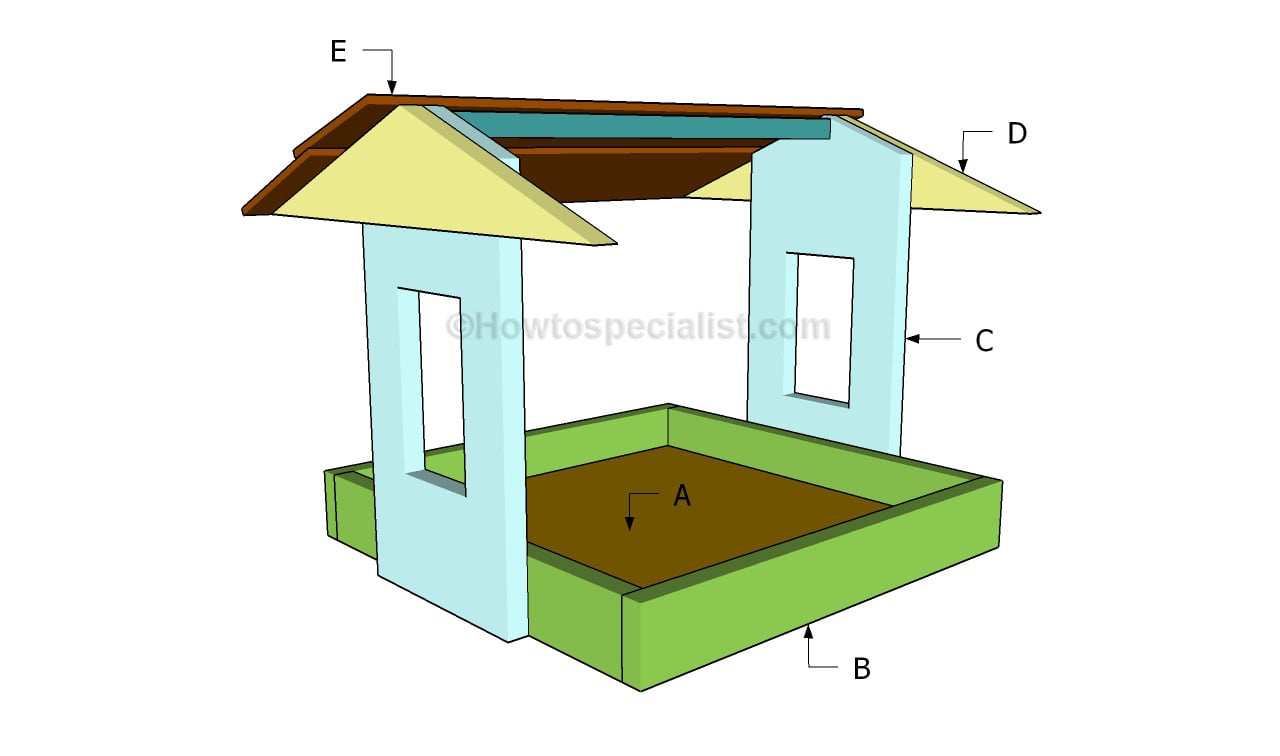
This step by step diy woodworking project is about how to build a platform bird feeder. Building a basic bird feeder with a simple design is ideal for any backyard, especially if you have a few scrap piece of lumber. It is essential to plan every aspect of the project before starting the constructions and the assembly, in order to prevent costly mistakes and to keep the costs under control.
There are many designs to choose from when building a bird feeder, so make sure you take a look over the rest of the similar plans shown on our site. Afterwards, buy weather resistant lumber, as the feeder will be exposed to moisture and sunlight. It is essential to choose lumber that is in a very good condition, meaning the boards should be perfectly straight and have no cracks.
Moreover, make sure the lumber hasn’t been treated with toxic substances that might hinder the birds. In order to lock the boards together tightly, we recommend you to add waterproof glue to the joints and to insert finishing nails. Cover the structure with a few coats of light paint, if you want to protect the components from decay and from water damage. See all my Premium Plans in the Shop.
Made from this plan
Building a bird feeder

Building a platform bed feeder
Materials
- A – 1 piece of 3/4 plywood – 16″x16″ long BASE
- B – 2 pieces of 1×3 lumber – 16” long, 2 pieces – 17 1/2″ long TRIMS
- C – 2 pieces of 1×8 lumber – 15 1/2″ long SUPPORTS
- D – 2 pieces of 1×4 lumber – 17 1/2″ long, 1 piece of 1×1 lumber – 17 1/2″ long RAFTERS
- E – 4 pieces of 1×6 lumber – 22 1/2″ long (1/4″ thick) ROOF
- 1 piece of 3/4″ plywood – 2’x2′
- 1 piece of 1×3 lumber – 8 ft
- 1 piece of 1×8 lumber – 3 ft
- 1 piece of 1×1 lumber – 2 ft
- 1 piece of 1×4 lumber – 3 ft
- 1 piece of 1×6 lumber – 8 ft (1/4″ thick)
- 1 1/4″ screws
- glue, stain
- wood filler
Tools
- Safety gloves, glasses
- Miter saw, jigsaw
- Chalk line, tape measure, spirit level, carpentry pencil
- Drill machinery and drill bits
Tips
- Apply several coats of wood stain to the wooden components
- Fill the holes with wood filler and smooth the surface
- Plumb the sides of the bench with a spirit level
Time
- One Day
Related
How to build a platform bird feeder
The first step of the project is to build the base of the bird feeder. As you can notice in the free plans, you need to attach 1×3 trims to a piece of 3/4″ plywood. Add waterproof glue to the joints and insert several finishing nails. Make sure you align the components properly, if you want to get the job done in a professional manner.
The next step of the woodworking project is to attach the supports to both sides of the frame. As you can notice in the plans, we recommend you to build the supports out of 1×8 lumber, by following the information shown in the plans. Cut out the pieces by drilling a stating holes and by using a jigsaw.
Cut small triangles out of wood and attach them to the top of the supports, as shown in the plans. Work with attention and lock the rafters into place with waterproof glue and finishing nails. In addition, fit a small piece of 1×1 lumber between the two sides of the bird feeder, in order to reinforce the structure.
Cover the roof of the feeder with small pieces of 1/4″ thick wood. Make sure the pieces of wood overlap at least 1″, in order to drain the water properly. Use galvanized nails to lock the pieces of wood to the rafters.
Last but not least, you should take care of the finishing touches. Therefore, check if all the components are locked into place properly and make adjustments if necessary. Smooth the exposed edges and the wooden surfaces with 120-grit sandpaper, along the wood grain.
Thank you for reading our project about how to build a platform bird feeder and we recommend you to check out the rest of the projects. Don’t forget to LIKE and SHARE our projects with your friends, by using the social media widgets. SUBSCRIBE to be the first that gets our latest projects.


