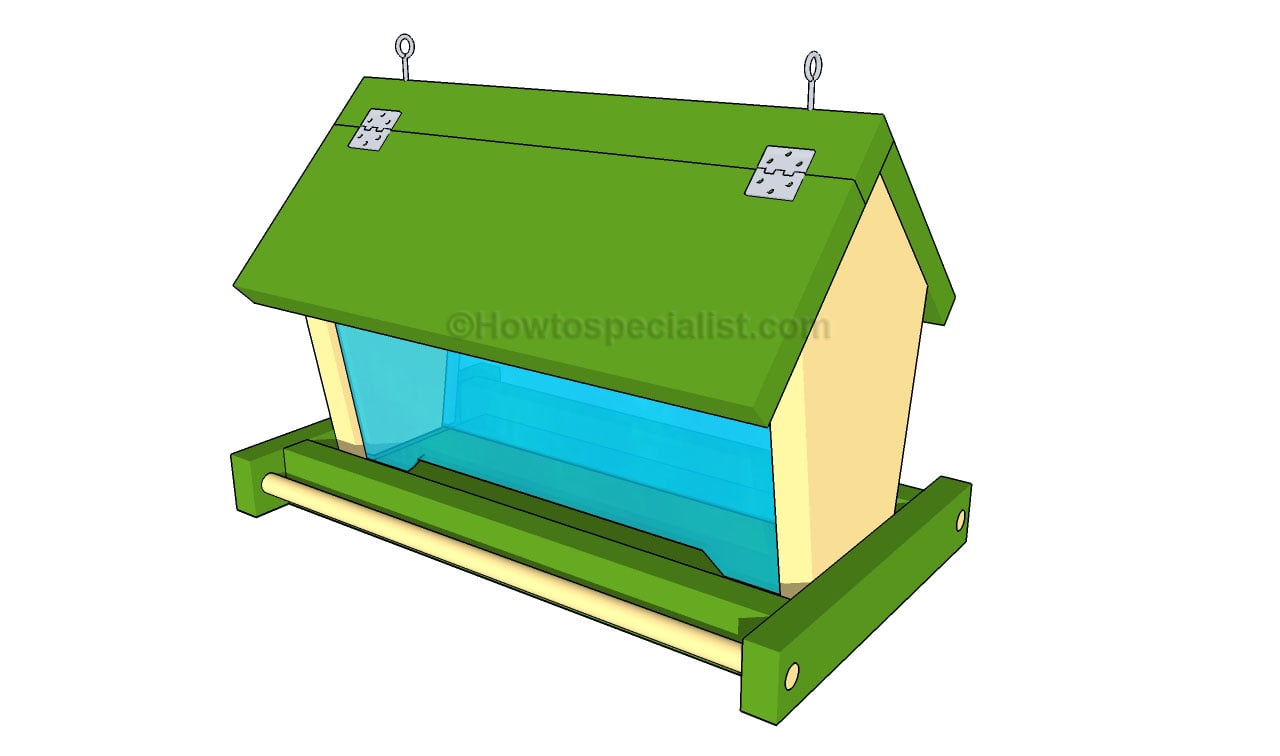
This step by step project is about how to build a bird feeder for kids. Building a wooden bird feeder is easy and it will help you attract birds to your backyard. If you want to involve your kids in the project, you should know this is a great opportunity to pass down several woodworking skills. Choose a simple design, as the one shown in this project and use professional tools.
There are many designs to chose form when building a bird feeder, so you should study the alternatives before starting the actual construction of the project. As you will see trough the instructions, we recommend you to invest in quality and weather-resistant lumber, such as pine, cedar or redwood. Take accurate measurements and use a good circular saw when building the components.
Always align the wooden components at both ends and add waterproof glue to the joints, in order to create a rigid structure. Moreover, we recommend you to drill pilot holes trough the wooden components before inserting the finishing nails, to prevent the wood from splitting. Work with attention and with great care and always plan everything form the very beginning. See all my Premium Plans in the Shop.
Made from this plan
Building a bird feeder for kids

Building a bird feeder
Materials
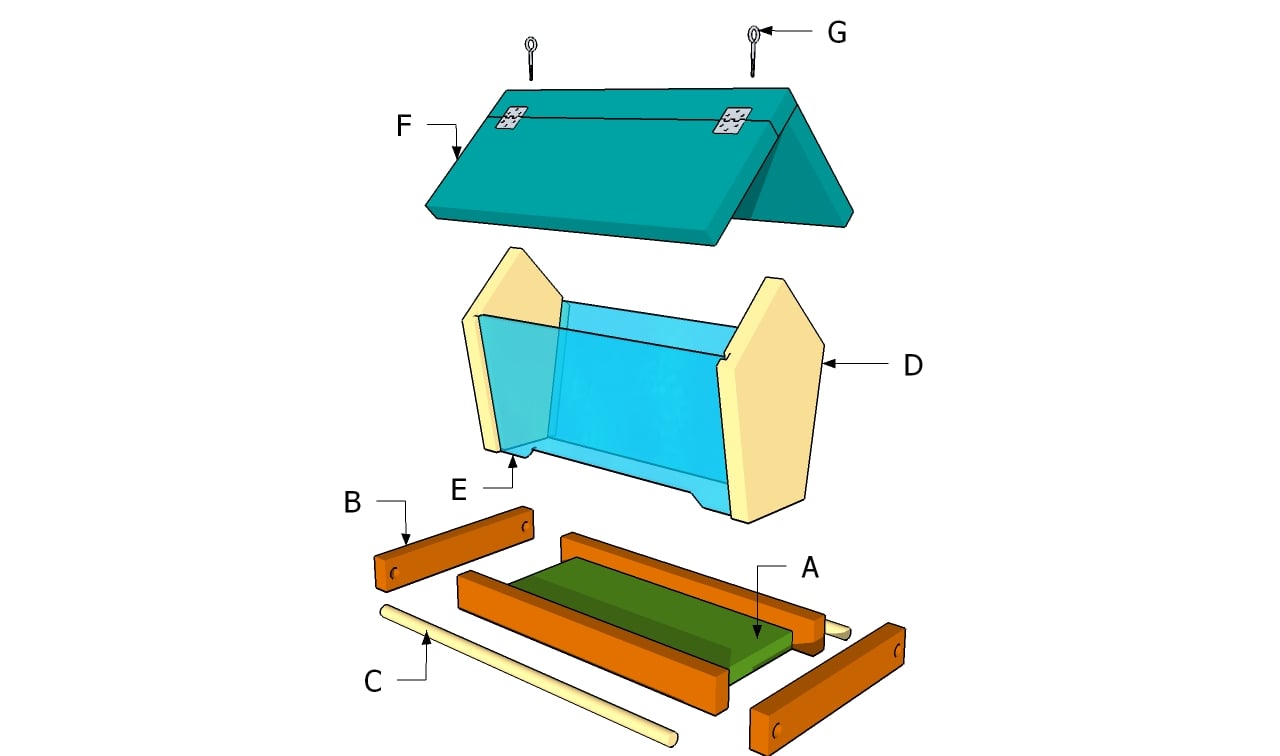
- A – 1 piece of 1×6 lumber – 14″ long BASE
- B – 2 pieces of 1×2 – 9″ long, 2 pieces – 14″ long TRIMS
- C – 2 pieces of 1/2″ dowels – 15 1/2″ long SUPPORTS
- D – 2 pieces of 1×6 lumber – 8 1/2″ long FACES
- E – 2 pieces of 1/4″ plexiglass – 6 1/4″ x 13″ long SIDES
- F – 1 piece of 1×6 lumber – 14″, 1 piece – 4 3/4″x14″, 1 piece – 1 1/2″ ROOF
- G – 2 eye screws HANGERS
- 1/2″ dowel – 3 ft
- 1 piece of 1×6 lumber – 6 fr
- 1 piece of 1/4″ plexiglass – 13″ x 26″
- 1 piece of 1×2 lumber -4 ft
- hinges
- hooks
- bird food
- 2 1/2″ screws
- 1 1/4″ screws
- glue, stain
- wood filler
Tools
- Safety gloves, glasses
- Miter saw, jigsaw
- Chalk line, tape measure, spirit level, carpentry pencil
- Drill machinery and drill bits
Tips
- Add trims to the bird feeder
- Secure the walls to the floor frame with galvanized screws
Time
- One Week
Related
How to build a bird feeder for kids
The first step of the woodworking project is to build the base of the bird feeder. As you can notice in the image, we recommend you to build the components form 1×6 lumber, using the information from the image. Use a good saw with a sharp edge to build the components, after taking accurate measurements. Make the side trims form 1×2 lumber and lock them to the base with finishing nails and waterproof glue.
The next step of the woodworking project is to fit the wooden dowels to both sides of the bird feeder. Drill pilot holes trough trims, fit the dowels and add waterproof glue to lock them into place. Leave at least 1/2″ from the edges when drilling the pilot holes, to prevent the wood from splitting.
Building the front and back faces of the bird feeder is one of the most complex steps of the woodworking project, but anyone can get the job done, if you pay attention to the instructions. Use two pieces of 1×6 lumber to build the faces of the feeder, using the pattern shown in the plans. Mark the cut lines with a pencil and cut the components with a saw. Carve 1/4″ channels along the sides of the gable faces.
Cut two pieces of plexiglass and fit them on both sides of the bird feeder. Make sure they slide easily inside the channels, otherwise you won’t be able to remove them and clean the interior of the wooden box. Smooth the cut edges of the plexiglass before fitting them into place.
As you can notice in the plans, we recommend you to cut a small notch at the bottom of the plexiglass, otherwise the birds won’t have access to the seeds. Use the pattern shown in the image, if you want to add style to your project.
One of the last steps of the bird feeder for kids project is to build the roof. As you can see in the image, one side of the roof should slide and open, as to fill the feeder with seeds. In order to get a professional result, you need to build the rof components from 1×6 lumber.
Attach the components into place, add waterproof glue and insert finishing nails, as to lock them to the frame in a professional manner. Add small hinges to the lid, as in the plans.
If you want to hang the bird feeder to a tree, we recommend you to insert eye screws into the top of the roof. Use several pieces of string to hang the construction. Alternatively, you could set a posts (at least 6′ long) into concrete and attach the bird feeder on top.
Last but not least, we recommend you to take care of the finishing touches. In order to get a professional result, fill the holes and the gaps with wood filler and let it dry out for a few hours. Check if there are protruding screws and fix this issue, if necessary.
Thank you for reading our project about how to build a bird feeder for kids and we recommend you to check out the rest of the projects. Don’t forget to LIKE and SHARE our projects with your friends, by using the social media widgets. SUBSCRIBE to be the first that gets our latest projects.


