This step by step woodworking project is about floating queen size platform bed plans. If you want to enhance the look of your bedroom, you should consider building a floating bed. This project features instructions for building a wooden made queen size bed frame. Follow the building codes and hire a professional contractor if you don’t have the right skills to undertake the project on your own.
We recommend you to invest in the best materials you could afford. Therefore, you should buy quality lumber, such as pine. Always take accurate measurements before adjusting the size of the components at the proper size. Drill pilot holes trough the components before inserting the wood screws, to prevent the wood from splitting. See all my Premium Plans in the Shop.
Made from this plan
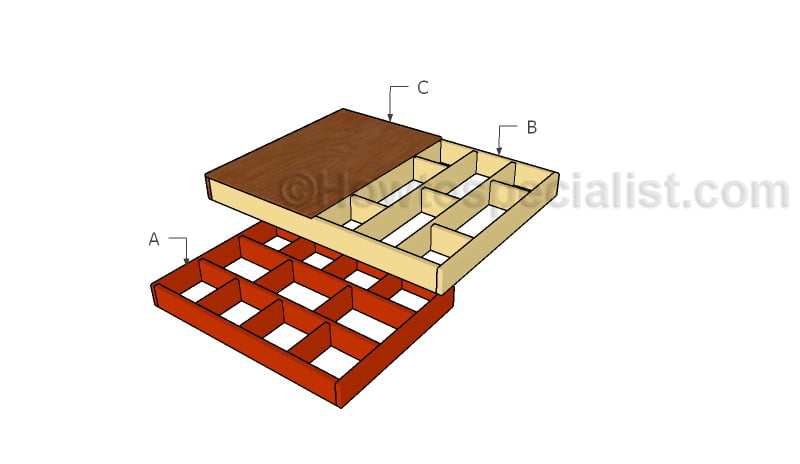
Building a floting platform bed
Materials
- A – 2 pieces of 2×8 lumber – 50″ long, 4 pieces – 67″ long, 8 pieces – 14 3/4″ long BASE
- B – 2 pieces of 2×8 – 79″ long, 2 pieces – 62″ long, 5 pieces – 59″ long, 9 pieces – 12″ long BED FRAME
- C – 2 pieces of 3/4″ plywood – 41″x62″ long SURFACE
- 2 pieces of ¾” plywood – 4’x6’
- 15 pieces of 2×8 lumber – 8′
- 2 1/2″ pocket screws
- 1 5/8″ screws
- connectors
- stain, glue, putty
- mattress
Tools
- Safety gloves, glasses
- Miter saw, jigsaw
- Chalk line, tape measure, spirit level, carpentry pencil
- Drill machinery and drill bits
Tips
- Measure the mattress before starting the project
Time
- One Weekend
Floating queen size platform bed plans
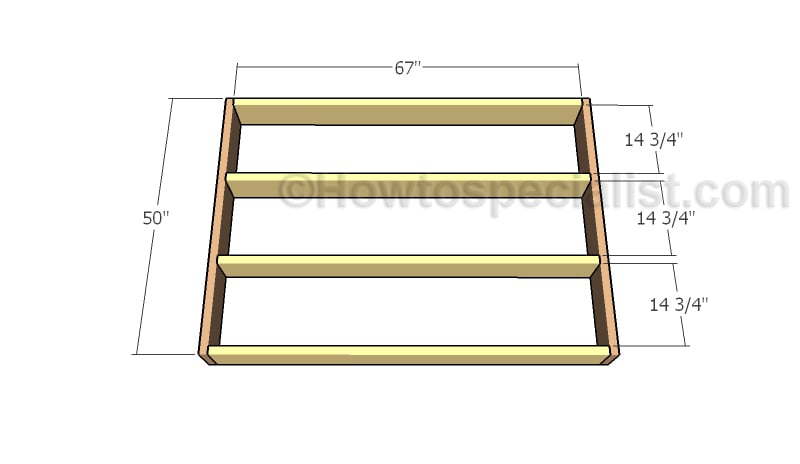
Building the base frame
The first step of the project is to assemble the frame for the base. Cut the components from 2×8 lumber. Align the edges with attention. Drill pocket holes at both ends of the 67″ long beams and insert 2 1/2 “screws into the perpendicular components. Make sure the corners are flush.
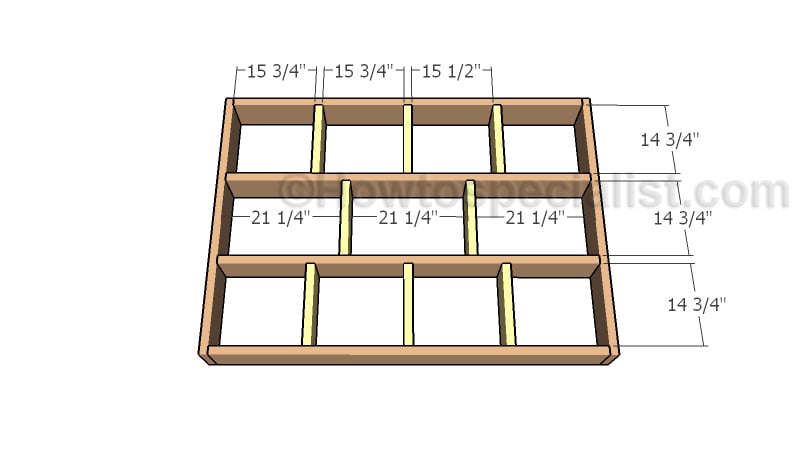
Fitting the blockings to the base frame
Cut blockings from 2×8 lumber. Drill pilot holes through the beams and insert 2 1/2″ screws into the blockings.
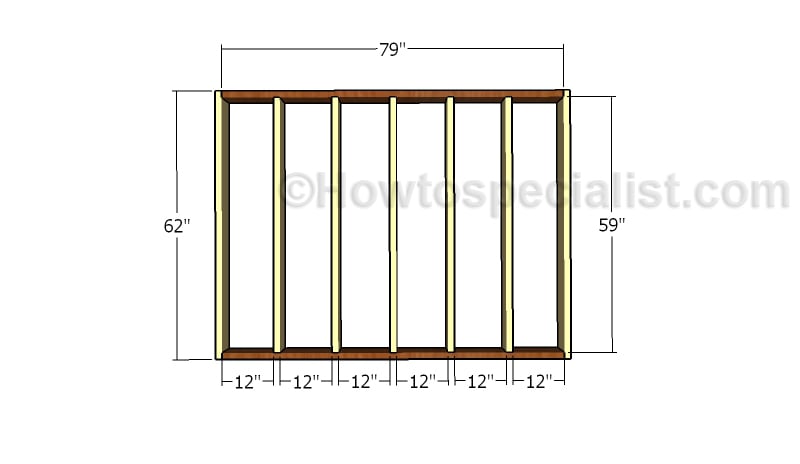
Assembling the top frame
Next, you need to build the top frame for the floating bed, the one that will actually support the mattress. Cut the components from 2×8 lumber. Drill pocket holes at both ends of the 79″ screws and insert 2 1/2″ screws into the 62″ beams.
Afterwards, you need to attach the intermediate supports. Drill pocket holes at both ends of the beams and secure them to the frame with 2 1/2″ screws. Make sure the corners are square and leave no gaps between the components.
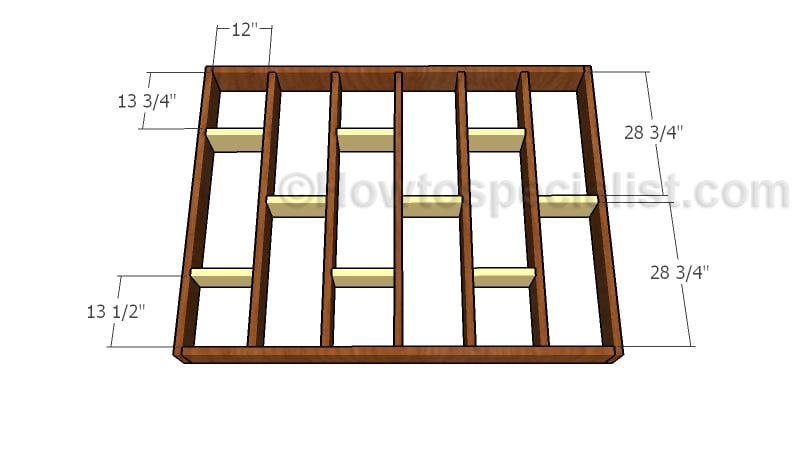
Fitting the blockings to the top frame
Fit 2×8 blockings to the frame, as shown in the diagram. Drill pocket holes at both ends of the blockings and insert 2 1/2″ screws into the beams.
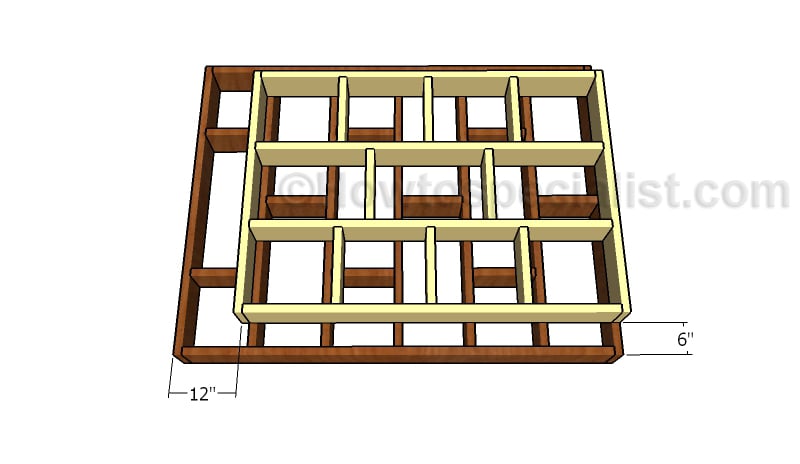
Assembling the frames
Attach the base to the top frame, making sure you align all the components with attention. Drill pilot holes through the beams and insert 3 1/2″ screws into the top frame.
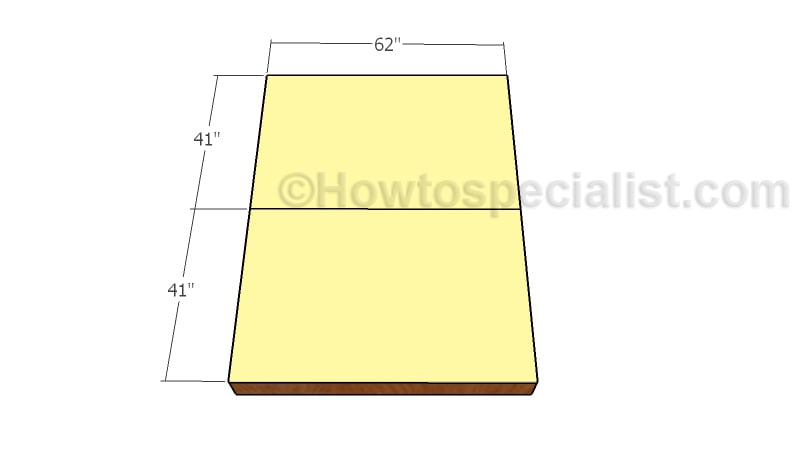
Attaching the plywood panels
Attach the 3/4″ plywood panels to the frame of the bed. Leave no gaps between the sheets and double check if the edges are flush, before securing them into place with 1 5/8″.
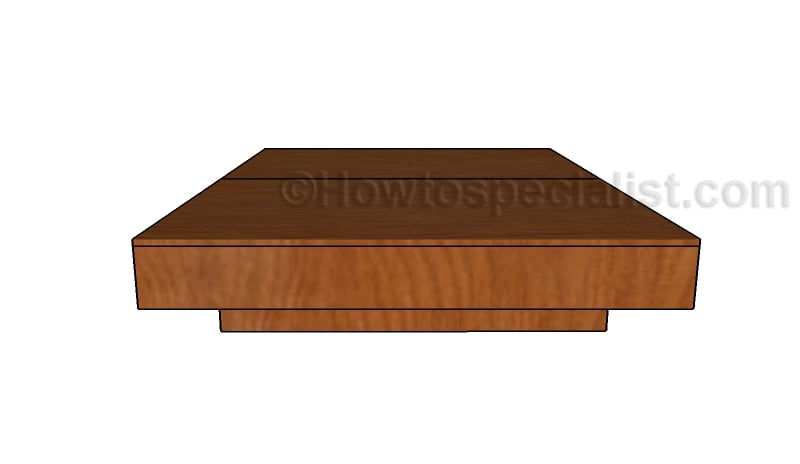
DIY Floating bed frame
Smooth the surface thoroughly and make sure the structure is rigid.

Floating Queen Size Platform Bed Plans
Thank you for reading our project about queen size floating bed frame plans and we recommend you to check out the rest of the projects. Don’t forget to LIKE and SHARE our projects with your friends, by using the social media widgets. SUBSCRIBE to be the first that gets our latest projects.

21 comments
How many screws does this take?????
A few hundreds screws (2 1/2″ pocket screws) and under 100 for the plywood (1 5/8″ screws). In addition, you need 3 1/2″ screws for connecting the frames together.
Thank you for marking these plans. They are great. I do have one question though. In your parts list you say to get 6″ lumber for the base but in the instructions you say to start the assembly of the base with 2×8 construction. What is the base supposed to be? 6 or 8 inch lumber?
Respectfully Dan-
Either one… it is a matter of taste.
thanks for this article, its helpful. do you have to attach the base frame to the top frame?
Yes. You need to lock them together tightly, otherwise the bed won’t have stability. Pill pilot holes through the top frame and insert screws into the base.
If one accepts standards that say a 2 x 6 weighs 2.00 lbs/ft. and a 2 x 8 weighs 2.64 lbs/ft. then the base frame plus top frame weighs 232 lbs. Add to that the 3/4″ ply, at 2.13 lbs/sq. ft. (for this plan, 35 sq. ft. to equal 74.8 lbs.) the total weight is 307 lbs.
Don’t know about you but I am not going to be able to complete the base and top and then turn the thing over to add the plywood deck by myself. Got friends? Once assembled, at 307 lbs., I am not going to be able to move this frame. Add approximately 70 lbs. for a memory foam queen mattress and, well . . . you get the picture.
Using adequately braced 1-by lumber would provide more than adequate support and cuts the base/top weight in half 116 lbs.). Still, the completed frame weighs in at 190 lbs. and 260 lbs. with mattress. Be it carpet or floor, moving the bed is going to require a team – or disassembly.
My point in all of this is, this is not a one-man project and, upon completion, the bed might be best located in a spot where it will never have to be moved – for whatever reason. “Honey, I was thinking . . . .
The whole thing is assembled with screws. So if you need to move it, just remove the screws holding the sections together and move separately.
How tall is the finished bed frame?
15 1/4″ without the mattress.
I like the idea of a 2×4 frame in place of the 2×8’s for a lower profile. Now can the frame be slightly undersized to be hidden by the mattress? So that I’m not busting my shins on the frame while getting into bed in a dark room?
Yes, you can do that. It will be still sturdy enough if you reinforce the joints.
Roughly how much did the supplies cost to complete the project?
How manny feet of wood was required to make the 2 sections?
The measurements you listed shows each section of the top frame as 12 inches apart but that only ends up being 72 inches not 79.
You need to add the thickness of the beams as well. 12″ is the gap between them
I was wondering if I wanted The bed higher can I use 2×10’s in the base and 2×8’s for the frame instead?
Yes, you can
I was wondering how do I attach the base frame to the top frame?
You can use rafter ties, or you can drill pilot holes at angle and inset screws.
Just curious on how many pieces of lumber all together?