This step by step diy article is about 2×4 bed plans. If you want to build a nice farmhouse bed out of 2×4 lumber, pay attention to these instructions. Although there are many designs you could choose from, in this article we will show you all you have to know about making a classic twin size farmhouse bed out of common materials. If you have worked with lumber before, the carpentry techniques should be familiar to you.
Buy quality lumber, made for building lumber, if you want to get a durable bed. Nevertheless, you could save some money if you purchase lumber with knots, which could even enhance the look of project, giving it a rustic appearance. Select the slats with great attention, checking if they are in a good condition (the lumber has to be straight and without chips, dents or cracks).
Always aligned the components before locking them together with screws. In addition, we recommend you to pre-drill the lumber, otherwise the wood might easily split. Add glue to the joints, if you want to enhance their bond. Smooth the cut edges with fine grit sandpaper and remove the residues using a vacuum cleaner. Make sure you take a look over the related plans to get an idea about what you can build for your home. See all my Premium Plans in the Shop.
Made from this plan
Simple farmhouse bed plans

Building the 2×4 bed
Materials
- A – 2 pieces of 2×4 lumber – 25” long, 2 pieces – 37″ long LEGS
- B – 4 pieces of 2×4 lumber – 39″ long CLEATS
- C – 7 pieces of 2×4 lumber – 6” long, 7 pieces – 18″ long RAILS
- D – 2 piece of 2×4 lumber – 75 1/2” long SLATS
- E – 2 pieces of 1×1 lumber – 75 1/2″ long CLEATS
- F – 17 pieces of 1×4 lumber – 39” long SLATS
- F – 2 piece of 2×4 lumber – 48″ long TRIMS
- 2 1/2″ screws, 2 1/2″ pocket screws
- 2 pieces of 1×1 lumber – 8 ft
- 9 pieces of 2×4 lumber – 8 ft
- 9 pieces of 1×4 lumber – 8 ft
- putty, glue, stain
- mattress
Tools
- Safety gloves, glasses
- Miter saw, jigsaw
- Chalk line, tape measure, spirit level, carpentry pencil
- Drill machinery and drill bits
Tips
- Pre-drill holes in the wooden components, before driving in the screws
- Smooth the exposed edges, by using a router with a 1/4” bit
Time
- One day
Related
- How to build a toddler bed
- How to build a storage bed frame
- How to build a crib
- Lifeguard chair plans
Building a 2×4 bed

Building the footboard
The first step of the woodworking project is to build the footboard for the simple farmhouse bed. As you can easily notice in the diagram, we recommend you to build the components out of 2×4 lumber, after taking accurate measurements. Drill pocket holes at both ends of the cleats, as well as at both ends of the guard rails. Align everything with attention, making sure the edges are flush and insert 2 1/2″ screws and add glue to make sure the structure is rigid.

Fitting the trims
Next, you have to fit the 2×4 trim on top of the footboard. Drill pocket holes along the top of the top cleat and insert 2 1/2″ screws into the 2×4 trim. Work with attention and add glue to the joints to create a rigid bond between the components.

Building the headboard
Next, you have to build the headboard in the same manner described above. The only difference is the size of the components. Drill pocket holes at both ends of the cleats and of the guard rails. Assemble everything tightly with 2 1/2″ screws and add glue to the joints. Place the guard rails equally spaced.

Fitting the trim to the headboard
Fit the 2×4 trim on top of the headboard and secure it to the structure by using 2 1/2″ screws, after making several pilot holes. Add glue to the joints and remove the excess with a damp cloth.

Assembling the frame of the bed
After building the footboard and the headboard, you need to lock them together by fitting the side slats to the bed frame. Drill pocket holes at both ends of the slats and secure them to the structure by using 2 1/2″ screws. Add glue to the joints and remove the excess by using a damp cloth. Make sure the slats are perfectly horizontal and the corners square. Leave no gaps between the components.

Fitting the side cleats
Next, install the 1×1 cleats to both sides of the bed frame. In order to get a professional result, we recommend you to check if they are horizontal by using a spirit level. Drill pilot holes and secure them into place by using 1 1/4″ screws. Add glue to the joints and remove the excess with a damp cloth.

Fitting the support slats
One of the last steps of the project is to fit the 1×4 support slats to the cleats. Cut the slats at the right size and secure them into place by using 1 1/4″ screws. Place the slats equally spaced to get a professional result.

Side Rails
Use 2×4 lumber for the side rails. Remember that this step is optional and that you should adjust the size of the rails according to the thickness of the mattress and based on your own needs. This is just a starting point, so have this in mind before building the rails.

2×4 Bench Plans
Last but not least, you need to take care of the final touches. Therefore, you need fill all the holes with a good filler and let the compound to dry out properly, before sanding the wooden surface with 120-grit sandpaper.
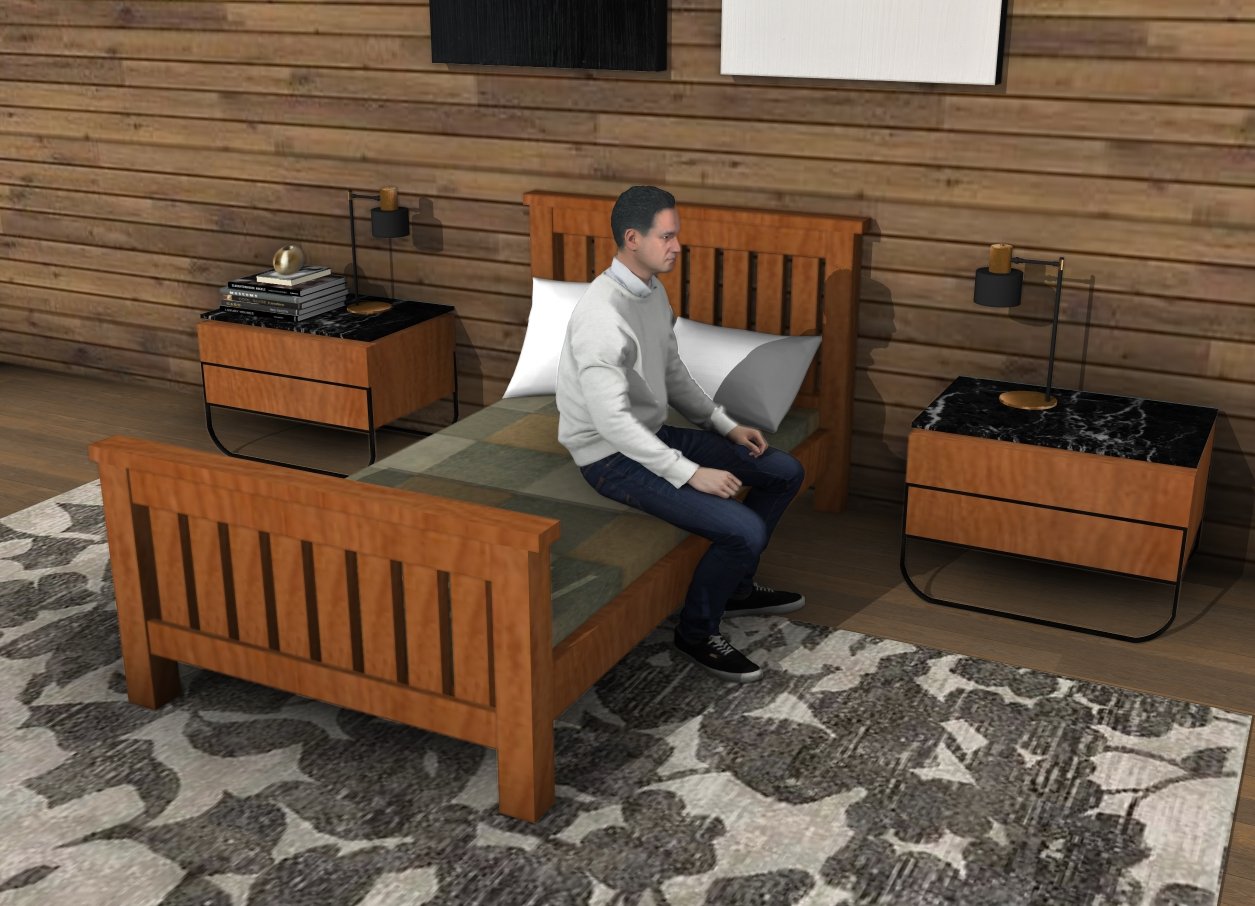
How to build a 2×4 bed frame
Building a 2×4 bed frame is a game-changer for your bedroom, offering both style and sturdiness. With easy-to-follow plans, you can create a custom bed frame without breaking the bank.
Use basic tools and affordable 2×4 lumber to craft a piece that perfectly suits your space and taste.

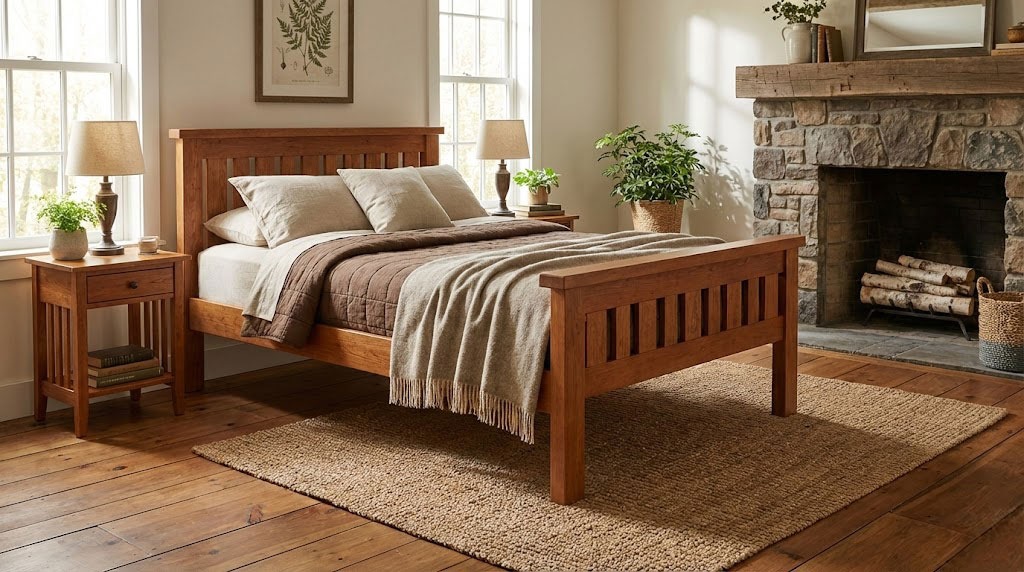
Single bed plans
Building a 2×4 bed frame is a cost-effective and rewarding project. You can expect to spend between $50 and $100 on materials, depending on the quality of wood and finishes you choose. With basic tools and a weekend’s worth of work, you’ll have a sturdy and stylish bed frame that looks custom-made. This DIY project not only saves money but also gives you the satisfaction of creating a beautiful, functional piece of furniture for your home.
Thank you for reading our article about 2×4 bed plans and we recommend you to check out the rest of our home improvement projects. Don’t forget to share this projects to your friends, using the social media widgets, if you’ve found it useful. Like us on Facebook to be the first that gets the latest updates and to help us create more free plans for you.
27 comments
The attachement of the side rails to the headboard and floor board is the most critical step in building a sturdy bed. Clearer instructions (and drawings) of how this is accomplished would be helpful.
Thank you,
Jane
Pocket holes at both ends of the rails and 2 1/2″ pocket screws. Alternatively, you can use 3″ lag bolts through the legs into the side rails (in case you want to disassemble the bed easily).
Can this bed to taken apart and moved? We are a military family and move often. So this is essential.
Yes, if you use these fasteners for the side rails: http://amzn.to/2kdFU4f In this manner, you can take the bed apart and have the headboard, the footboard and the rails separately.
Can you tell me how many 2×4 ‘s I will need to build a twin bed
9 pieces of 2×4 at 8′
2 pieces of 1×1 at 8′
9 pieces of 1×4 at 8′
They count that you give of how many 2x4s is it correct if you build the side rails. I bought 10 2×4 at 8’ and I was still about one short
Are those the exact cuts for a twin size? I was going to have the wood cut at the hardwood store
Yes.
Please email me privately
Does this fit a standard toddler mattress?
The one we are looking at it 52×27.5×5.5 inches
This bed is too big for that mattress. Check out this plans for that: http://howtospecialist.com/finishes/furniture/how-to-build-a-toddler-bed/
Could you please tell me what size mattress was used when the bed was finished? We are in the middle of building and want to get the mattress as a Christmas present
This bed is designed for a 38″x75″ mattress.
Do you have plans for a full size version of this bed?
No. I don’t.
Do you by chance have the plans for a full sized bed
Yes. Here: http://howtospecialist.com/finishes/furniture/full-size-bed-frame-plans/
How exactly did you attach the 1×1 cleats?
You drill pilot holes and use 1 5/8″ screws.
If I wanted to use this design with the toddler mattress, could I simply adjust the cleats and slats to 27″ and the trim to 36″? We have about a 37″ wide space to place the bed in.
I would go for 28″ so you 1/2″ on both sides to fit the mattress. You should also set the side boards to 53″ (a standard toddler mattress is 52″ long).
Interested in a plan using 2x lumber for a queen size bed. Can you provide the changes in the plan for queen size frame?
I’ll add your suggestion to my to do list.
questions.. my boys both have a twin but the mattress is a high mattress.. are these plans suitable for a high mattress?
They are, but you can replace the 2×4 rails with 2x6s, so the bed holds the mattress better.
What’s the weight limit on this bed?
Do you know what you spent on this twin bed frame to build?