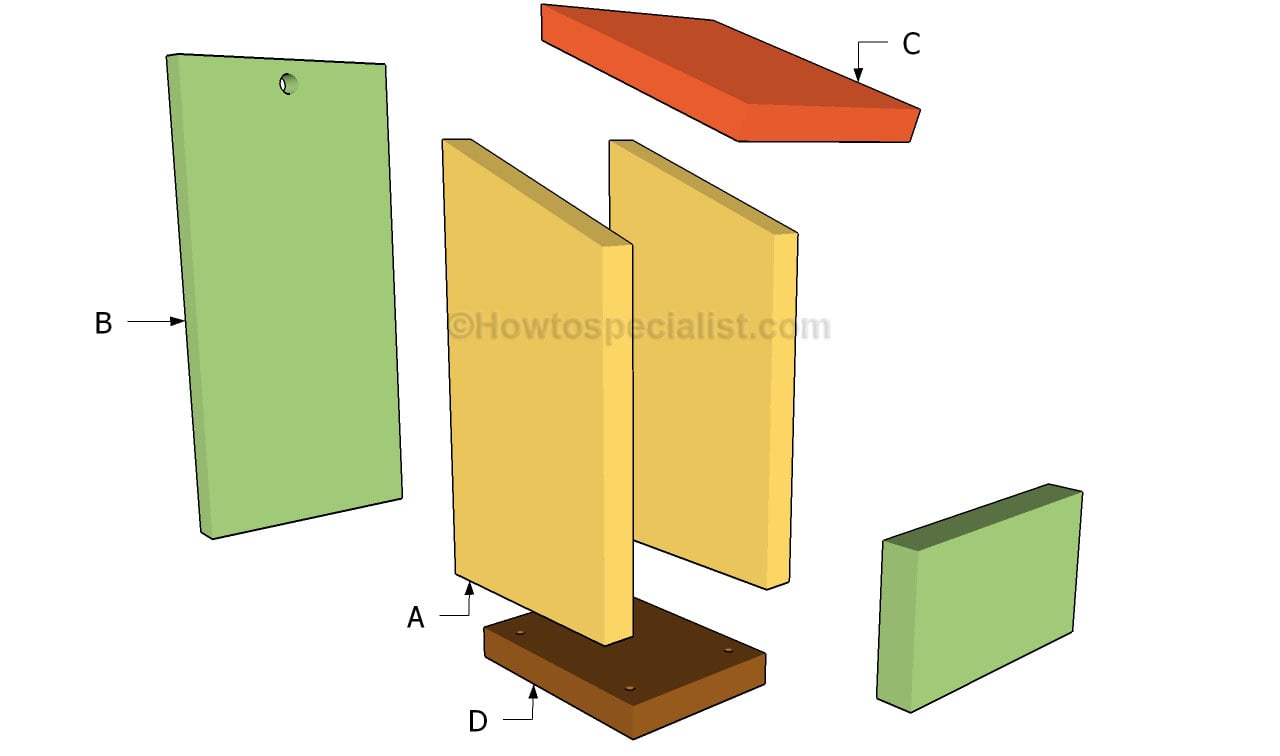
This step by step diy project is about how to build a nest box. Building a bird nest box is a simple project that can be done even by kids, under your supervision. This project is the perfect opportunity to pass down several woodworking techniques to your kids and to create something unique. Watching the birds every morning will be an amazing experience, so make sure you build a proper nest box.
Choosing the right for the bird nest box is critical, so make sure you choose weather-resistant lumber, such as oak or beech rather than pine. Drilling several holes trough the bottom of the box is essential, as the rain drops will quickly drain out. Place the nest boxes in trees, at least 6′ above the ground, in order to protect the little birds from predators, such as cats.
After getting the job done and gaining confidence in your skills, you should consider building other things for your home. There are many other similar project on HowToSpecialist.com, so don’t forget to take a look over the rest of the detailed plans. In addition, there are hundreds of detailed plans that come with step by step instructions, if you want to enhance the look of you home or garden. See all my Premium Plans in the Shop.
Made from this plan
Building a nest box

Building a nesting box
Materials
- A – 2 pieces of 1×6 lumber – 10” long SIDES
- B – 1 piece of 1×6 lumber – 12” long, 1 piece – 3″ long FACES
- C – 1 piece of 1×6 lumber – 7″ long ROOF
- D – 2 pieces of 1×6 lumber – 4″ long BOTTOM
- 1 piece of 1×6 lumber – 6 ft
- 2 1/2″ screws
- 1 1/4″ screws
- glue, stain
- wood filler
Tools
- Safety gloves, glasses
- Miter saw, jigsaw
- Chalk line, tape measure, spirit level, carpentry pencil
- Drill machinery and drill bits
Tips
- Apply several coats of wood stain to the wooden components
- Fill the holes with wood filler and smooth the surface
- Plumb the sides of the bench with a spirit level
Time
- One Day
Related
How to build a nest box
The first step of the woodworking project is to build the frame of the nest box. As you can see in the image, we recommend you to attach the side walls to the back support. Build the components from 1×6 slats and lock them together with finishing nails. Pre-drill the lumber, in order to prevent the wood from splitting.
Attaching the roof of the nest box is the next step of the project. Therefore, cut a small piece of 1×6 lumber and attach it to the top of the box, by using nails and waterproof glue. Moreover, cut one end of the slat at 20 degrees, by using a miter saw, before fitting it into place.
Next, cut a piece of lumber and fit it to the bottom of the bird nest. Make sure you drill several small holes in the bottom of the nest, in order to enhance the water drainage. Align the component at all ends, if you want to get the job done in a professional manner. Work with attention and with great care, especially if you don’t have an extensive expertise in the carpentry field.
The last step of the garden project is to take care of the final touches. Therefore, attach the front wall (3″ high) to the frame of the nest box and lock it into place with finishing nails and waterproof glue. Afterwards, smooth the wooden surfaces with fine-grit sandpaper and clean the residues with a cloth.
Thank you for reading our project about how to build a nest box and we recommend you to check out the rest of the projects. Don’t forget to LIKE and SHARE our projects with your friends, by using the social media widgets. SUBSCRIBE to be the first that gets our latest projects.


