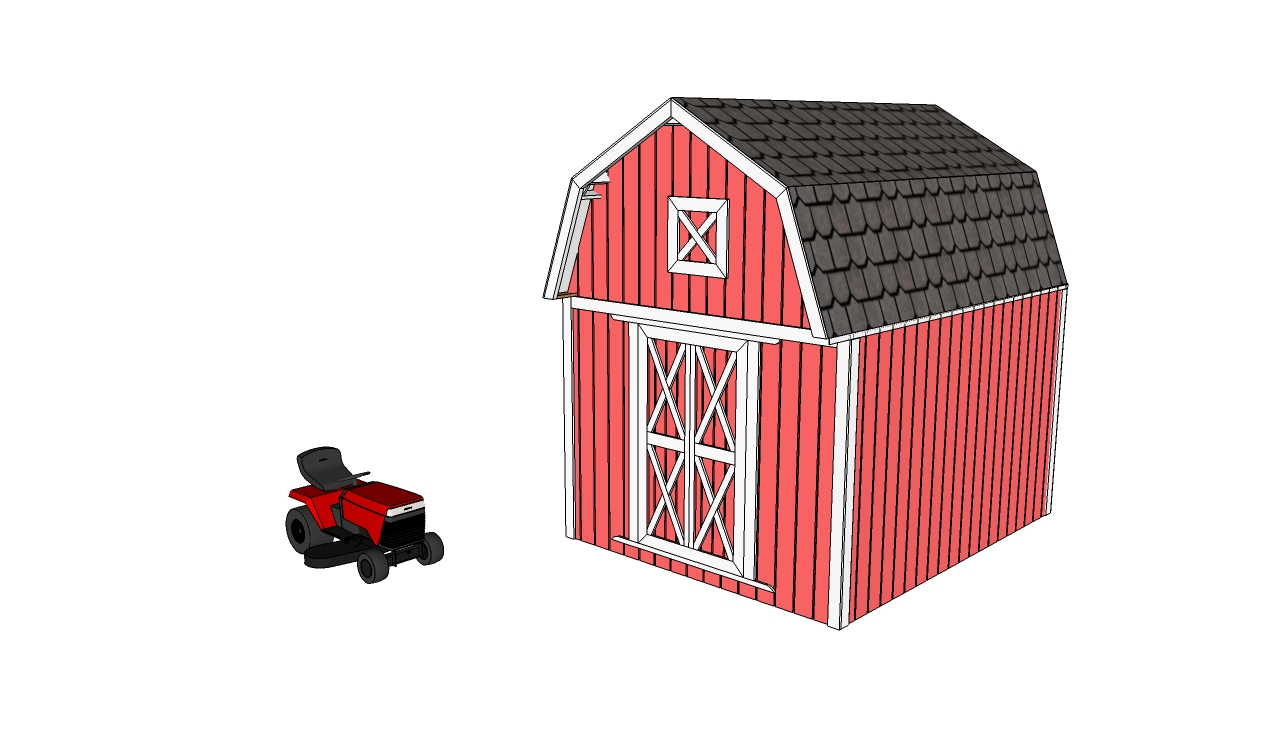
This diy step by step article is about barn shed plans free. If you need a shed with a traditional gambrel roof, but you don’t afford to buy an expensive kit or to hire a qualified team of builders, you could keep the expenditures at a decent level and undertake the project by yourself. A barn has a rustic appearance but it also provide a significant storage space, being ideal to deposit tools and other items you don’t use on a regular basis. In this article, we show you how to build a simple shed with a gambrel roof, using common tools, materials and techniques. See how to build a barn shed with loft HERE. PDF downloadable plans, for this project, with premium features in the Store.
Before starting the project, you have to consult the legal requirements, otherwise you might not comply with the building codes. Therefore, you should remember that there is a certain distance you should leave from the shed up to the property line or a standard depth of the concrete footings, according to the area where you leave. Apart from respecting the legal requirements you should understand that you construction will also be durable.
If you want to build a permanent construction, you should pour a concrete slab and attach the construction to it. On the other hand, if you want a light construction and you plan to move it in the foreseeable future, we recommend you to place several concrete footings and 4×4 skids. In addition, if you won’t deposit heavy items in the barn shed, using the skids is a good way to keep the total costs under control. See all my Premium Plans in the Shop.
Made from this plan
In order to build a barn shed, you need the following:
Materials
- A – 9 pieces 2×4 lumber 93” long, 2 pieces of 2×4 lumber 120” long JOISTS
- B – 80 sq ft 5/8” plywood sheets FLOOR DECKING
- C – 2×4 lumber WALL STUDS AND PLATES
- D – 2×4 lumber TRUSSES
- E – 250 sq ft of 5/8 grooved plywood EXTERIOR SIDING
- F – 140 sq ft of 1/2 tongue and groove ROOFING SHEETS
- G – 140 sq fit of tar paper ROOFING FELT
- H – 140 sq ft of asphalt shingles ASPHALT SHINGLES
- I – 5/8” plywood, 1×4 lumber and 4 hinges DOUBLE DOOR
- J – 1×4 lumber TRIMS
- 2 1/2″ screws, 4d nails
- stain, putty
- hinges + latch
- tar paper, asphalt shingles
- joist hanger
- structural nails for ties
Tools
- Safety gloves, glasses, Miter saw, jigsaw
- Chalk line, tape measure, spirit level, carpentry pencil
- Drill machinery and drill bits
- Router, 1/4” round bit – optional, Power mixer
- Wheelbarrow, shovel, post digger, Ladder
Tips
- Lay the carport properly, using batter boards and string
- Pre-drill holes in the wooden components, before driving in the screws
- Align the components before locking them into place with screws
- Don’t use lumber that is likely to crack or shrink
Time
- Two weekends
My best tips for building a 8×10 gambrel shed:
A gambrel shed is a great way to maximize storage space while adding a charming barn-style structure to your yard. With its distinctive double-sloped roof, it provides extra headroom and loft space. Here are my best tips for building an 8×10 gambrel shed.
1. Plan Your Design
Before starting, carefully plan the design:
- Dimensions: A 8×10-foot shed is compact but offers plenty of room for storage. Make sure to check local building codes for any size or height restrictions.
- Gambrel roof: The gambrel roof has two slopes on each side—one steep and one shallow. This design is ideal for adding loft space or extra headroom.
- Windows and doors: Plan for double doors wide enough for larger items, and include windows for natural light and ventilation.
Planning the design ensures the shed meets your storage needs and fits well into your yard.
2. Build a Solid Foundation
A solid foundation is critical for a long-lasting shed:
- Concrete slab: For the most stability, pour a 4-6 inch concrete slab. This ensures the shed has a solid base that won’t shift.
- Gravel or pavers: If you prefer a simpler foundation, lay gravel or pavers. Level the ground and compact it to prevent movement.
- Elevated wooden base: If you want to keep the shed off the ground, build a wooden base using pressure-treated 2×6 lumber. This will protect the shed from moisture.
A strong foundation prevents the shed from shifting and keeps it level over time.
3. Construct the Frame
The frame is essential to the shed’s structure:
- Floor frame: Build the floor frame using 2×6 pressure-treated lumber. Space the joists 16 inches apart and attach them to the rim joists. Cover with 3/4-inch plywood to create a sturdy floor.
- Wall frame: Construct the walls with 2×4 studs, spaced 16 inches apart. Leave openings for doors and windows. One wall will need to be taller to accommodate the gambrel roof.
- Roof frame: Build the gambrel trusses using 2×4 lumber and metal plates. The steep lower slope and gentle upper slope give the roof its distinctive barn-like look.
Building a solid frame ensures the shed is strong and can support the roof and walls.
4. Install the Gambrel Roof
The gambrel roof provides both style and function, offering extra storage space:
- Trusses: Install the gambrel trusses on top of the wall frames, ensuring they are properly spaced and aligned. Secure them to the top plate with metal brackets or screws.
- Roof sheathing: Cover the roof with plywood or OSB sheathing, extending slightly beyond the walls to prevent water runoff from seeping inside.
- Roofing material: Install asphalt shingles, metal panels, or wood shingles to cover the roof. Start at the bottom and overlap each row to create a watertight surface.
A well-installed gambrel roof provides extra headroom and loft storage space, making it both functional and stylish.
5. Add Siding and Windows
Complete the exterior by adding siding and windows:
- Siding: Use T1-11 plywood siding, vinyl, or wood lap siding to cover the exterior walls. Attach the siding using galvanized nails or screws, and make sure to overlap the panels for water protection.
- Windows: Install weather-resistant windows for natural light and ventilation. Seal them with caulk to prevent leaks.
- Doors: Build or install double doors wide enough to accommodate large items like lawnmowers or equipment. Use heavy-duty hinges and locks for security.
Siding and windows complete the shed’s exterior, protecting it from the elements and improving functionality.
6. Paint or Stain for Protection
Once the shed is complete, protect it with paint or stain:
- Paint: Use exterior-grade paint to protect the shed from moisture and UV rays. Light colors help reflect heat and keep the interior cooler.
- Stain: If you prefer a natural look, apply a wood stain to enhance the wood grain and protect it from the elements.
Finishing the shed with paint or stain not only protects it but also improves its appearance.
Bonus Tip: Add Loft Space for Extra Storage To make the most of the gambrel roof, consider adding a loft area inside the shed for storing smaller items or seasonal equipment.
Barn Shed Plans Free
Building a barn shed is a fun project, as it is a great opportunity to learn new woodworking techniques and to build a beautiful rustic construction. As you can see in the image, you just need to join the components together, provide you choose the right plans for your needs.
Gambrel Shed Plans

Anchoring the post into concrete
There are many types of foundation you could use when building a shed, starting with a sturdy concrete slab up to using skids. While the fist solution is ideal for permanent constructions, the second alternative is recommended if you want to move the shed.
Therefore, you have to place the skids on concrete footings, as in the image. For extra rigidity, you could dig 2′ deep holes, fill them with concrete and install appropriate anchors.

Building the floor of the barn shed
Afterwards, you have to build the floor frame of the shed, using 2×4 or 2×6 (if you will store heavy items in the shed) joists. Place the joists every 16” on center.
Installing the plywood sheets
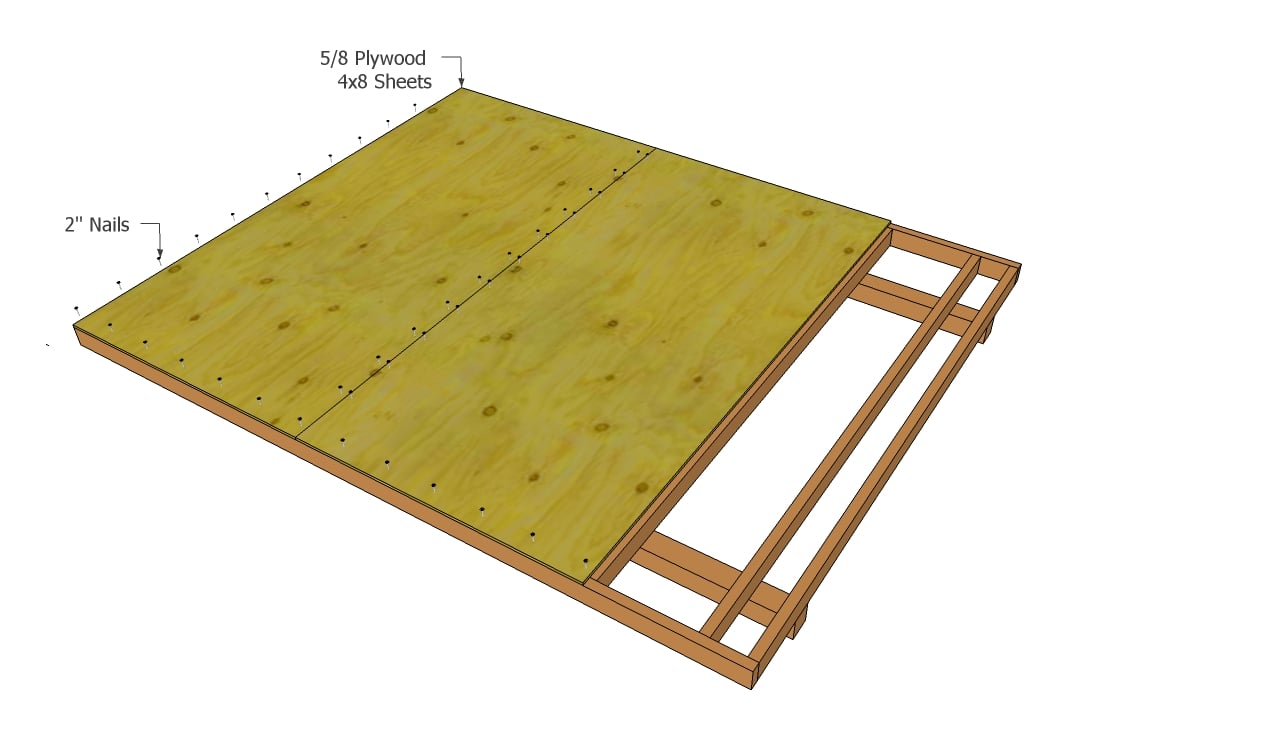
Next, you have to attach the 5/8” plywood sheets into place and secure them with decking screws or nails. Make sure you drive in the nails every 10”, along the rim beams and joists. The corners of the sheets should overlap perfectly over the floor frame.
Alternatively, you could also install 2×4 decking, if you want to obtain a more traditional appearance. Place a nail between the boards, to get consistent gaps.
Barn Shed Wall Plans
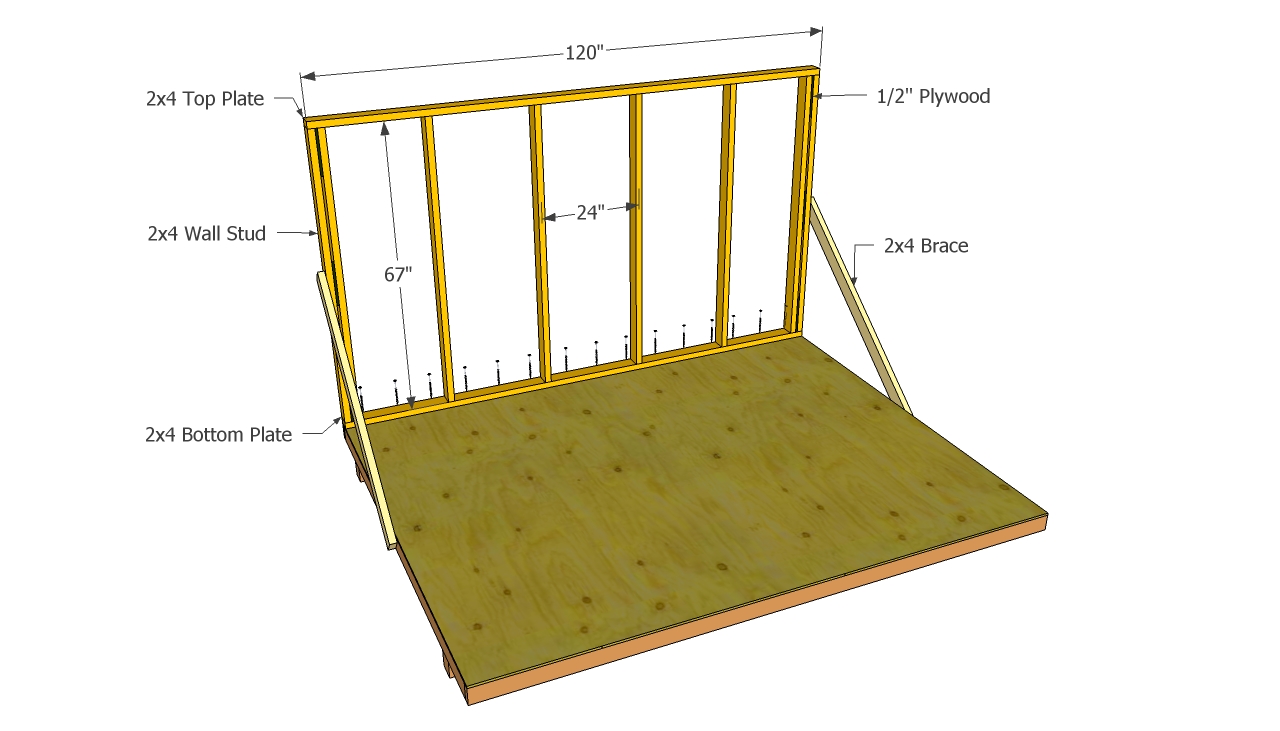
The next step is to build the walls of the barn shed on the ground, and to secure them into place. Therefore, you have to build the side walls from 2×4 lumber, making sure you place the wooden studs every 24” on center.
Installing the walls of the shed
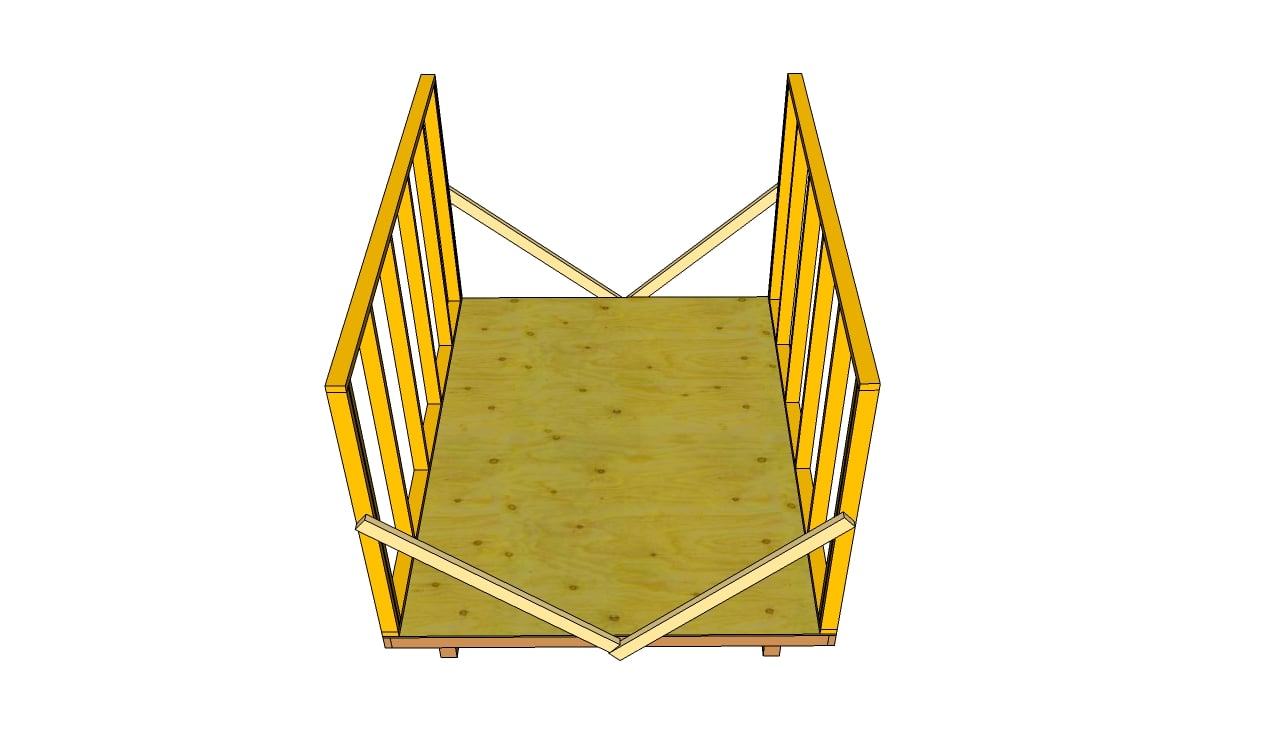
Continue the project by installing the opposite wall, in the same manner described above. Work with great care and good judgement, if you want to obtain a professional result.
Remember that you don’t have to remove the braces before installing the front and the back walls. If you want to install a side window, now it’s the time to adjust the wall frame accordingly. Make sure you install a double header and a trim stud, to secure the windows properly.

Building the back wall
Measure the size between the two side walls and build the back wall frame, using 2×4 lumber. Place the wall properly and ask somebody else to hold it, while you insert the 6” nails trough the bottom plate.

Front wall plans
As you can see in the image, you have to take into account several things when building the frame, such as leaving enough space for the door opening, reinforcing the frame and installing a double header. Don’t forget that you could adjust the width of the door opening according to your needs. Plumb the wall frame before installing it, by using 6” screws / nails.
Barn Shed Roof Plans

Barn shed roof plans
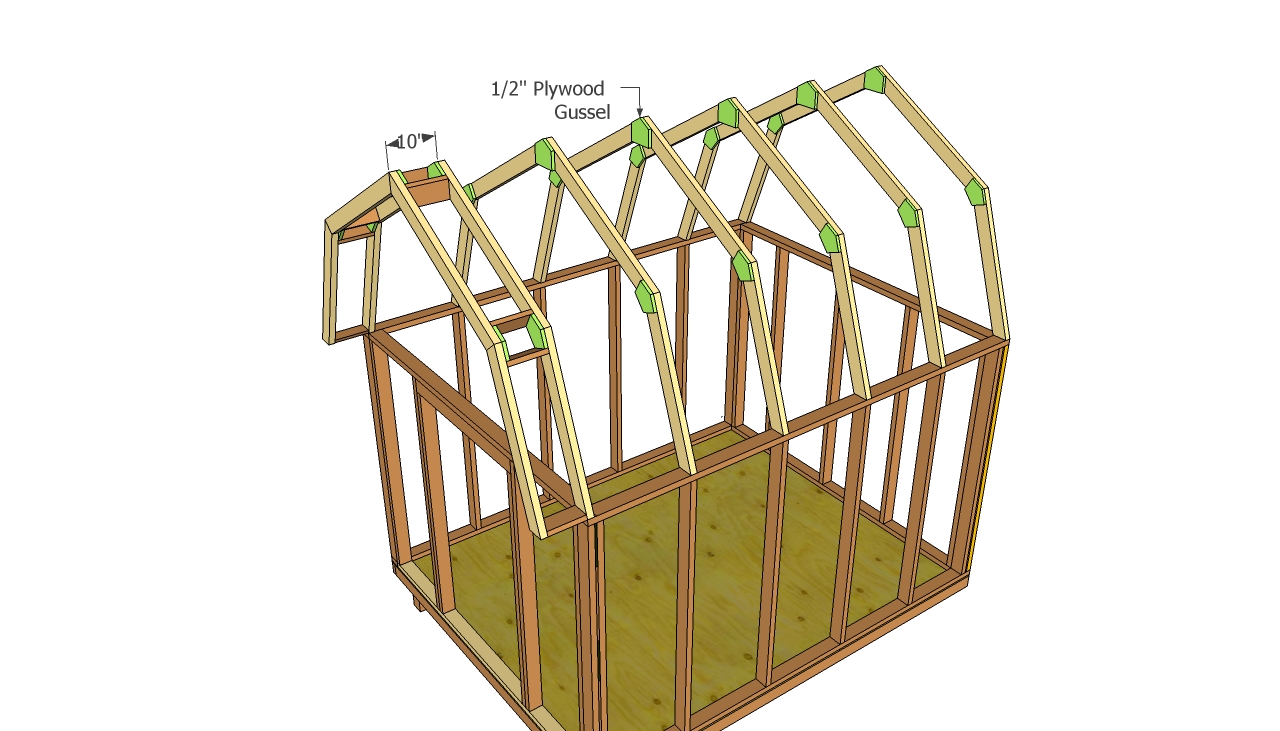
The key of this complex step is to cut the rafters at the right angles and to join them together properly. Drive in 4” nails trough the rafters in the top plate, making sure the trusses are level.
Gambrel Roof Plans
After you have cut all the rafters, you should lock them together using 1/2 plywood gussets. The gussets don’t have to be too large, otherwise they might affect the design of the barn shed.
Therefore, you should things simple and build gussets about 4” on each side of the joints. Lock them into place by inserting galvanized nails. In addition, install another truss, in order to get 10” overhang on the front end of the barn.

Installing the exterior siding
Afterwards, you have to install the 5/8” grooved exterior siding into place with 1 1/4 nails, along the walls studs, top plate and bottom plate. Cut the siding with a reciprocating saw, making sure the blade is sharp, otherwise it might tear the edges.
Roofing Sheets
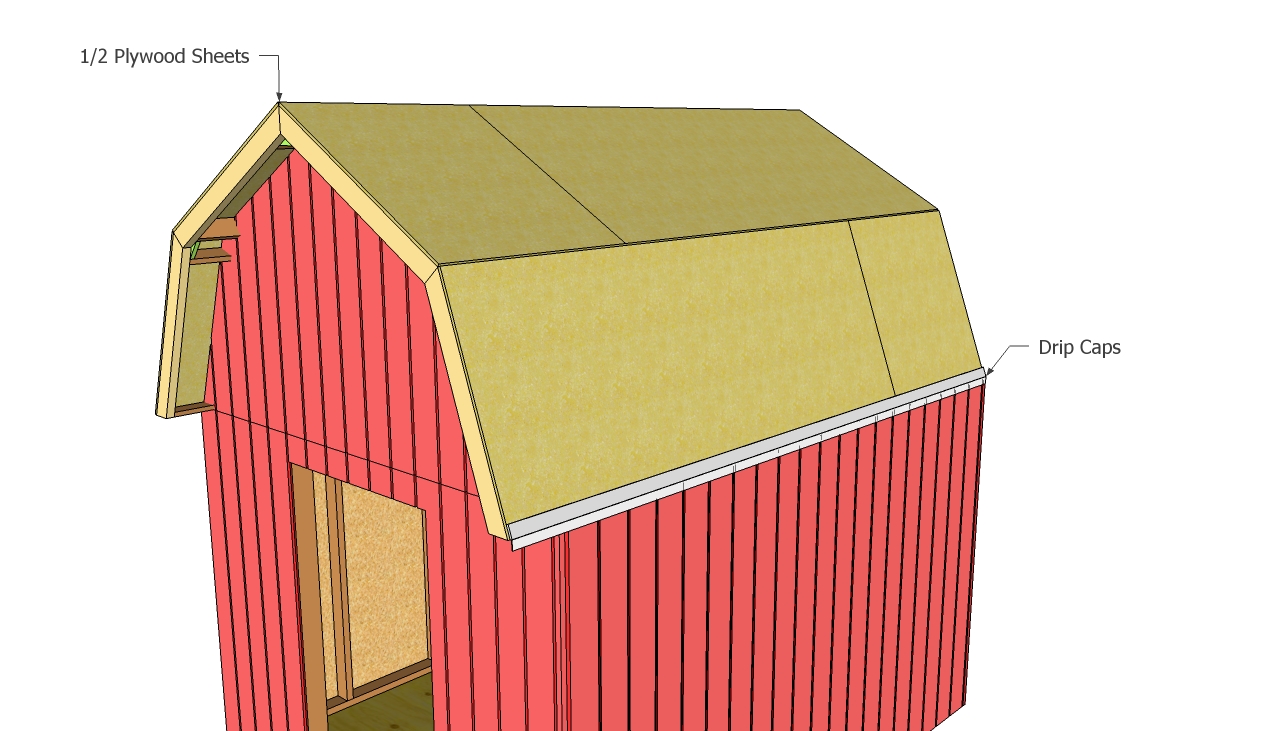
Continue the building process, by installing the 1/2 tongue and groove plywood and securing the sheets with nails. Align the plywood sheets at both ends and lock them into position with galvanized nails, along the rafters.

Installing the asphalt shingles
It is essential to install the drip caps properly, as well as the roofing felt. Therefore, the bottom drip caps should be installed under the roofing felt, while the drips caps placed along the sides of the roof should be placed over the tar paper.
The tar paper should overlap 2-4”, to protect the roof from water. Install the shingles starting with the bottom of the roof. The shingles should overhang the drip caps 1/2”, to drain the water properly.

Installing the trims
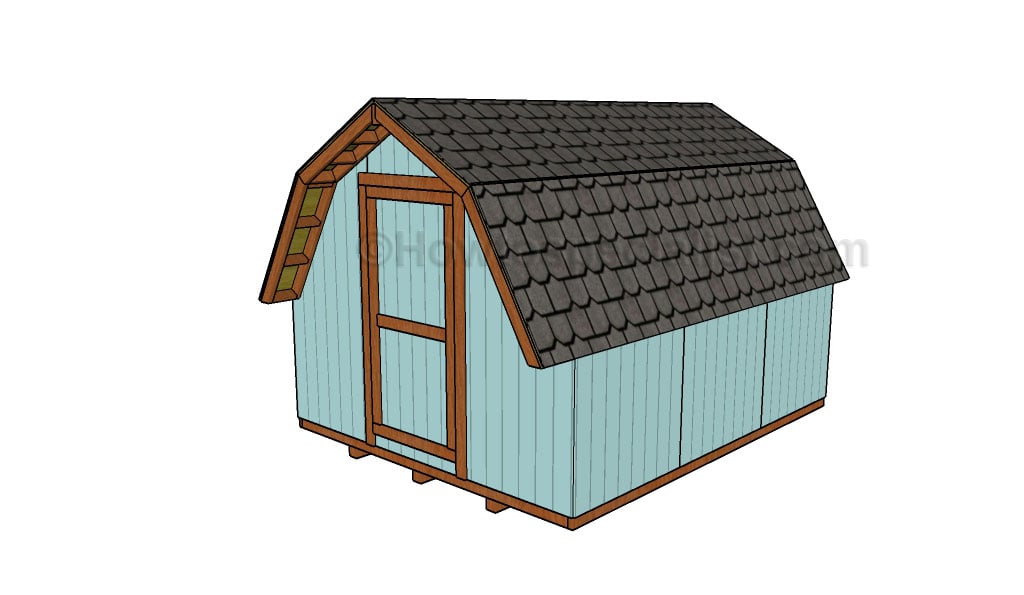
After you have attached the 3 tab shingles into place, you have to install the 1×4 trims. As you can see in the image, there are many design patterns you can apply, but you should choose the ones that fit your needs and tastes properly.

Building the doors of the barn
Building the double doors of the gambrel shed is a straight forward job, if you use the right materials and techniques. In order to obtain a smooth transition between the barn shed and the double doors, you should use the 5/8” grooved plywood.
After you build the double doors, you have to attach it to the barn, by using four hinges. Attach several x-shaped trims, to enhance the traditional look of the barn.
Seal the gaps with a waterproof filler and smooth the surface with a sander. Afterwards, you should apply several coats of varnish or protective paint, in order to prevent serious water damage or wood decay.
If you follow the basic guidelines and use the right plans and technique for your needs, you should get the job done like a professional. Afterwards, you could use the barn shed according to your needs and wishes.
10×12 Barn shed plans free
Make sure you take a look over the rest of the barn projects, as there are so many ideas to choose from when building a shed. See the step by step project with detailed diagrams and a complete cut list HERE. PDF downloadable plans, for this project, with premium features in the Store.
By following these tips, you’ll be able to build a durable and stylish 8×10 gambrel shed that offers both storage and a distinctive design. With careful planning and the right materials, your shed will provide years of functionality and enhance your outdoor space.
Thank you for reading our article about barn shed plans and we recommend you to read the rest of our projects. Don’t forget to share our articles with your friends, by using the social media widgets.


