If your kitchen cabinets are looking a little tired—maybe a little outdated, scratched up, or just plain dull—but you’re not quite ready to rip everything out and start fresh, I’ve got some good news. You don’t need a big budget, fancy tools, or even sandpaper to give your cabinets a whole new lease on life. That’s right: you can paint your kitchen cabinets without sanding, and I’m going to walk you through exactly how to do it, step by step, with beginner-friendly techniques that actually work.
This method is ideal if you want to update your kitchen without all the mess of sanding or the cost of replacing cabinetry. Whether your cabinets are solid wood, wood veneer, or even laminate, you can get amazing results using the right products and a little patience. And let’s be real—no one enjoys sanding, especially when it means fine dust in every corner of your house for weeks.
With today’s high-adhesion primers and bonding paints, the “no-sanding” approach isn’t just a Pinterest hack—it’s a practical, proven technique used by homeowners and pros alike. You’ll still need to prep properly, and you’ll still need to take your time. But the trade-off is worth it: a dramatic kitchen transformation you can pull off in a weekend, with zero dust and no power tools required. If you’re ready to roll up your sleeves and bring your kitchen back to life—without breaking the bank—let’s jump into the project and get those cabinets looking like they just came from a custom showroom.
Why Skip the Sanding?
Sanding is usually the go-to prep step in cabinet painting, but let’s be real—it’s messy, time-consuming, and a little intimidating if you don’t have the tools. The good news? Modern bonding primers and deglossers do the heavy lifting for you. As long as your cabinets are structurally sound and relatively smooth, you can skip sanding and still get a durable, professional-looking finish.
This method is perfect if you:
- Want to avoid sanding dust all over your house
- Have cabinets with details or grooves that are hard to sand
- Don’t have a sander or don’t want to use one
Step 1: Clear Out and Clean Like You Mean It
First things first—don’t skip the disassembly. It might be tempting to leave the doors and drawers in place and just tape around the hinges, but trust me: you’ll get much cleaner, more professional-looking results if you paint everything flat and separately. That means taking off every door, removing all the drawers, and unscrewing the hardware—handles, knobs, hinges, you name it.
As you go, grab a roll of painter’s tape, sticky notes, or a marker and label everything. A simple number system works wonders—label the inside edge of each door and match it to the cabinet box. That way, when it’s time to reassemble, you won’t be playing cabinet Tetris trying to figure out where everything belongs.Now comes one of the most important steps in the whole process: degreasing. Over time, cabinets—especially those near the stove, oven, and sink—get coated in an invisible layer of oil, food splatter, and hand grime. That residue will keep paint and primer from bonding properly, and if you skip this part, you’re almost guaranteed to get chipping or peeling down the road.
Mix up a cleaning solution using warm water and a heavy-duty degreaser. You can use a commercial product like Krud Kutter, or make your own with white vinegar and a few drops of Dawn dish soap. Using a sponge or rag, scrub every inch of your cabinet surfaces—fronts, backs, sides, and especially the frames on the cabinet boxes.
Focus on high-touch areas like door edges, handles, and drawer fronts, where grease and dirt love to settle. If you run your hand over a spot and it still feels slick or tacky, give it another pass. Once everything is thoroughly clean, rinse with fresh water and let it dry completely before moving on. It might not be glamorous, but this deep clean is what separates a “weekend project” from a finish that actually lasts. So take your time, crank up some music, and get that grime out of the way—you’re laying the foundation for a paint job that’s going to look good for years.
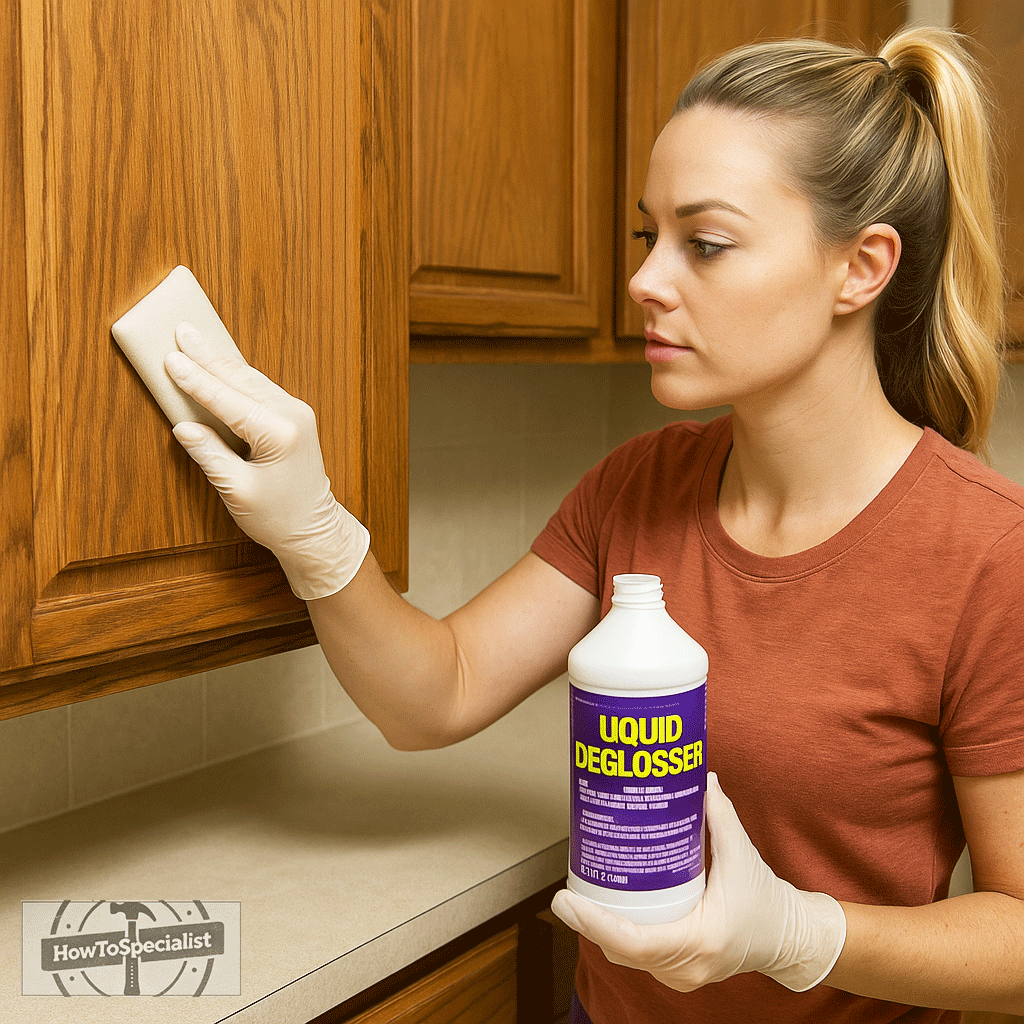
Step 2: Use a Liquid Deglosser
Now that your cabinets are squeaky clean and dry, it’s time to break out your secret weapon: liquid deglosser—also known as liquid sandpaper. This handy product is a game-changer if you want to skip the mess of sanding without sacrificing adhesion. What it does is break down that slick, glossy finish that most cabinets have, creating a surface your primer can actually grab onto.
Deglosser is especially useful if you’re working with cabinets that have been previously painted, sealed, or have a factory finish like laminate or thermofoil. It works on wood, MDF, and veneer too—as long as you follow the directions. Put on a pair of gloves (this stuff can be a little harsh on skin) and pour a bit of deglosser onto a clean lint-free cloth or rag. Then wipe it over every surface you plan to paint—doors, drawer fronts, sides, and cabinet frames. Work in sections and keep your strokes smooth and even. You don’t need to scrub it in—just make sure the entire surface gets coated.
Let the deglosser sit and dry based on the product’s label instructions. Some dry in 10–15 minutes, others might take up to 30. Either way, don’t rush it. This drying time is essential because it gives the chemical process time to do its thing and dull the sheen.
You usually won’t need to rinse it off, but double-check the label to be safe. And don’t worry if the cabinets don’t look drastically different after this step—it’s more about what’s happening at a microscopic level. The glossy seal has been broken, and now you’ve got a better surface for primer to cling to. Skipping sanding doesn’t mean skipping prep—this is the part that makes the “no sanding” method actually work. Done right, it gives you that durable, factory-finish look without kicking up a cloud of dust in your kitchen.
Step 3: Prime with the Right Stuff
This is the step where a lot of DIYers slip up. It’s tempting to grab whatever primer you’ve got sitting in the garage or just pick the cheapest option off the shelf—but cabinet painting is not the time to cut corners. You need a bonding primer, specifically designed to stick to smooth, slick, previously finished surfaces like kitchen cabinets.
Take a close look at the label before you buy. The words you’re looking for are “bonding primer,” “adhesion primer,” or “multi-surface primer.” These formulas are made to grab onto glossy finishes—even over laminate or varnish—and create a base that your topcoat paint will love.
Once you’ve got your primer, it’s time to apply it the right way. Use a high-quality angled brush to cut in along edges, inside grooves, and in corners where a roller just can’t reach. Then switch to a foam roller for the flat panels and frame sections. Foam rollers are your best friend here—they leave a smooth, even surface without the brush marks that can ruin an otherwise perfect paint job.
Apply a light, even coat—don’t go heavy. The goal isn’t to smother your cabinets in primer, it’s to give your paint something to grip. Thick coats can drip, streak, or take forever to dry, so keep it thin and consistent. Depending on your product, the primer might be ready for a second coat in an hour or two, or it may need a full four hours or more. Always check the manufacturer’s instructions for proper drying times and recoat windows.
Now, if you’re going from dark cabinets to a lighter color—say espresso brown to bright white or soft sage green—it’s smart to do a second coat of primer. Not only does this help prevent any color bleed-through, but it also gives your final paint color better coverage and vibrancy. You’ll thank yourself later when the topcoat goes on smoother and looks more even.
Done right, this priming step is what sets the foundation for a paint job that won’t chip, peel, or scratch off after a few weeks. Take your time here, and you’ll set yourself up for success in the next stage—the one where you finally get to bring color into the mix.

Step 4: Paint Like a Pro
Once your primer has fully cured and you’ve got a nice, smooth base, it’s time for the most satisfying part: bringing your cabinets to life with paint. This is where you start to see all your hard prep work pay off.
The type of paint you choose matters—a lot. Skip the basic wall paint and reach for something that’s made to stand up to wear and tear. The best paints for cabinets are either a non-yellowing enamel or a hybrid acrylic-alkyd formula. These paints dry harder than regular latex paint, resist scuffs and chips, and hold up beautifully to the kind of traffic your kitchen sees daily. They also clean up nicely, which is a must when you’re dealing with splashes of sauce, greasy hands, and the occasional mystery smudge.
Stick with the same brush-and-foam roller combo you used during priming. The angled brush will help you cut in around the edges, corners, and detail trim, while the foam roller gives you that smooth, almost factory finish on the flat panels. The key here is thin, even coats. Don’t glob it on. Thick paint is more likely to drip, sag, or leave roller texture behind, and it’ll take forever to dry.
Two light coats are almost always better than one heavy coat. If you want that buttery-smooth look, patience is your best friend. If you do spot a few drips or light brush strokes after the first coat dries, don’t panic. Let it dry completely, then grab a high-grit sanding sponge (220 or finer) and gently smooth out the problem spots before adding your next coat. Dry time depends on the paint and your room conditions. Most cabinet paints will be dry to the touch in four to six hours, but that doesn’t mean they’re ready for a second coat just yet. If it’s humid or cool in your space, it might take longer. When in doubt, follow the label instructions and give it extra time to cure between coats. Rushing this step can ruin the smooth finish you worked so hard for.
Once the second coat is on and dry, step back and admire it. You’re almost there—and your kitchen is already looking like a whole new space. Up next? Giving your freshly painted cabinets time to fully cure before reassembly. Almost done!

Step 5: Let Everything Cure Before Reassembling
This is the part where most folks get a little impatient—and believe me, I don’t blame you. You’ve been without cabinet doors for days, your kitchen probably looks like a project zone, and you’re ready to get things back to normal. But here’s the deal: don’t rush the cure time. It might look dry on the surface, but paint takes time to fully harden underneath—and that curing process is what gives you that long-lasting, durable finish.
Most cabinet paints need at least 2 to 3 days to cure before you reinstall doors and drawers. And if you really want to be safe—especially if you live in a humid area or used a thicker paint—give it the full 7 days recommended by many manufacturers. This extra time helps prevent dents, smudges, fingerprints, and sticking hinges that can ruin your fresh finish before it’s had a chance to set properly. Once your cabinets are fully cured, you can finally start reassembling. Begin by reinstalling the doors and drawers in their original positions (you labeled them, right?), then screw the hinges and hardware back in place.
This is also the perfect time to upgrade your cabinet hardware if you want to take the transformation up a notch. Swapping out dated knobs for modern matte black pulls, brushed brass handles, or even clean white ceramic knobs can make a huge visual impact with minimal effort. It’s like putting the cherry on top of a sundae—you’ve already done the hard work, now it’s time for the finishing touch.
After everything is back together, give your cabinets a once-over, step back, and take it all in. That fresh, updated look you’ve been dreaming about? You did that—with your own two hands. And just like that, your kitchen has a brand-new vibe—without sanding, without spending thousands, and without hiring a pro. Now go pour yourself a cup of coffee and enjoy that view. You earned it.
Will This Last?
Yes—painting your kitchen cabinets without sanding absolutely works, as long as you take your time with the prep, choose the right products, and let each layer cure properly. That’s the real secret: the results come from patience and doing each step right, not from expensive tools or a contractor’s license.
If you’re working with surfaces like wood veneer, laminate, or thermofoil, just be mindful that they may need a little extra care. These finishes tend to be slicker, so your primer and paint may take longer to fully cure. And once your project’s complete, be gentle with your newly painted surfaces—clean with mild soap and water, and avoid abrasive sponges or harsh chemicals, especially during the first month while everything continues to harden.
At the end of the day, painting your kitchen cabinets without sanding isn’t just doable—it’s smart. You’ll save time, avoid the dust storm that comes with sanding, and completely transform the look of your kitchen without tearing the whole thing apart. You’ll walk away with a crisp, clean, totally refreshed space that makes your whole home feel lighter and brighter.
And let’s be honest—there’s something incredibly satisfying about tackling a project like this yourself. That moment when the paint is dry, the hardware is on, and the doors are back in place? It feels amazing. You didn’t just update your cabinets—you built something with your own hands. So if your kitchen is crying out for a facelift, skip the sander. Grab your roller, trust the process, and get to work. You’ve absolutely got this.