This step by step diy article is about how to build a roof for a 12×16 shed. After building the base of the shed and fitting the wall frames, you need to continue your project by fitting the rafters and the rest of the roofing components. Design everything from the very beginning, otherwise you won’t be able to make a cost estimate and you might be taken aback by many potential issues. PDF downloadable plans, for this project, with premium features in the Store.
The easiest way to build the roof of the 12×16 shed in just a weekend is easy, but you need to take a few aspects into account. Cut all the components, after double checking all the measurements. Afterwards, align the rafters at both ends and assemble the trusses on a perfectly level surface. Don’t forget to enhance the rigidity of the joints by installing 1/2” plywood gussets.
You also need to place the trusses on top of the walls, with the help of another person, and lock them into place with 3 1/2” galvanized screws. Always drill pilot holes before inserting the nails, to prevent the wood from splitting. Generally speaking, the trusses should be equally spaced, so place them every 24” on center. Plumb the components with a level, otherwise the roof won’t have a neat look. Check out my new 12×16 shed plans HERE.
Made from this plan
In order to build a roof for a large shed, you needs the following:
Materials
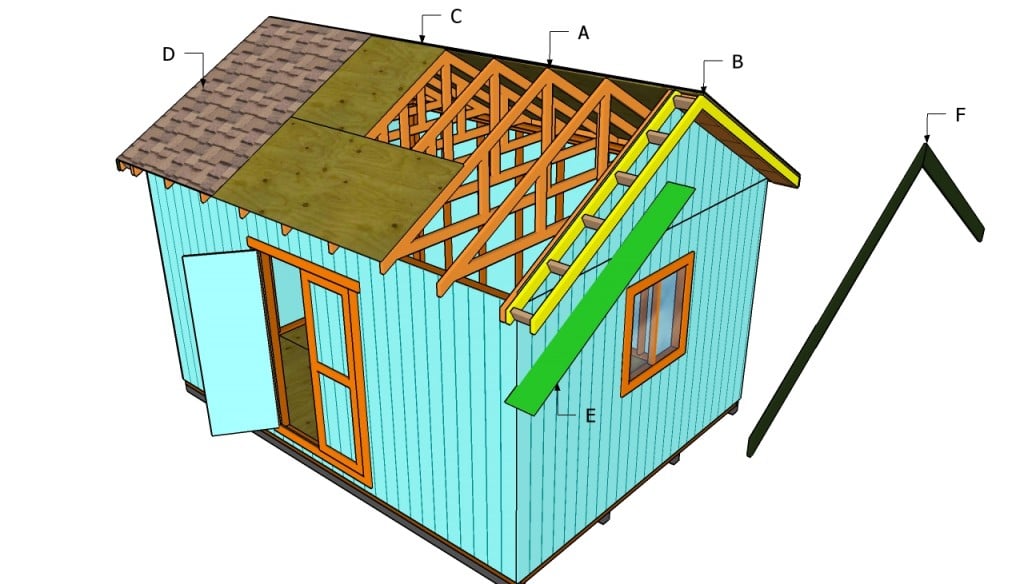
- A – 18 pieces of 2×4 lumber – 92” long, both ends cut at 30º RAFTERS
- A – 9 pieces of 2×4 lumber – 145 1/4” long, cut at 60º at both ends BOTTOM RAFTERS
- A – 18 pieces of 2×4 lumber – 20 3/4”, 9 pieces of 2×4 lumber – 38 1/2” long INTERMMEDIATE RAFTERS
- B – 4 pieces of 2×4” lumber – 92” long, 12 pieces of 2×4 lumber – 7” long 2xOVERHANG
- C – 9 sheets of 3/4” togue and groove plywood ROOFING SHEETS
- D – 300 sq ft of roofing felt, 300 sq ft of tar paper SHINGLES
- E – 5 sheets of 1/2” plywood SOFFIT
- F – 2 pieces of 1×6 lumber – 213 1/4”, 4 pieces of 1×6 lumber – 90 3/4”, ends cut at 30º TRIMS
Tools
- Miter saw
- Circular saw
- Drill machinery, drill bits
- Safety gloves, glasses
- Chalk line, tape measure, spirit level, carpentry pencil
Tips
- Pre-drill holes in the wooden components, before driving in the screws
- Install front and back overhangs
Related
- Part 1: How to build a 12×16 shed
- Part 2: How to build a roof fora a 12×16 shed
- Part 3: How to build double shed doors
Building a roof for a large shed
Building a roof for a large shed is a straight forward job, especially if you plans everything from the very beginning. If you want to get the job done quickly or you don’t have a large expertise in the field, we recommend you to build a gable roof for your storage construction.
How to build a roof for a 12×16 shed

Roof trusses plans
The first step of the project is to assemble the trusses of the roof. In order job get the job done accurately, we recommend you to build all the components and afterwards to lock them together tightly. Remember that it is essential to make all the roof trusses exactly the same, otherwise you won’t be able to install the roofing sheets.
Fitting the roof trusses
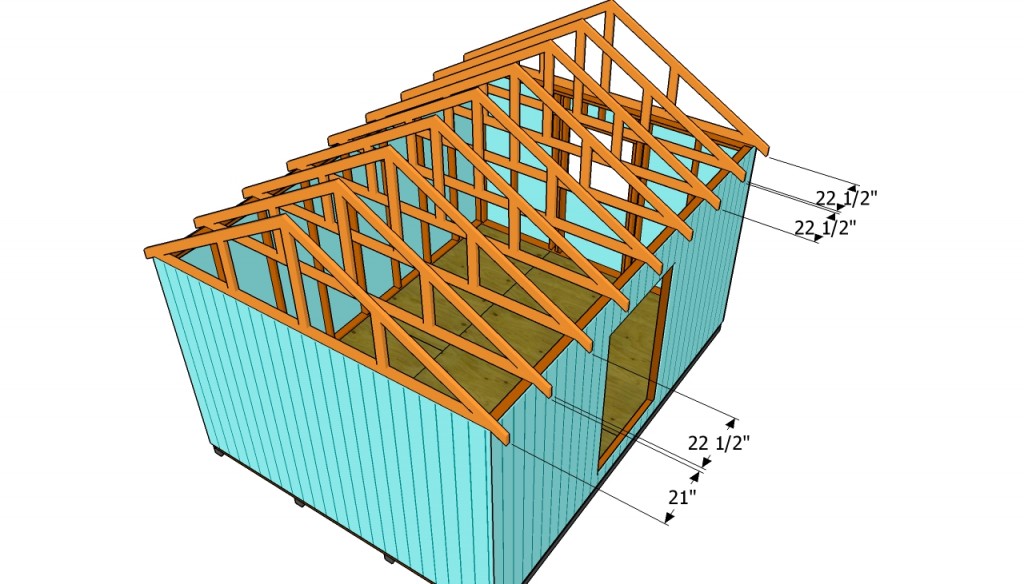
Lift the trusses off the ground and fit them on top of the wall plates, as in the image. Then, align the components at both ends and plumb them with a spirit level. Drill pilot holes trough the rafters and drive 3 1/2” galvanized wood screws into the plates.
Make sure the trusses are equally spaced, leaving about 24” on center between them. The rood should have a slope of at least 30º, to drain the water properly.
Attaching the gable ends
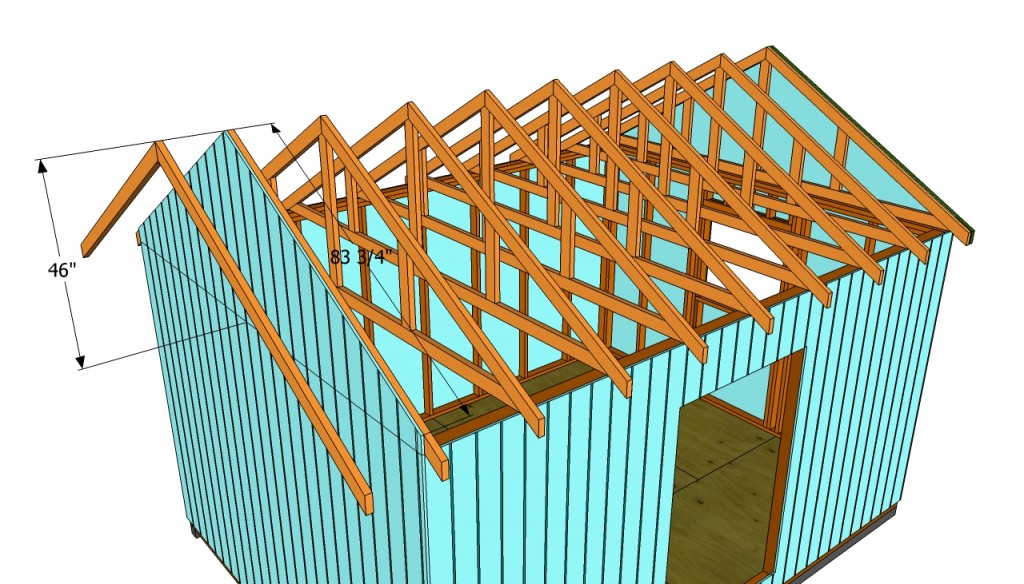
After installing all the wooden trusses to the top plates, you need to continue the project by fitting the gable ends. In addition, now it is the right time to build the side overhangs. In order to build a rigid structure, we recommend you to secure the exterior rafters to the trusses, by inserting 3” screws every 8”.
Align all the components, making sure the shed roof had a symmetrical appearance.
Installing the overhangs
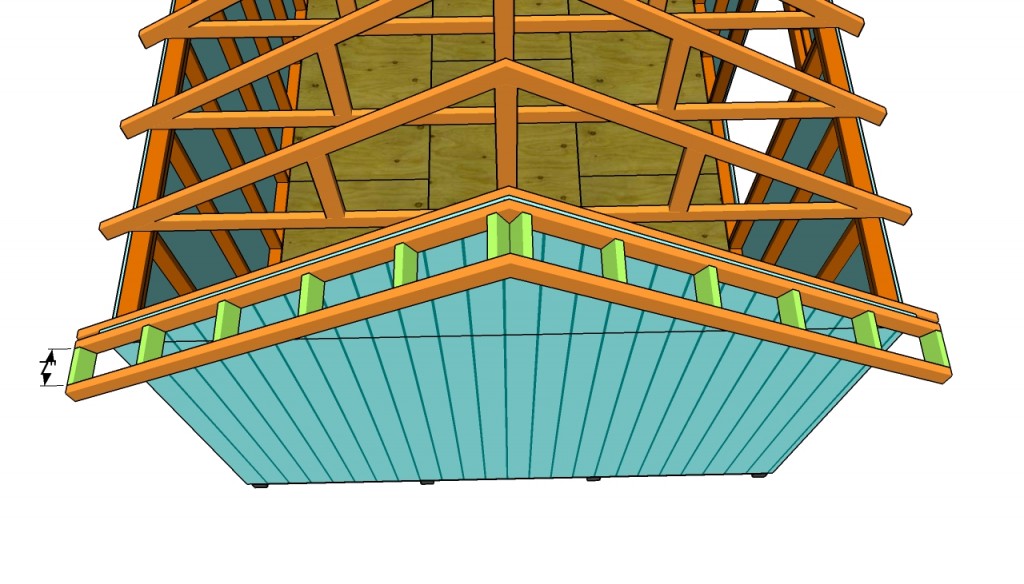
Building the overhangs is a straight forward job, if you follow the right plans and use adequate materials. In addition, make sure the size of the overhangs fit your needs, as later will be impossible to change something. Fit 2×4 wooden blocks between the rafters and lock them into place with 3” wood screws.
Make sure you coutersink the head of the screws and drill pilot holes, to prevent the wood from splitting.
Installing the roofing sheets
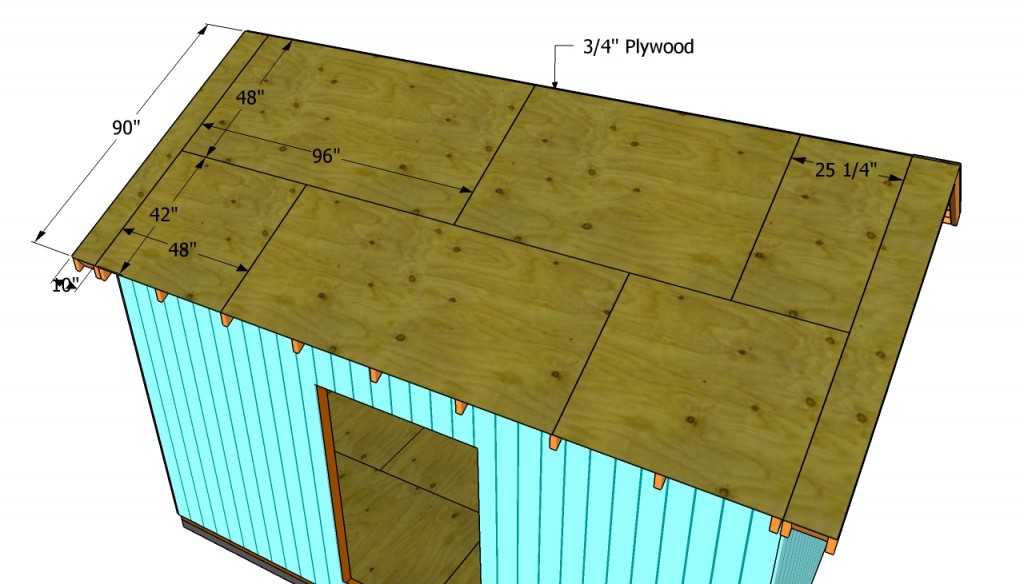
Attaching the roofing sheets into place should’t take a lot of time, if you use 3/4” tongue and groove plywood. Lay the sheets on the rafters and secure them into place with 2” screws, every 8” along the rafters. The edges of the sheets should be flush with the roof, so make sure you take into account this aspect before inserting the screws.
You could adjust the size of the sheets to the right shape using a circular saw with a sharp blade.
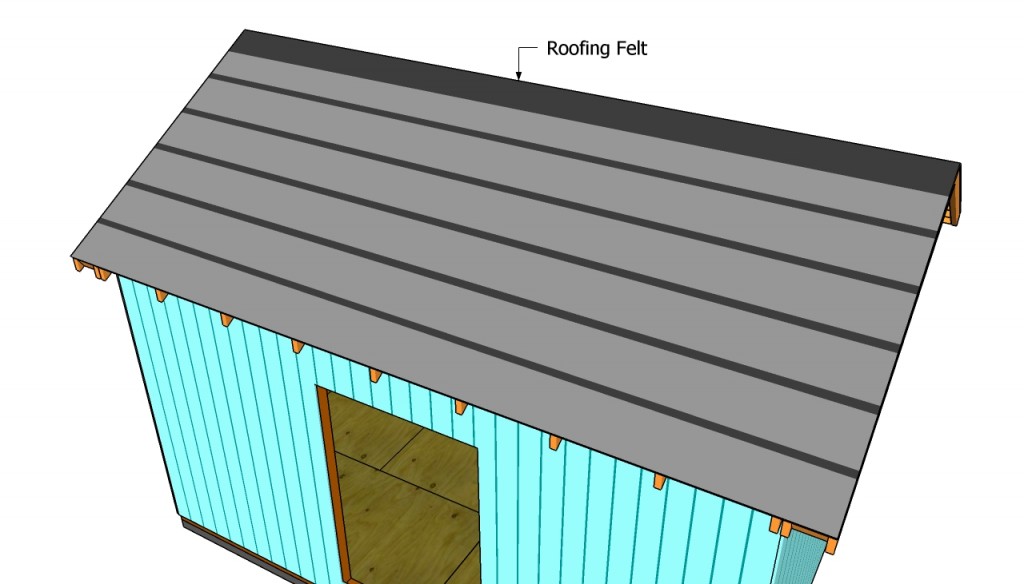
Attaching the roofing felt
The next step of the woodworking project is to cover the roof with felt. As you can see in the image, you need to make sure the strips of roofing felt overlap at least 2”. In addition, you have to lock the tar paper to the plywood sheets with staples.
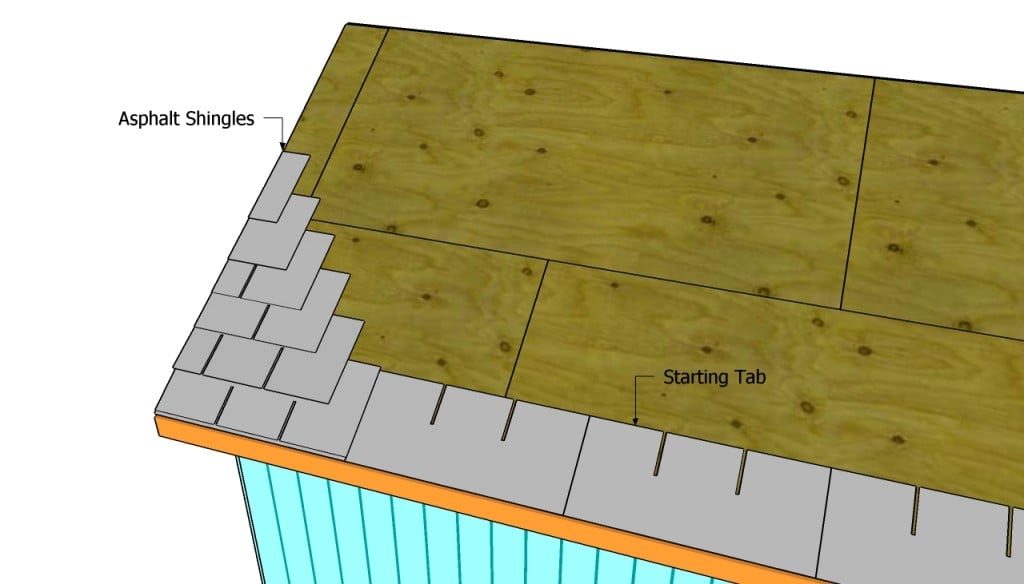
Installing asphalt shingles on the shed
Next, you should install the shingles to the roof of the large shed. Start with the bottom of the roof, by fitting the first course, as in the image. Use roofing tacks to secure the shingles to the roofing sheets.
Start the first course with a full tab, the second with 2 1/2 tabs, the third with 2 tabs, the forth with 1 1/2 tabs, the fifth with 1 tab, the sixth with half tab and the seventh with a 3 tabs. Secure the shingles with roofing tacks.
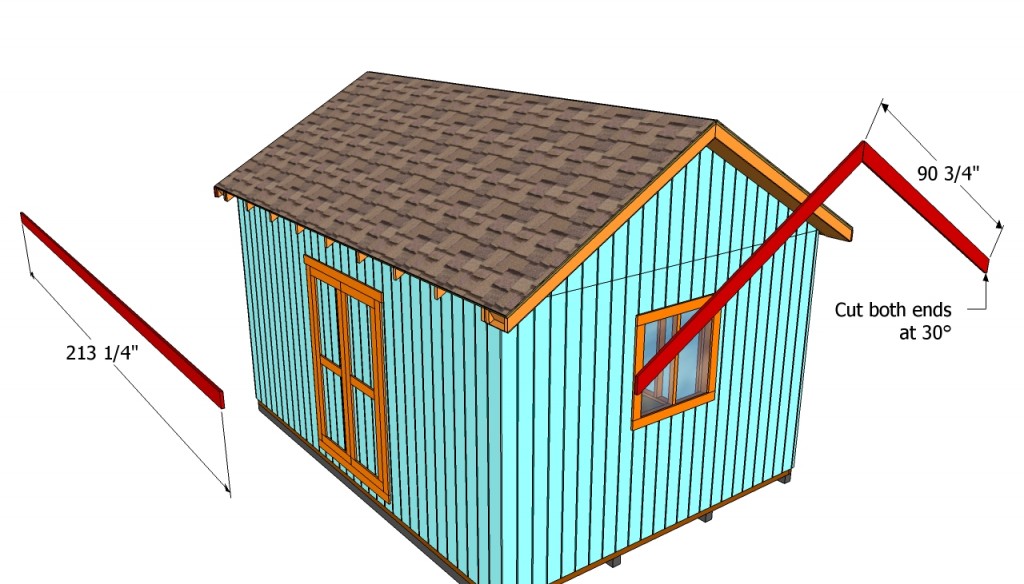
Attaching the trims
One of the last steps of this project is to attach the 1×6 trims to ends of the wooden rafters, as well as to the side ends of the large shed. As you can see in the image, you need to adjust the size of the trims with a circular saw, making sure you don’t tear the edges. Afterwards, lock the trims into place with 1 1/4” finish nails.
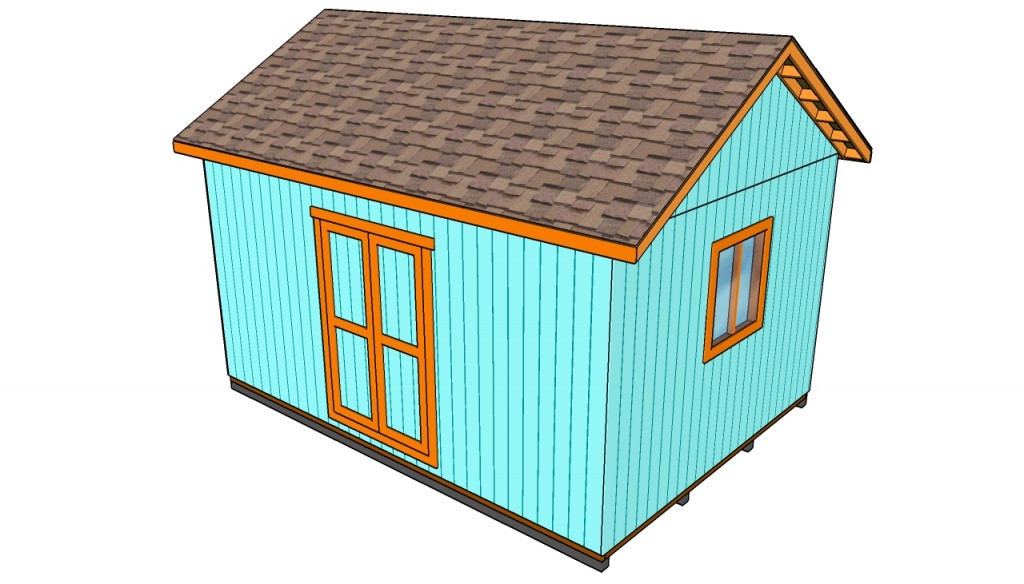
Fitting the door and window
Last but not least, you should take care of the finishing touches. Therefore, in order to get the job done as a professional, you need to check if the roof structure is secured properly together. In addition, make sure there are no gaps between the shingles and the trims, otherwise fill them with beads of silicone. Check out my new 12×16 shed plans HERE.
Thank you for reading our article about how to build a roof for a 12×16 shed and we recommend you to check out the rest of our projects. Don’t forget to share our projects with your friends, by using the social media widgets.

24 comments
Good stuff the only way you could make it easier is to come out and build it just hope it’s as easy as it looks
Haha… If I had time I would come to give a hand to everybody, as sawdust is my addiction. Tom built this shed, as you can see in the Your Photos section, so it is not an impossible project. Let me know if you need any extra-information.
Any idea what the cost is?
The whole shed? Probably around 700 to 1000 $.
How do you figure 700 to 1000? I just priced the wood for the floor and walls and its $1200. I have not got to the roof yet. I wish the list would show exactly what you need simpler.
Example. 100 – 2×4 8 ft. , 2 – 2x4x16… so on. but it does for ALL the shed, its broke into sections. Put what we need for the entire shed so I can go to lowes, and say I need this, and then start building.
I am almost done with mine. I used rough cut lumber and it cost me approximately 1600 in lumber, t1-11 and plywood. 2 boxes of 2500 count nails was just over 100. It’ll probably be another 300 to shingle the roof and about 400 for a garage door. I modified these plans a little bit so I could put a 9′ x 7′ overhead garage door in it. Otherwise it’s a great plan and I love how mine is coming out.
What exact part of the overhangs requires (2x) 2″X6″x192″ boards? “B – 2 pieces of 2×6” lumber – 192” long, 13 pieces of 2×6 lumber – 141” long OVERHANG”
I built my overhangs and it only took (8X) 2″X6″X12′ boards. Just finished them up and they look nice, but I then look down and see a few extra boards and now I can’t place where those (2x) 16″ers would go. Any ideas?
Sorry for that. It was a typing mistake in the cutting list. I corrected the measurements. I am really glad you managed to get the done and I would love to see how your shed turns out. Regarding those 2 pieces of 2×6 lumber left, I think you have to send them back or use them for another awesome project. How does a picnic table sounds?
I will use them as extra bracing for the roof. I will try to upload a picture of the finished product when I am done. I built it on an old concrete pad/slab that had a 16’X24′ building on it, probably built in the 1940’s. Turns out it has a hog pen before that and was built with a slope in it, so my new building(12’X16′, 1/2 the size of old building) is on 4″X6″X16′(instead of 4″X4″) skids to help brace the side I had to raise. This is my first solo project and full project. I spent a few days looking around for what I felt was a good, full set of plans and I arrived at yours. Thanks for all the help!
It sounds like a really interesting project considering the issues you had to deal with. Good luck with the finishing touches and I am here if you need any assistance.
For anyone else making this, you might want to go with 9 boards for your roof instead of 8. I needed 4.25 boards per side when factoring in the overhangs. 6″ (42″ – 48″) left over from bot piece cuts is not enough to cover 10″ overhang span. Will probably have 1/2 a board left over, but WAY better than being 1/2 board short like I am. Worst case scenario is you do not use it and can take it back to the store for a refund. SIDE NOTE- My “Mowes” store only had interior grade plywood that was splitting/warped, so I went with OSB for my roofing sheets as it was $12 a board cheaper. It is interior grade as well but looked WAY better than the plywood they had. I also purchased some water sealant/proofer and rolled each panel of OSB with it and let it dry. Not the best product, but it seems to work decent and add a small, yet noticeable extra layer of defense against water. The water sealant/proofer I purchased was $25, but I still “saved” about $50 over the plywood. I only did this because of how sad the plywood at my Mowes store looked. Either way, go with 9 sheets, not 8.
Why do the overhangs require 2 x 6 spacers if the frame itself is made of 2 x 4 construction ??? Thank-you
Hey there Jack, like the shed a lot, I’m going to use these plans and use the finished product for a workshop. Wanna make a couple of modifications. Would like to put two windows along each 16 foot run and a barn door on one end. Is there anything by way of framing plans I can turn to for the proper layout for this mod.? Also, insulation…I’m good on how to insulate the walls. How would you recommend I go about insulating the roof area. In CO. it can get pretty cold and I intend to use this shop year round. Thanks so much for all your help on this, much appreciated!!
For the barn doors placed on one end you can check these plans (http://myoutdoorplans.com/shed/12×16-barn-shed-plans/). Framing the windows should be done in the same manner as in these plans, so it shouldn’t be difficult to make. Regarding the roof insulation I would use fiberglass batts.
wow really nice and clear!
i want to make a regular shed roof for this (one slant down) any idea where i can get plans for a roof like that for this shed?
Thanks
If you want to build a lean to shed, I recommend you these plans: http://myoutdoorplans.com/shed/8×12-lean-to-shed-plans/
I need to know how many bundles it takes to do a 12×16 shed
The standard reference is that each bundle is 100 SF (or a “square”), and this is used to compute the shingles needed for your project.
I am building a boat port 27 X 14. However, to get the boat in and out, I have to eliminate a corner post support. So instead of six posts to support the roof, I only have 5. The roof would be a lean-to design. Is it possible to build a roof where one corner support is missing and still have structural integrity.
No, unless it is attached to an already existing building.
Can I use 2×6 instead of 2×4
Yes, but you might need to adjust their length.
I plan on building your 12×16 shed. Since I’ll be purching the 2×4s in bulk what would be the ideal size to order?
You need 8′ and 14′