This step by step woodworking project is about generator shed roof plans. This is PART 2 of the project where I show you how to build the roof and the front double doors. This will ensure a super easy access to the interior of the shed. My plans come with step by step instructions and you can easily adjust all the dimensions to suit your needs. See my other DIY projects HERE.
We recommend you to invest in the best materials you could afford. Therefore, you should buy weather-resistant lumber, such as pine or cedar. Always take accurate measurements before adjusting the size of the components at the proper size. Drill pilot holes trough the components before inserting the wood screws, to prevent the wood from splitting. See all my Premium Plans in the Shop.
Made from this plan
Generator Shed Roof Plans

Building a generator shed
Materials
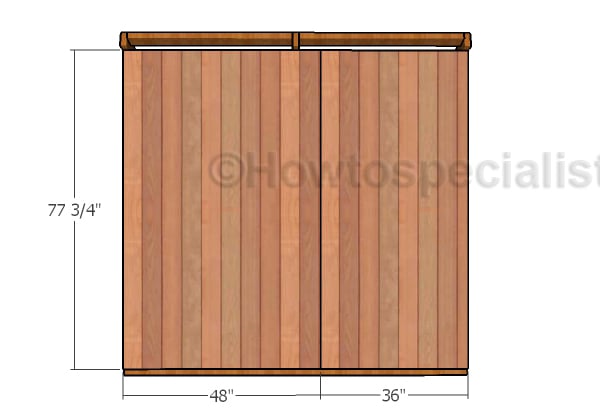
- E – 1 piece of T1-11 siding – 48″x77 3/4″ long, 1 piece – 36″x77 3/4″ long, 1 piece – 48″x62 1/2″ long, 1 piece – 36″x62 1/2″ long, 2 pieces of T1-11 sifing – 36″x74 1/4″ long, 2 pieces – 24″x80 3/4″ long SIDING
- G – 2 pieces of 1×4 lumber – 60 3/4″ long, 2 pieces – 61 3/4″ long, 4 pieces – 77 1/4″ long, 1 piece of 1×4 lumber – 78 3/4″ long, 2 pieces – 57 1/2″ long TRIMS
- H – 1 piece of T1-11 siding – 36″x57 1/2″ long, 2 pieces of 1×4 lumber – 36″ long, 2 pieces – 50 1/2″ long DOOR
- I – 2 pieces of 2×2 lumber – 88 1/2″ long, 3 pieces – 69″ long LID FRAME
- J – 2 pieces of 3/4″ plywood – 44 1/4″x72″ long, 50 sq ft of tar paper, 50 sq ft of asphalt shingles ROOF
- K – 5 pieces of 2×4 lumber – 70 1/2″ long, 4 pieces – 39 3/4″ long, 2 pieces of 1×4 lumber – 88 1/2″ long RAFTERS
- 5 pieces of 2×4 lumber – 6′
- 2 pieces of 2×4 lumber – 8′
- 6 pieces of 2×2 lumber – 8′
- 19 pieces of 1×4 lumber – 8′
- 6 pieces of T1-11 siding – 4×8
- 2 pieces of 3/4″ plywood – 4’x8′
- 50 sq ft of tar paper, 50 sq ft of asphalt shingles
- 1 1/2″ brad nails, 2 1/2″ screws, 3 1/2″ screws
- 6 hinges, 1 latch
- wood filler , wood glue, stain/paint
Tools
- Safety gloves, glasses
- Miter saw, jigsaw
- Chalk line, tape measure, spirit level, carpentry pencil
- Drill machinery and drill bits
Time
- One Week
Building a generator shed roof
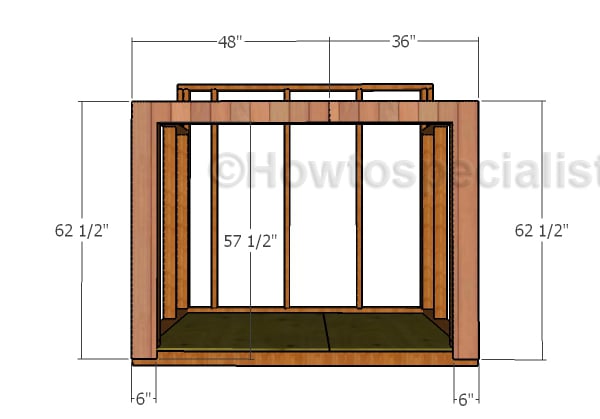
Front Wall – Siding
Attach T1-11 siding to the front face of the generator shed. Make the cuts to the sheets and secure them into place with 2″ brad nails.
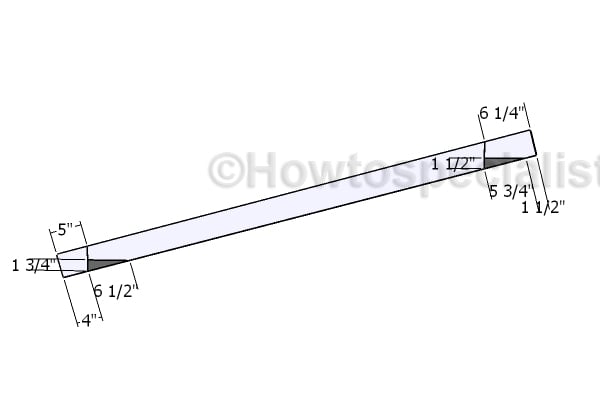
Building the rafters
Build the rafters from 2×4 lumber. Mark the cut lines on the rafters and get the job done with a circular saw. Smooth the edges flush for a professional result.
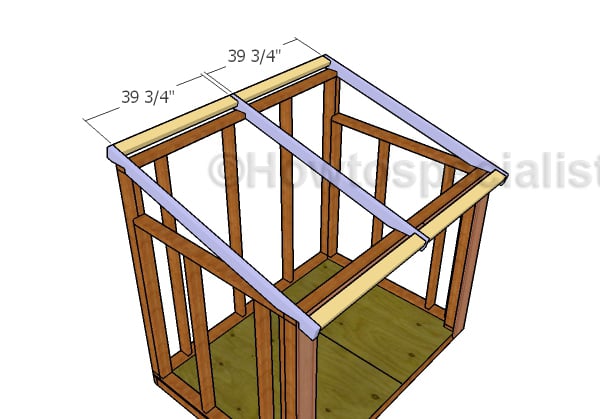
Building the roof frame
Attach the rafters to the top of the generator shed, as shown in the diagram. In addition, you need to fit the supports so you reinforce the structure. Drill pilot holes and insert 3 1/2″ screws to lock everything together tightly.
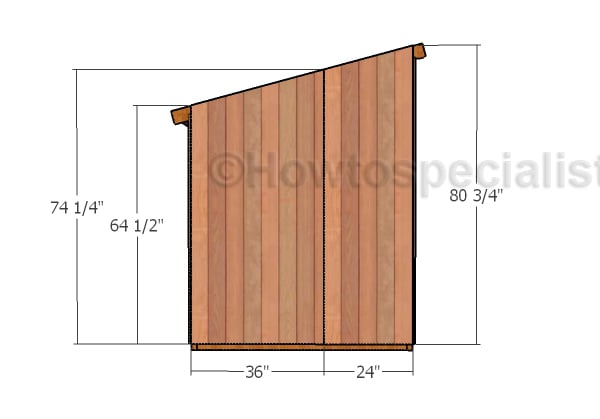
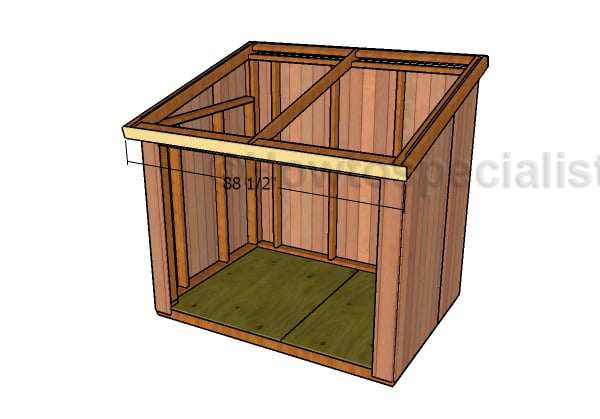
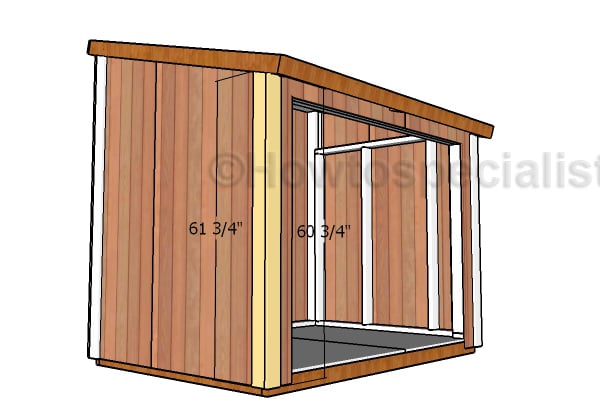
Side Wall – Siding
Cut the T1-11 siding panels to the right dimensions and shapes and then secure them into place with 2″ brad nails.
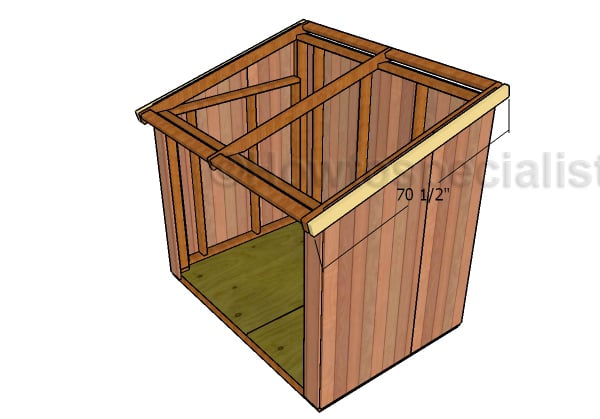
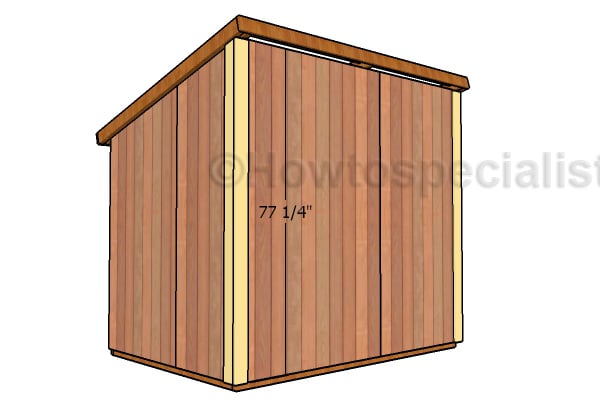
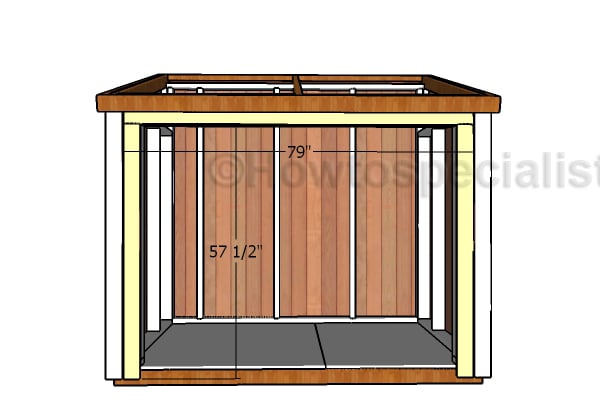
Back Wall – Siding
Attach the T1-11 siding panels to the back of the shed. Leave no gaps between the panels for a neat result.
Side roof trims
Fit 2×4 trims to the sides of the roof. These trims will work as overhangs, so you protect the walls from water damage. Use 2″ brad nails to secure the trims into place.
Roof trims
Attach 1×4 trims to the front and back of the generator shed roof.
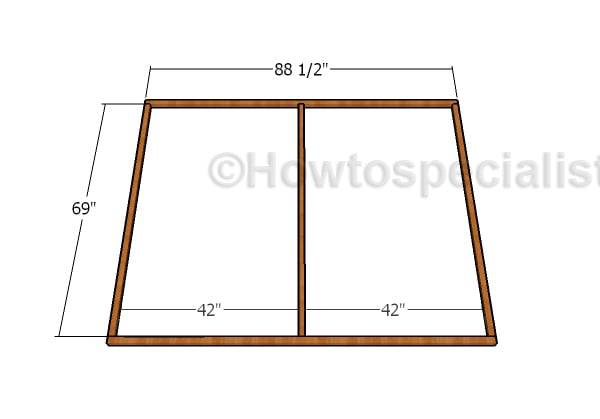
Roof Frame
Build the frame for the hinged roof from 2×2 lumber. Drill pilot holes and insert 2 1/2″ screws to assemble the frame tightly. Check if the corners are square and add glue to the joints.
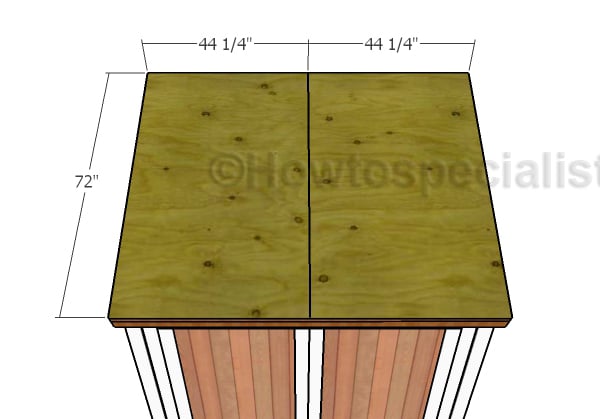
Fitting the roof
Attach the roof frame to the top of the generator shed and secure it to the back with hinges. Fit 3/4″ plywood panels to the lid frame and secure it into place with 1 5/8″ screws.
Front corner trims
Fit 1×4 trims to the front corners of the generator shed, using 2″ brad nails.
Corner back trims
Fit the trims to the back corners of the generator shed, as well.
Fitting the jambs
Fit 1×4 slats around the door opening, as jambs. Drill pilot holes and secure them into place with 2 1/2″ screws.
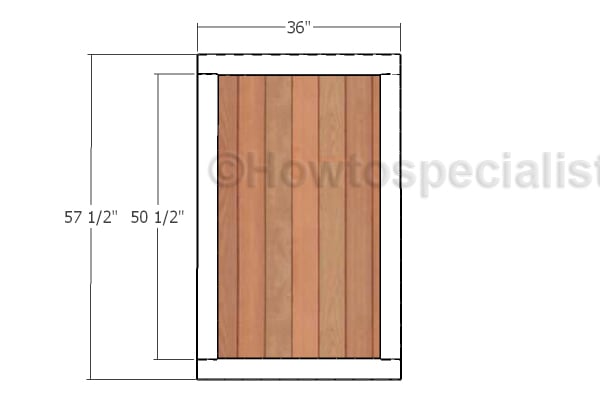
Building the doors
Build the doors for the generator shed from 1×4 lumber and the panels from T1-11 siding. Use glue and 1 1/4″ brad nails to secure the trims into place tightly.
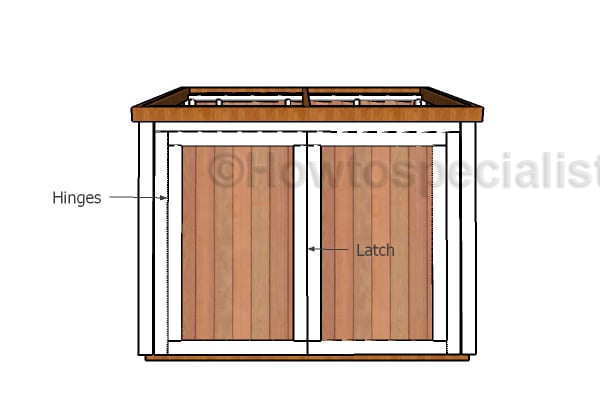
Fitting the front doors
Fit the doors to the opening and secure them to the jambs with hinges. Install a door latch so you lock the doors tightly.
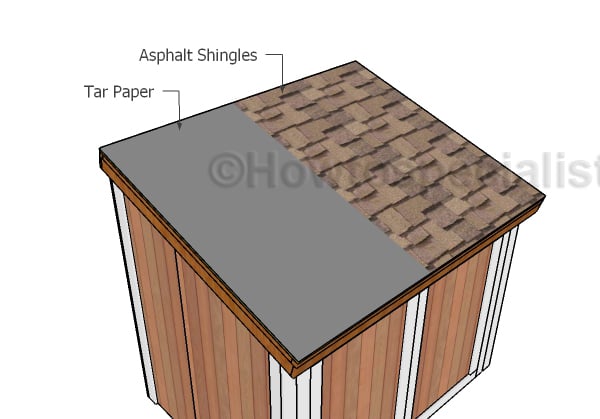
Fitting the roofing
You could fit asphalt shingles to protect the shed, as it is a straight forward solution. Therefore, install roofing felt over the roofing sheets, making sure the strips overlap at least 2″. Secure the tar paper to the plywood sheets with roofing staples. Fit the side drip edges over the roofing felt, while the bottom drip edges should be fit under. Place a starting course at the bottom of the roof, before installing the asphalt shingles. Always read the manufacturing instructions before starting the installation, as there are several aspects that differ.
Smart Tip: The first course should star with a 3 tab shingle, the second course with a 2 1/2 tab , the third course with a 2 tab, the forth course with a 1 1/2 tab, the fifth course with a 1 tab, the sixth course with a 1/2 tab. Repeat the process from the beginning, starting with the seventh course. Don’t forget that the shingles should overhang from the drip edge about a 1/4″. In addition, secure the asphalt shingles to the roof decking with tacks.
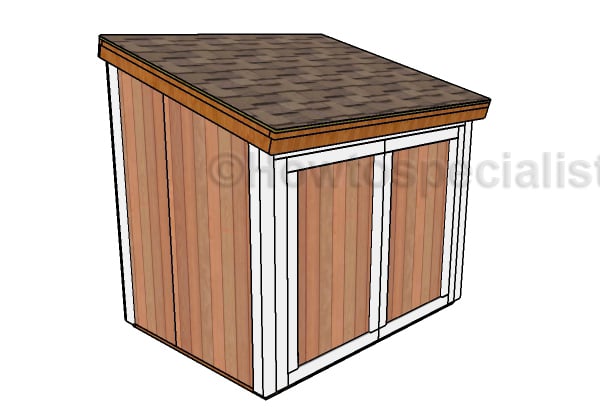
Portable generator enclosure plans
Fill the holes with wood putty and smooth the surface with 120-220 grit sandpaper. Apply a few coats of paint or stain over the components to enhance the look of the shed and to protect them from decay.
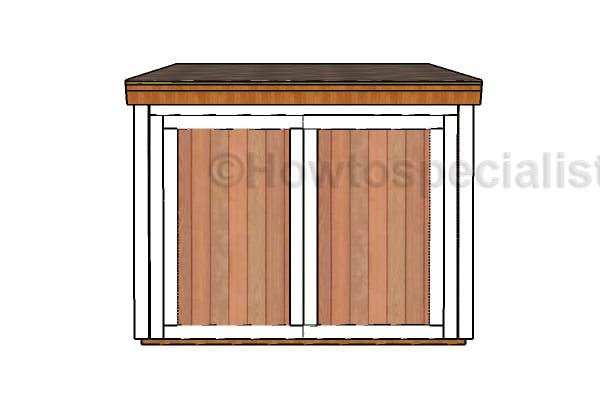
Portable generator enclosure plans – Front View
Last but not least, we recommend you to take care of the finishing touches. In order to get a professional result, fill the holes and the gaps with wood filler and let it dry out for a few hours. Take a look over PART 1 of the project, so you learn how to build the frame of the shed.
Thank you for reading our project about generator shed roof plans and we recommend you to check out the rest of the projects. Don’t forget to LIKE and SHARE our projects with your friends, by using the social media widgets.
<< Previous | Next >>
4 comments
I am trying to figure out how to attach the roof so it can open for refueling the generator. I don’t see any reference to a hinge mechanism to connect the roof so it opens. What do you recommend.
I don’t think you read the instructions. The shed has a hinged roof. The frame is made from 2×2 and then you attack the plywood panels. The roof is hinges to the rafters.
Condescending and inaccurate reply. Actually, you didn’t explain that well at all, spec a hinge type or location. Piano hinge or very narrow strap hinges? If you are referring to attaching to the blocking between the rafters, those are purlins. Additionally, the trim on a roof edge is called fascia and will impinge on the hinges when openingand the hinge pivot will prevent flush attachment. Also that roof assembly is very heavy and did not mentioin necessary flashing details. You’d need struts of some kind to support the wieght, it flopping it down will tear the hinges out over time. Also who ever used a brad nail for exterior construction?
This isn’t terrible for a CAD exercise but it’s not complete for real world application.
Great plans. You say fix 2×4 trims to the sides of the roof and use 2 inch brad nails, but they would only extend 1/2 inch into the siding beneath the 2×4 trim and not into the rafter under the siding. If you used 1×4 on the sides I’d understand the 2 inch nails, but with 2×4 trim don’t you need 2 1/2 or better yet 3 inch nails?