This step by step diy project is about 10×12 barn shed plans. If you want to build a learn more about building the roof for the barn shed, pay attention to this project. Follow the instructions and pay attention to the diagrams. Build the garden shed even if you are a beginner when it comes to woodworking. Take a look over the rest of the project, to see how to build the frame of the barn shed.
You should always plan everything from the very beginning, in order to prevent costly mistakes and to save time. In most of the cases, you need a friend to give you a hand when assembling the barn shed. Invest in high quality lumber and plywood, as the components will be exposed to bad weather. Protect the components with appropriate paint or stain.
There are a few tips that you should take into account, if you want to get a professional result. Therefore, take accurate measurements and use professional tools when making the cuts or when drilling pilot holes. Align the components at both ends and add waterproof glue to the joints, if you want to create a rigid structure. See all my Premium Plans in the Shop.
Made from this plan
How to build a barn shed roof
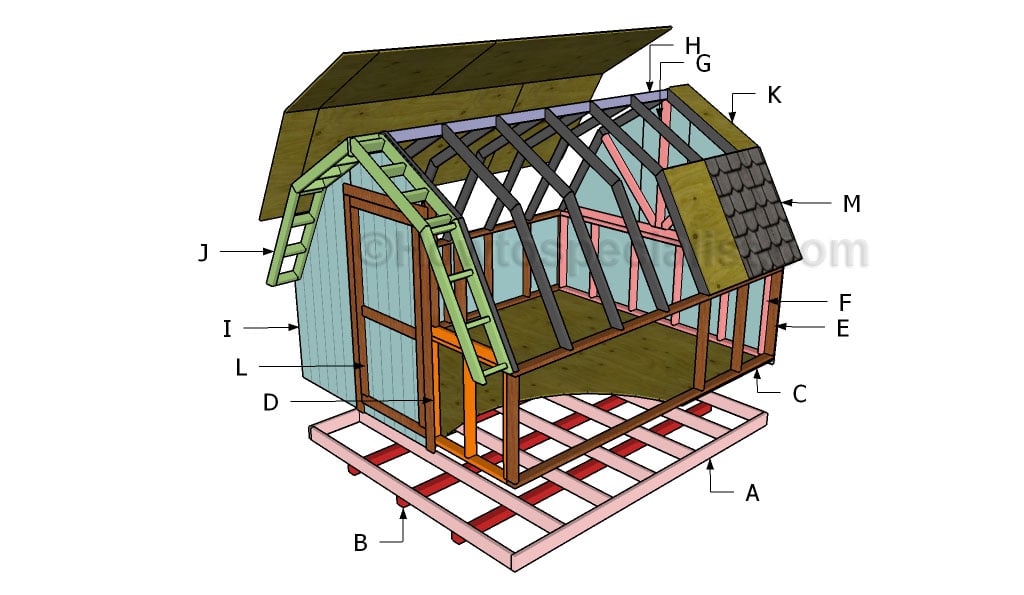
Building a 10×12 barn shed
Materials
- I – 8 pieces of 5/8″ siding – 41 3/4″x48″ long, 1 pieces – 24″x41 3/4″ long, 2 pieces – 48″x55 1/2″ long, 1 piece – 24″x64 1/2, long, 1 piece – 23 1/2″x37″ long, 2 pieces 41 1/2″x93 1/2″ long SIDING
- J – 4 pieces of 2×4 lumber – 48″ long, 4 pieces – 41 1/2″ long, 16 pieces – 9″ long 2xOVERHANG
- K – 1 piece of 3/4″ plywood – 48″x96″ long, 1 piece – 48″x48″ long, 2 pieces – 12 1/2″x48″ long, 1 piece – 41 1/2″x96″ long, 1 piece – 41 1/2″x48″ long, 2 pieces – 12 1/2″x41 1/2″ long 2xROOFING
- L – 1 piece of 5/8″ siding – 37″76 1/4″ long, 2 pieces of 1×4 lumber – 37″ long, 2 pieces – 69 1/4″ long, 1 piece – 30″ long DOOR
- M – 240 sq ft of tar paper, 240 sq ft of asphalt shingles 2xROOFING
- 10 pieces of 2×4 lumber – 8 ft
- 7 pieces of T1-11 siding sheets – 4’x8′
- 7 pieces of 3/4″ plywood – 4’x8′
- 6 pieces of 1×4 lumber – 8 ft
- 240 sq ft of tar paper, 240 sq ft of asphalt shingles
- 200 pieces of 3 1/2″ screws
- 800 pieces of 1 5/8″ screws
- 50 pieces of 1 1/4″ screws
- roofing nails
- 1 shed hinge set
Tools
- Safety gloves, glasses
- Miter saw, jigsaw
- Chalk line, tape measure, spirit level, carpentry pencil
- Drill machinery and drill bits
Tips
- Use a good miter saw to make the angle cuts
- Drill pilot holes before inserting the screws
- Set the posts in concrete for proper support
Time
- One Week
Related
- Part 1: 10×12 Barn shed plans
- Part 2: How to build a barn shed roof
Free barn shed plans
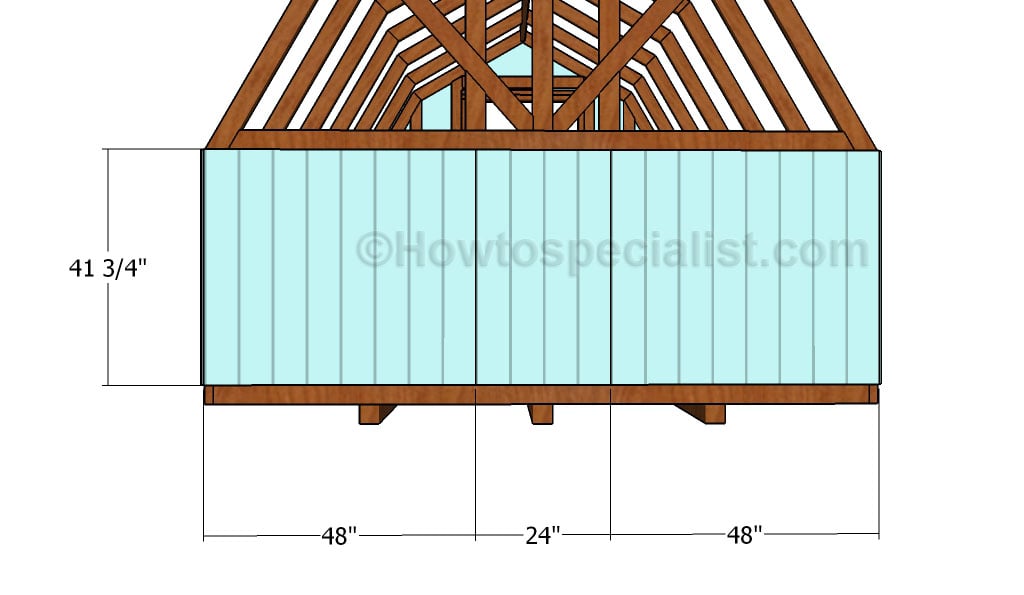
Fitting the base back walls
Fit house wrap to the exterior frame, making sure the strips overlap several inches. Always start installing the wrap from the bottom of the shed. Installing the T1-11 exterior siding to the framing, using 1 1/4″ finishing nails or 1 5/8″, after makings sure the top of the sheets are flush with the top plates. In addition, align the sides of the sheets with great attention, if you want to get a professional result. As you can easily notice in the image, the siding should cover several inches the joists. Moreover, when installing the rest of the sheets, you should connect them together properly.
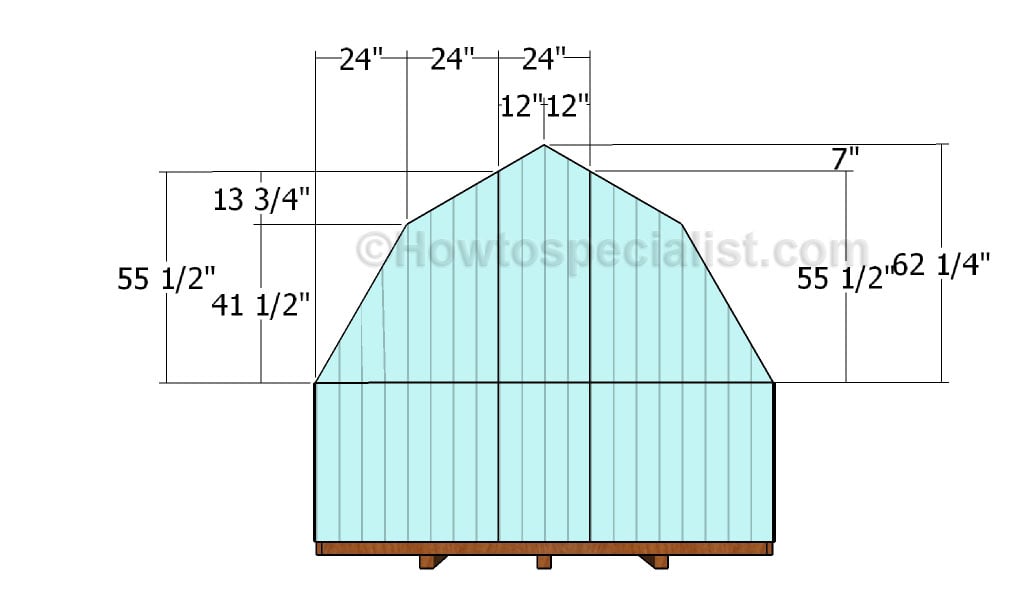
Fitting the back walls
Fit the rest of the sheet to the upper section of the back wall. Use a circular saw to make the cuts and secure them into place easily. Leave no gaps between the components and smooth the exposed edges.
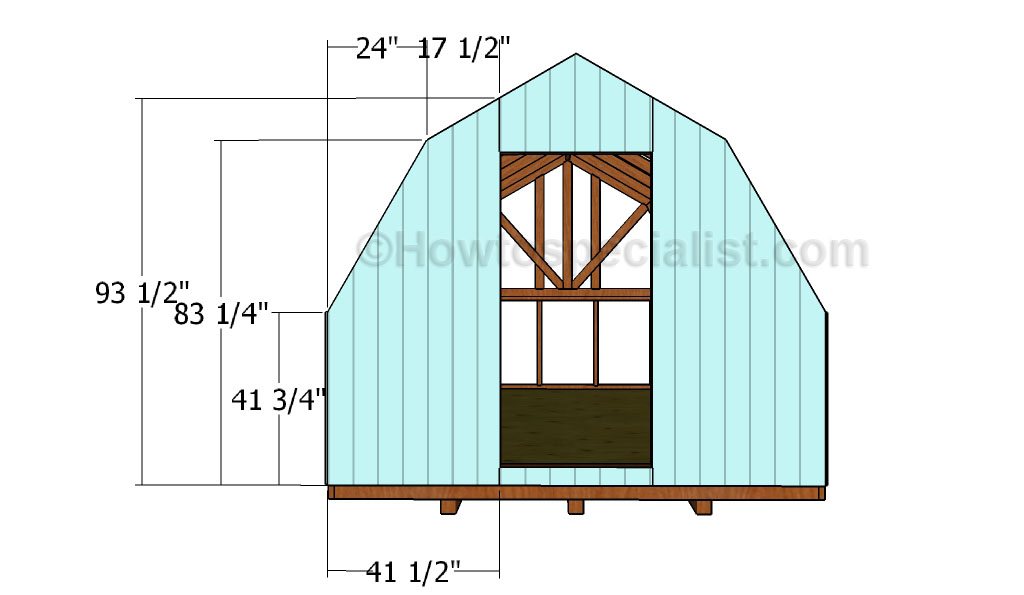
Fitting the front panels
Fit the siding sheets to the front face of the barn shed, as shown in the diagram. Leave no gaps between the components.
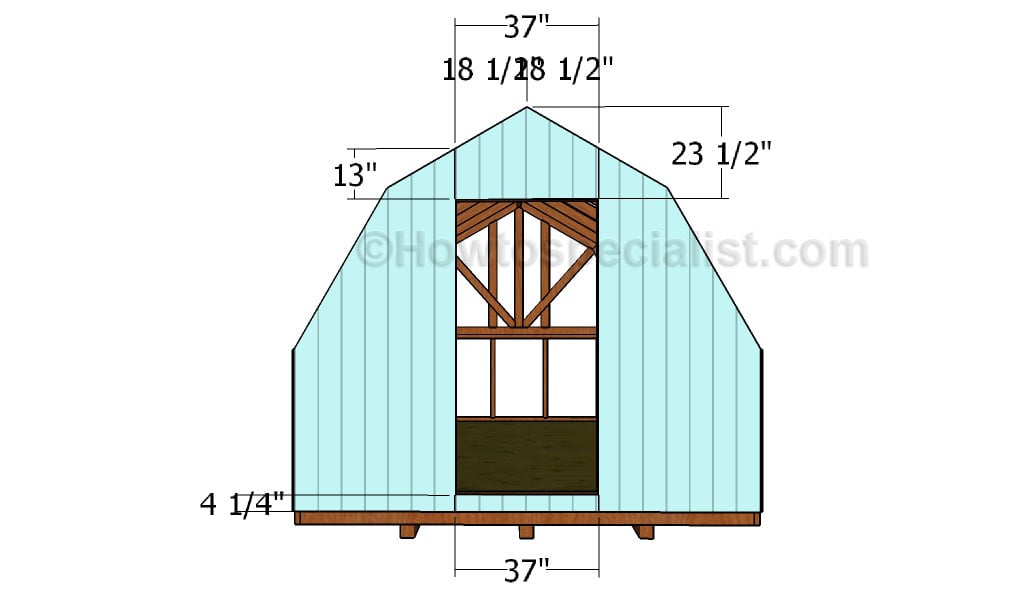
Front wall
Build the rest of the front wall, as described in the diagram.
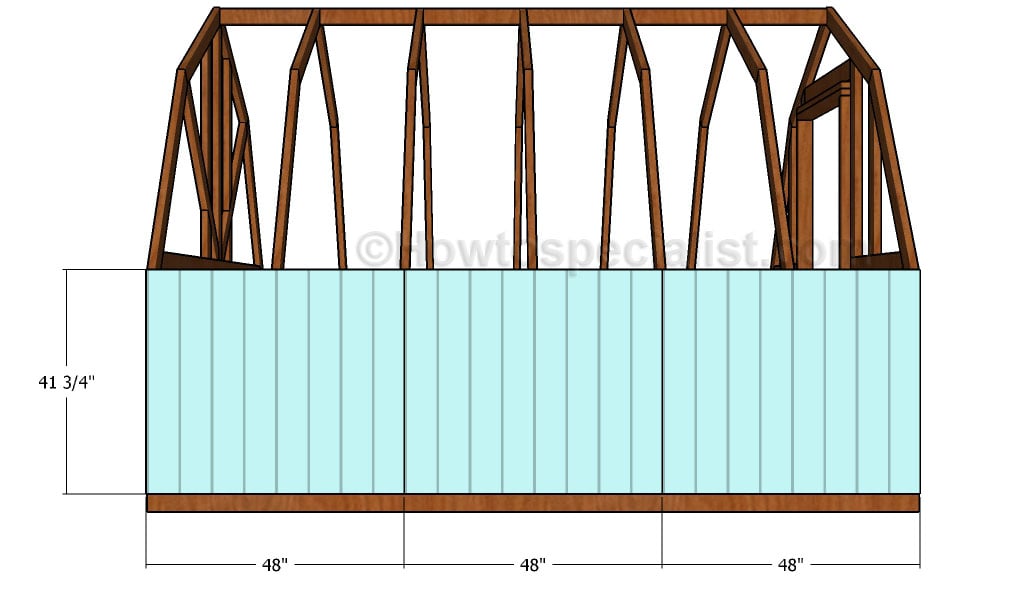
Attaching the side walls
Attach the siding panels to the sides of the bar. Align the sheets with attention and secure them to the framing using a nail gun. Leave no gaps between the components.
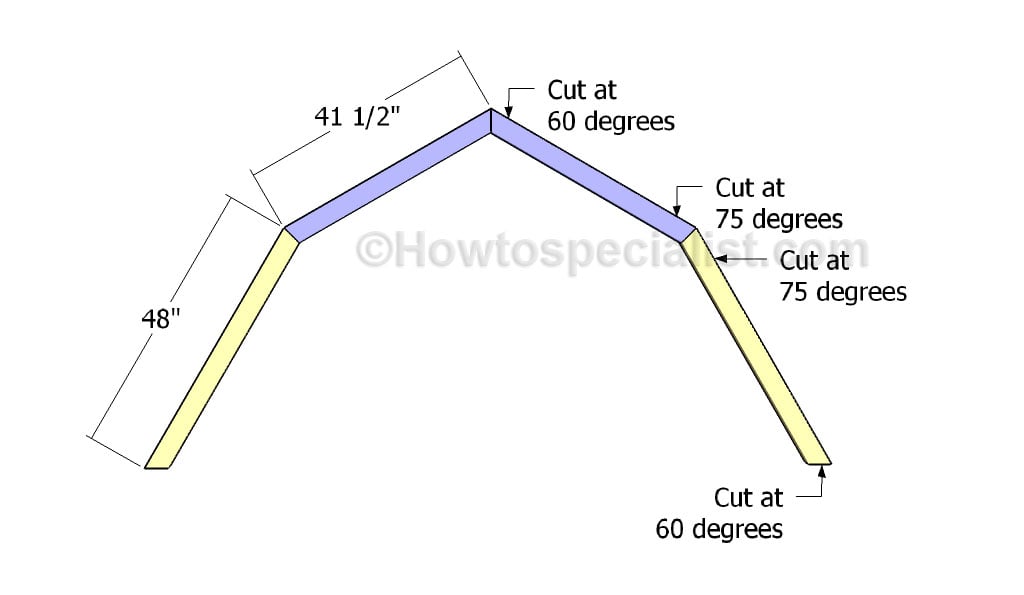
Building the end rafters
Building the overhangs for the front and back faces of the barn shed is a straight process. Cut the rafters at the right size and lock them together with 2 1/2″ screws, as described in the diagram. Build four trusses as shown in the plans. (set the miter saw at 15 degrees and at 30 degrees)
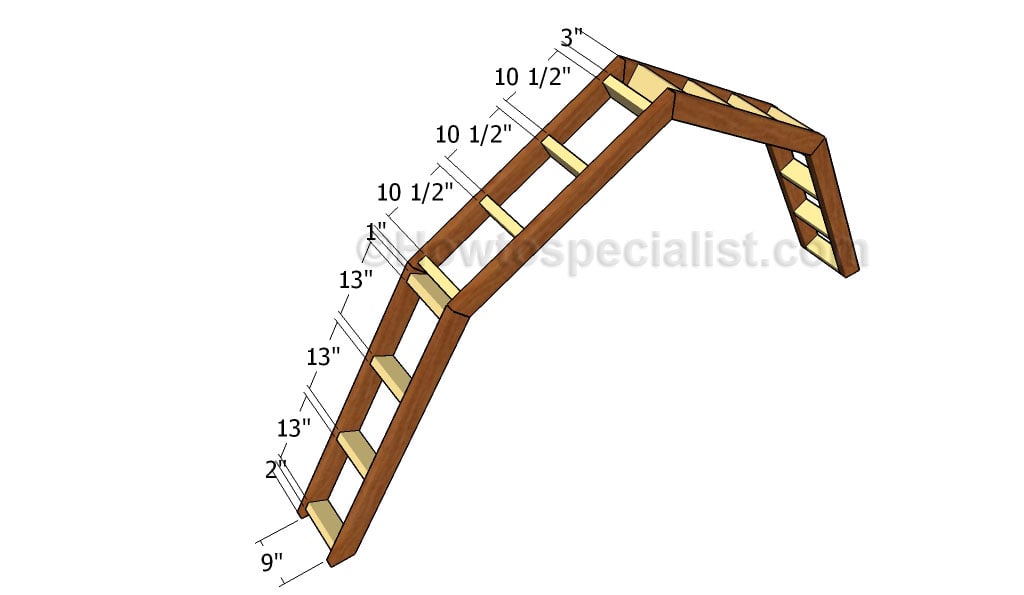
Attaching the blockings
Fit 2×4 blockings to the trusses, in order to create the overhangs. Drill pilot holes through the rafters and insert 2 1/2″ screws into the blockings.
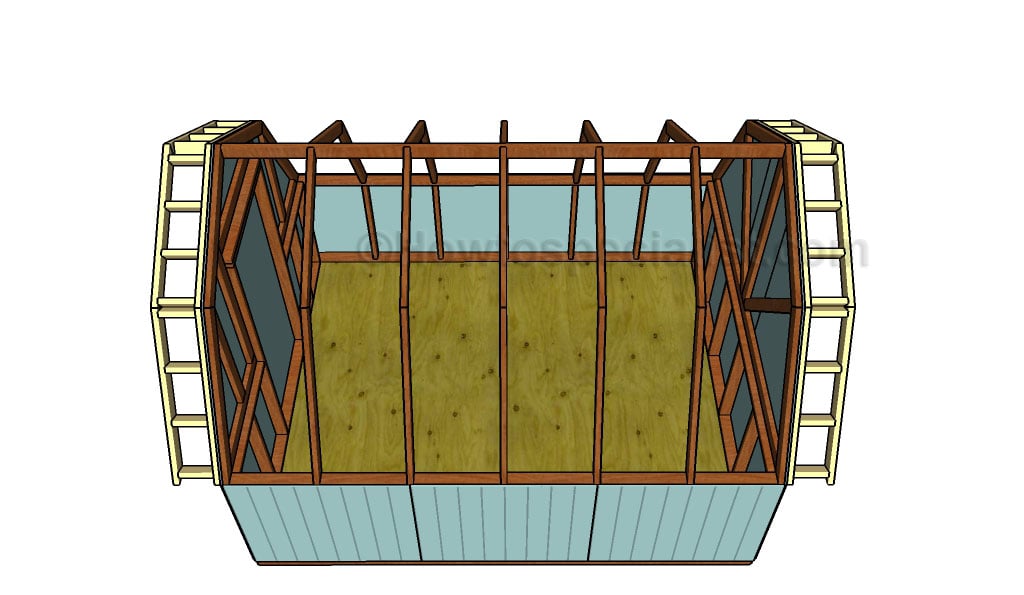
Fitting the overhangs
Fit the overhangs to the front and to the back of the barn shed. Drill pilot holes and insert 2 1/2″ screws to lock the overhangs to the framing.
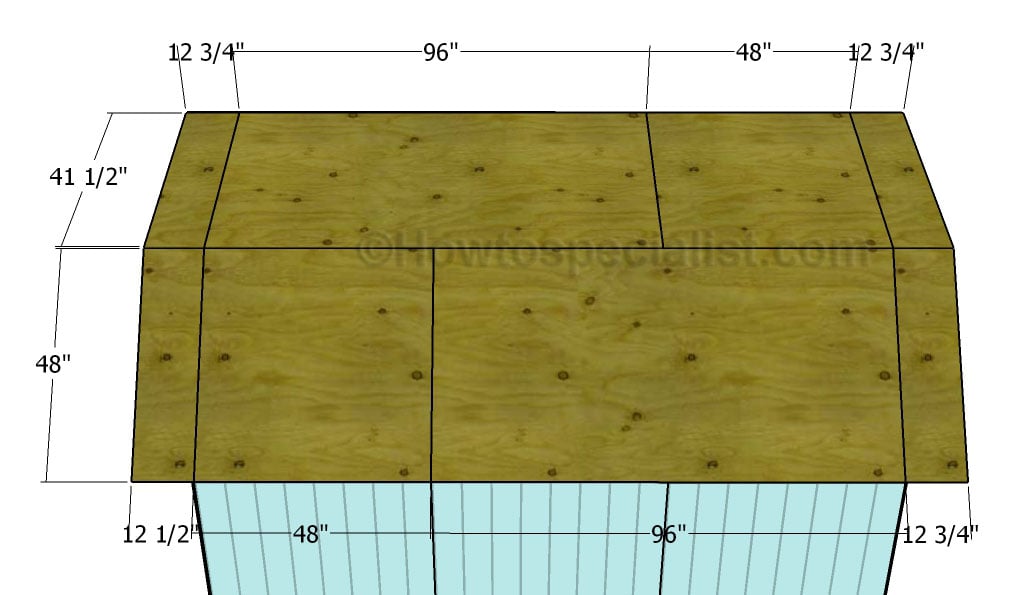
Attaching the roofing sheets
The next step of the woodworking project is to attach the 3/4″ plywood sheets to the rafters, as described in the diagram. Leave no gaps between the sheets and secure them to the rafters using 1 1/4″ galvanized screws, every 8″ along the rafters. Using tongue and groove sheets will help you save time and get a professional result. Repeat the process on the opposite side of the gazebo, using the same woodworking techniques.
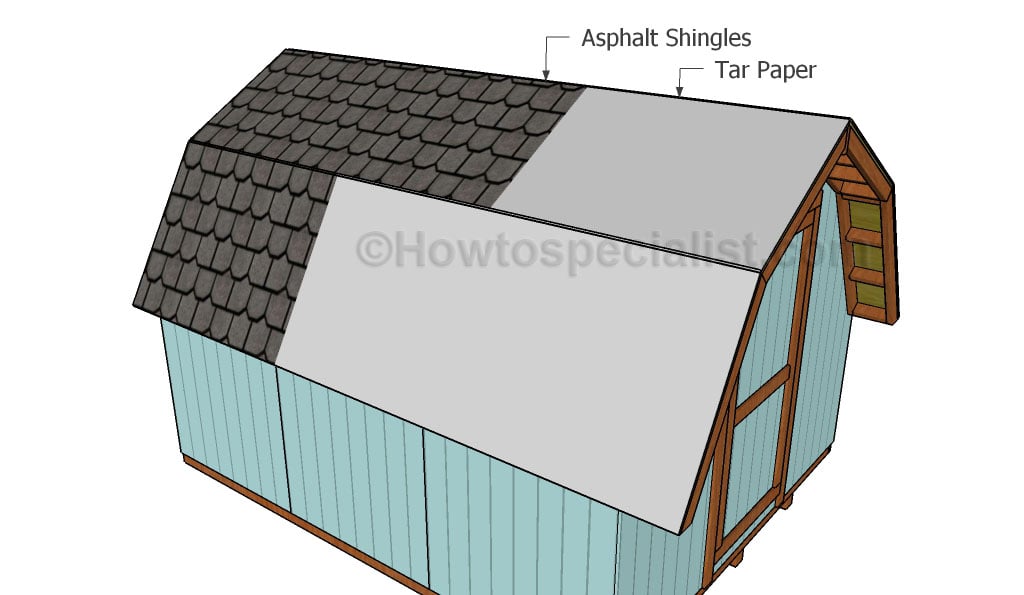
Fitting the roofing
You could fit asphalt shingles to protect the barn, as it is a straight forward solution. Therefore, install roofing felt over the roofing sheets, making sure the strips overlap at least 2″. Secure the tar paper to the plywood sheets with roofing staples. Fit the side drip edges over the roofing felt, while the bottom drip edges should be fit under. Place a starting course at the bottom of the roof, before installing the asphalt shingles. Always read the manufacturing instructions before starting the installation, as there are several aspects that differ.
Smart Tip: The first course should star with a 3 tab shingle, the second course with a 2 1/2 tab , the third course with a 2 tab, the forth course with a 1 1/2 tab, the fifth course with a 1 tab, the sixth course with a 1/2 tab. Repeat the process from the beginning, starting with the seventh course. Don’t forget that the shingles should overhang from the drip edge about a 1/4″. In addition, secure the asphalt shingles to the roof decking with tacks.
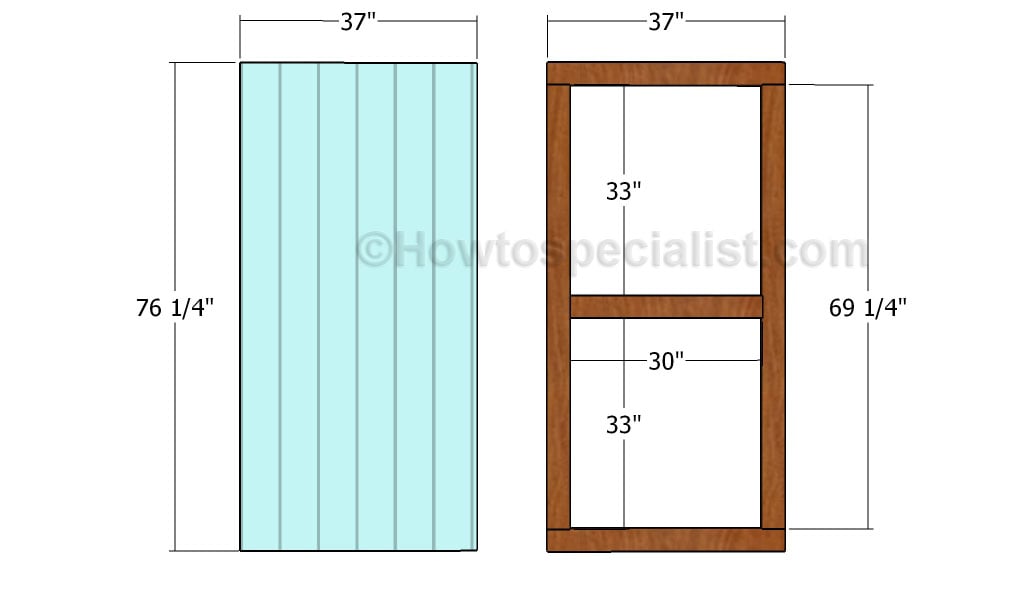
Building the shed door
Build the door out of a piece of siding and 1×4 lumber. Assemble the door frame with pocket holes and 1 1/4″ screws. Drill pocket holes at both ends of the vertical and middle components. Fit the trims to the panel and secure them into place using 1 1/4″ finishing nails and glue. Align the edges with great care and clamp them together tightly.
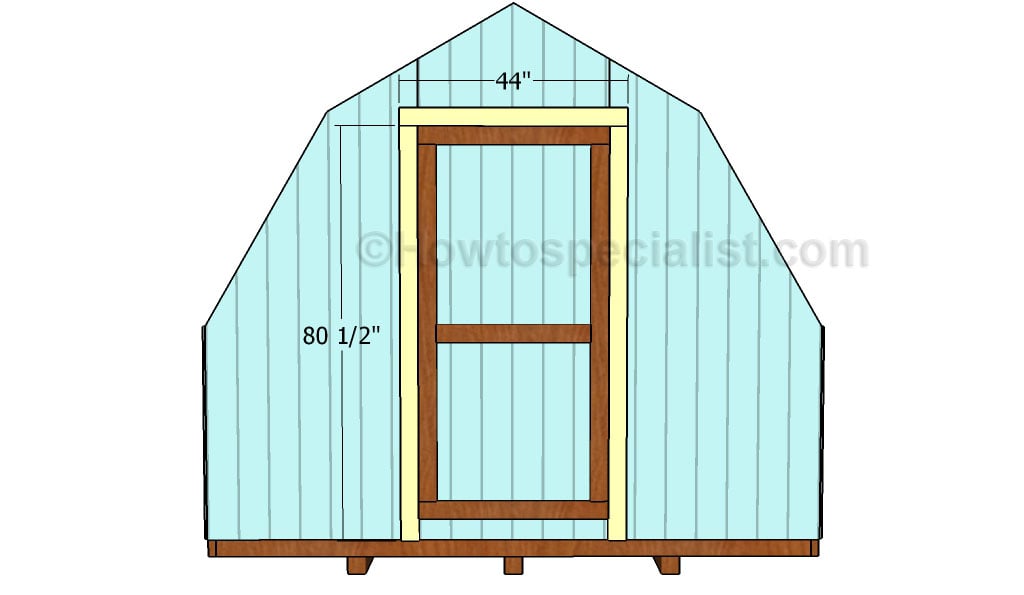
Fitting the door jambs
Fit 1×4 door jambs around the door opening. Use brad nails to lock the trims into place and secure the door into place using hinges. Install a latch to lock the door when needed.
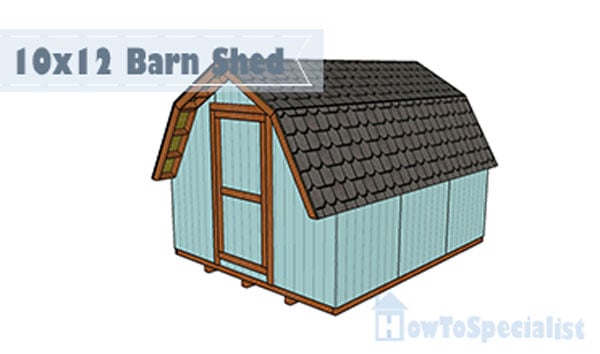
Barn-Shed-Plans
Last but not least, we recommend you to take care of the finishing touches. In order to get a professional result, fill the holes and the gaps with wood filler and let it dry out for a few hours. Check if there are protruding screws and fix this issue, if necessary.
Thank you for reading our project about 10×12 free barn shed plans and we recommend you to check out the rest of the projects. Don’t forget to SHARE and LIKE our projects with your friends, by using the social media widgets, if you want to help us keep adding free woodworking plans.
<< Previous | Next >>

1 comment
What is the inside height of the 10 x 12 Barn Shed?