
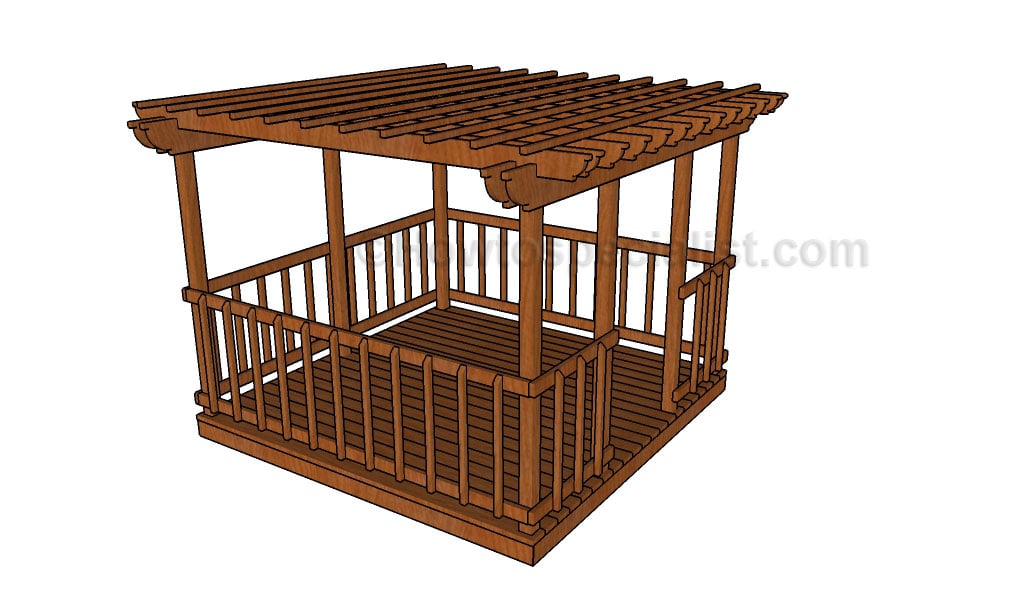
This step by step woodworking project is about free screened gazebo plans. I have designed this square 12×12 gazebo with screens, so you can build one in your garden, especially if you are near a lake. As always, my plans come with the most level of details you can even find online. Make sure you read the local building codes, before starting the project, so you learn the legal requirements.
There are many designs and plans you could choose from, so you should take a look on more projects before starting the actual project. Nevertheless, if you are looking for a simple but sturdy design, this project might be the solution to your needs. Moreover, you could build all the components from 2×4 lumber, as to save both time and money. Make sure you check all the dimensions before making the cuts, otherwise the components might not fit together easily. See all my Premium Plans in the Shop.
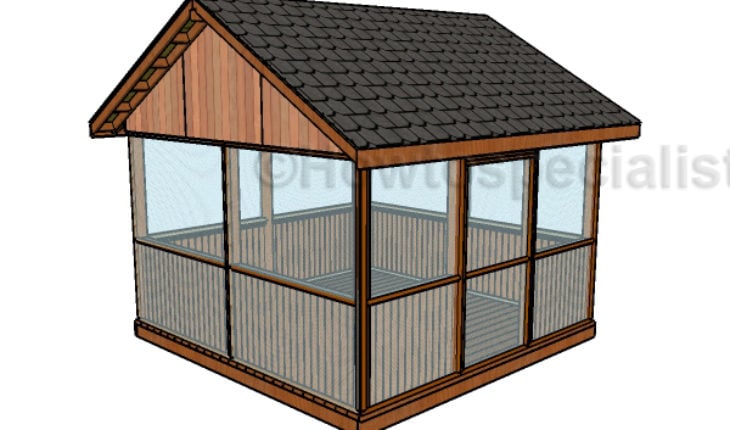
Made from this plan
Screened Gazebo Plans
Building a screened square gazebo
Materials
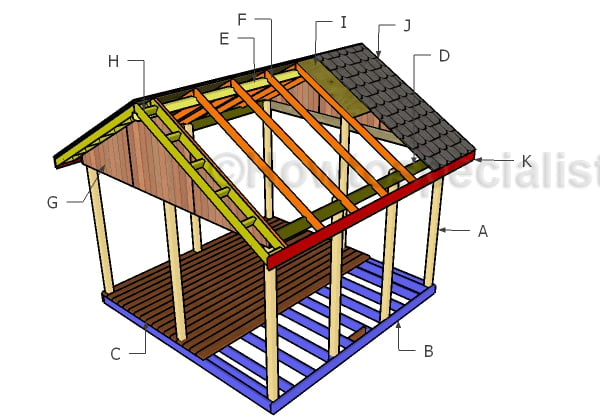
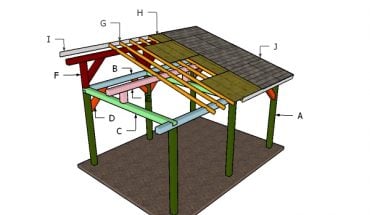
- A – 7 pieces of 4×4 lumber – 96″ long, 2 pieces – 133″ long POSTS
- B – 2 pieces of 2×6 lumber – 144″ long, 12 pieces – 141″ long, 2 pieces – 14 1/2″ long FLOOR FRAME
- C – 27 piece of 2×6 lumber – 144″ long DECKING
- D – 2 pieces of 2×6 lumber – 144″ long, 2 pieces – 141″ long TOP RAILS
- E – 1 piece of 4×4 lumber – 165 1/4″ long RIDGE PLATE
- F – 14 pieces of 2×4 lumber – 96″ long RAFTERS
- G – 4 pieces of 3/4″ plywood – 37″x48″ long, 2 pieces – 48″x51″ long GABLE ENDS
- H – 8 pieces of 2×6 lumber – 96″ long, 24 pieces – 7 1/2″ long OVERHANGS
- I – 2 piece of 3/4″ plywood – 48″x96″ long, 2 pieces – 48″x48″ long, 2 pieces – 46″x48″ long, 2 pieces – 46″x96″ long, 4 pieces – 10 3/4″x94″ long ROOF
- J – 200 sq ft of tar paper, 200 sq ft of asphalt shingles ROOFING
- K – 2 pieces of 1×6 lumber – ” long TRIMS
- 7 pieces of 4×4 lumber – 8′
- 2 pieces of 4×4 lumber – 12′
- 1 piece of 4×4 lumber – 14′
- 18 pieces of 2×6 lumber – 12′
- 27 pieces of 2×6 decking – 12′
- 24 pieces of 2×6 lumber – 8′
- 2 pieces of 1×6 lumber – 14′
- 7 pieces of 3/4″ plywood – 4’x8′
- 3 pieces of 5/8″ siding – 4’x8′
- post anchor
- 6″ lag screws
- rafter ties
- 1 5/8″ screws, 2 1/2″ screws
- 200 sq fr of tar paper, asphalt shingles
- 2″ brad nails
- wood glue, stain/paint, wood filler
Tools
- Safety gloves, glasses
- Miter saw, jigsaw
- Chalk line, tape measure, spirit level, carpentry pencil
- Drill machinery and drill bits
Time
- One Week
How to build a square gazebo with screens
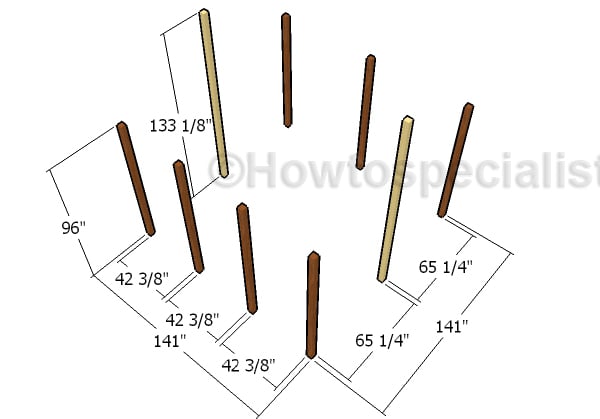
Laying out the posts
The first step of the project is to lay out the posts for the gazebo. As you can see in the plans, this will be a 12’x12′ gazebo. Use batter boards and string to layout the posts for the gazebo. You will need 4×4 posts for the project. You can either set them into concrete or use post anchors.
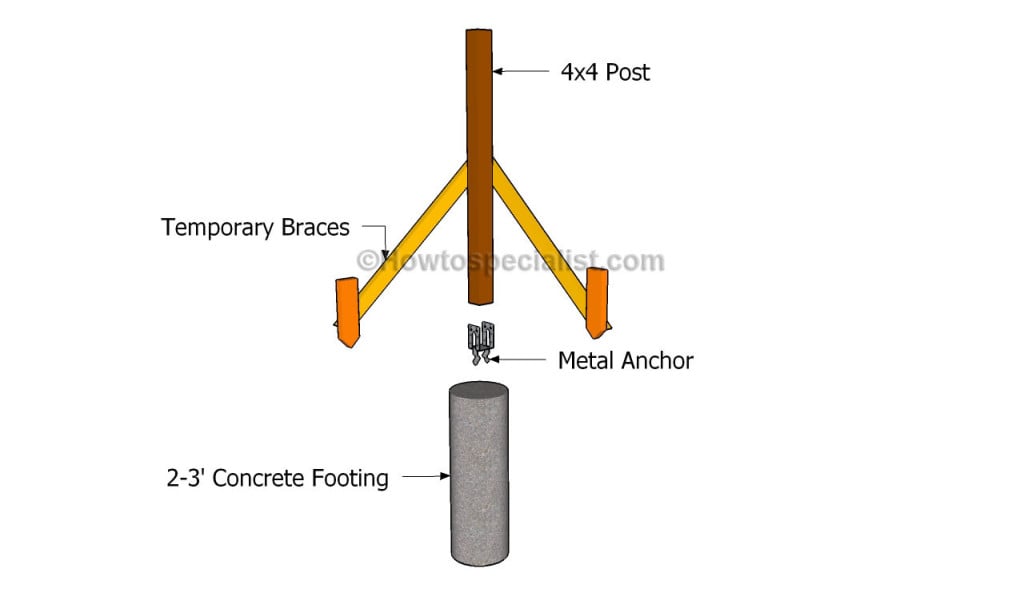
Anchoring the posts
Dig 2-3′ holes into the ground and then pour concrete footing for the posts. As you can easily notice in the diagram, you have to use adjustable anchors. Use a spirit level when fitting the posts to the anchors. In addition, you could use temporarily braces, until you build the frame of the gazebo. In this manner, all the posts will be locked plumb into position.
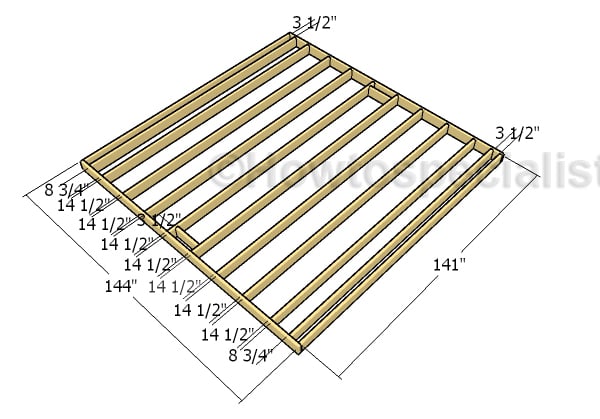
Building the floor frame
After fitting the posts, you need to attach the 2×6 joists to build the floor frame. Make sure you don’t build the floor frame separately. This diagram is just to help you understand the distances you need to leave between the joist.
Drill pilot holes through the joists and insert 3 1/2″ screws into the perpendicular components and into the posts. Align the edges with attention and leave no gaps between the components.
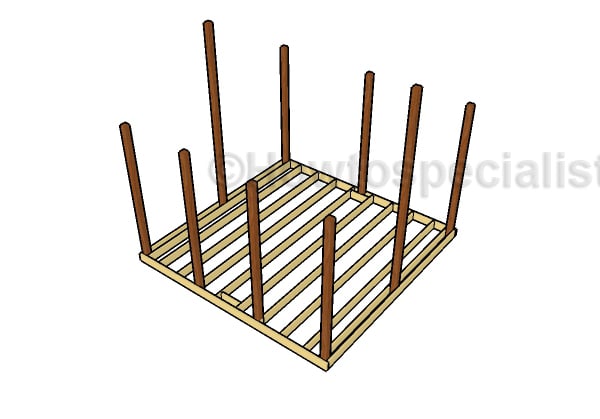
Frame with posts
Once you attach the joists to the posts, the frame of the square gazebo should look like the one in the diagram.
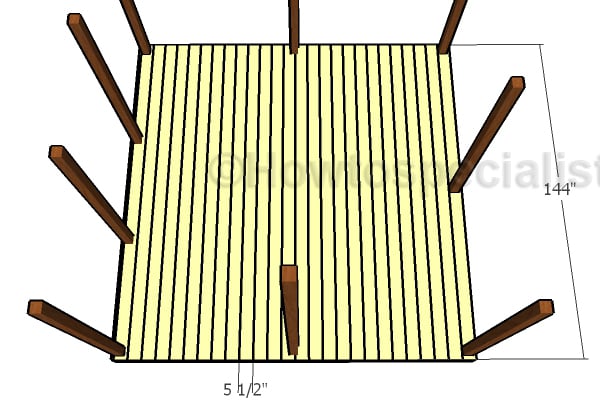
Fitting the decking
Attach the 2×6 decking boars to the floor frame. Align the edges flush, drill pilot holes and insert 2 1/2″ screws into the joists. Make sure you make some notches, so you can fit the decking boards around the posts. In addition, if you want, you can place a nail between the boards so you create some small equal drainage gaps.
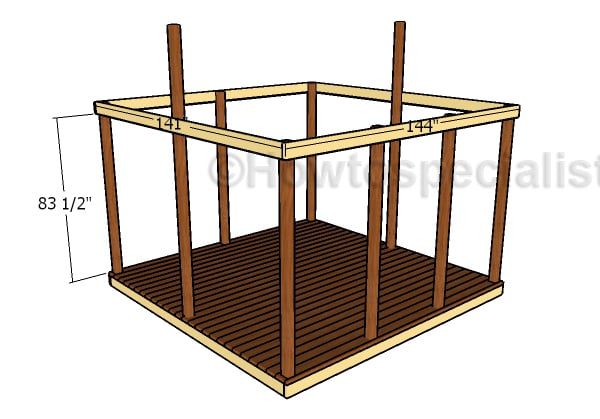
Fitting the top plates
Attach the 2×6 beams to the top of the posts. Align the edges flush, drill pilot holes and insert 3 1/2″ screws to lock them into place tightly.
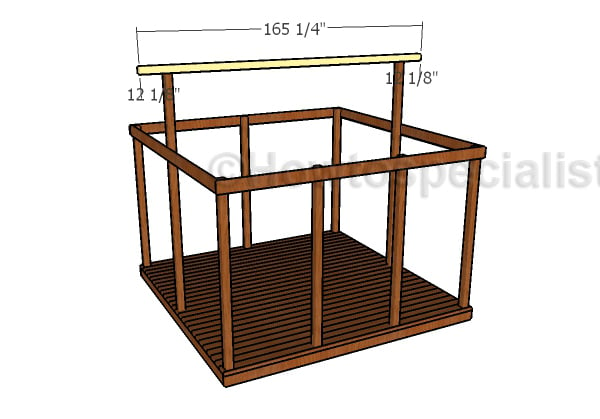
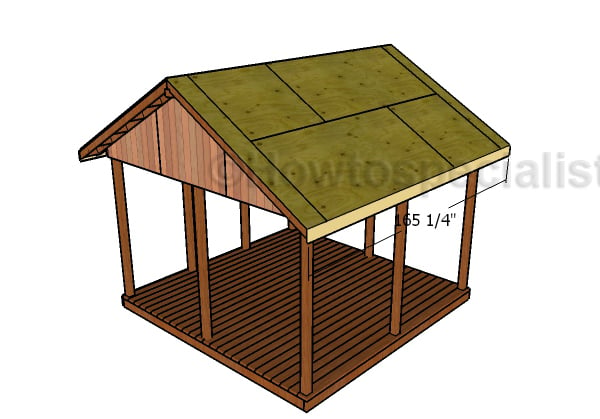
Fitting the top ridge
Fit the 4×4 beam to the top of the posts. Center the beam to the support posts and use appropriate hardware to lock them into place tightly. Make sure the corners are square and check if the top beam is perfectly horizontal, by using a spirit level.
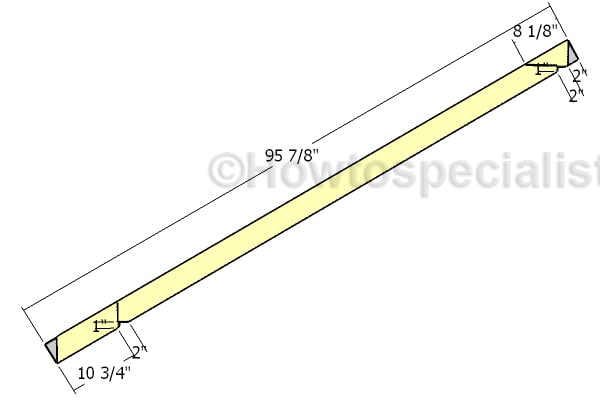
Building the rafters
Build the rafters for the gazebo, using 2×6 lumber. Mark the cut lines on the beams and then get the job done with a saw. Make the birdsmouths to the rafters, so you can easily fit into place properly.
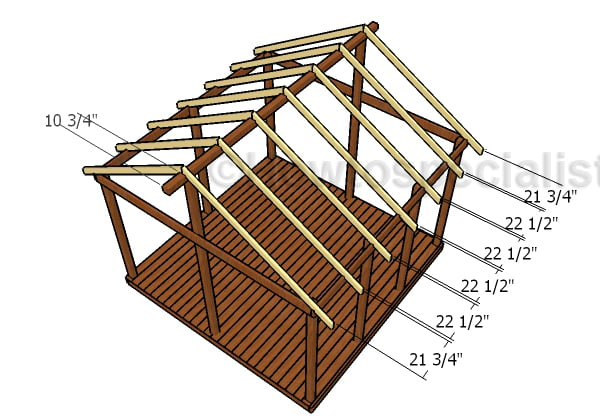
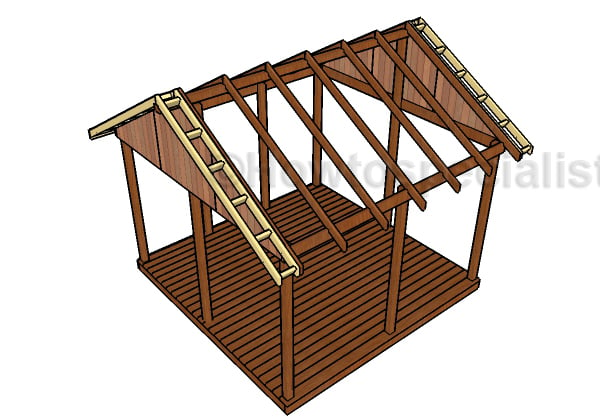
Fitting the rafters
Fit the rafters to the top of the gazebo. Place the rafters every 24″ on center and lock them into place with rafter ties.
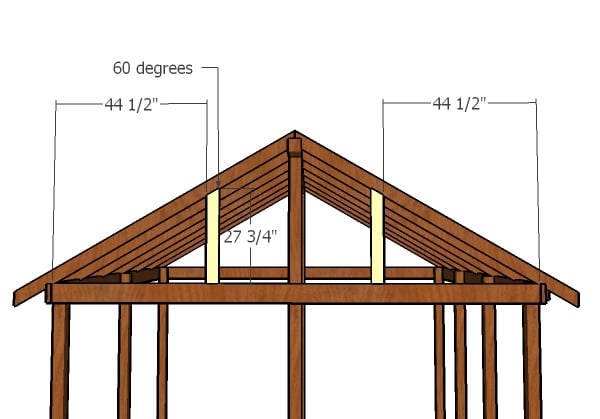
Gable end supports
Use 2×4 lumber for the gable end supports. Make a cut to the top of the supports, drill pocket holes and insert 2 1/2″ screws into the frame.
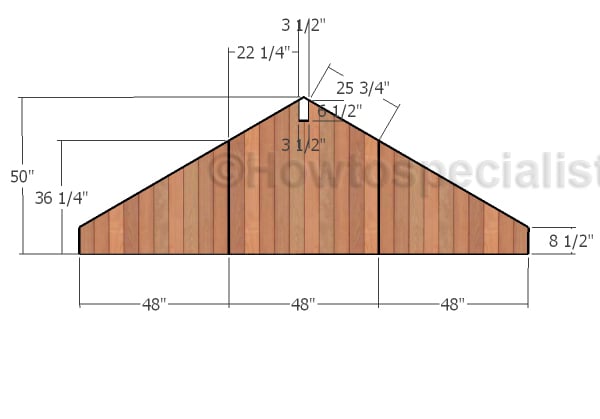
Gable end panels
Use T1-11 siding for the gable end panels. Cut the sheets to the right size and dimensions, following the pattern shown in the diagram.

Fitting the gable end panels
Fit the panels to the gable ends, align the edges flush and insert 6-8d nails to lock them into place tightly.
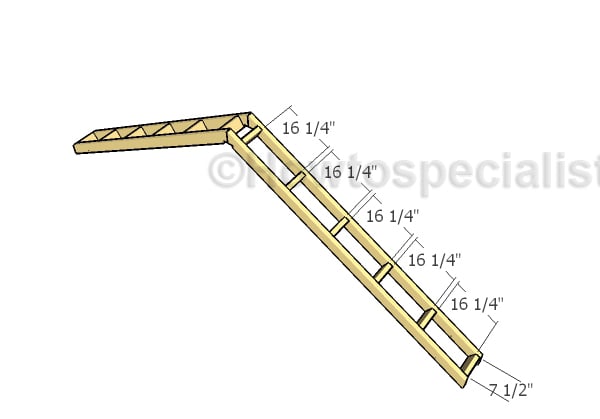
Building the overhangs
Assemble the overhangs from 2×4 lumber. Drill pilot holes through the rafters and insert 3 1/2″ screws into the blockings. Remember that you can easily adjust the size of the overhnags.
Fitting the overhangs
Fit the overhangs to the front and to the back of the gazebo. Align the edges flush, drill pilot holes and insert 2 1/2″ screws to lock them into place tightly.
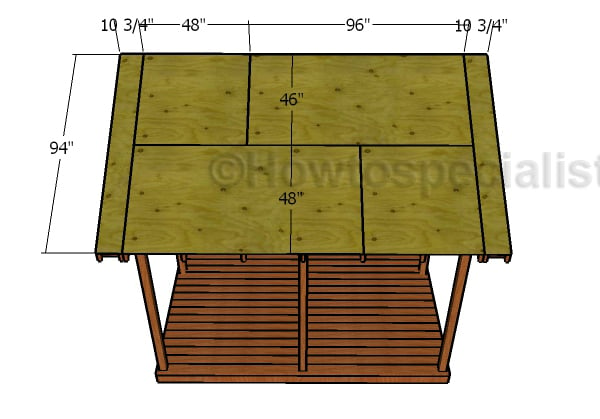
Fitting the roof sheets
Fit the 3/4″ plywood sheets to the roof of the gazebo. Cut the sheets to the appropriate sizes and then lock them into place with 1 5/8″ screws. Leave no gaps between the sheets. Insert the screws every 8″ along the rafters.
Side roof trims
Fit the 1×6 trims to the sides of the gazebo and lock them into place with 2″ brad nails.
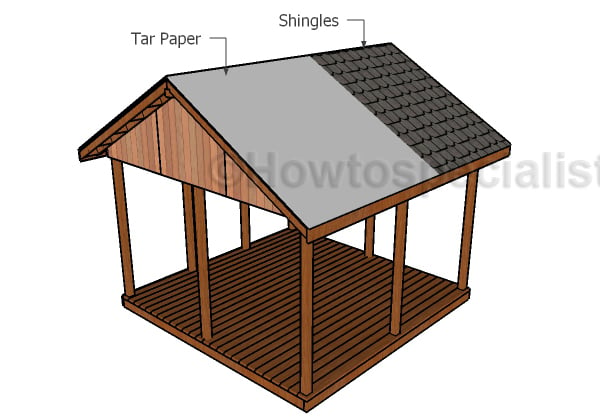
Fitting the roofing
The next step of the woodworking project is to cover the roof with felt. As you can see in the image, you need to make sure the strips of roofing felt overlap at least 2”. In addition, you have to lock the tar paper to the plywood sheets with staples.
Next, you should install the shingles to the roof of the large shed. Start with the bottom of the roof, by fitting the first course, as in the image. Use roofing tacks to secure the shingles to the roofing sheets.
Start the first course with a full tab, the second with 2 1/2 tabs, the third with 2 tabs, the forth with 1 1/2 tabs, the fifth with 1 tab, the sixth with half tab and the seventh with a 3 tabs. Secure the shingles with roofing tacks.
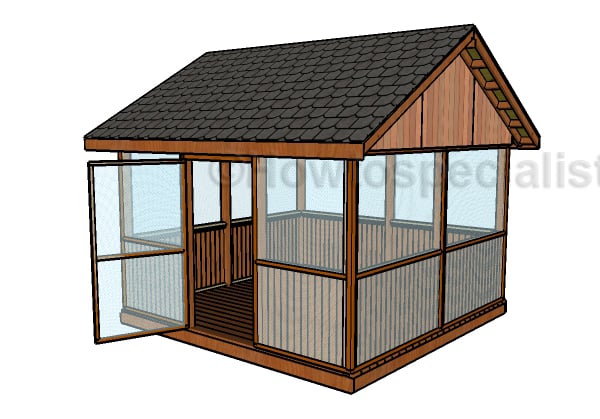
Screened square gazebo plans
Don’t forget to take a look over PART 2 and PART 3 of the gazebo project, so you learn how to build the railings and how to make the gazebo screens.
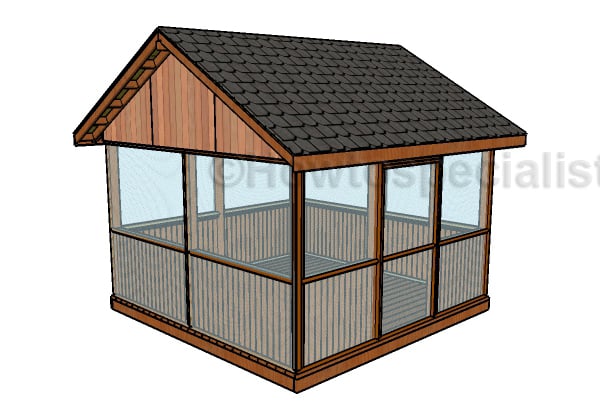
Screened gazebo plans
This 12×12 gazebo features screens on all four sides, as well an access door. If you want to add value to your value or if you want to build a lake gazebo, make sure you choose this project. I promise you won’t regret building this projects.
If you want to download the plans. just click on the GET PDF PLANS button bellow.

Thank you for reading our project about free screened gazebo plans and we recommend you to check out the rest of the projects. Don’t forget to LIKE and SHARE our projects with your friends, by using the social media widgets.
<< Previous | Next >>

I built this gazebo but I had to modify some things I found the top was not very sturdy I also put the screen on the inside
Looking forward to seeing a few pics with your project. You can send them here: http://howtospecialist.com/give-back/
Frank can you elaborate on how you made it more stable?
Do you have the materials list or measurements by any chance to make this in 10×10 – trying to avoid getting a building permit and I really want to use your well laid out plan!
No, I don’t have plans for that.