This step by step diy project is about outdoor sofa plans. If you want to hang out in your backyard with the loved one, building a basic wooden sofa is a great idea. The best part of the project is that you can adjust the size and the design of the sofa to suit your needs. Fit a few pillows to the outdoor sofa frame and enjoy your new cozy corner of your backyard.
A wooden sofa can be used both in your house and in your backyard. You should always plan everything form the very beginning and to adjust the size of the sofa to your needs, while you can still use the woodworking techniques described in this project. Mark the cut lines on the slats before making the patio sofa and use a jigsaw to get the job done.
There are a few tips that you should take into account, if you want to get a professional result. Therefore, take accurate measurements and use professional tool when making the cuts or when drilling pilot holes. Align the components at both ends and add waterproof glue to the joints, if you want to create a rigid structure. Round the exposed edges with sandpaper or by using a good router. See all my Premium Plans in the Shop.
Made from this plan
Outdoor sofa plans

Building an outdoor sofa
Materials
- A – 4 piece of 2×4 lumber – 27 1/4″ long LEGS
- B – 2 pieces of 2×4 lumber – 33″ long BRACES
- C – 2 pieces of 2×4 lumber – 36″, 1 piece – 72″ long TRIMS
- D – 8 pieces of 2×4 lumber – 14 3/4″ long BALUSTERS
- E – 2 piece of 2×4 lumber – 65″ long SUPPORTS
- F – 3 pieces of 2×2 lumber – 65″ long CLEATS
- G – 11 pieces of 1×4 lumber – 24″ long SUPPORT SLATS
- H – 11 pieces of 2×4 lumber – 17″ long BACKREST
- 7 pieces of 2×4 lumber – 12 ft
- 2 pieces of 2×2 lumber – 8 ft
- 3 pieces of 1×4 lumber – 8 ft
- 2 1/2″ screws, 2 1/2″ pocket screws
- cushion, wood putty, glue
Tools
- Safety gloves, glasses
- Miter saw, jigsaw
- Chalk line, tape measure, spirit level, carpentry pencil
- Drill machinery and drill bits
Tips
- Use a good miter saw to make the angle cuts
- Drill pilot holes before inserting the screws
Time
- One Week
Related
How to build an outdoor sofa
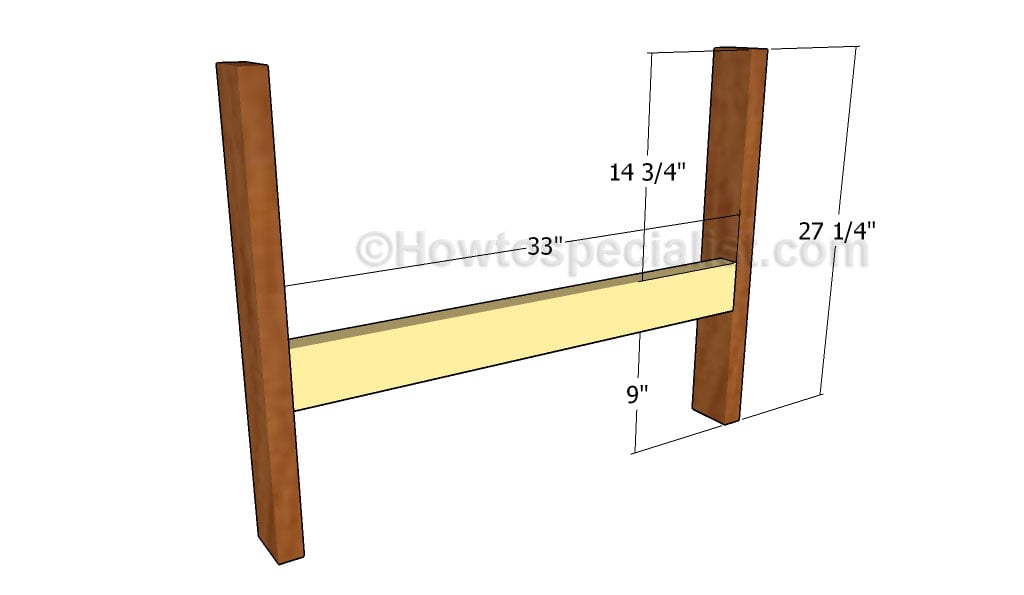
Building the sides
The first step of the woodworking project is to build the sides of the outdoor sofa. As you can easily notice in the diagram, we recommend you build the components out of 2×4 lumber. Drill pocket holes at both ends of the horizontal supports and insert 2 1/2″ screws. Make sure the corners are square and leave no gaps between the components.
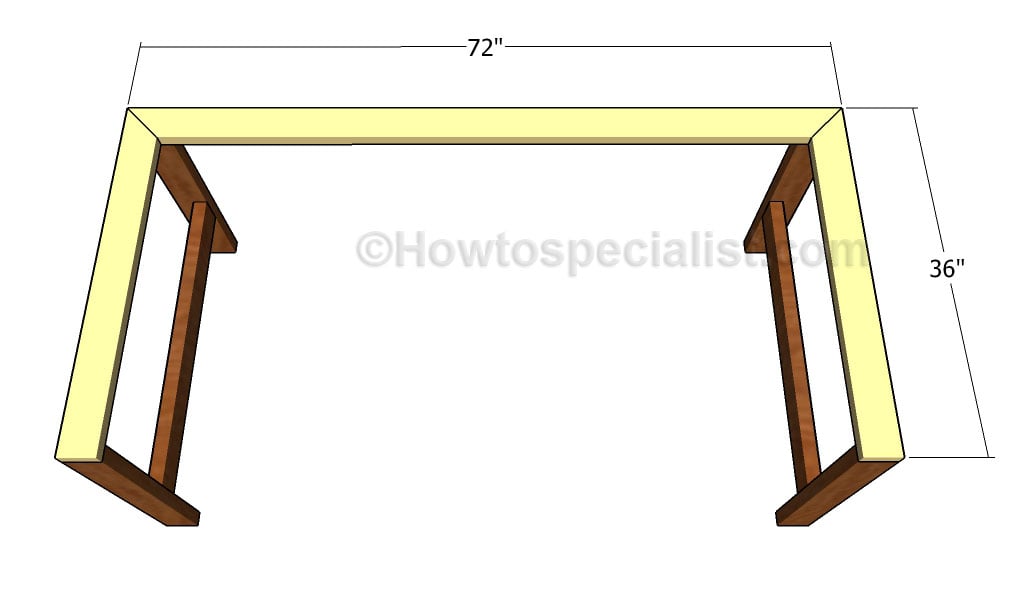
Fitting the top trims
Next, fit the top trims to the components, as described in the diagram. Cut the ends of the 2×4 trims at 45 degrees and secure them to the structure using 2 1/2″ screws. Drill pilot holes through the trims before inserting the screws, to prevent the wood from splitting.
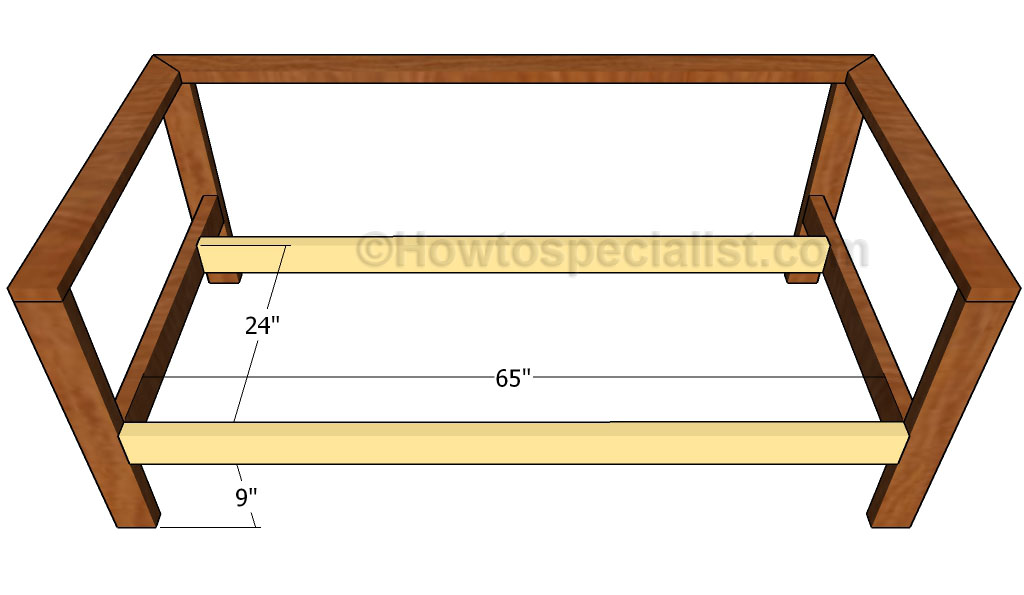
Building the frame
Afterwards, fit the 2×4 supports to the bottom of the outdoor sofa, as described in the diagram. Drill pocket holes at both ends of the supports and secure them to the sides using 2 1/2″ screws. Add glue to the joints and check if the corners are right-angled.
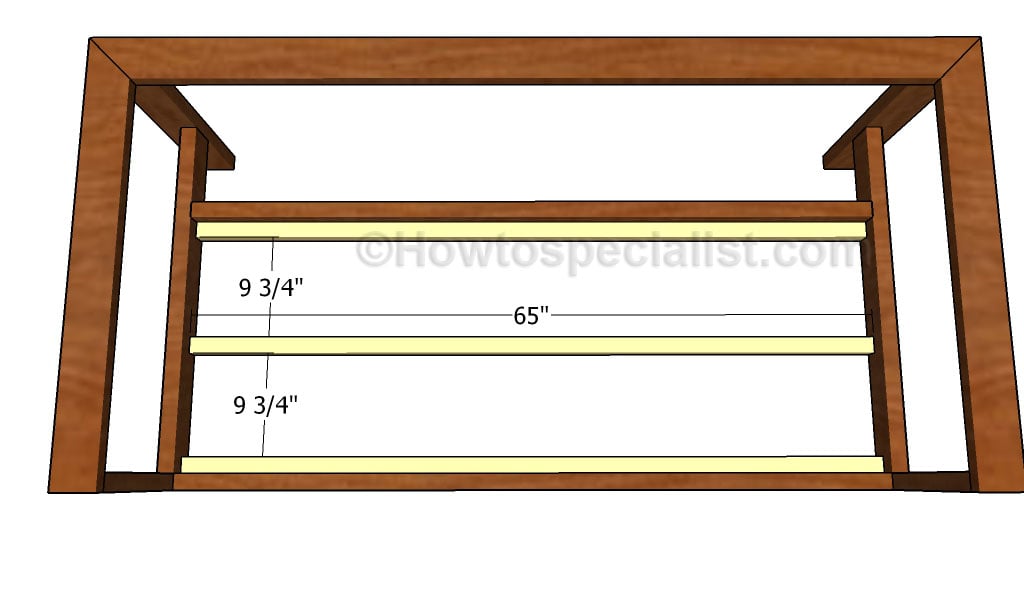
Fitting the cleats
Build the cleats out of 2×2 lumber. Cut the cleats at the right size and secure them to the frame using 2 1/2″ screws. Align the bottom edge of the cleats to the bottom edge of the supports and leave no gaps between the components.
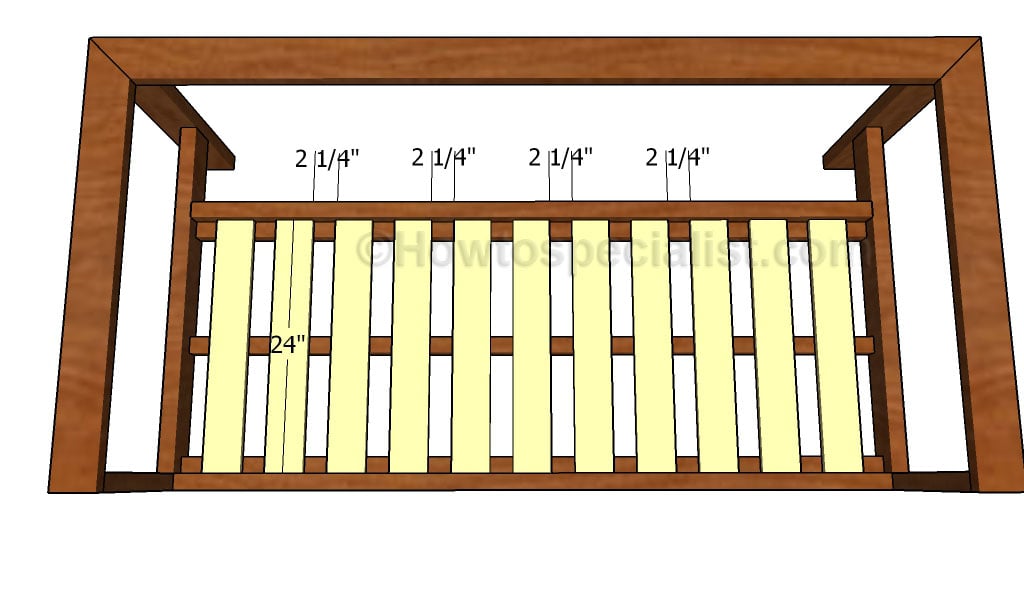
Fitting the bottom slats
Fit the 1×4 supports slats to the cleats, as described in the diagram. Place the slats equally-spaced and secure them to the cleats using 1 1/2″ screws.
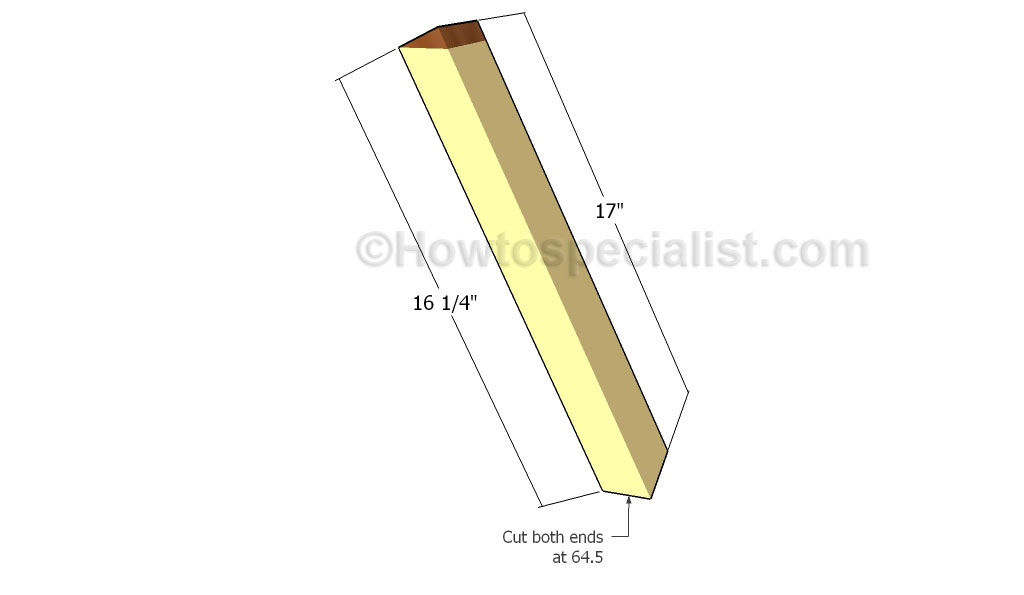
Building the back supports
Build the backrest out of 2×4 lumber. Use the information in the diagram to build the components. Cut both ends of the slats at 64.5 degrees. Drill pilot holes at both ends of the components and secure them to the structure using 2 1/2″ screws.
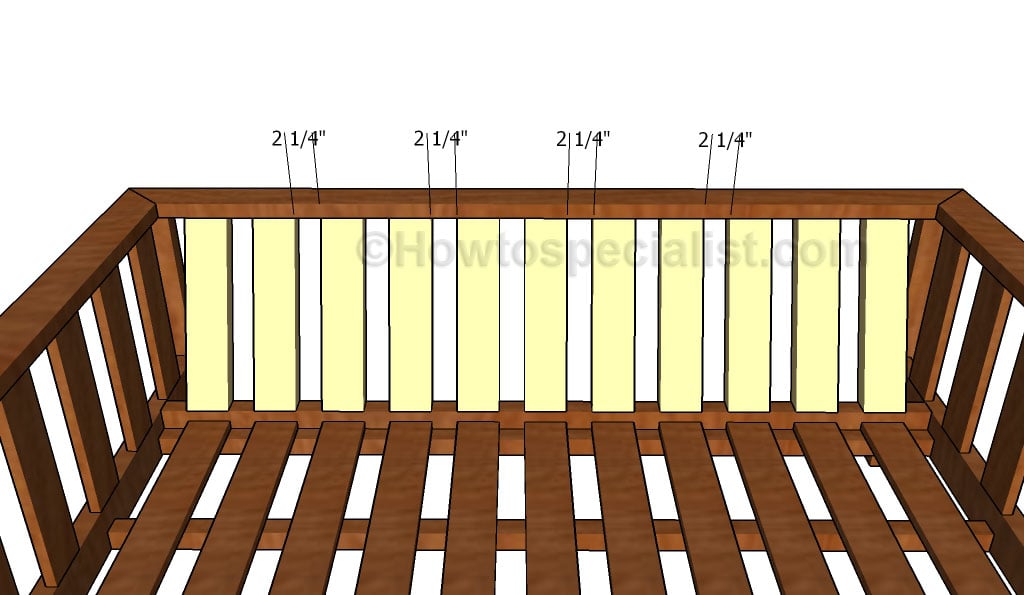
Fitting the backrest slats
Drill pilot holes at both ends of the components and secure them to the structure using 2 1/2″ screws. Place the supports equally-spaced in order to get a professional result. Leave no gaps between the components for a professional result.
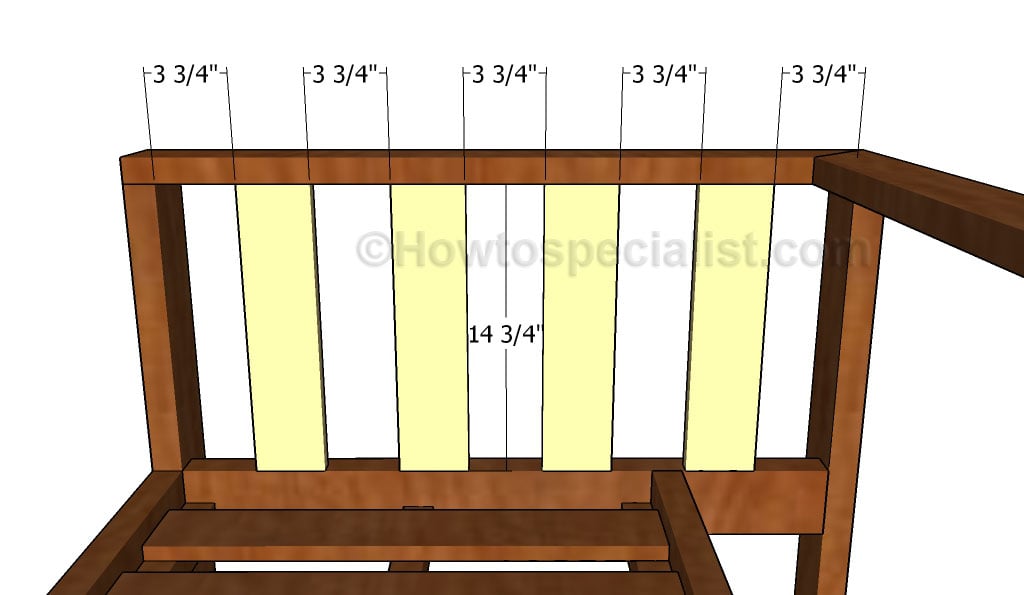
Fitting the side slats
In addition, we recommend you to fit 1×4 supports to the sides of the sofa. Drill pocket holes at both ends of the supports and secure them to the frame using 1 1/4″ screws. Place the slats equally-spaced and leave no gaps between the components.
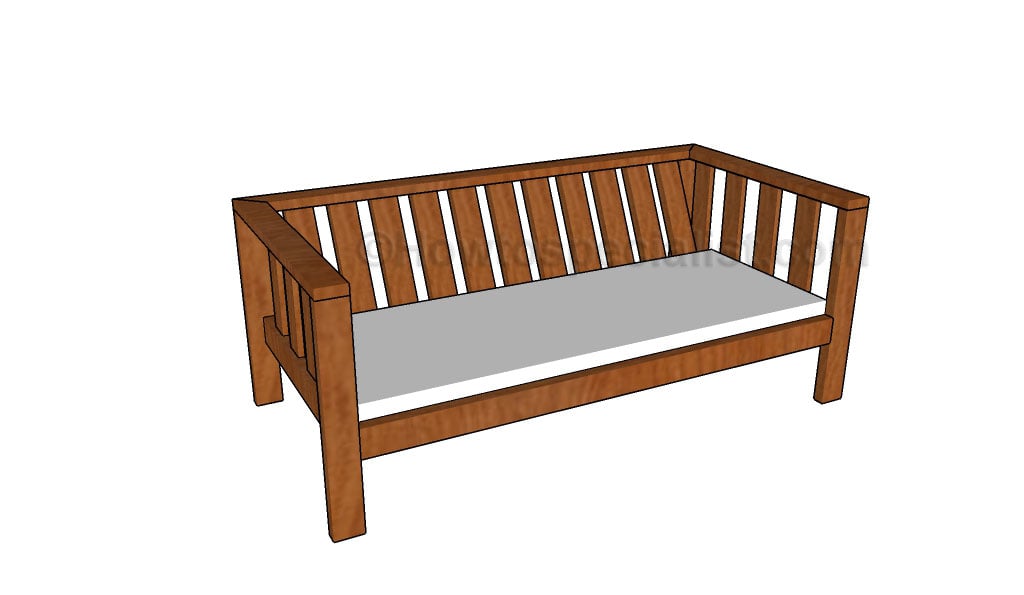
Outdoor sofa plans
Last but not least, we recommend you to take care of the finishing touches. In order to get a professional result, fill the holes and the gaps with wood filler and let it dry out for a few hours. Check if there are protruding screws and fix this issue, if necessary.
Thank you for reading our project about outdoor sofa plans and we recommend you to check out the rest of the projects. Don’t forget to LIKE and SHARE our projects with your friends, by using the social media widgets. SUBSCRIBE to be the first that gets our latest projects.


17 comments
Just built this. Awesome plans and the sofa turned out great. Going to make one more.
Thanks for stopping by and for using my plans. Congratulation for your project and I’m looking forward for your next builds. It would really be awesome if you could send a few images with your project, as me and the rest of the readers want to see how it looks like.
The plans were easy to follow. I modified the length to 60 inches. Applied early Americana stain and satin poly finish. Cushions from target.
https://drive.google.com/file/d/0B9T6Ma10TuIpUGZtVWJRNm9Oc28/view?usp=drivesdk
Thank you for sharing! Your outdoor sofa looks lovely. Looking forward to seeing your future projects.
I will send it when its done.
g sumbry
Looking forward to seeing it. Thanks!
Excellent plans,
Thank you
You’re welcome. Let me know how it comes out.
The seat seems too low for our liking. I think I’ll change it to sit at about 14 inches off the ground. Since I’m super new to woodworking, I’m hoping I can make this slight adjustment without messing it up. I think the only thing that it will affect is the length of the balusters and the back rest slats.
Yes, that true. But it will also slightly affect the angle at which you have to cut the backrest slats. Good luck and let me know how it comes out!
Excellent point. I sure will!
great design and plan. appreciate the details. which type of lumber do you suggest to sustain the outdoor conditions. will the pine wood meet the requirements?
Pine works, but you need to apply certain products (stain, poly). I recommend you to use cedar.
HELP. I am a little confused about the back rest – does the bottom of the back rest slat sit on top of the back supportpiece? If so, I can’t figure out the best way to screw this to the trim piece using a 2 1/2″ screw per the instructions. Any suggestions? Does the top of the back rest slat sit flush with the front end of the trim piece or is it flush to the back end> Also my miter saw only cuts up to 45 degrees. Any suggestions as to how to get a 64.5 degree cut?
To get a 64.5 degree cut you set it at 25.5 degrees. The back slats are flush with both the top trims and the bottom support. The best way to screws them is to use pocket holes.
I made two of these benches last year but I also adapted the design to make two single-seaters and two footrests to go with the set. I’d be happy to send photos if you wish.
I would love to