This step by step diy project is about how to build a workshop. Building a L-shaped workshop shed is easy, if the right plans and woodworking projects are used. Basically, any person with basic woodworking skills can get the job done, but there are several aspects you should take into account before starting the project. Taking into account the complex L-shape of the shed, you need to reinforce the structure and to align everything properly.
The first step of the project is to choose professional plans that fit your needs and tastes. You could adjust the size of the shed, but make sure you don’t so anything that could affect the rigidity of the construction. We recommend you to consult the local building codes before starting the project, as there are lots of legal requirements you have to comply with. In addition, buy quality lumber, such as pressure-treated lumber, if you want to get a durable result.
Build the wall frames on a level surface and check if all the corners are right-angled before installing them into place. From our experience, we recommend you to ask a friend to assist you during the construction project, as one has to hols the components into place, while the other one drive the screws. Don’t forget to check out the other parts of the project, in order to see how to fit the siding or how to install the roof.
Made from this plan
In order to build a workshop, you need to use the following:
Materials
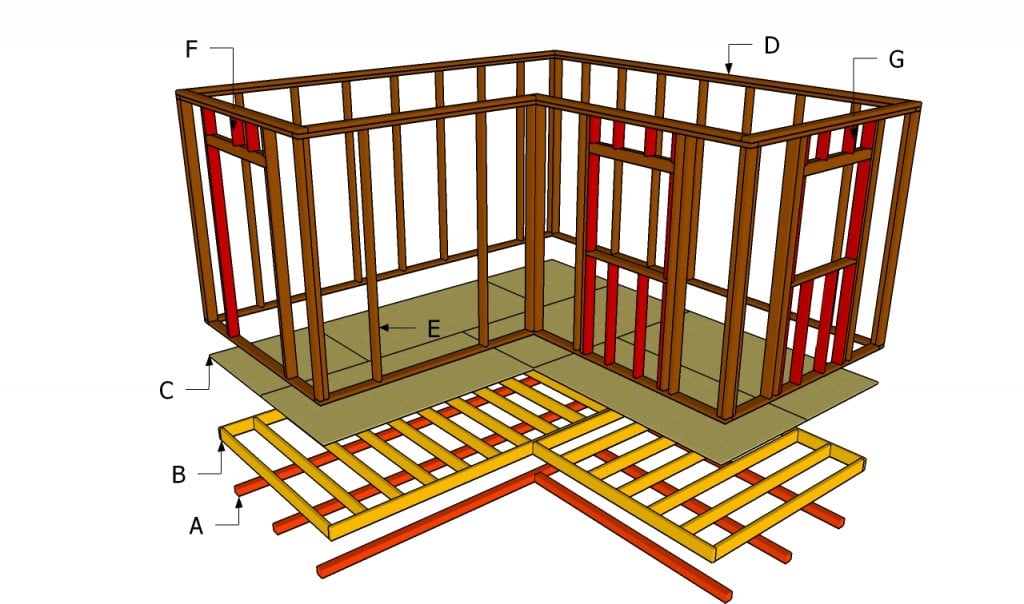
- A – 3 pieces of 4×4 – 192″ long, 3 pieces of 4×4 – 106″ long SKIDS
- B – 20 pieces of 2×6 – 93”, 2 piece of 2×6 – 96, 2 pieces – 192″ JOISTS
- C – 6 pieces of 3/4″ tongue and groove plywood – 48 x 96″ FLOORING
- D – 2 pieces of 2×4 – 192″, 1 piece – 185″, 3 piece – 185 1/2″, 2 piece – 99 1/2″, 1 piece – 92 1/2″ PLATES
- D – 5 piece of 2×4 – 96″ long, 3 piece – 89″ long PLATES
- E – 42 pieces of 2×4 – 90″ long STUDS
- F – 5 pieces of 2×4 – 10″, 2 pieces – 76 1/2″, 2 pieces – 48″ DOOR STUDS
- G – 8 pieces of 2×4 – 9 1/2″, 6 pieces – 39″, 4 pieces – 36″, 8 pieces – 39 1/2″ WINDOW STUDS
Tools
- Safety gloves, glasses
- Miter saw, jigsaw
- Chalk line, tape measure, spirit level, carpentry pencil
- Drill machinery and drill bits
Tips
- Apply several coats of wood stain to the wooden components
- Secure the walls temporarily with braces
Time
- One Day
Related
- Part 1: How to build a workshop
- Part 2: How to install siding on a shed
- Part 3: How to build an L-shaped roof
- Part 4: How to install roof decking
- Part 5: How to build a shed door
Building a workshop

Building a workshop
How to build a workshop

Building the floor frame
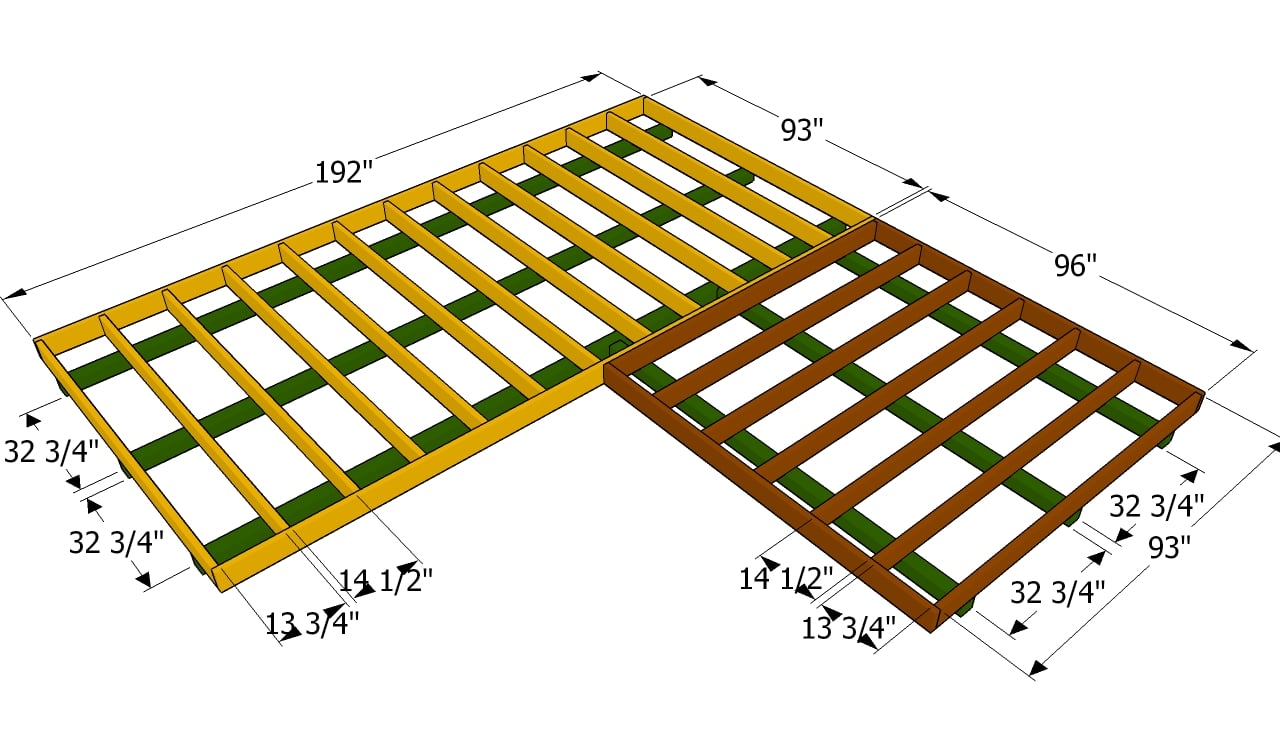
The first step of the project is to build the frame of the floor. Therefore, you need to use 2×6 lumber and 3″ galvanized screws. Build the two frames separately, making sue you drill pilot holes before inserting the screws and check if the corners are right-angled. Place the frames on 4×4 skids, places about 10″ from the edges of the frames.
Toe-nail the frames to the skids thoroughly and lock them together with 3″ wood screws. Make sure you place the skids on concrete slabs, as to distribute the weight fo the constructions evenly.
Continue the woodworking project by covering the frame with 3/4″ sheets of plywood, as in the plans. It is essential to connect the tongue and groove sheets together properly and to lock them into place with 2″ galvanized screws. Make sure the sheets are flush with the frame, before driving in the screws.
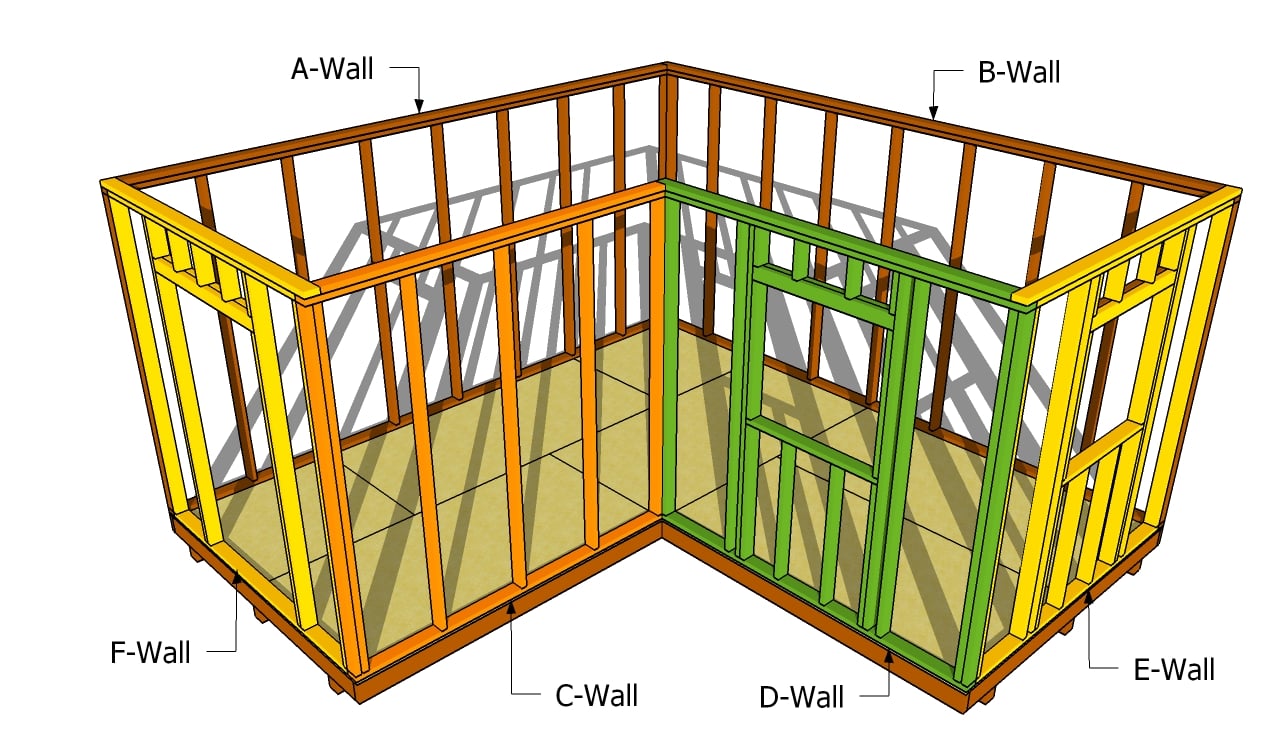
The next step of the project is to build the walls of the workshop. We recommend you to cut the components at the right size and to assemble them on a level surface. Drill pilot holes trough the plates and insert 3″ screws into the studs. These plans are optimized for 4×8′ sheets of siding, so make you follow the instructions, otherwise you won’t be a ble to attach teh sheets to the studs properly.
Place several pieces of 1/2” plywood between the double studs placed at both ends of the walls. Fitting the plywood filler blockings is essential, as you need to connect the adjacent walls properly.
Follow the plans when building the walls, otherwise they won’t fit together properly. Use a carpentry square to check if the corners are right-angled, every time you add a wooden component.
Framing a window is not difficult, but there are several things you should know. First of all, the most common size for a shed window is about 3×3′, but you can adjust it as to fit your needs. Place a double header at the top of the window opening, in order to support the weight of the roof properly. In addition, place trimmer and cripple studs, as in the image, to enhance the rigidity of the frame.
Follow the instructions described above and use the plans to build the E wall. If you don’t want to frame a window on this wall, you should just place regular studs, spaced at 24″ on center.
Framing a door opening in the wall is a straight forward job. As you can see in the image, you need to place a double header and reinforce the sides with trimmer studs. Adjust the size of the door according to your needs, but use the same techniques described above. As you can notice in the image, you should cut a piece in the bottom plate, using a hand saw.
After assembling the frames on the ground, you should attach them to the floor, as in the image. Ask another person to help you with lifting the frames and placing them on the workshop’s floor. Align the walls properly and plumb them with a spirit level, before drilling pilot holes trough the plans and inserting 3 1/2” into the joists. Secure the frames into place with braces, util you fit the rest of the walls.
Install the rest of the walls, placing them as in the image. Reinforce the structure by driving screws into the adjacent walls. Make sure the walls are flush with the floor and the top plates are horizontal. Work with attention and with great care, if you want to get the job done as a professional.
Last but not least, we recommend you to take care of the finishing touches. In order to get a professional result, fill the holes and the gaps with wood filler and let it dry out for a few hours. Next, smooth the surface along the wood grain, using medium-grit sandpaper.
Thank you for reading our project about how to build a workshop and we recommend you to check out the rest of the projects. Don’t forget to share our projects with your friends, by using the social media widgets.
<< Previous | Next >>


1 comment
Is it possible to purchase a set of plans for this L shaped workshop shed ? I’ve tried looking through your Premium Plans webpage, but cannot find this particular building.
Thanks for your assistance with this enquiry.
Gerald Lewis.