One of the easiest ways to start soundproofing a room is by softening the surfaces. Hard floors and bare walls reflect sound like crazy, so your first mission is to soak some of that noise up. Think thick area rugs, heavy curtains, and fabric wall hangings. Even a bookshelf packed with books can help dampen sound. The idea is to break up flat, echoey surfaces with texture and padding—bonus points if it makes the space feel cozier too.
Next, focus on the walls that face your noisiest neighbor or street. Peel-and-stick acoustic panels are a renter’s dream: they’re easy to install, don’t damage walls, and actually work. You can also try hanging a thick quilt or moving blanket (yep, really!) for a budget-friendly sound barrier. If you’re feeling crafty, build a simple wooden frame, staple on batting and fabric, and mount it as a custom acoustic panel. It doubles as decor and peace of mind. Doors and windows are major weak spots when it comes to sound. Add weatherstripping or a door sweep to block the gap under the door where sound loves to sneak in.
For windows, layer in thermal curtains or hang a second curtain rod with a thick blanket behind your main set. It’s not glamorous, but it’s shockingly effective at cutting outside noise—and keeping heat in during winter too. If you want to go one step further, look at adding mass to your walls or ceiling with mass loaded vinyl (MLV). It’s a dense, flexible material that can be installed behind furniture or layered under rugs. Even foam floor mats or interlocking gym tiles can make a difference in an upstairs unit. The key is layering sound-absorbing and sound-blocking materials in the places where the noise hits hardest.
Start with the Walls
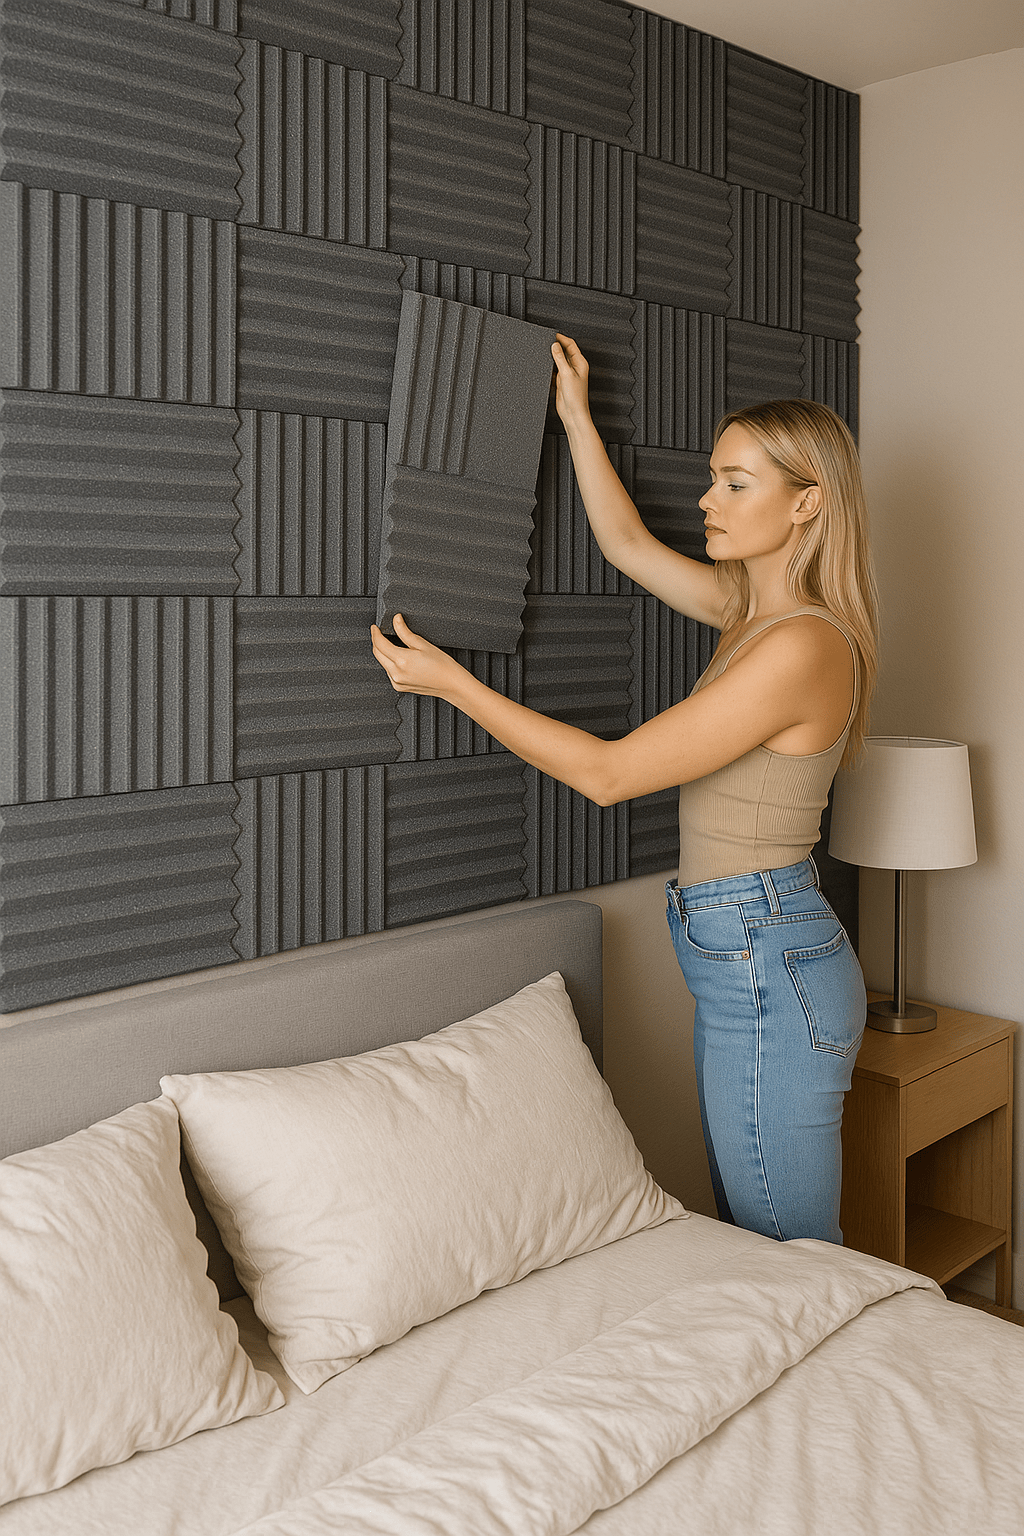
Walls are the most obvious place to start when it comes to soundproofing—especially if you’re hearing conversations, TV shows, or even the clink of cutlery from the unit next door. Since you probably can’t knock down drywall in a rental, your best move is to either block the sound or absorb it. The more layers and softness you can add to a wall, the better chance you have at cutting down the noise that leaks through. One of the easiest DIY options? Hanging thick, quilted moving blankets or sound-dampening curtains. These don’t just absorb sound—they’re easy to take down and won’t damage the walls, making them ideal for renters or anyone on a budget.
If you want something more attractive and permanent-looking, consider building your own acoustic panels. Grab a few rigid insulation boards or foam panels, wrap them tightly in canvas or cotton fabric, and secure with staples on the back. Mount them to the wall using removable picture-hanging strips or Command hooks. Not only do they soak up mid-to-high frequencies (like voices), they also double as decorative wall art. It’s a weekend project with big results—your space will feel quieter and look more put-together.
Another sneaky trick is using furniture as soundproofing. A tall, full bookshelf placed directly against a shared wall adds instant mass and insulation. Fill it tightly with books, soft baskets, or even rolled-up blankets. The more dense the items, the more sound gets absorbed before it can pass through. You can also push a padded headboard or upholstered bench against the wall for extra softness where you need it most.
If you’re up for it, layer soundproofing methods for even better results. Stick peel-and-stick acoustic foam behind the bookshelf or behind fabric panels to catch echoes and reduce bounce-back inside your room. The combination of added mass and sound absorption makes a noticeable difference, especially in small apartments where every noise seems louder. Soundproofing your walls isn’t just about blocking—it’s about softening the entire soundscape. And with a few creative touches, it can look great too.
Deal with Doors (They’re Major Sound Leaks)
If you’re hearing hallway noise, conversations, or the elevator dinging all day, your interior door is probably the problem. Most apartment doors are hollow-core, which means they offer almost no sound insulation at all—essentially acting like a thin sheet of plywood between you and the rest of the building. Replacing it with a solid-core door would be ideal, but that’s rarely an option in a rental. Thankfully, there are a few simple and affordable ways to dramatically cut down the noise without breaking any lease rules.
Start by sealing up the gaps. Sound travels easily through the tiny spaces around the edges of a door, especially at the bottom. Add adhesive weather stripping around the sides and top of the door frame—this helps block airflow and, with it, sound. Then, slide a door sweep or draft stopper along the bottom edge. These are cheap, easy to install, and surprisingly effective at blocking the constant hum of hallway activity.
For an extra layer of sound protection, hang a thick curtain or even a quilted moving blanket over the back of the door. Use removable adhesive hooks or a tension rod so you don’t damage the walls or doorframe. When drawn across the door, the fabric acts as a sound-absorbing barrier, softening incoming noise and dampening echo on your side. It might not win any design awards, but the peace and quiet it brings is well worth it.
If you want to dress it up a little, go for a heavy velvet curtain or sew your own fabric panel to match your decor. The key is density—thicker materials block more sound. And the best part? Everything is removable and reversible, so when it’s time to move, your door can go right back to how it was—no holes, no hassle.
Don’t Ignore the Windows
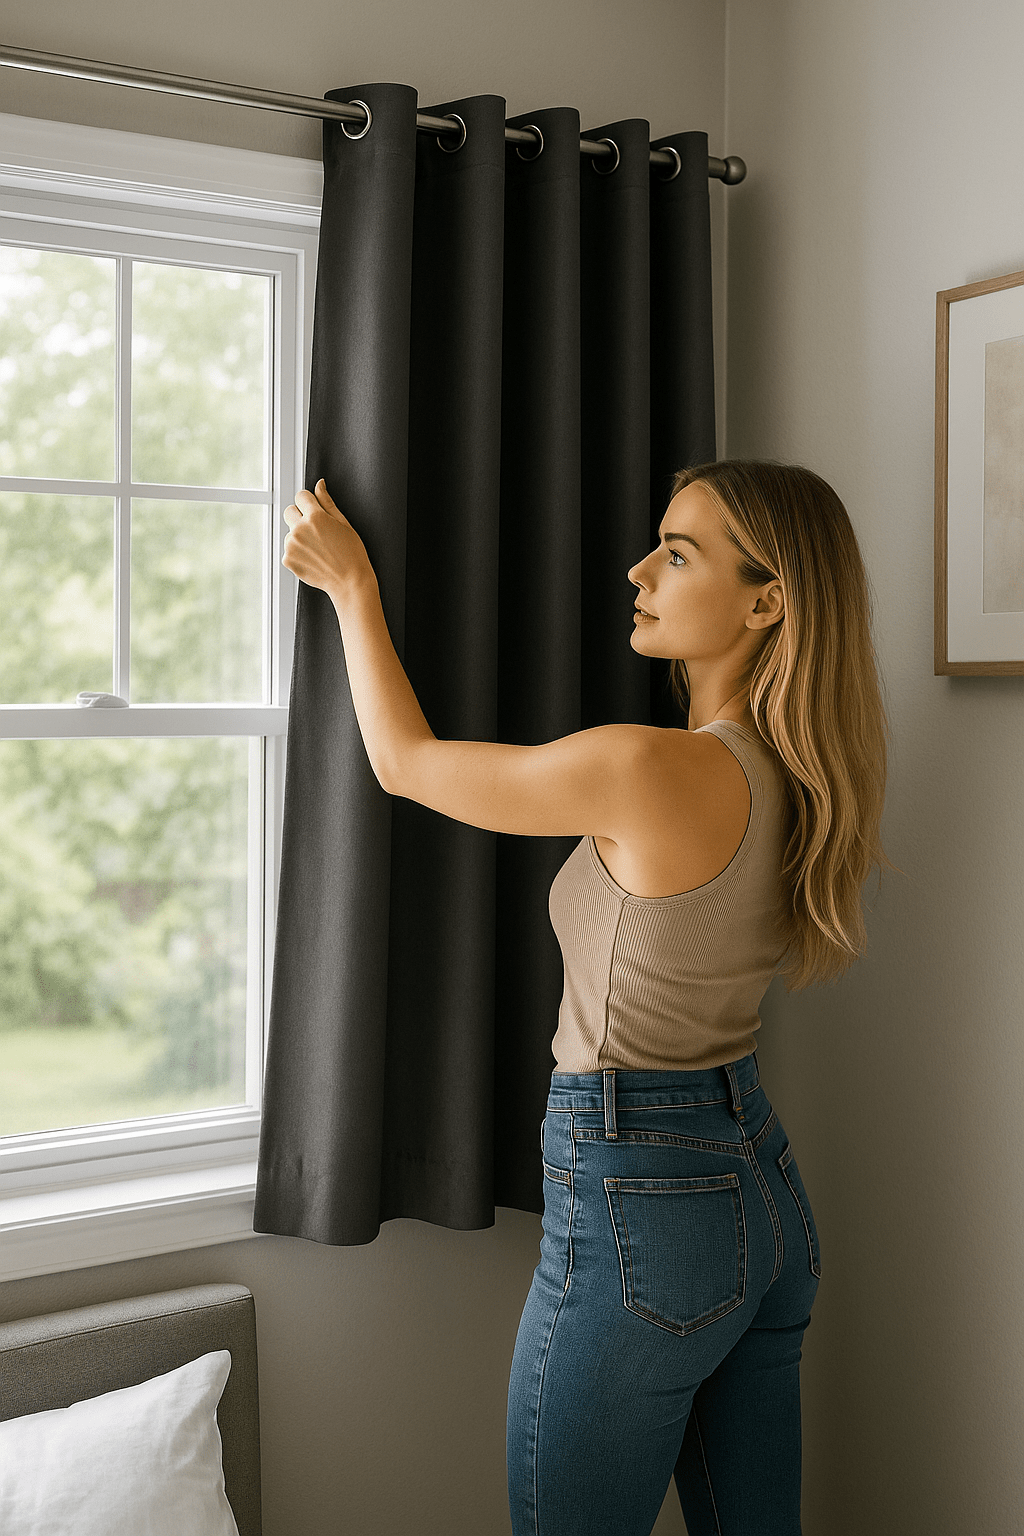
Outside noise—like traffic, sirens, barking dogs, or construction—can be relentless, especially if your apartment faces a busy street. And more often than not, it’s your windows that are letting all that sound in. Single-pane windows, which are common in older buildings, are notoriously bad at blocking noise. Replacing them with double- or triple-pane windows would help—but if you’re renting, that’s usually not an option. Fortunately, there are a few clever ways to reduce noise intrusion without making permanent changes or spending a fortune.
Start with the easiest fix: thermal blackout curtains. These are designed to block light and retain heat, but their thickness and density also make them great for absorbing sound. Look for curtains labeled as “insulated” or “noise-reducing”—they typically have multiple layers of fabric and a foam or felt core. Install them as close to the window frame as possible and let them hang well past the bottom and sides for maximum coverage. They don’t just muffle sound—they can also make your room feel more cozy and private.
Want to go a step further? Add a second layer. Use a tension-mounted curtain rod to hang another set of heavy drapes right in front of the first. The air gap between the two layers acts as a buffer zone, further reducing sound transmission. This setup not only softens city noise but also helps insulate your apartment from drafts and heat loss in winter—so it’s a win on multiple fronts.
And here’s a DIY trick that works surprisingly well: cut a piece of rigid foam board to the size of your window frame and slide it into place behind your curtains at night. It blocks out both sound and cold air, and you can stash it under the bed or behind furniture during the day. It might not be glamorous, but it’s highly effective—and fully reversible when your lease is up.
Soften the Floors
If you’ve got hardwood or tile floors, you might be creating more echo and noise without realizing it. Sound bounces off hard surfaces, which can amplify even small sounds—like footsteps, dropped keys, or voices—making your space feel louder than it really is. This kind of noise buildup is especially common in open-plan apartments or rooms with high ceilings. The solution? Soften the surfaces.
Start with a large area rug. It acts like a sound sponge, absorbing impact noise and airborne sound alike. Choose a thick rug if possible, and make sure it covers as much of the floor as you can—especially in living rooms and bedrooms. If you want to go the extra mile, layer it over a dense rug pad made of felt or rubber. Not only does it add comfort underfoot, but it also boosts sound absorption and insulates against cold floors in the winter.
If you’re dealing with upstairs neighbors, this setup works double duty by dulling the echo in your own apartment and reducing the noise transfer back up to theirs. That makes it a thoughtful upgrade—not just for you, but for everyone in the building.
And don’t forget about the rest of the room. Floor cushions, poufs, fabric ottomans, and even soft storage bins can add both visual interest and acoustic benefit. These smaller additions work together to break up the bounce of sound waves and give your space a cozier, quieter feel. It’s proof that a more peaceful home doesn’t have to mean ripping up floors or adding insulation—it can start with just a little decorating savvy.
Tackle the Ceiling (Without Screws or Drills)
Overhead noise is one of the trickiest parts of apartment living—especially if your upstairs neighbors sound like they’re hosting nightly furniture-moving contests. The issue usually comes down to two things: thin ceilings and a lack of insulation between floors. While you can’t do much about the structure itself in a rental, there are some clever, renter-friendly tricks to help muffle the sound and make your space feel quieter.
One of the best options is to install acoustic tiles using removable adhesive strips or heavy-duty Velcro. These lightweight panels are designed to absorb airborne sound and reduce echo, and they’re surprisingly effective when mounted to the ceiling. Look for foam or fabric-covered versions that are designed for temporary installs. They won’t damage your ceiling and can be taken down easily when it’s time to move out.
If you’re into a more creative or boho-inspired vibe, try a soft ceiling instead. Stretching thick fabric or canvas panels across the ceiling can help trap sound and reduce echo. You can hang them with adhesive hooks, curtain wire, or even small tension rods between walls. The result isn’t just functional—it gives your space a cozy, tented atmosphere that feels intentional and relaxing.
To boost the effect even more, combine ceiling fabric with other sound-absorbing décor like tall bookshelves, plush rugs, and curtains. Every soft surface you add helps reduce overall noise levels and echo, making your home feel more peaceful even in a noisy building. It’s all about layering textures in smart, strategic ways that look good and perform even better.
Add White Noise (It Works)
If you’ve tried all the tricks and still find yourself tuning in to every little noise, try masking it instead. A white noise machine or a simple phone app can drown out small background sounds and help your brain focus on one steady, calming tone. It’s not a soundproofing tool per se—but it’s a sanity-saver, especially for bedrooms and home offices.
For an even thriftier approach, use a fan or a Bluetooth speaker playing rain or ambient forest sounds. Layering soft sound over distracting noise can help you focus or fall asleep without feeling like you’re at war with your walls.
Best Tips
Noise from Shared Vents and Outlets
Sound can travel surprisingly well through HVAC vents, electrical outlets, and even light fixtures—especially in older buildings. Add foam gaskets behind outlet covers and switch plates. You can also cover vents temporarily with magnetic vent covers or acoustic foam if they’re not essential.
Door Gaps and Closet Hacks
Interior closets that back up to shared walls can be turned into noise barriers by filling them with storage, extra clothes, or foam panels. Also, address gaps above and around doors, which leak more sound than people realize. Weatherstripping and draft blockers help here too.
Before-and-After Sound Testing Tip
Use a free decibel meter app to measure sound levels before and after applying these fixes. It’s a simple, data-backed way to prove that even low-cost solutions make a difference—and it adds credibility to your DIY advice.
Final Thoughts
Soundproofing a room on a budget isn’t about achieving total silence—it’s about reducing noise to a level that makes your space feel more peaceful, private, and livable. Whether you’re trying to block out your neighbor’s TV, traffic from the street, or footsteps from the apartment above, small improvements can make a big impact. The key is understanding where sound is getting in and using layered, soft, and removable materials to interrupt that path.
You don’t need construction tools or a big budget to get results. With basic supplies like acoustic tiles, thermal curtains, rugs, and a little DIY creativity, you can address every surface—walls, windows, floors, even ceilings—and make your room noticeably quieter. Each fix might seem small on its own, but when combined, they add up to a much more comfortable and private space.
So whether you’re setting up a quiet office corner, trying to sleep better, or just hoping to hear yourself think, these strategies will help. You’re not building a recording studio—you’re building a space that works for you, and with the right approach, you can do it all without breaking your lease or your budget.