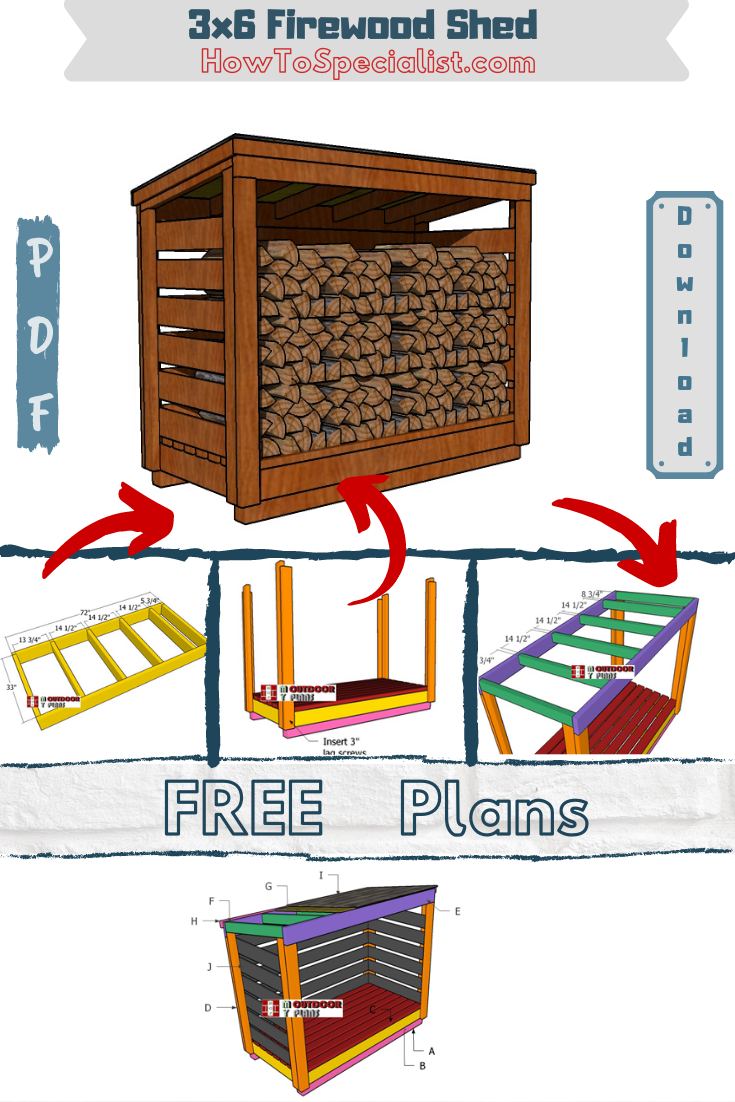
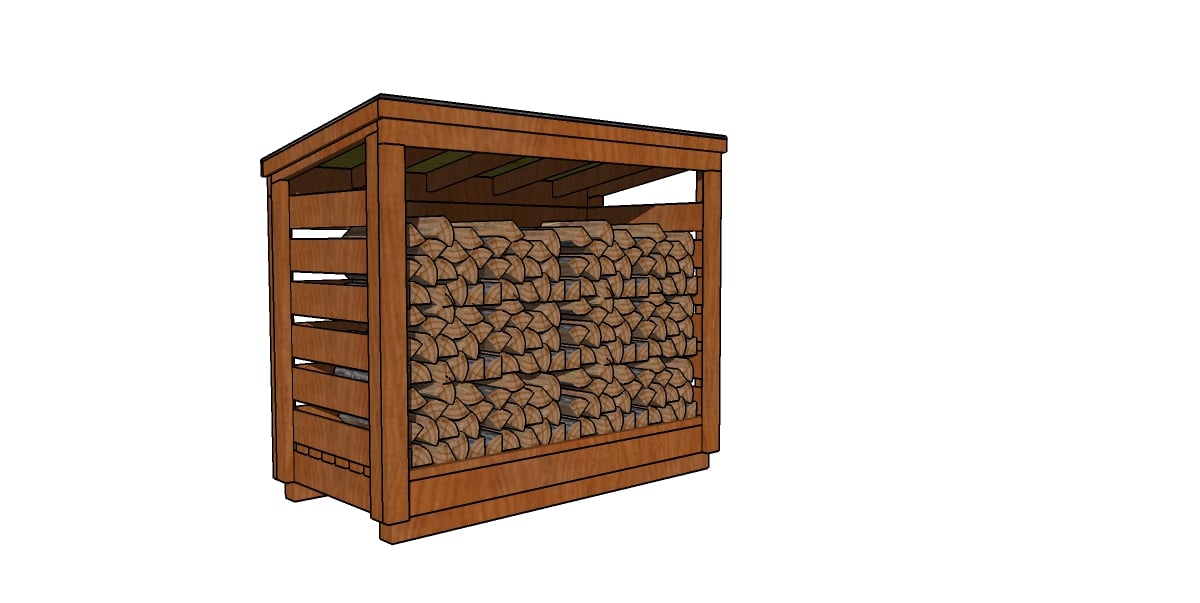
This step by step woodworking project is about 3×6 firewood shed plans. You can build this lean to wood shed under 250 usd and store up to 1/2 cords of firewood. This shed has a footprint of 3×6 and it features a large opening to the front, while the other 3 sides are enclosed with 1×6 boards. My woodworking plans come with step by step 3D diagrams, instructions and full CUT ad SHOPPING lists. See my other DIY projects HERE. Lots of PDF downloadable plans with premium features in the Store.
We recommend you to invest in the best materials you could afford. Therefore, you should buy weather-resistant lumber, such as pine or cedar. Always take accurate measurements before adjusting the size of the components at the proper size. Drill pilot holes trough the components before inserting the wood screws, to prevent the wood from splitting. This is a guest posts from MyOutdoorPlans.com
Made from this plan
It’s that easy to build a 3×6 firewood shed!
1/2 Cord Firewood Shed Plans – PDF Download
Building-a-3×6-wood-shed
Cut and Shopping Lists
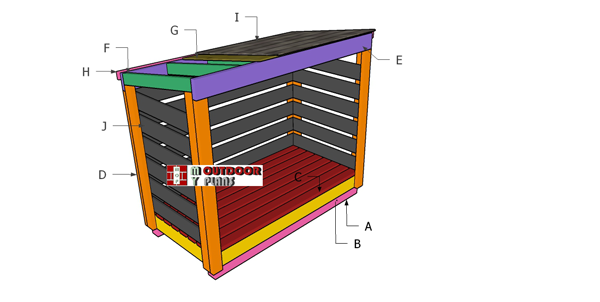
A – 2 pieces of 2×6 lumber – 6 ft long, 6 pieces – 33″ long FLOOR FRAME
B – 2 pieces of 4×4 lumber – 6 ft long SKIDS
C – 8 pieces of 2×4 lumber – 6 ft long DECKING
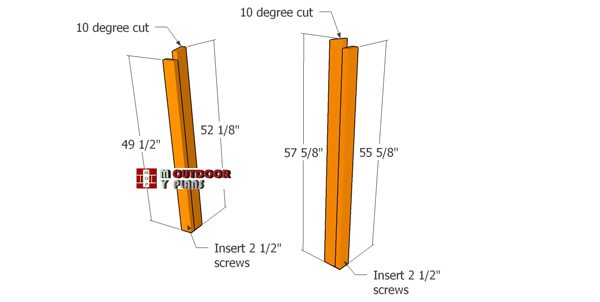
D – 2 pieces of 2×4 lumber – 49 1/2″ long, 2 pieces – 52 1/8” long, 2 pieces – 57 5/8” long, 2 pieces – 55 5/8” long POSTS
E – 2 pieces of 2×6 lumber – 75″ long SUPPORT BEAMS
F – 6 pieces of 2×4 lumber – 37 1/8″ long RAFTERS
G – 1 piece of ½” plywood – 38 ¾”x75” long ROOF
H – 2 pieces of 1×3 lumber – 39 7/8″ long, 2 pieces – 76 ½” long TRIMS
I – 25 ft of tar paper, 25 ft of asphalt shingles ROOFING
J – 12 pieces of 1×6 lumber – 36” long, 6 pieces – 70 ½” long PANELS
Tools
- Safety gloves, glasses
- Miter saw, jigsaw
- Chalk line, tape measure, spirit level, carpentry pencil
- Drill machinery and drill bits
Time
- One Weekend
Building the firewood shed floor – 3×6
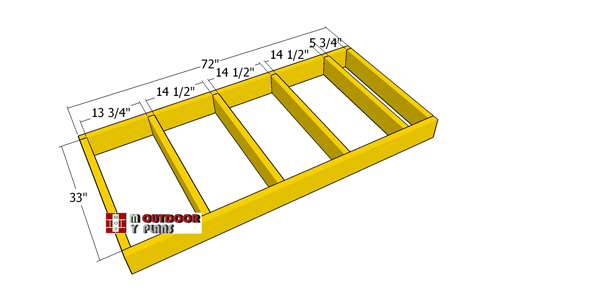
Assembling-the-floor-frame
Firstly, you need to assemble the floor frame for the small firewood shed. Therefore, use 2×6 lumber for the joists and lay them on a level surface. Drill pilot holes through the rim joists and insert 3 1/2″ screws into the perpendicular components. Place the joists every 16″ on center and make sure the corners are square. Use at least 2 screws for each joint.
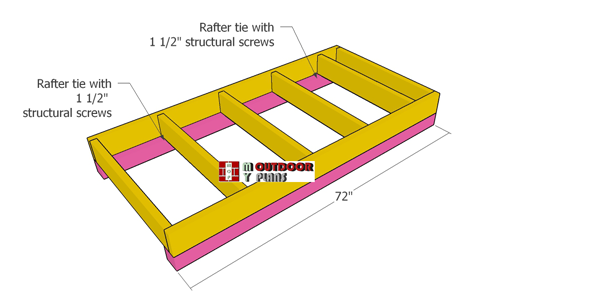
Fitting-the-skids—3×6-firewood-shed
Next, select the location for the shed. Remove the top vegetation layer and level the surface thoroughly. You can use 4×4 skids or concrete blocks under the floor frame of the shed. We need them to lift the frame from the ground and thus, protect the joists from the elements.
Secure the skids to the floor frame with rafter ties and 1 1/2″ structural screws. Use at least 2 ties for each skid.

Fitting-the-floor-slats
Continue the outdoor project by attaching the 2×4 boards to the floor frame. Align the edges and cut a piece of wood at 1 1/8″ to use it as a spacer. Drill pilot holes and insert 2 1/2″ screws to lock the boards into place.
Building the frame of the wood shed
Assembling-the-corner-posts
Use 2×4 lumber for the corner posts. Cut the posts at the dimensions shown in the diagram. Add glue to the joints, drill pilot holes and insert 2 1/2″ screws to assemble the corner posts. Make sure you align the edges flush, before inserting the screws.
Notice the angle cuts that need to be made to the side posts. Use a miter saw to make the 10 degree cuts accurately.
Fitting-the-corner-posts
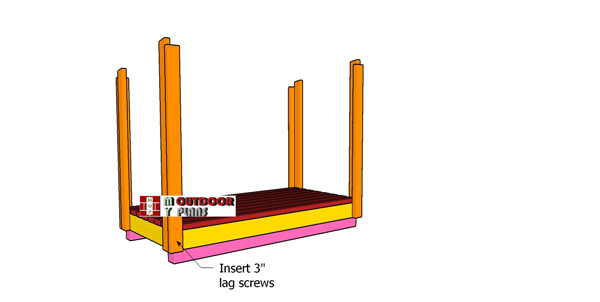
The next step of the project is to attach the corner posts to the floor of the shed. Align the edges flush and use a spirit level to plumb the posts before inserting the screws into the floor. Drill pilot holes and insert at least two 3″ lag screws for each joint.
Fitting-the-support-beams
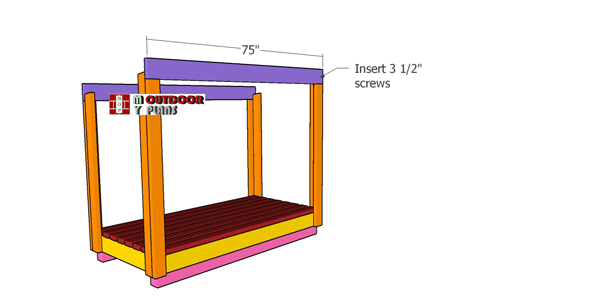
Use 2×6 lumber for the top support beams. Drill pilot holes through the side posts and insert 3 1/2″ screws into the top beam. In addition, notice the structural connectors used to lock the into place the top beams. You need L ties to secure the beams to the front and back posts. Of course, you need to insert 1 1/2″ structural screws to lock the ties into place.
Building the lean to roof for the wood shed
Rafters
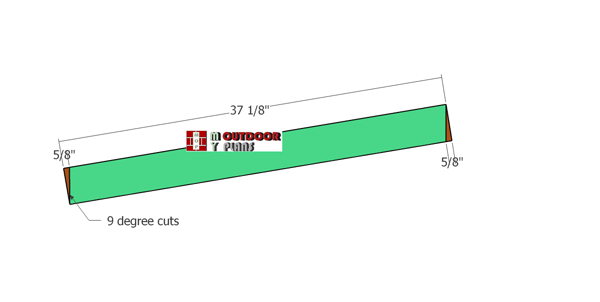
Use 2×4 lumber for the rafters of the lean to wood shed. Mark the cut lines and get the job done with a circular saw. We need the birdsmouth cuts to lock the rafters properly to the support beams.
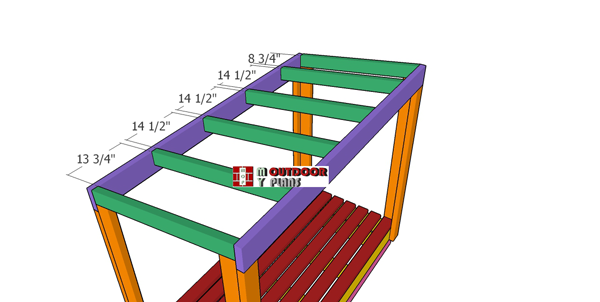
Fitting-the-rafters
Fit the rafters to the top of the shed and place them spaced as shown in the diagram. Drill pilot holes through the support beams and insert 3 1/2″ screws into the rafters.
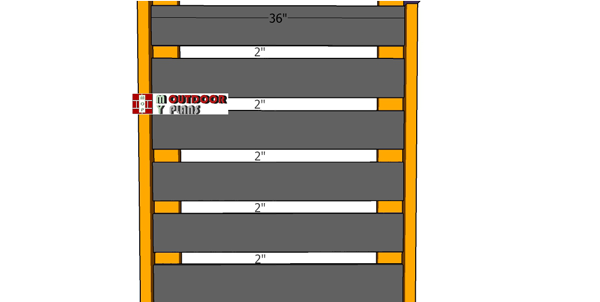
Side-wall-panels
Use 1×6 slats for the sides of the firewood shed. Align the edges flush and place a 2″ wood block between the slats. Insert 1 5/8″ screws to lock the slats into place tightly.
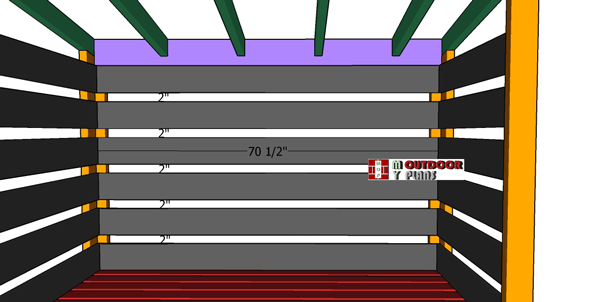
Back-wall-slats
Fit the slats to the back of shed, as well. Use 1 5/8″ screws to secure the slats into place.
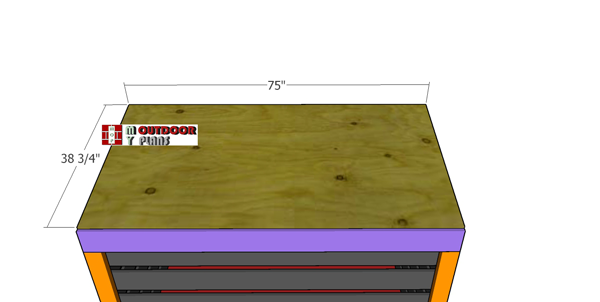
Roofing-sheets
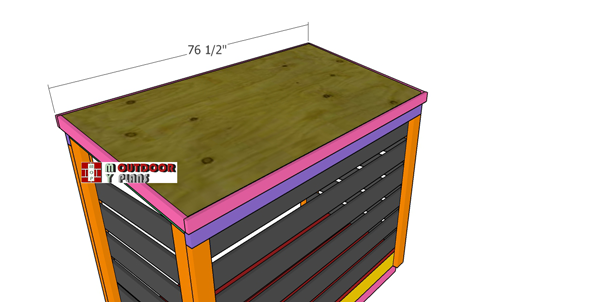
Cut a piece of 1/2″ plywood at 38 3/4″x75″ and then attach it to the top of the wood shed. Align the edges flush and insert 1 5/8″ screws to lock them into place tightly, every 8″ along the framing.

Side-roof-trims
Next, we need to attach 1×3 trims to the shed, to make it look nice and polished. Therefore, make the angle degree cuts to both ends of the boards and secure it into place with 2″ finish nails.
Roof-trims—3×6-firewood-shed
Fit the decorative trims to the front and back of the shed, as well. Use 2″ nails to secure them into place tightly.
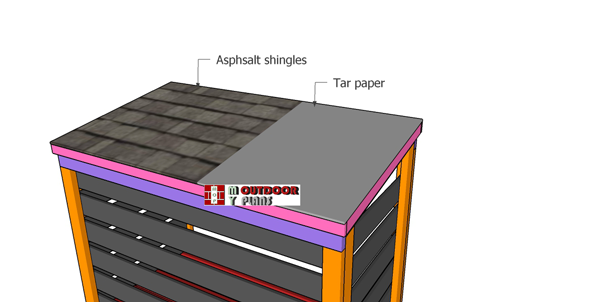
Fitting-the-roofing
Next, install the drip edges on all 4 sides and install the tar paper, along with the asphalt shingle roofing. Read the manufacturer’s instruction on how to lay the shingles properly and with the appropriate nails.
Finishing touches for the woodshed
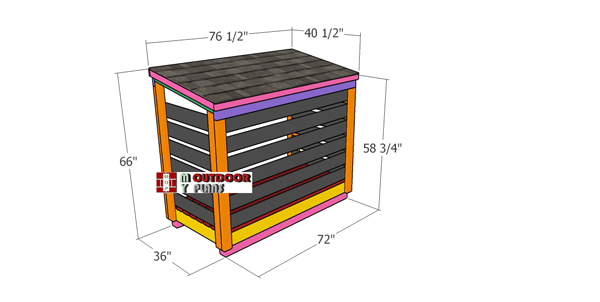
3×6-firewood-shed—overall-dimensions
Last but not least, take care of the finishing touches. Apply a few coats of paint / stain over the components to enhance the look of the shed and to protect the components from decay.
This is a beautiful small storage shed that will help you store 1/2 cords of wood efficiently and on a super affordable budget. Notice the overall height of the shed is under 6 ft. If you want to build a large shed that can hold up to 9 cords of wood, you should take a look over these plans.
3×6 firewood shed
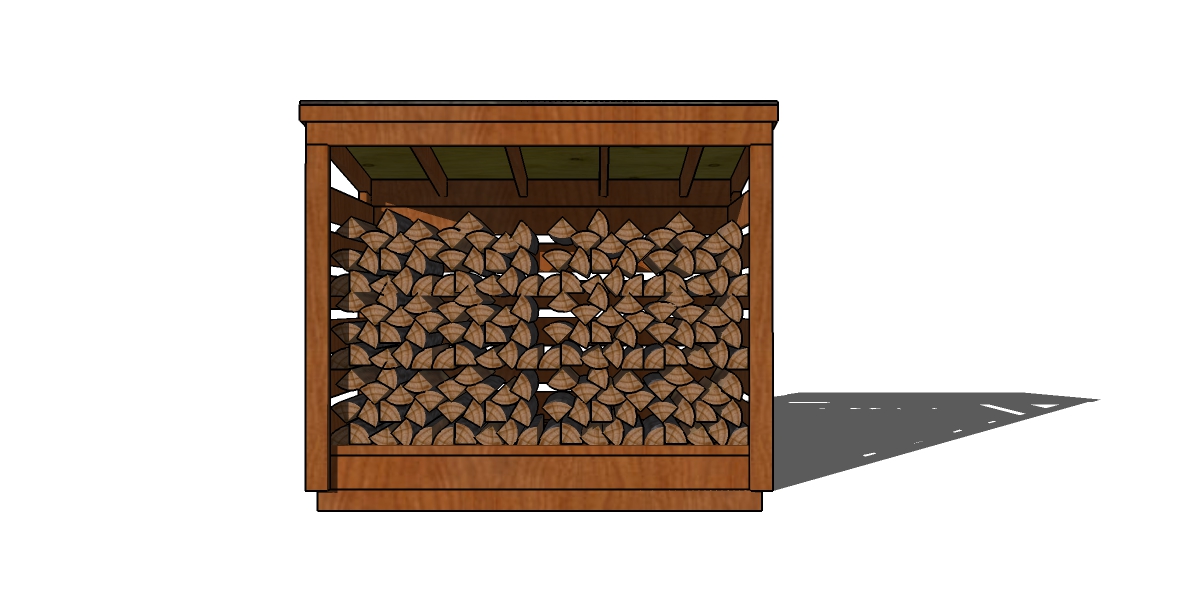
3×6 firewood shed – front view
You can see the rest of my shed plans HERE. If you like my project, don’t forget to SHARE it on Facebook and Pinterest. This is a simple firewood shed plan that can shelter up to 1/2 cords of wood, but you can stack a few of these units together for more room.
If you want PREMIUM PLANS for this project, that include full Cut list and Shopping lists, as well as cut layout diagrams, please check the GET PDF PLANS button bellow.
Thank you for reading our project about 3×6 firewood shed plans and I recommend you to check out the rest of the projects. Don’t forget to LIKE and SHARE our projects with your friends, by using the social media widgets. SUBSCRIBE to be the first that gets our latest projects.
