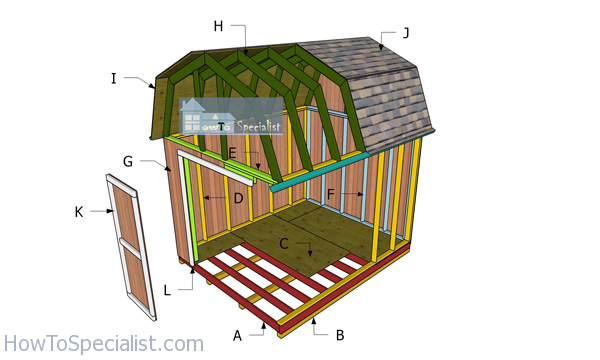
This step by step diy woodworking project is about 10×12 gambrel shed plans. This is a really sturdy backyard shed that features a gambrel style roof and double doors to the front wall. This shed is built on sturdy 2×4 wall framing. You can easily add a loft to this shed, if you like the style. Remember that you need to read the local building codes before starting the construction, so you comply with the legal requirements. See my other shed plans HERE.
We recommend you to invest in the best materials you could afford. Therefore, you should buy weather-resistant lumber, such as pine or cedar. Always take accurate measurements before adjusting the size of the components at the proper size. Drill pilot holes trough the components before inserting the wood screws, to prevent the wood from splitting. See all my Premium Plans HERE.
Made from this plan
10×12 Gambrel Shed – Free DIY Plans
Building-a-10×12-gambrel-shed
Materials
Tools
- Safety gloves, glasses
- Miter saw, jigsaw
- Chalk line, tape measure, spirit level, carpentry pencil
- Drill machinery and drill bits
Time
- One Week
Related
How to build a 10×12 barn shed

Building-the-shed-floor-frame
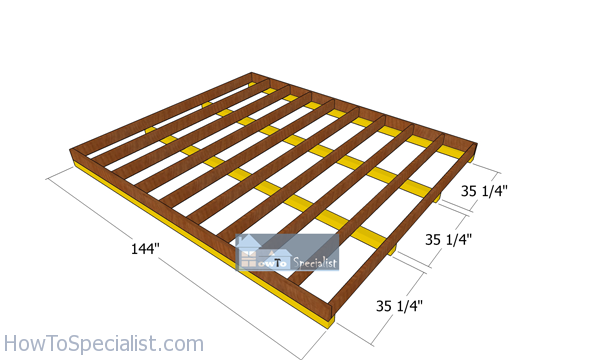
The first step of the project is to build the frame for the garden storage shed. As you can easily notice in the diagram, you need to cut the components at the right dimensions. Use a saw to cut the components from 2×6 lumber. Align the edges with attention and make sure the corners are square. Drill pilot holes through the rim joists and insert 3 1/2″ screws into the perpendicular components.
Fitting-the-floor-skids
Fit the 4×4 skids under the floor frame. Align the skids with attention and use screws to lock the frame to the skids. The skids will lift the frame from the ground and therefore, they will protect it from moisture. Use rafter ties to secure the skids to the shed floor frame.
Fitting-the-floor-sheets
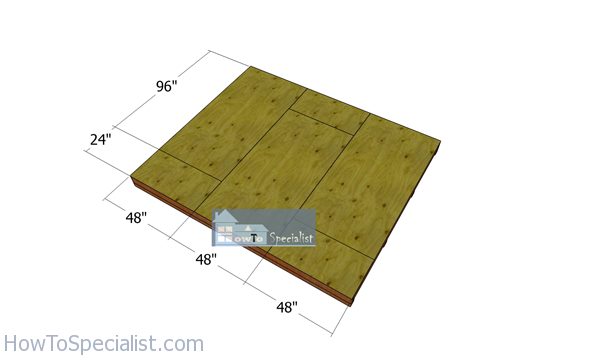
Fit 3/4″ plywood sheets to the floor frame. Align the edges flush and insert 1 5/8″ screws, every 8″ along the frame. Leave no gaps between the components.
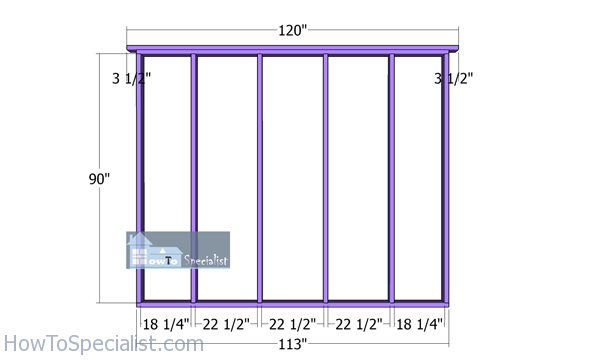
Side-wall-frames
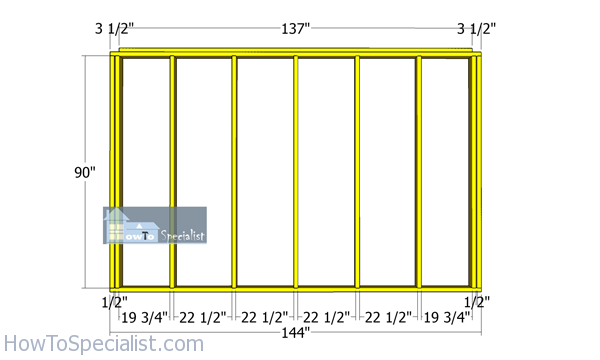
Building the side wall frames is a straight forward process, as you need to cut all the components at the right dimensions and then lock them together tightly with 3 1/2″ screws or framing nails. Place the studs every 24″ on center and check if the corners are square. Place double studs at both ends of the components for a professional result (fit 1/2″ plywood blockings between them).
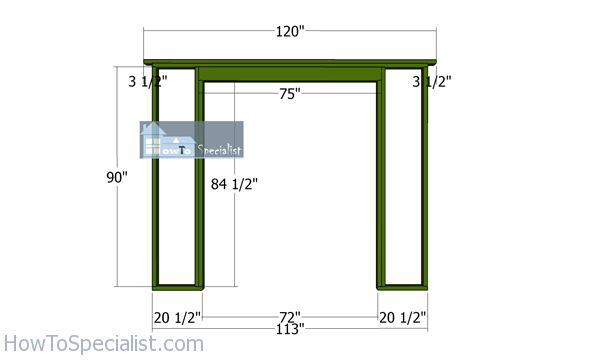
Front-wall-frame
Next, you need to build the front wall frames. Cut all the components from 2×4 lumber, as shown in the diagram. Drill pilot holes through the plates and insert 3 1/2″ screws into the studs. Place the studs equally spaced. You can adjust the size of the door opening to suit your needs.
Back-wall-frame
Next, build the back wall for the backyard storage shed. Cut the components at the dimensions shown in the diagram and then use the same techniques described above to assemble the wall together tightly. Notice the double top plate and the 3 1/2″ overhangs on both sides.
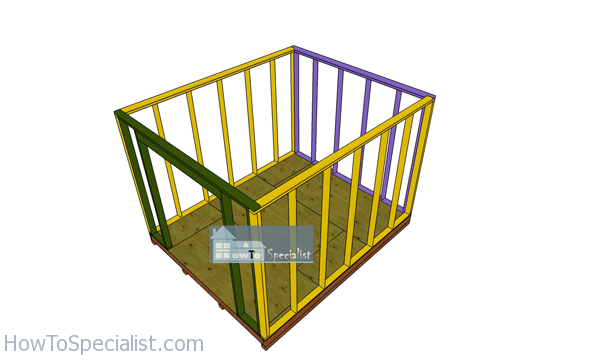
Assembling-the-shed-frame
Fit the wall frames to the floor of the shed. Align the edges with attention and plumb the wall frames with a spirit level. Drill pilot holes through the bottom plates and insert 3 1/2″ screws. In addition, you need to lock the adjacent wall together tightly with 3 1/2″ screws. Make sure the corners are square and align the edges with attention.
Fitting-the-side-wall-panels
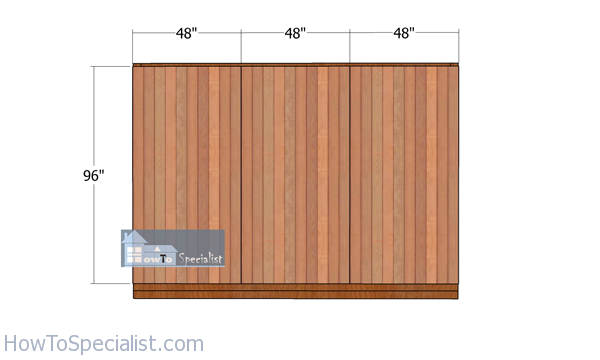
Fit the T1-11 siding sheets to the sides of the barn shed. Align the edges and leave 1 1/2″ from the top edge of the walls. Leave no gaps between the panels and insert 8d nails every 8″ along the wall frames.
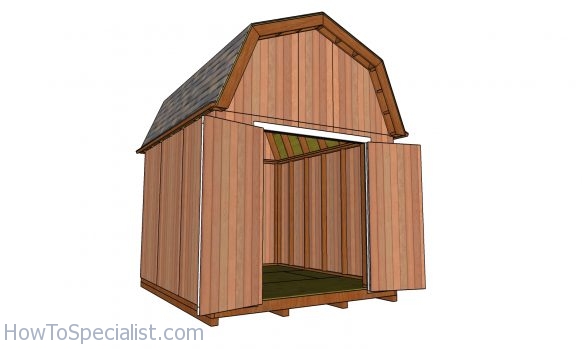
10×12 Gambrel Shed plans – doors open
This gambrel shed is compact and it features large double front doors. If you want to see other shed designs, take a look over my other projects HERE.
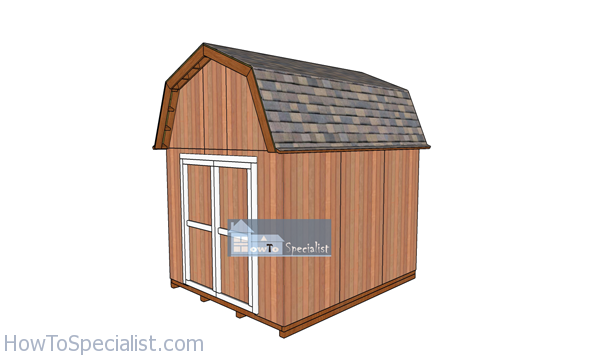
How-to-build-a-10×12-gambrel-shed
This is a medium sized storage shed, making it ideal for a small backyard. Don’t forget to take a look over PART 2 of the project so you learn how to build the roof and the front door for the storage shed. If you like my project, don’t forget to SHARE it on Facebook and Pinterest.
If you want to download the plans. just click on the GET PDF PLANS button bellow.
Thank you for reading our project about 10×12 barn shed plans and I recommend you to check out the rest of the projects. Don’t forget to LIKE and SHARE our projects with your friends, by using the social media widgets. SUBSCRIBE to be the first that gets our latest projects.

<< Previous | Next >>
1 comment
my concrete pad is 142″ x 142″. is it possible to modify your bar shed plan and build directly on the pad? so probably 140″ x 140″? I would use treated lumber on the wall plates and anchor them to the concrete pad.