This article is about pizza oven free plans. Building an outdoor pizza oven is a dream for every family, which can be easily turned to reality if you use proper free plans. Consequently, in this project we will show you some basic pizza oven free plans, along with the needed materials, tools and dimensions, as to get the job done in just an weekend. Buying a pizza oven kit is a good decision, but it might be a little too expensive for most of us, so why not try to build an outdoor pizza oven by yourself. By paying attention to our plans,, you will be able to build a brick oven by yourself, in two weekends.
Before building the pizza oven, you need to decide its location. A good location will help you turn the outdoor pizza oven in a focus point of your backyard. Consequently, you must have at least 30 sq feet / 10 m2 around the pizza oven, as to be able to set a table and several chairs when having guests. In addition, make sure you build the brick oven far away from your house and property line, but under the shade of a big tree. Alternatively you could build a shelter to protect the construction from bad weather.
The pizza oven must be far away from inflammable substances and from your windows, as the smoke could get in. Setting the location of the pizza oven is a serious task, so make sure the place is safe and enjoyable. In addition, you have to comply with the local building codes, therefore you have to know the legislation before starting the project. If you don’t have basic knowledge about new constructions, we recommend you to consult a qualified engineer to help with structural plans. See all my Premium Plans in the Shop.
Made from this plan
Materials
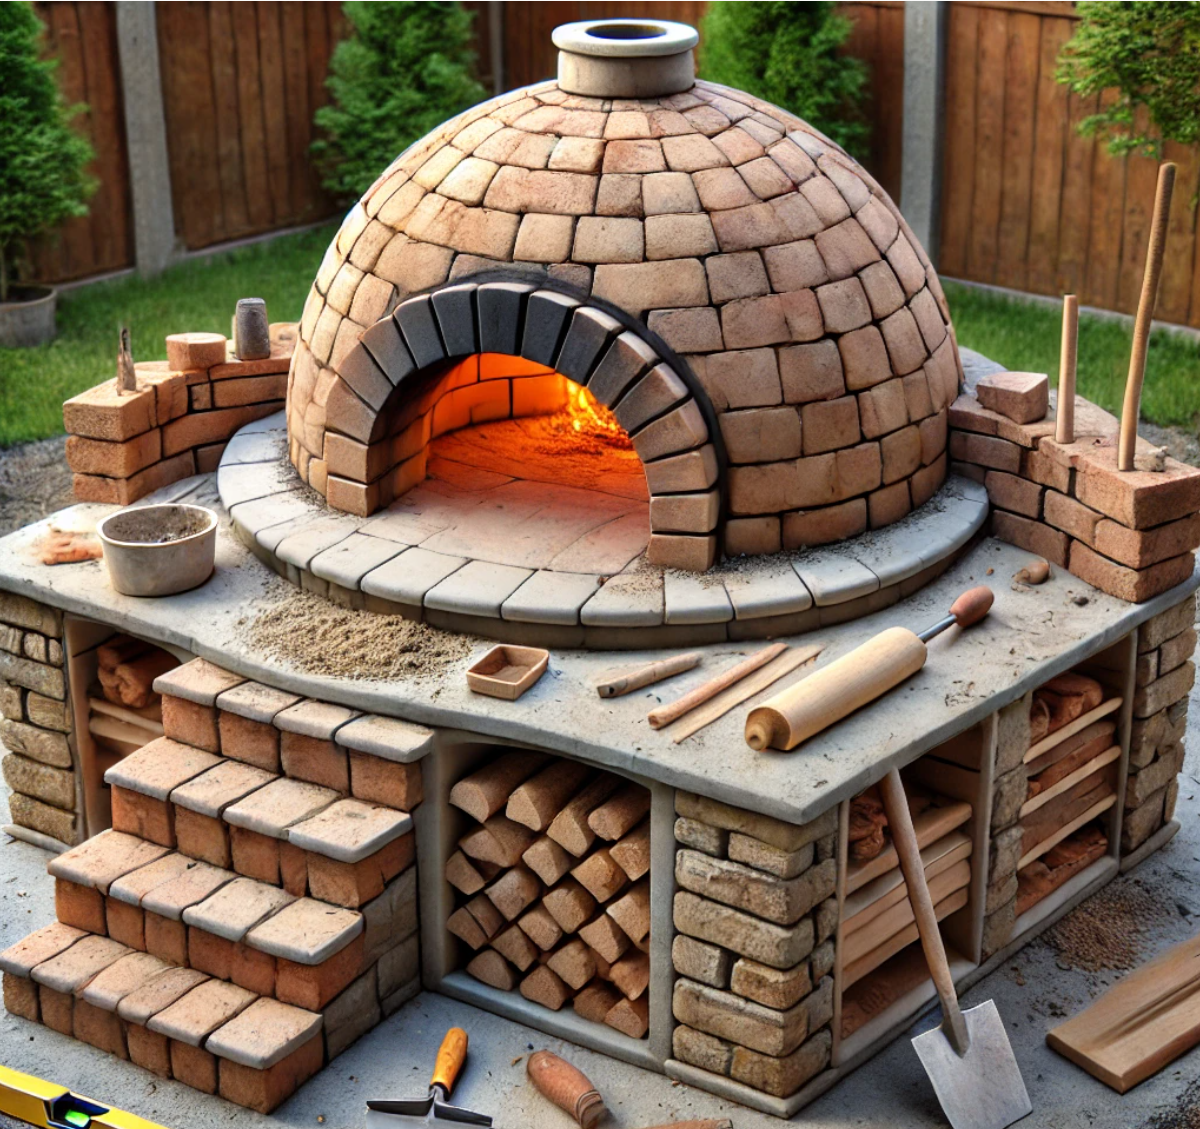
- 200 bricks and 20 refractory bricks – PIZZA OVEN DOME
- 2×10 and 2×4 lumber, 2 1/2” screws – FORM
- Cement, sand, gravel, rebars – FOUNDATION AND COUNTERTOP
- 60 concrete blocks – BASE
- Clay, sharp sand – FIRE MORTAR
- pizza peel
- pizza pan
- thermometer
Tools
- Safety gloves, glasses, Wet saw (to cut the bricks)
- Concrete mixer, Hammer, spirit level, carpentry pencil
- Trowel, bucket, sponge
Tips
- Read carefully the other articles related to pizza oven construction
- Glue the bricks together, using a fire clay mortar
- Plumb the base walls with a spirit level
Time
- Two weekends
Related
My best tips on building a pizza oven dome with base cabinet:
Building a pizza oven dome with a base cabinet creates a functional and stylish outdoor centerpiece. The dome retains high heat for perfect pizzas, while the base cabinet provides storage or a solid foundation for the oven. Here are my best tips for building a pizza oven dome with a base cabinet.
1. Plan the Design
Before you start building, it’s essential to plan the design of your pizza oven and base cabinet:
- Oven size: A typical pizza oven dome is 32-36 inches in diameter for home use. Consider how many pizzas you plan to cook at once.
- Base size: The base cabinet should be slightly larger than the oven to support it fully. A typical base might be 4×4 feet or larger, depending on your space and desired storage capacity.
- Materials: The dome is typically built with fire bricks and mortar, while the base cabinet can be built using cinder blocks, brick, or wood (with a reinforced concrete top).
Sketch out your design, including the height of the base cabinet (typically 36 inches for comfortable use).
2. Choose the Right Location
Selecting the right spot for your pizza oven is key to success:
- Level ground: Ensure the area is flat and stable for both the oven and base.
- Ventilation: Make sure there’s enough airflow around the oven to vent smoke properly.
- Distance from your home: Keep the oven a safe distance from structures to avoid fire hazards but close enough for easy access during cooking.
3. Gather the Right Materials
Here’s a list of materials you’ll need to build the pizza oven dome and base cabinet:
- Fire bricks for the oven floor and dome
- Refractory mortar for the dome
- Cinder blocks or bricks for the base cabinet
- Concrete mix for the foundation and base countertop
- Insulation such as ceramic fiber or vermiculite
- Metal or wood form for shaping the dome
- Steel rebar for reinforcing the base
- Chimney flue for proper ventilation
Make sure you use fire-rated materials that can withstand the high temperatures of the pizza oven.
4. Build a Solid Foundation
A strong foundation is essential to support the weight of the pizza oven and base cabinet:
- Mark the area where the oven will sit and dig down 6-8 inches to create a stable base.
- Pour a concrete slab for the foundation, making sure it’s level and slightly larger than the base cabinet.
- Insert steel rebar into the concrete for added reinforcement.
Allow the foundation to cure for at least 24-48 hours before proceeding.
5. Construct the Base Cabinet
Next, build the base cabinet that will support the pizza oven:
- Use cinder blocks or bricks to build the base. Arrange the blocks in a square or rectangular shape, leaving an open space in the front for storage or access.
- Stack the blocks to your desired height, typically about 36 inches. Use mortar to secure the blocks together and ensure they are level as you build.
- Add steel rebar or reinforcement between the blocks for extra stability, especially if the oven will be heavy.
Once the base is built, pour a concrete countertop on top. This provides a flat, solid surface for the pizza oven to rest on. Allow the concrete to fully cure before proceeding.
6. Build the Pizza Oven Floor
The floor of the pizza oven is critical for heat retention and cooking:
- Lay fire bricks on top of the concrete base in a herringbone or grid pattern. This creates the cooking surface where pizzas will be placed.
- Use refractory mortar to set the fire bricks in place, ensuring they are level and tightly fitted.
The fire brick floor should be perfectly level to ensure even cooking.
7. Create a Dome Form
To build the dome, you’ll need a form to shape the bricks:
- You can create a temporary form using sand or a wooden or metal structure shaped like a dome. The form will support the bricks while you build the dome.
- Shape the dome to your desired size, with a typical height about 50-60% of the oven’s width.
The form is critical to ensuring your dome has the proper shape for heat retention.
8. Build the Dome
Once the form is in place, you can begin constructing the dome:
- Start laying fire bricks at the base of the dome, using refractory mortar to secure them. Angle the bricks slightly inward as you build up.
- Continue building the dome in rows, working your way upward while maintaining the inward angle. Use a rubber mallet to gently tap the bricks into place as needed.
- Leave an opening at the front for the oven door and a small opening at the top for the chimney flue.
Ensure the bricks are tightly fitted and evenly spaced for proper heat retention.
9. Install the Chimney
A chimney flue is essential for ventilating the oven:
- Install a metal chimney pipe at the top of the dome near the front. This will allow smoke to escape while maintaining heat inside the oven.
- Use refractory mortar to secure the chimney in place.
Make sure the chimney is positioned correctly to allow for proper airflow.
10. Add Insulation
Insulating the dome helps retain heat for longer cooking sessions:
- Apply a layer of ceramic fiber insulation or vermiculite around the outside of the dome.
- Cover the insulation with a layer of refractory mortar or clay, creating a protective outer shell.
This step helps keep the oven hot for extended cooking sessions, perfect for making multiple pizzas.
11. Cure the Oven
Before firing up your oven for the first time, it’s important to cure it:
- Start by building small fires in the oven over several days, gradually increasing the heat each day.
- This process dries out the mortar and bricks, preventing cracks from forming.
Allow the oven to fully cure before cooking pizzas at high temperatures.
12. Finish the Base Cabinet
For a polished look, add finishing touches to the base cabinet:
- You can cover the cinder blocks with stone veneer, brick, or stucco to match your outdoor space.
- Add shelves or a storage area in the open space beneath the oven for storing wood, tools, or accessories.
DIY Pizza Oven

Pizza oven plans
Before building the pizza oven, you have to choose the right free plans to fit your needs and tastes. Consequently, you have to decide on the dimensions and design of the oven. On the other hand, you could choose to add a wood fired stove, a concrete table, several cabinets and build a complex outdoor kitchen. Irrespective of your tastes, we recommend you to study thoroughly this issue before starting the project.
Pizza oven free plans

Pizza oven foundation plans
The first step of the project is to build a strong foundation for your pizza oven. Therefore, you have to dig 1-2′ in the ground and install a rigid structure of rebars. Next, you should build a form, by using 2×8 wooden boards. Generally speaking, we recommend you to build the elevation of the foundation as high as possible, as to protect the pizza oven from water and snow.
Secure the wooden form by installing 2×4 stakes, as you can see in the image. Use a level to make sure the form is level on all four sides.

Pouring the concrete foundation
After you have build the form and installed the rebar structure, you have to pour the concrete. Therefore, you have to prepare it with a power mixer, by using the following recipe: 2 parts cement, 3 parts sand, 4 parts gravel and enough water to obtain a compund with the consistency of cream.

Laying the concrete blocks
After building the foundation, let it dry for a couple of days, before constructing the walls of the pizza oven base. In our pizza oven free plans, we have created a storage space under the pizza oven dome, as to be able to deposit fire woods or other objects.
In order to build the walls, you have to use concrete blocks and cement-based mortar. In most of the cases, 4-5 rows of concrete blocks are enough, so that the height of the walls should be around 25”.
Building the base of the pizza oven

Pizza oven countertop form
Next, you have to construct the counter-top and the cooking floor. Therefore, you should start this stage by installing the wooden form. Use four 4×4 post and cut them to the needed dimensions, to support the concrete counter-top.
Place two 2×4 wooden boards on top of them, before laying the actual form. From our experience, we recommend you not to fasten the boards to the posts, as it would be difficult to disassemble the form after the concrete dries out.

Pizza oven base free plans
You have to build the form from wooden boards, before installing the re-bar structure and pouring the concrete. The base of the pizza oven should be at least 6” thick, otherwise it might not support the weight of the dome.

Pizza oven floor
After building the form-work from wooden boards, you have to install the reinforcing bar structure. Use thick rebars and make a net structure, as you can see in the image. The distance between the rebars should be around 4”, as to create a rigid and durable floor.
In addition, at the intersection of all these bars, you have to tie them tightly with construction wire. Remember that you have to use spacers under the rebars, as to create a space of 1”-2” between the form and the structure.

Pizza oven flooring free plans
Next, after the concrete has dried out, you should build the floor of the pizza oven dome. Consequently, you should use fire bricks, as they are resistant to the high temperatures developed inside the dome and they also store the heat.
The floor should have a circular form, as much as possible, as you will build the dome-shaped walls on the edge of the cooking floor. Fill the space around the cooking floor with concrete or flagstone.

Building the brick dome
Afterwards, you should build the dome, using regular bricks. Cut the bricks into half in order to obtain a circular shape. Mix 1 part clay with 2 parts sharp sand, until you obtain a mortar resistant to high temperatures.

Outdoor pizza oven plans
As you can see in the plans, you should leave enough space to build the entrance. Lay the bricks and build a nice arch, using a plywood template. Don’t forget to leave a hole on top of the entrance, to let the smoke out of the dome.
In addition, you have to create the pizza oven’s chimney, by using our pizza oven plans free. Lay the bricks on shiner, to save time and materials. Plumb the walls with a spirit level.

Brick pizza oven
Last but not least, you should build the pizza oven dome and the chimney, as to get the job done in a professional manner. In order to build the outdoor pizza oven, you have to use refractory cement between the bricks, as a regular cement won’t resist the high temperatures developed inside the dome.


Outdoor kitchen with a pizza oven
In this image you can see a fragment from other projects on Howtospecialist.com. Consequently, you should check out the rest of our pizza oven and outdoor kitchen projects, to see images during the construction process and the underlying bricklaying techniques.
Thank you for reading our article on free pizza oven plans and we recommend you to check out the rest of our projects. Don’t forget to share our articles with your friends, by using the social media widgets.
Related projects: