This step by step diy project is about how to build a lean to carport. Building a simple carport is a straight forward project, if you plan everything from the very beginning and use the right carpentry techniques. A lean to construction is ideal for narrow backyards, as well as for a woodworking novice, as it doesn’t require an extensive expertise in carpentry. Moreover, you only need basic tools, to get the job done.
Before starting the actual construction of the lean to carport, you need to study the local building codes thoroughly. The legal requirements vary extensively according to the area where you live, so you should read them a few times. In most of the cases, the construction require a building permit, so you need to be aware of the required depth of the footings, or the materials you are allowed to use.
Align the wooden components at both ends, before driving in the screws. Drill pilot holes trough the components to prevent the wood from splitting. Check the corners for squareness, every time you install a component. Check if the posts are plumb and if the support beams are horizontal, before locking them into place with screws or bolts. A lean-to construction will be easier to build as compared to a gable roof carport .The roof will direct the water in only one direction, so you could build it close to the property line. See all my Premium Plans in the Shop.
Made from this plan
Building a lean to carport plans
Materials
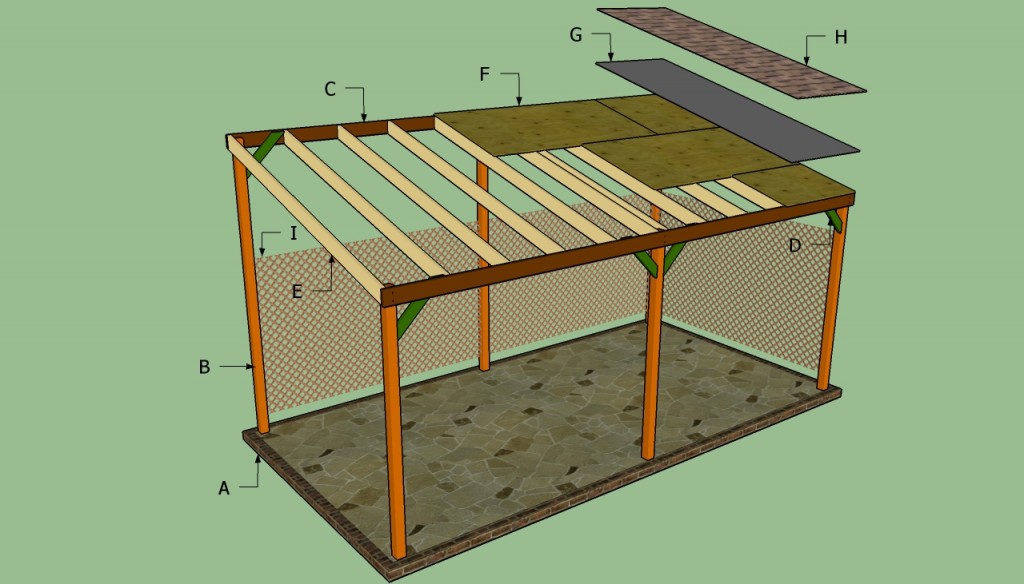
- A – 6 pieces of adjustable metal anchors, tube forms, cement, sharp sand, gravel FOOTINGS
- B – 3 pieces of 4×4 lumber – 96” long, 3 pieces of 4×4 lumber – 127 1/4” long POSTS
- C – 2 pieces of 2×6 lumber – 120” long RIM RAFERS
- D – 8 pieces of 2×4 lumber – 26” long BRACES
- E – 12 pieces of 2×6 lumber – 124 1/4” long – both ends cut at 15º RAFTERS
- F – 8 piece of 3/4” tongue and groove plywood ROOFING
- G – 120 sq ft of tar paper ROOFING FELT
- H – 120 sq ft of asphalt shingles SHINGLES
- 3 pieces of 4×4 lumber – 8 ft
- 3 pieces of 4×4 lumber – 12 ft
- 2 pieces of 2×6 lumber – 8 ft
- 2 pieces of 2×4 lumber – 10 ft
- 12 pieces of 2×6 lumber – 12 ft
- 8 pieces of 3/4″ plywood – 4’x8′
- 120 sq ft of tar paper
- 120 sq ft of asphalt shingles
- post anchor, tube form, concrete
- 2 1/2″ screws, 5 1/2″ carriage bolt, rafter ties
- roofing felt, asphalt shingles
Tools
- Safety gloves, glasses
- Miter saw, jigsaw
- Chalk line, tape measure, spirit level, carpentry pencil
- Drill machinery and drill bits
Tips
- Pre-drill holes in the wooden components, before driving in the screws
- Check the corners for squareness, using a corner square
Time
- One weekend
Related
How to build a lean to carport

Laying out the carport
The first step of the project is to lay out the carport in a professional manner. In order to get an accurate result, you need to use batter boards and string, as in the image. Check the corners for squareness, by applying the well-known 3-4-5 rule to every corner.

Anchoring the post into concrete
Afterwards, you have to set the posts into place. As you can see in the image, you have several options: set the posts into concrete, pour concrete footing and attach adjustable anchors or setting the supports to a slab.
Fitting the posts
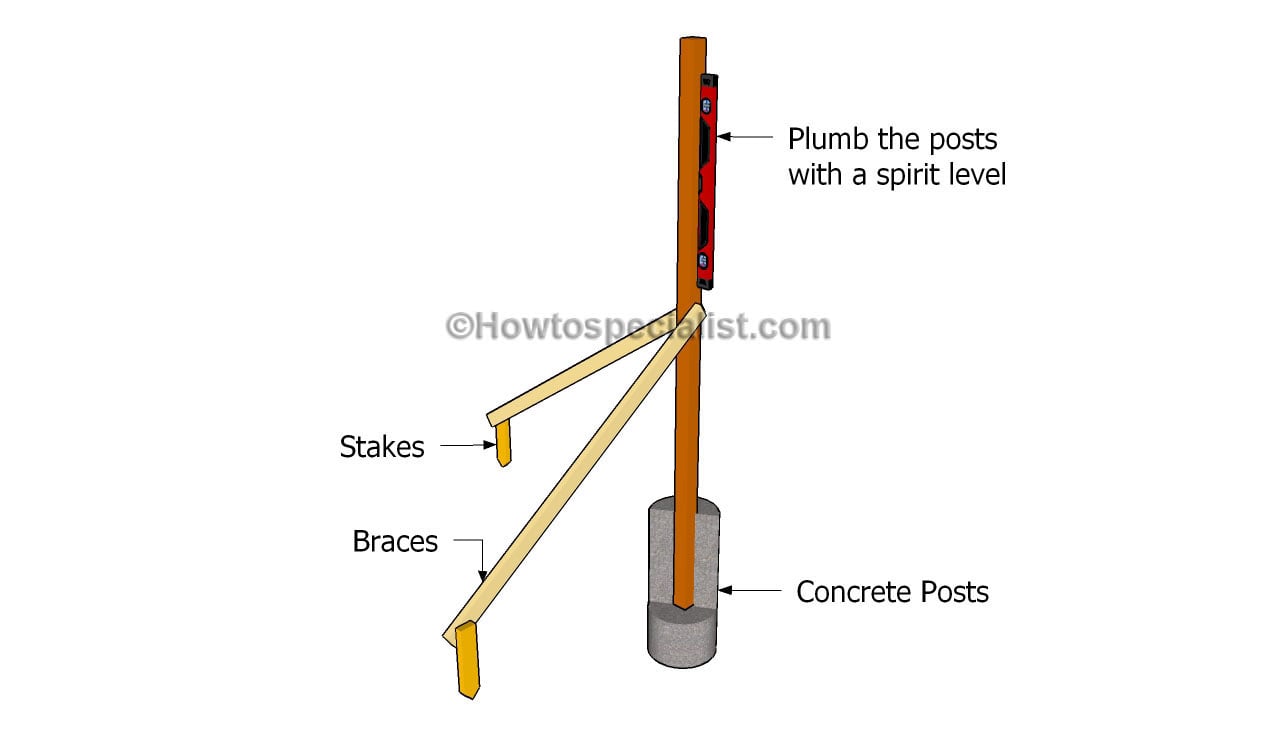
Setting the posts in concrete is essential for the rigidity of the carport. As you can easily notice in the diagram, we recommend you to dig 3′ deep holes and to pour 2″ gravel on the bottom. Install the tube forms to the holes. Secure the posts with braces before filling the forms with concrete, making sure the posts are level.
Fitting the wooden posts
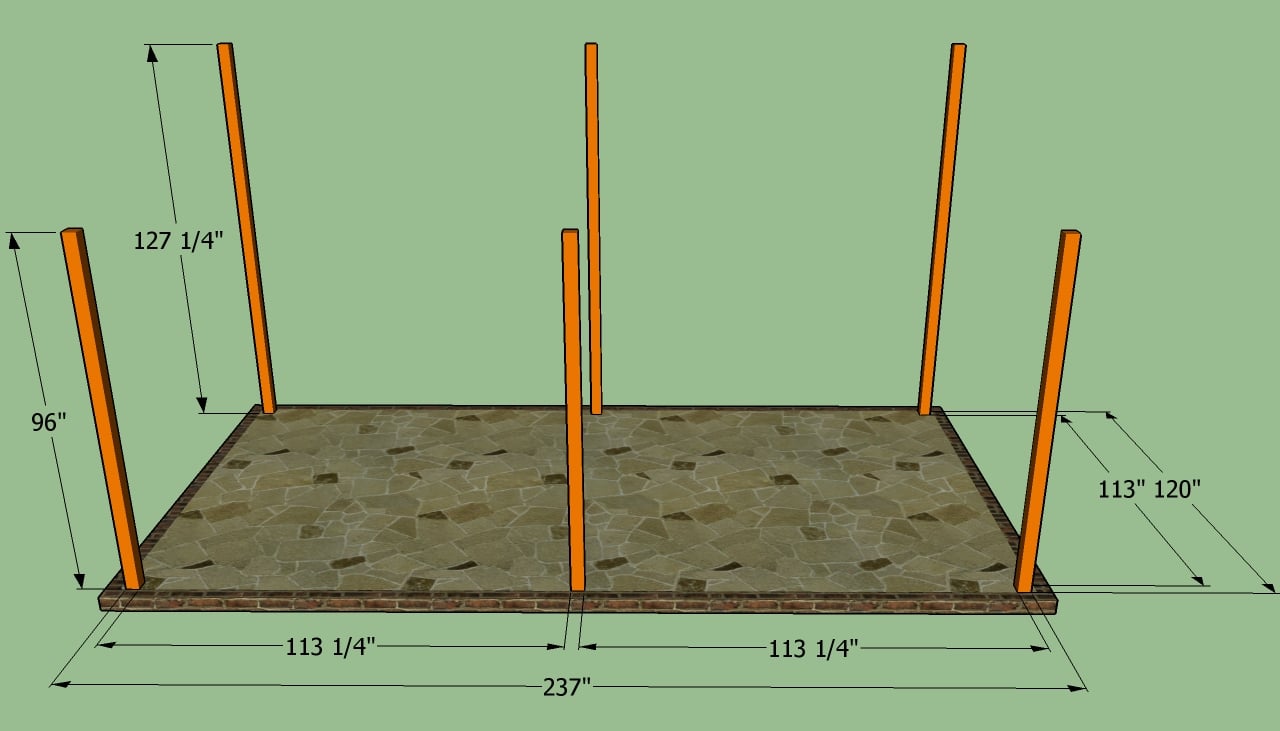
Fitting the posts into place should be a straight forward task, as you just need to secure them with lag screws to the metal anchors. Use a good circular saw to cut the posts at the right size, making the ends are right-angled.

Attaching the support braces
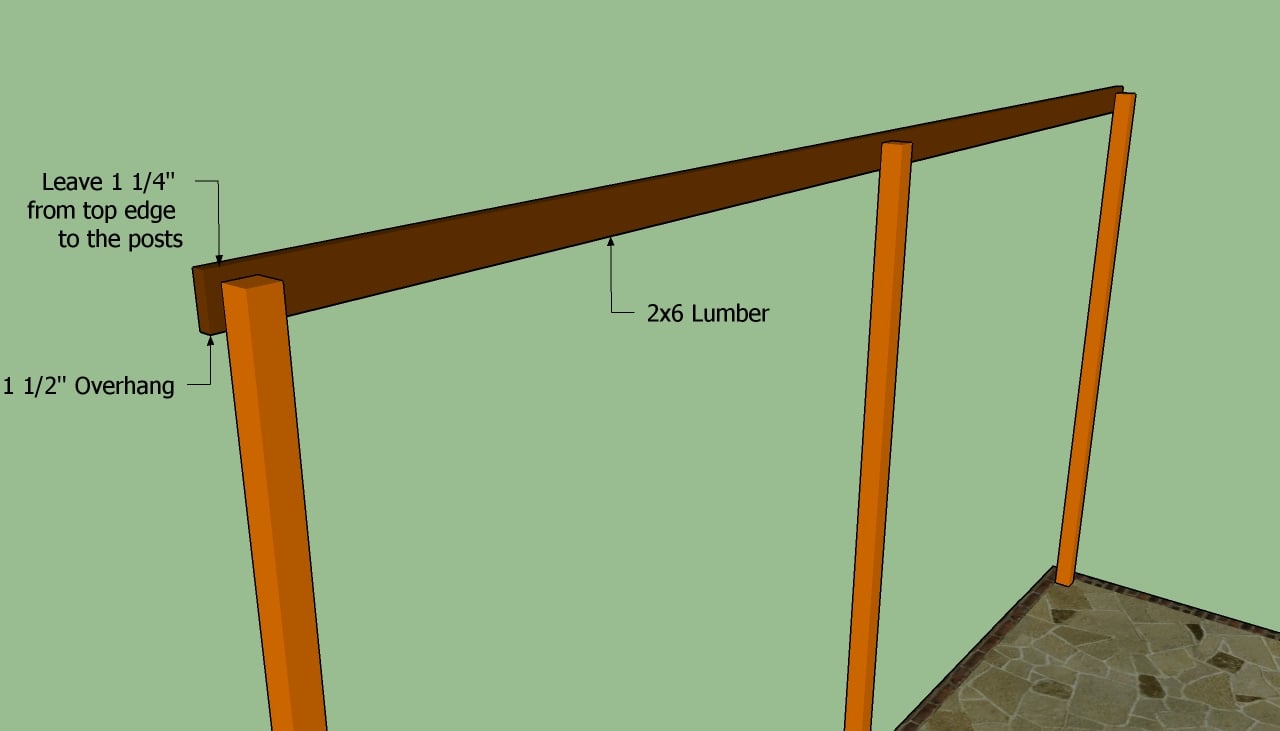
Afterwards, you need to attach the support beams to the wooden posts, as in the plans. In order to get the job done in a professional manner, you need to align the 2×6 beams at both ends (the supports should overhang 1 1/2” on both ends). In addition, check if the supports are level, before clamping them to the wooden posts. Drill pilot holes trough the beams and posts, before driving in the 5 1/2” carriage bolts.
Top ridge
As you can see in the image, the crossbeams should overhang about 1 1/2” at both ends. In addition, the top ridge should be installed 1 1/4” higher as compared to the posts, otherwise you won’t be able to secure the roofing sheets properly.

Attaching the braces
If you live in a windy area, or you have secured the posts with posts anchors rather than setting them in concrete, you should increase the rigidity of the structure with wooden braces. As you can see in the image, you have to cut both ends of the braces at 45º and lock them into place with screws.
Drill pilot holes trough the braces and insert the 2 1/2” screws, to prevent the wood from splitting. Make sure the braces are aligned properly, before inserting the screws.
Installing the rafters
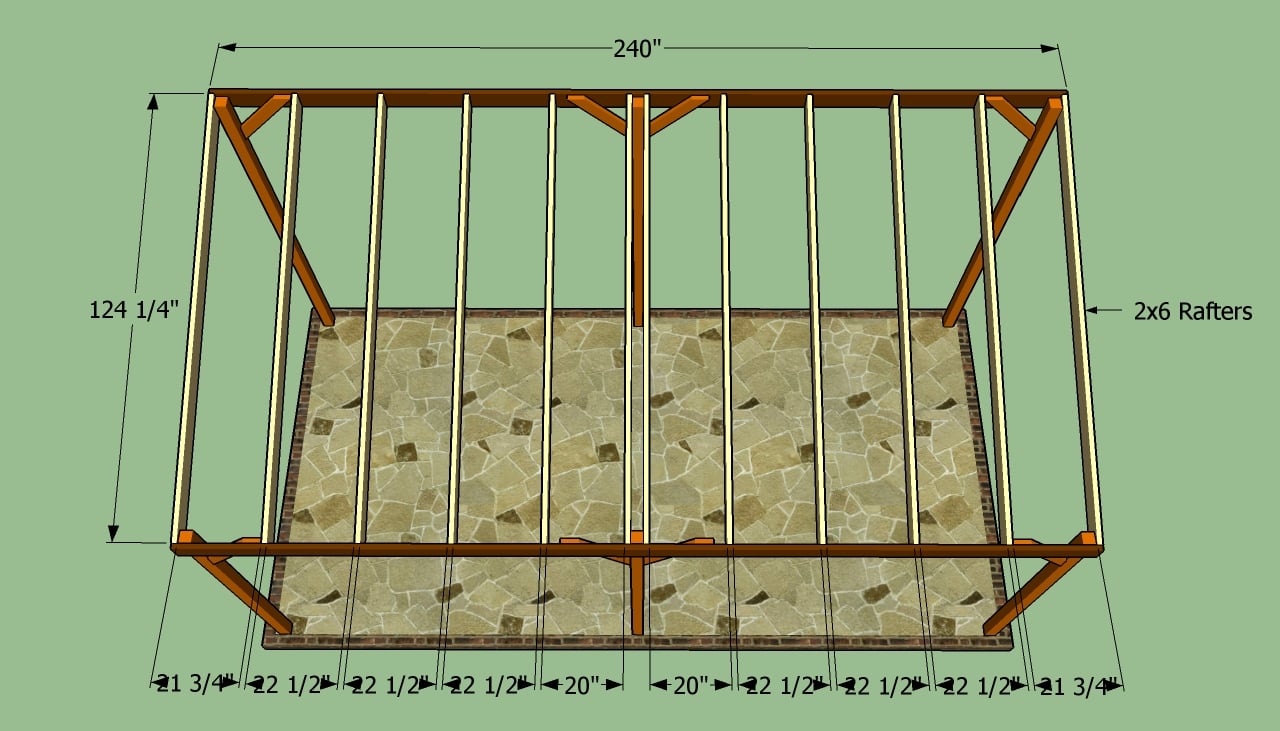
The next step of the woodworking project is to build the rafters and to fit them into place. In order to drain the water properly, the roof should have a slope of at least 15º. Therefore, cut both ends of the rafters at 15º, using a circular saw with a sharp blade.

Securing the rafters
In order to lock the rafters tightly to the crossbeams, you have several alternatives. On one hand, you could drill pilot holes trough the breams and insert 3” screws from the outside of the lean-to carport.
On the other hand, you could use corner framing hardware to anchor the rafters to the rim beams. Use 1 1 /2 screws to secure the rafters into place tightly. Ask a friend to hold the rafters, while driving in the screws.

Attaching the roofing sheets
After installing the rafters into place, you need to fit the roofing sheets. If you want to get the job done properly and to get a durable result, we recommend you to use 3/4” tongue and groove plywood sheets and to la them as in the plans.

Covering the roof with felt
Cover the roof with felt, making sure the strips overlap at least 2”. Use staples to secure the tar paper to the 3/4” plywood. Fit the back and front drip edge over the roofing felt, while the side drip edges should be installed under the felt.
Install the shingles starting with the bottom of the roof. First, install the starting course with the tabs upward-oriented. Continue the installation by fitting the tabs and securing them into place with staples.
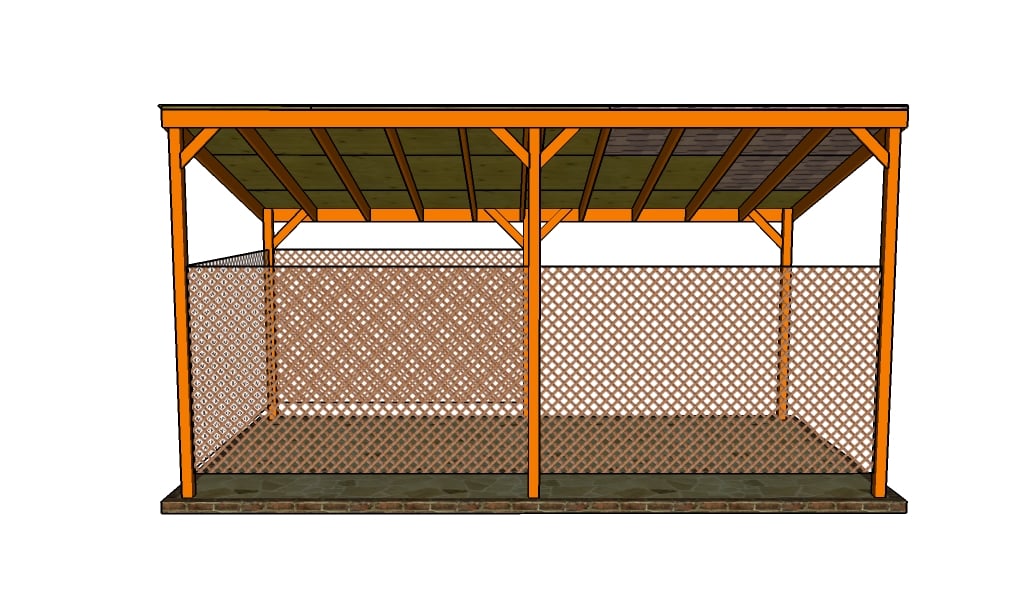
Single car carport
The carport seem from one side. Fitting lattice panels to the sides would be a great way to protect your car from the elements.
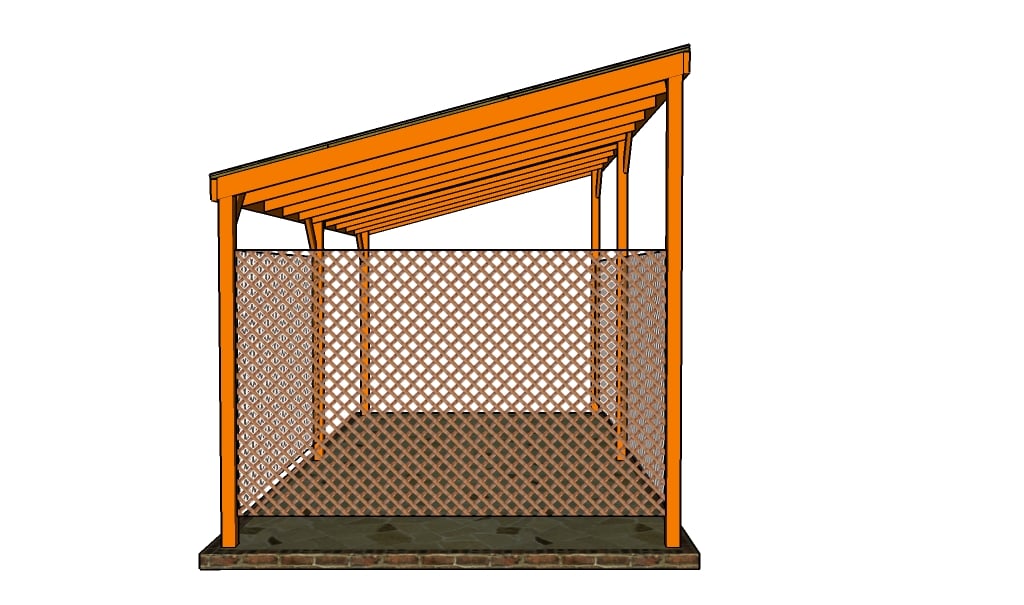
Building a lean to carport
The carport seen from the front. As you can notice, the wooden lean to carport is a simple construction with a modern design, ideal for any backyard.
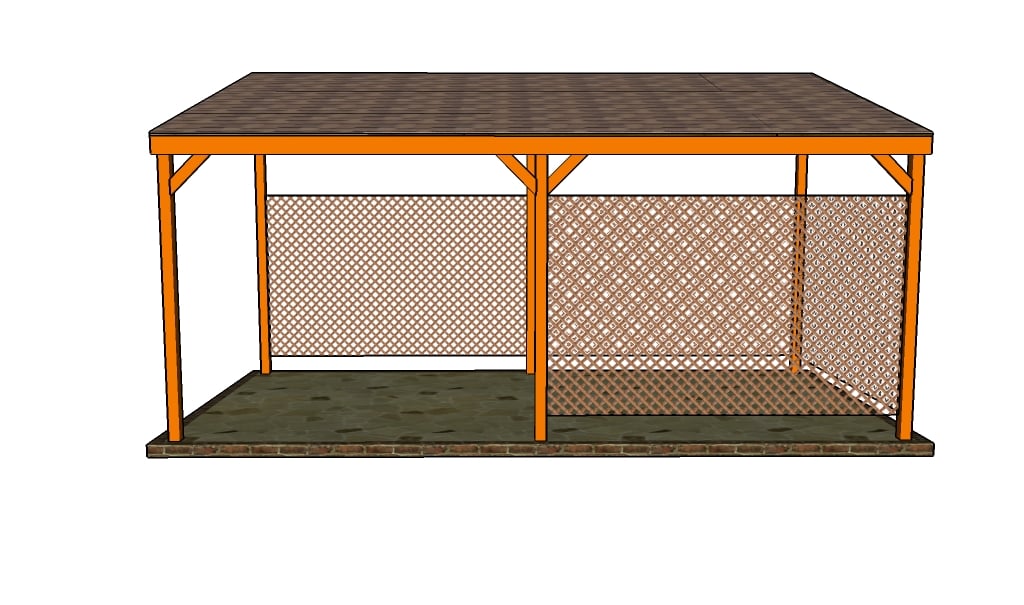
Lean to carport plans
The carport seen from the opposite side. As you can notice, the slope of the roof is steep enough to drain the water efficiently. I have a newer and much fresher design for a lean to carport, so take a look HERE. The plans also come with full Cut & Shopping lists! I promise you will like it very much.
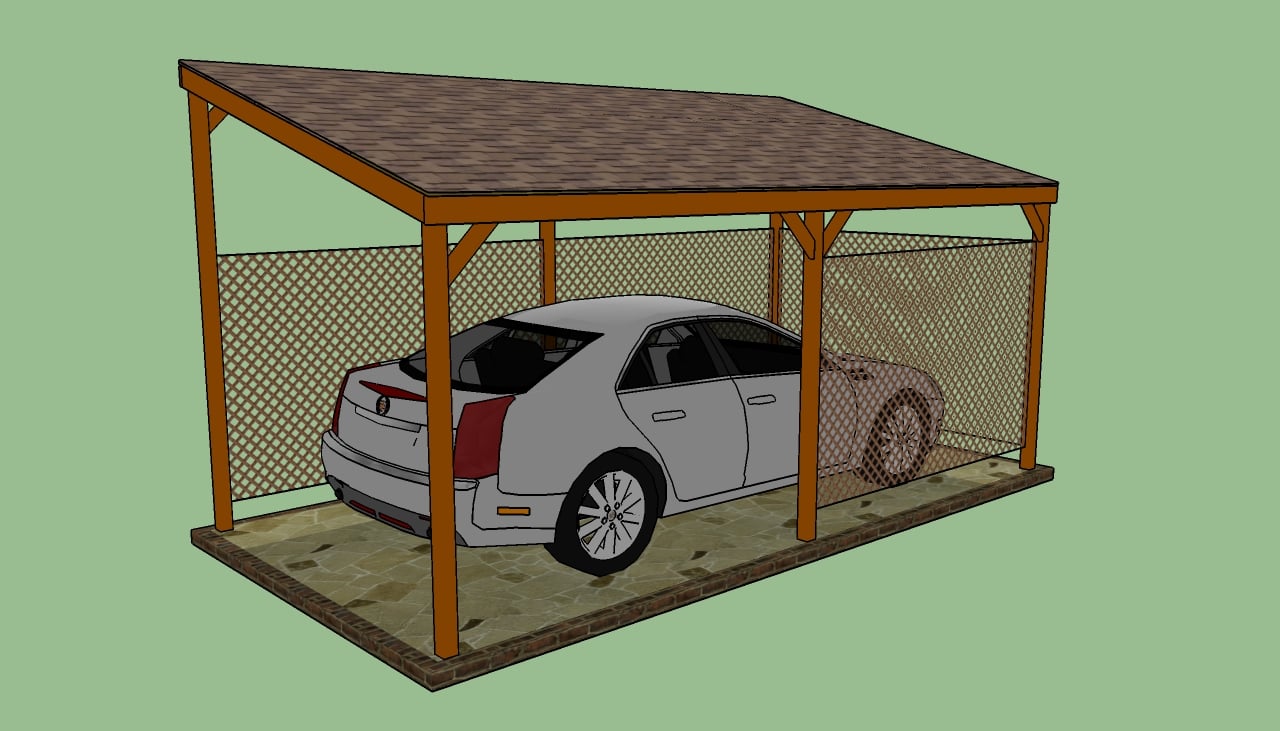
How to build a lean to carport
Last but not least, you should take care of the final touches. Therefore, you could install lattice panels between the posts and use them as privacy screens. In addition, you need to fill the holes with wood putty and to let it dry out for several hours, before sanding the components. See all my carport plans HERE.
Thank you for reading our project about how to build a lean to shed and we recommend you to check out the rest of our articles. Don’t forget to share our tips with your friends, by using the social media widgets, if you have found this project useful. LIKE us on Facebook to be the first that gets our latest updates and to help us create more free plans for you.

12 comments
I have a question you show to use 3 inch wood screws in center post. Do you then use 5 inch carriage bolt for ends only, which would be 4 carriage bolts. Not sure what you mean.Thanks
You need to use at least 2 carriage bolts or lag screws for each post joint. You can use that for the center posts, as well. Consider these plans, as well: http://myoutdoorplans.com/carport/12×24-do-it-yourself-lean-to-carport-plans/
These plans are great. Is there anyway a 6 inch over hang by using birds mouth could be added?
Take a look over these plans: http://myoutdoorplans.com/carport/12×24-do-it-yourself-lean-to-carport-plans/
Very informative plans, thank you for providing tgese.
I plan to build this style next to my garage because I don’t have the wall height on garage to obtain correct heights/roof pitch.
I will be using metal roofing.
My dimensions are slightly different being 10ft wide x 32ft long. The top of trusses will be approx 9ft high on high side.
My question is , in your opinion, will I be able to use 4×4 wood posts(set in postholed concrete footers)or will I have to go to 4×6 or 6×6 size post due to height of carport & sq footages?
Thank you
It depends on the local weather conditions, the snow load and the wind speed. As a general rule, you will always be better off using thicker posts and that will also improve the look of the carport.
What is the maximum snow load per sqf for this plan?
Thanks
Thanks for the plans. I have 2 questions.
1. Are the 3 post next to the structure necessary? Can’t we just attach a 2×6 or 2×8 to the side of the structure as mounting point for the rafters?
2. Also I am not sure what the terminology is but shouldn’t there be something in place above where th rafters meet the structure in part of the roof to prevent water from seeping down the side of the building? Would it be called a flashing or splash pan? Please excuse my novice understanding.
Once again thank you.
1. Yes, you can do that (it’s called ledger).
2. Yes, you would need that, but it depends of the roofing product you are going to install.
Thanks Jack. Can this be made in steel, and a 4 meter x 6 meter construction ?
Hey.
Trying to help an elderly lady —-installing attached open air carport with metal roof. Just like what’s described in this article. PROBLEM: I must submit plan to building dept —-thru want me to use a pro.
Any place I can access and print plans suitable for the City of Florence SC building department?
We want to build a 20×19 2 car lean to style, what changes should be made for that size carport?