This step by step diy woodworking project is about 10x16 free standing pergola plans. This rectangular wood pergola has a modern design and it is budget friendly, so you can save a ton on money by choosing to make this on your own. This pergola is easy to build and it features a sturdy structure with 6×6 posts. Remember that you need to read the local building codes before starting the construction, so you comply with the legal requirements.
I recommend you to invest in the best materials you could afford. Therefore, you should buy weather-resistant lumber, such as pine or cedar. Always take accurate measurements before adjusting the size of the components at the proper size. Drill pilot holes trough the components before inserting the wood screws, to prevent the wood from splitting. See all my Premium Plans HERE.
Made from this plan
Pin it for later!
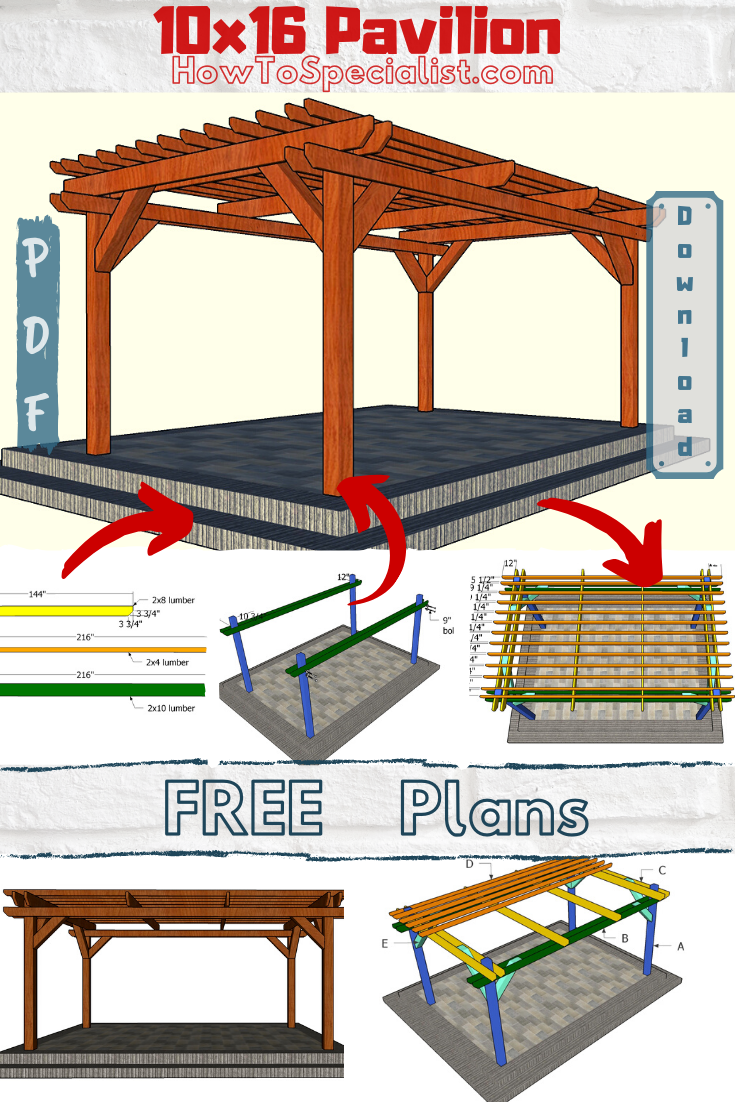
10×16 Pergola Plans – Step by Step
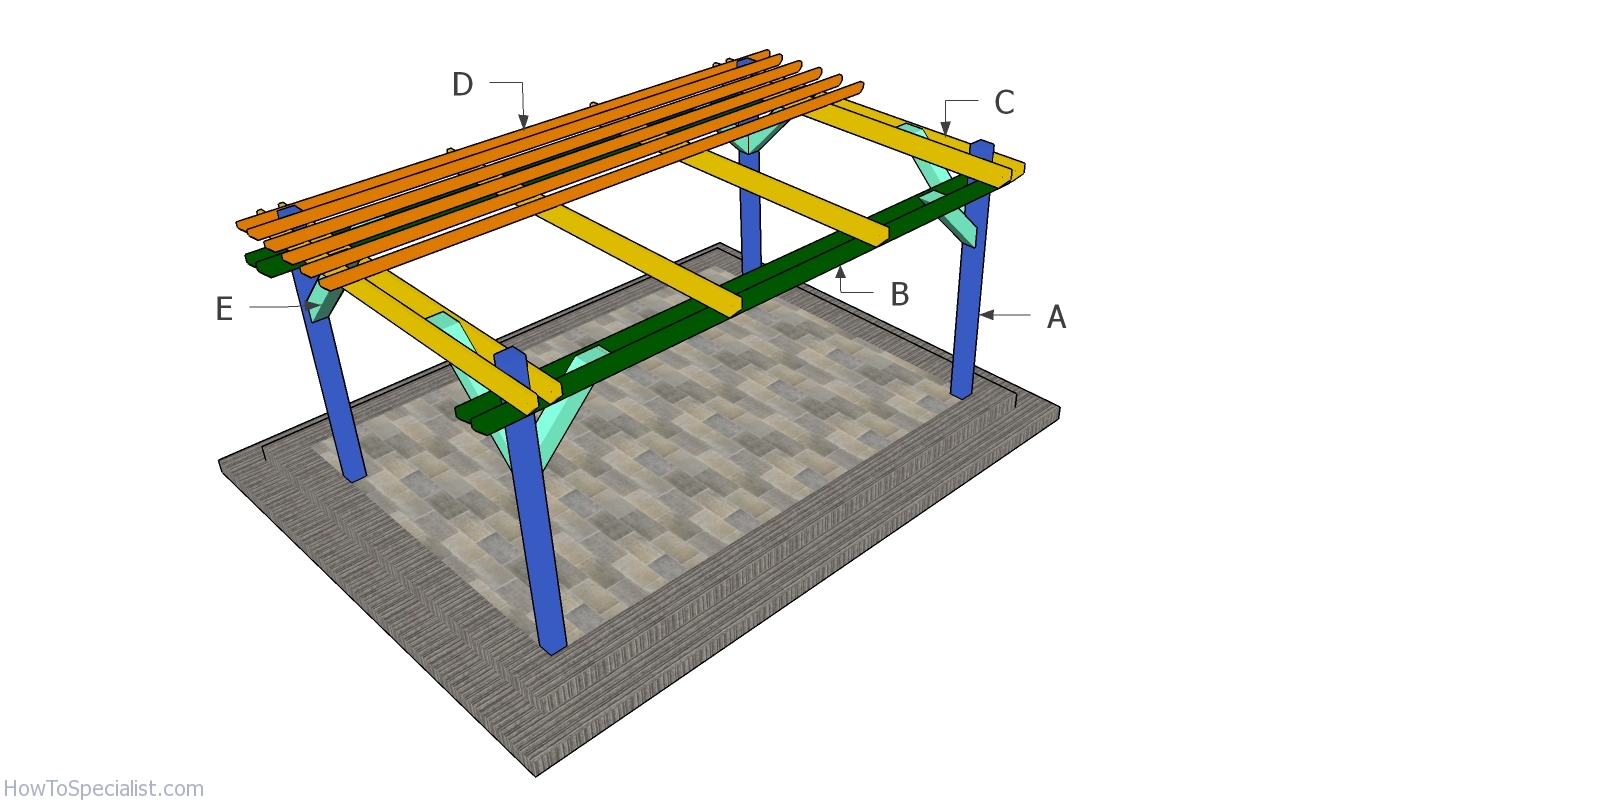
Building a 10×16 pergola
Materials
- A – 4 pieces of 6×6 lumber – 8′ long POSTS
- B – 4 piece of 2×10 lumber – 18′ long SUPPORT BEAMS
- C – 6 pieces of 2×8 lumber – 12′ long SHADE ELEMENTS
- D – 13 pieces of 2×4 lumber – 18′ long TOP SLATS
- E – 4 pieces of 6×6 lumber – 45 1/2″ long, 4 pieces – 36 1/4″ long BRACES
- 8 pieces of 6×6 lumber – 8 ft
- 13 pieces of 2×4 lumber – 18 ft (you can use 26 pieces of 10 ft long 2x4s, as well)
- 4 pieces of 2×10 lumber – 18 ft
- 6 pieces of 2×8 lumber – 12 ft
- 50 pieces of 3 1/2″ screws
- 16 pieces of 5 1/2″ screws
- 4 pieces of 6×6 post anchor
- post to beam connectors
- 1 box of 1 1/2″ structural screws
- 4 pieces of 14″-16″ tube form
- 4 pieces of concrete bags
- 4 pieces of rafter ties
- 39 pieces of rafter clips
- 8 pieces of 9″ carriage bolts
- wood filler , wood glue, stain/paint
Tools
- Safety gloves, glasses, ladder, shovel, wheelbarrow
- Miter saw, jigsaw, circular saw, post hole digger
- Chalk line, tape measure, spirit level, carpentry pencil
- Drill machinery and drill bits
Time
- One Week
Cut Layout Diagrams
How to build a 10×16 pergola
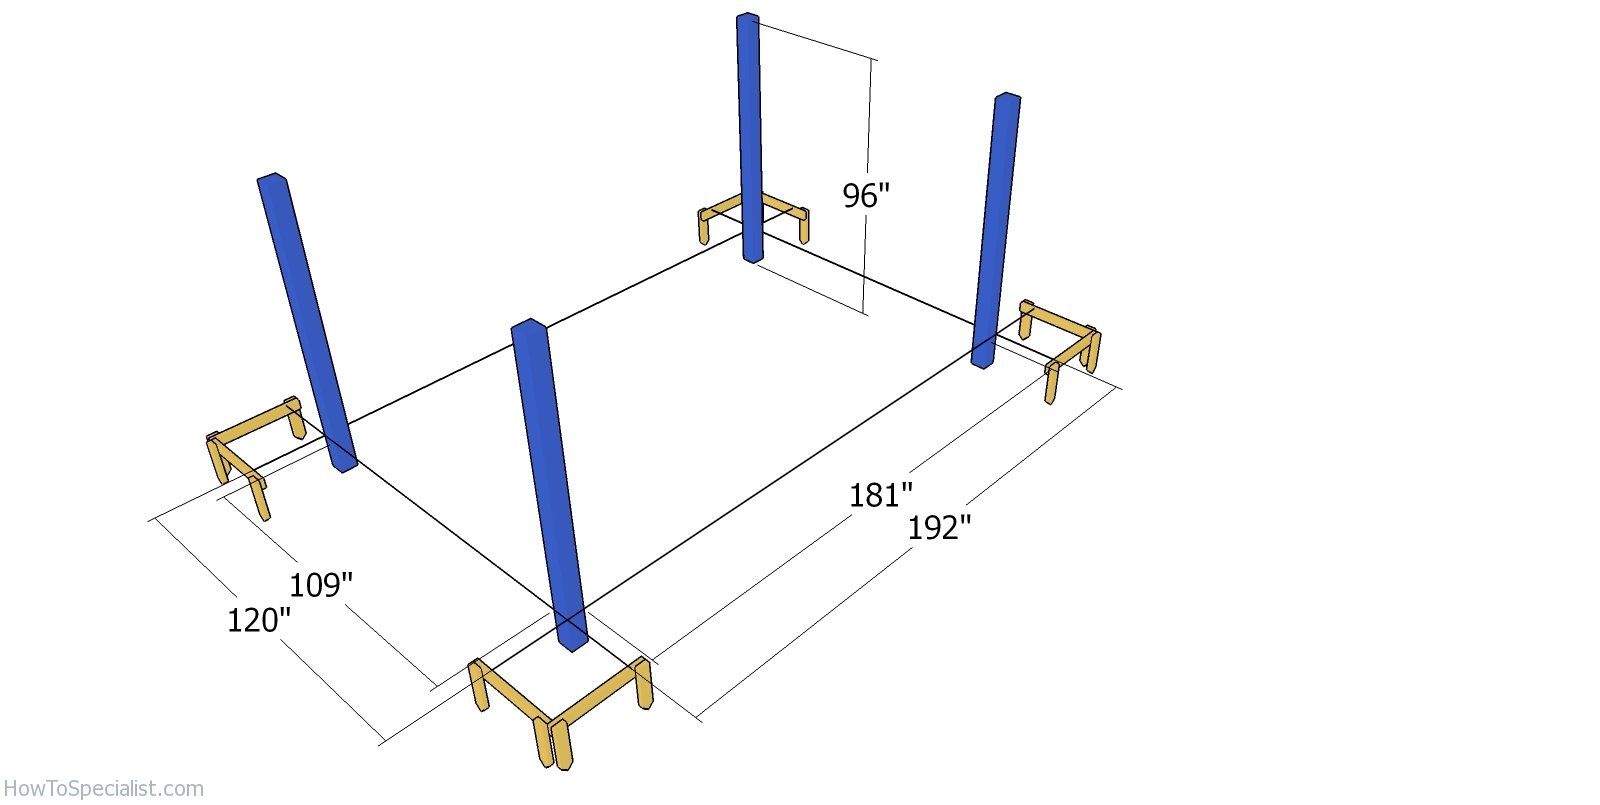
Laying out the pergola – 10×16 pergola
Next, you need to layout the garden free standing pergola. Therefore, use string and batter boards to lay out the location of the posts. Measure the diagonals and make adjustments till they are equal. Moreover, you need to apply the 3-4-5 rule to each of the four corners, so you make sure they are right angled. It is also important to select the location for the shed and to comply to the local codes, of any. Remove the vegetation layer before setting the posts into place.
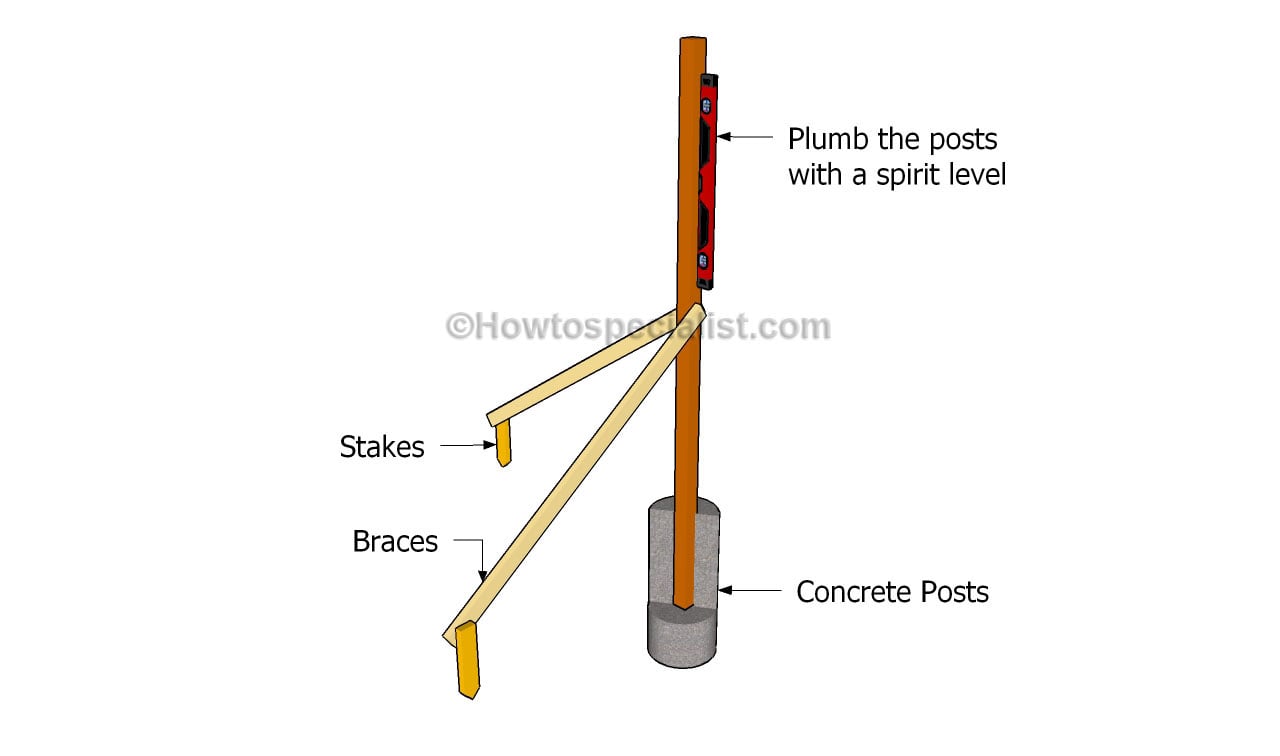
Fitting the posts
You can set the 6×6 posts in concrete or you can pour footings and secure them in place with anchors. Dig 2-3′ deep holes and 14″ in diameter and then compact a layer of gravel to the bottom. Fit the 12″ tubes and set the 6×6 posts into place (or fit the anchors). Use a spirit level to plumb the posts and then secure them into place with temporarily braces. Pour the concrete in the tube forms and let it dry out for several days.
Remember that in my case, the plans are designed considering you will lock the posts using anchors. If you plan to lock the posts in concrete, just add 3′ to all the posts.
Rafters
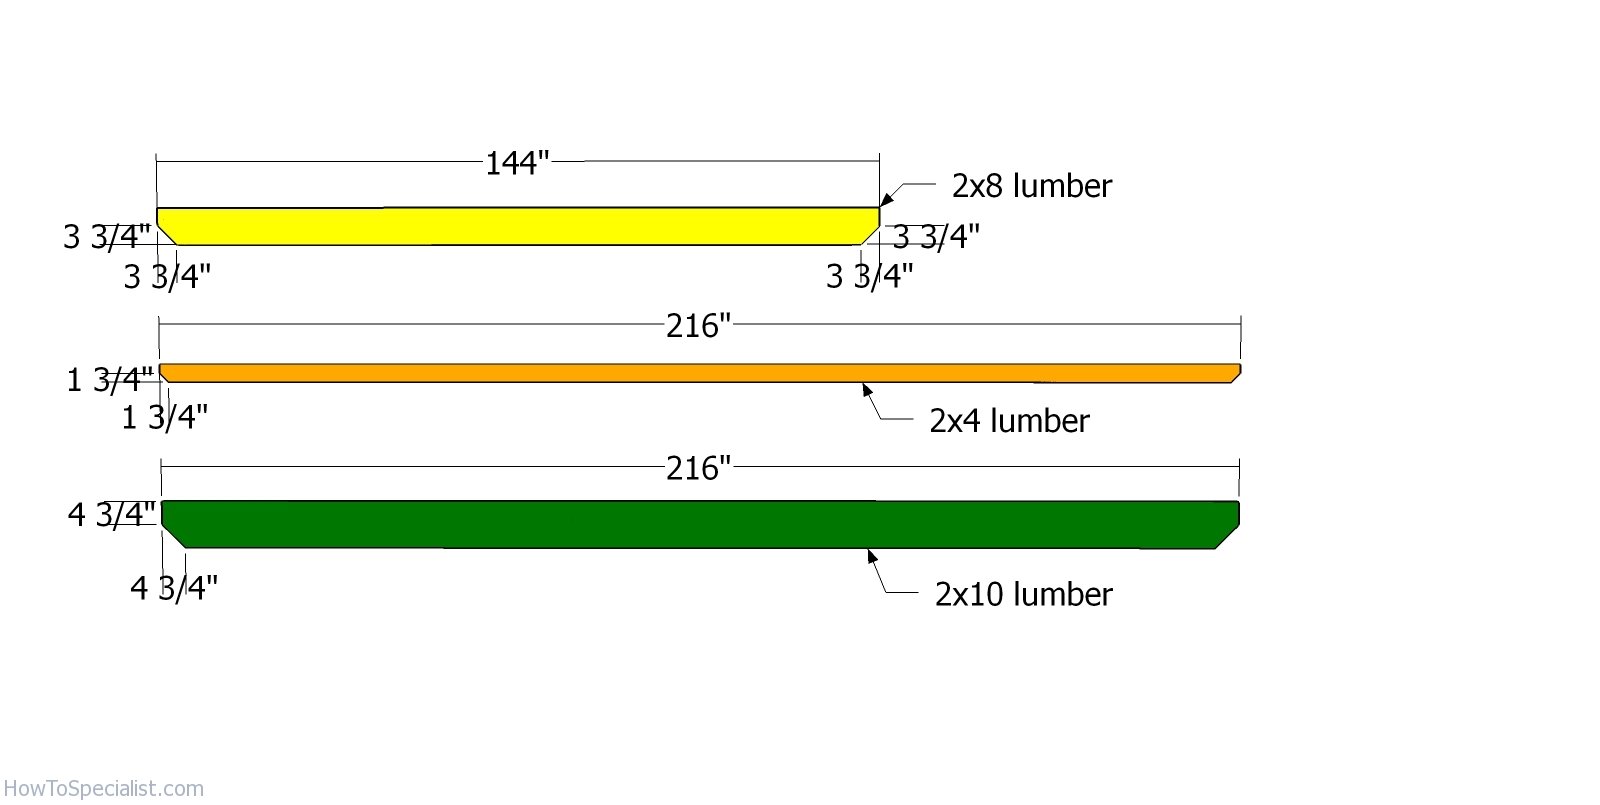
Cut the support beams and the shade elements using the info from the diagram. Mark the cut lines to the beams and get the job done with a circular saw. Smooth the edges with sandpaper. You should notice that the components are made from different materials.
Remember that you can make different style cuts to the ends of the rafters. You cannot be wrong because it’s all up to your skills and imagination.
Fitting the support beams
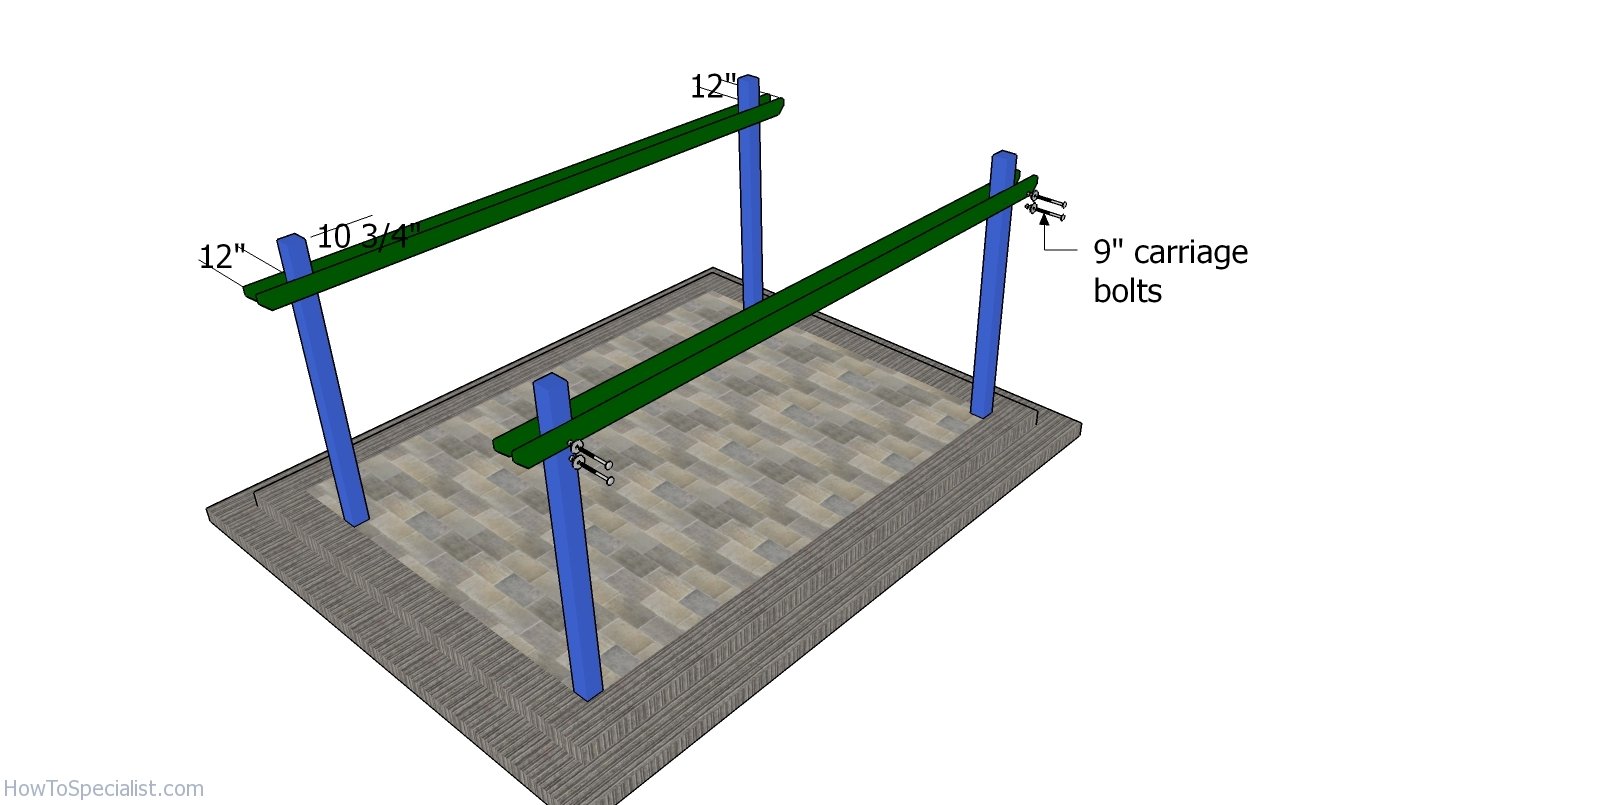
Align the 2×10 support beams to the posts then clamp them into place tightly. Use a spirit level to plumb the posts and to check if the beams are perfectly horizontal. Drill pilot holes through the 6×6 posts and through the beams. Insert 9″ carriage bolts (two for each joint) and lock everything tightly. Make sure the beams are horizontal and check if the corners are square
Fitting the rafter supports
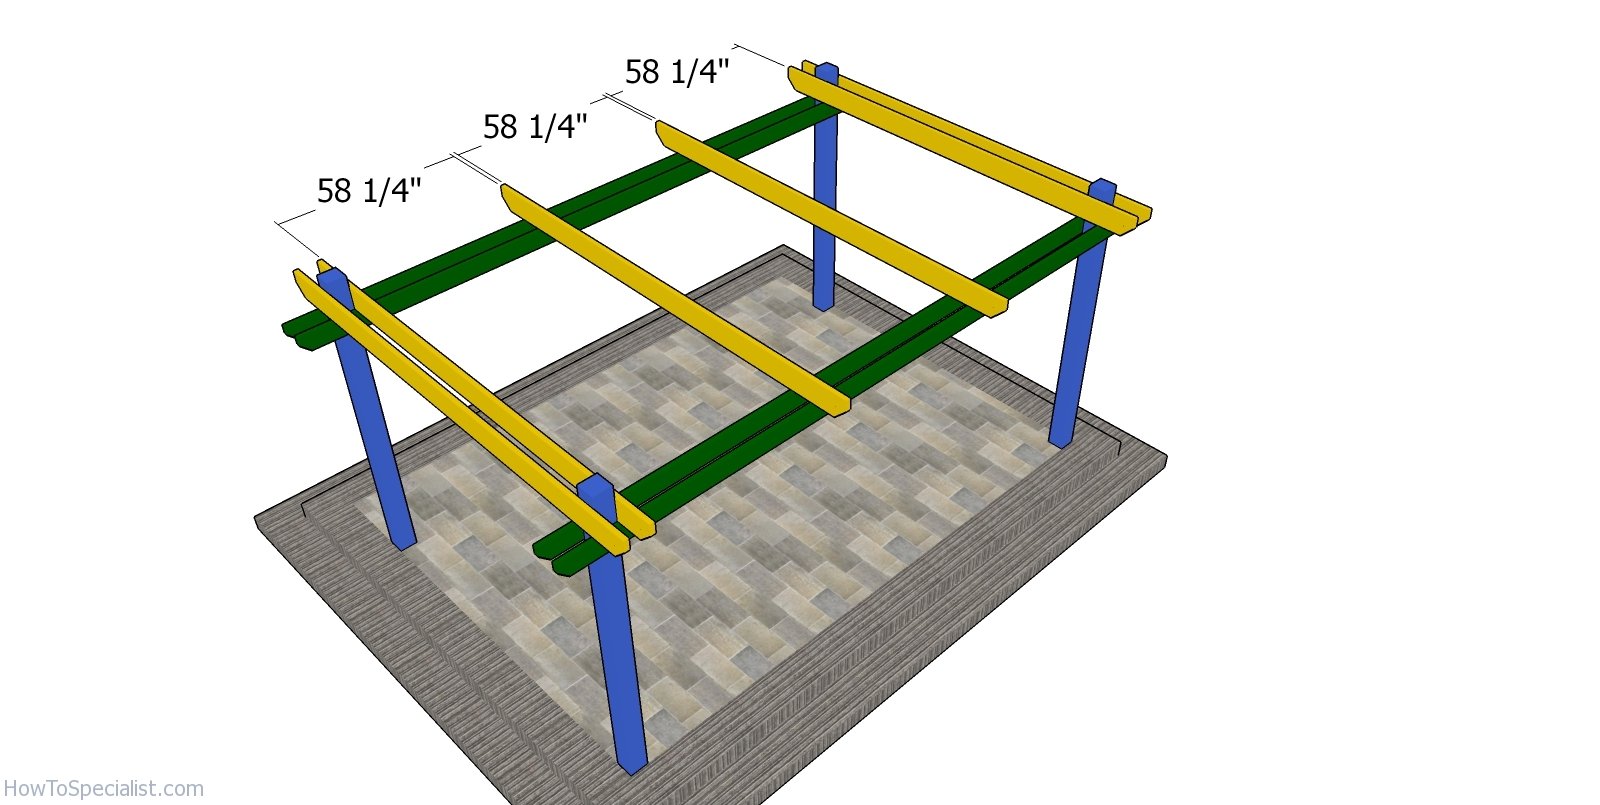
The next step of the project is to build the 2×8 beams to the pergola, as shown in the diagram. Leave 12″ overhangs on both ends of the beams. Clamp the beams to the posts, drill pilot holes and insert 3 1/2″ screws. Fit the middle beams into place with rafter ties and 1 1/2″ structural screws. The beams will support the rafters.
Braces
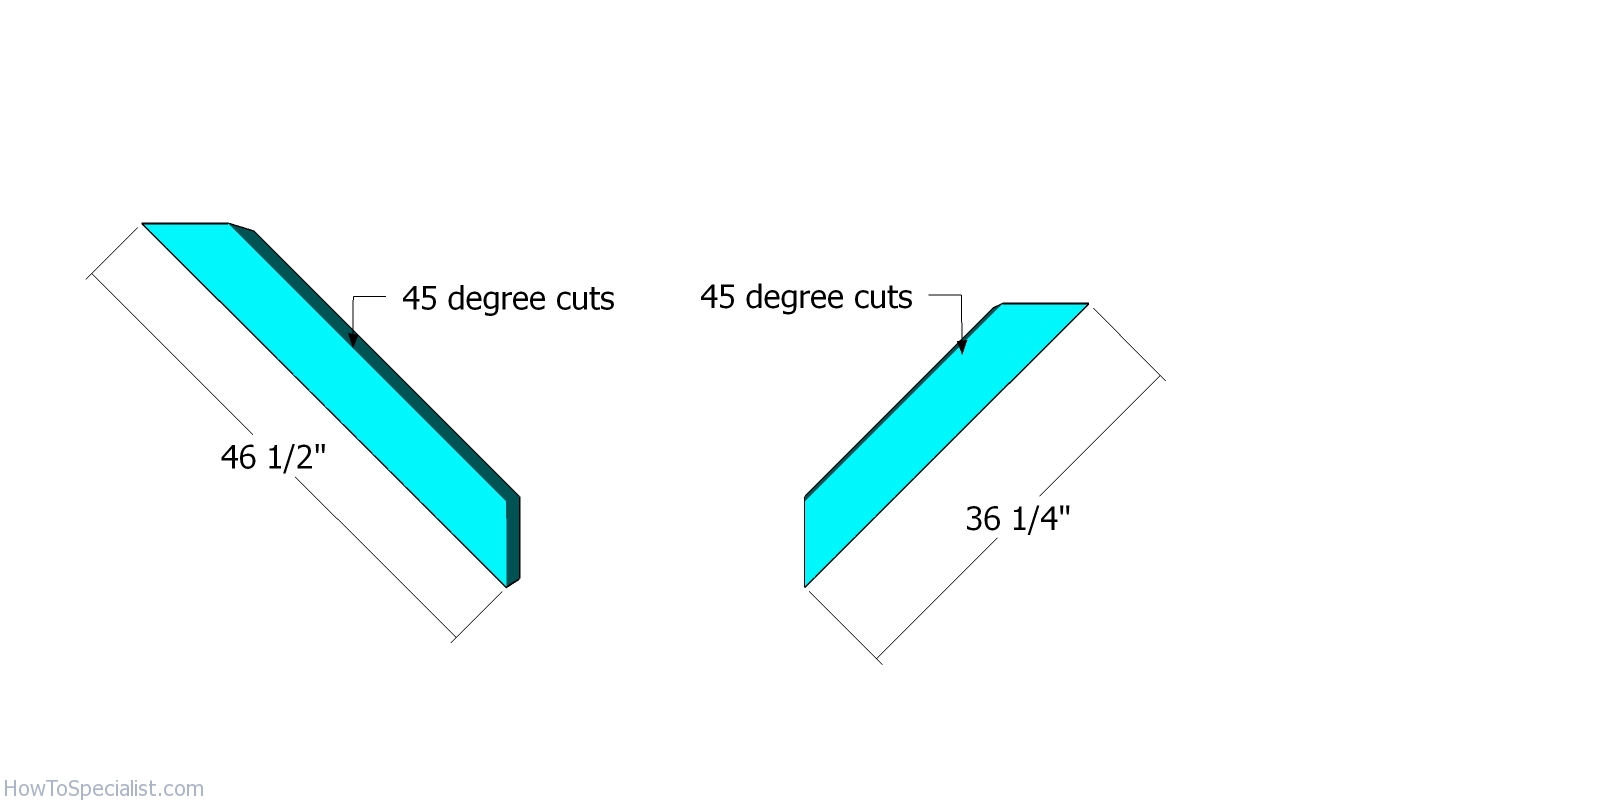
Use 6×6 lumber for the diagonal braces. Use a miter saw to make 45 degree cuts to both ends of the braces.
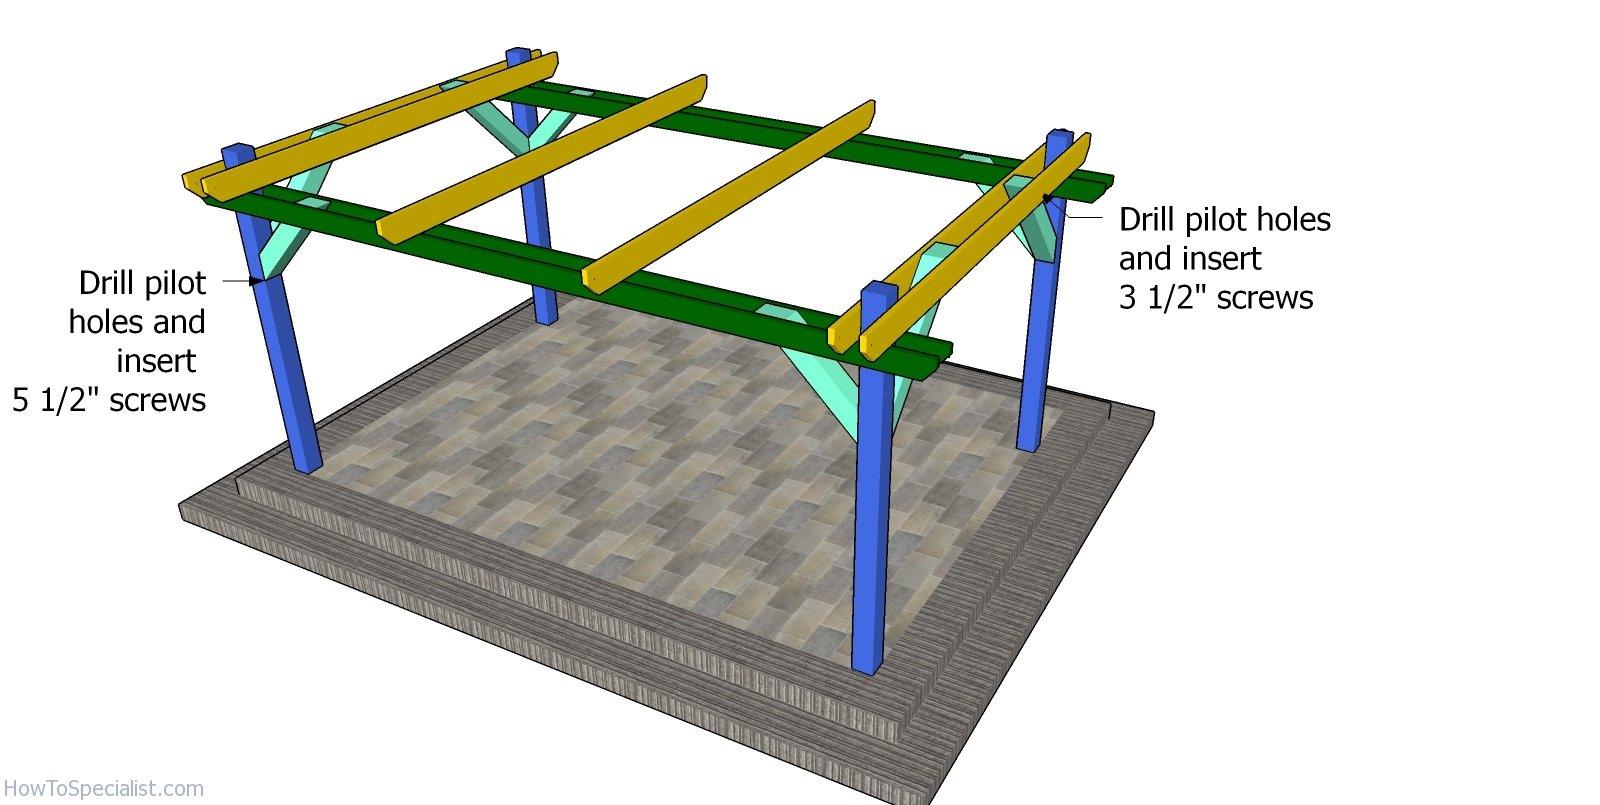
Fitting the braces
Fit the braces to the pergola, as shown in the diagram. Drill pilot holes through the beams and insert 3 1/2″ screws to lock them into place. Drill pilot holes through the braces and insert 5 1/2″ screws into the posts. Before setting the braces, plumb the posts with a spirit level.
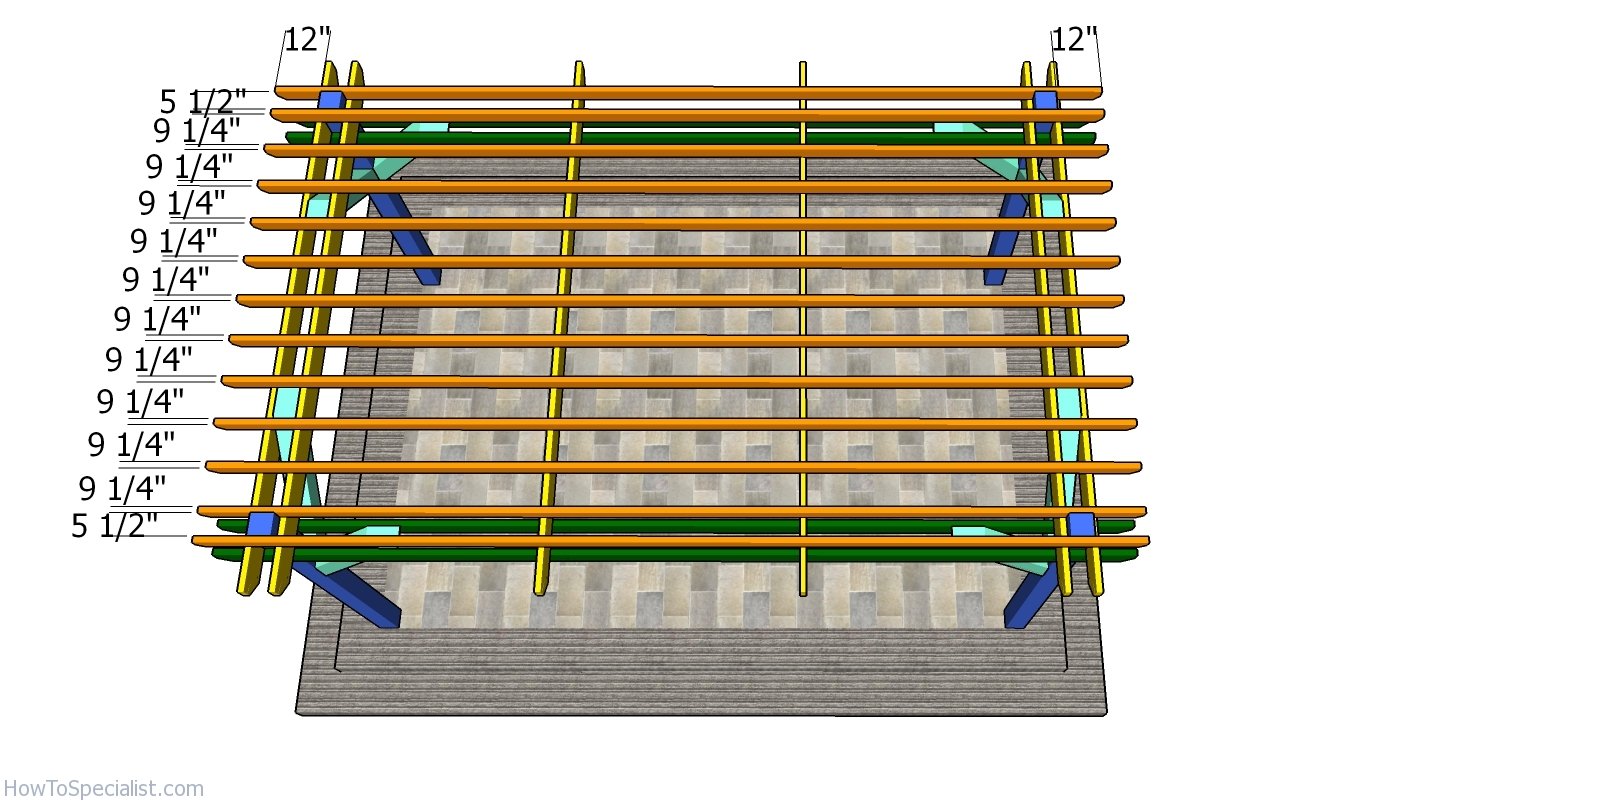
Top rafters
Fit the 2×4 shade elements to the top of the square pergola and place them equally spaced. Drill pilot holes and insert screws to lock them tightly to the support beams. Alternatively, you should use rafter clips to lock the components together tightly. You can adjust the size between the shade elements, so you let more or less light to the covered area.
Cut a piece of wood at 9 1/4″ and use it as spacer, so you can get even gaps between the rafters.
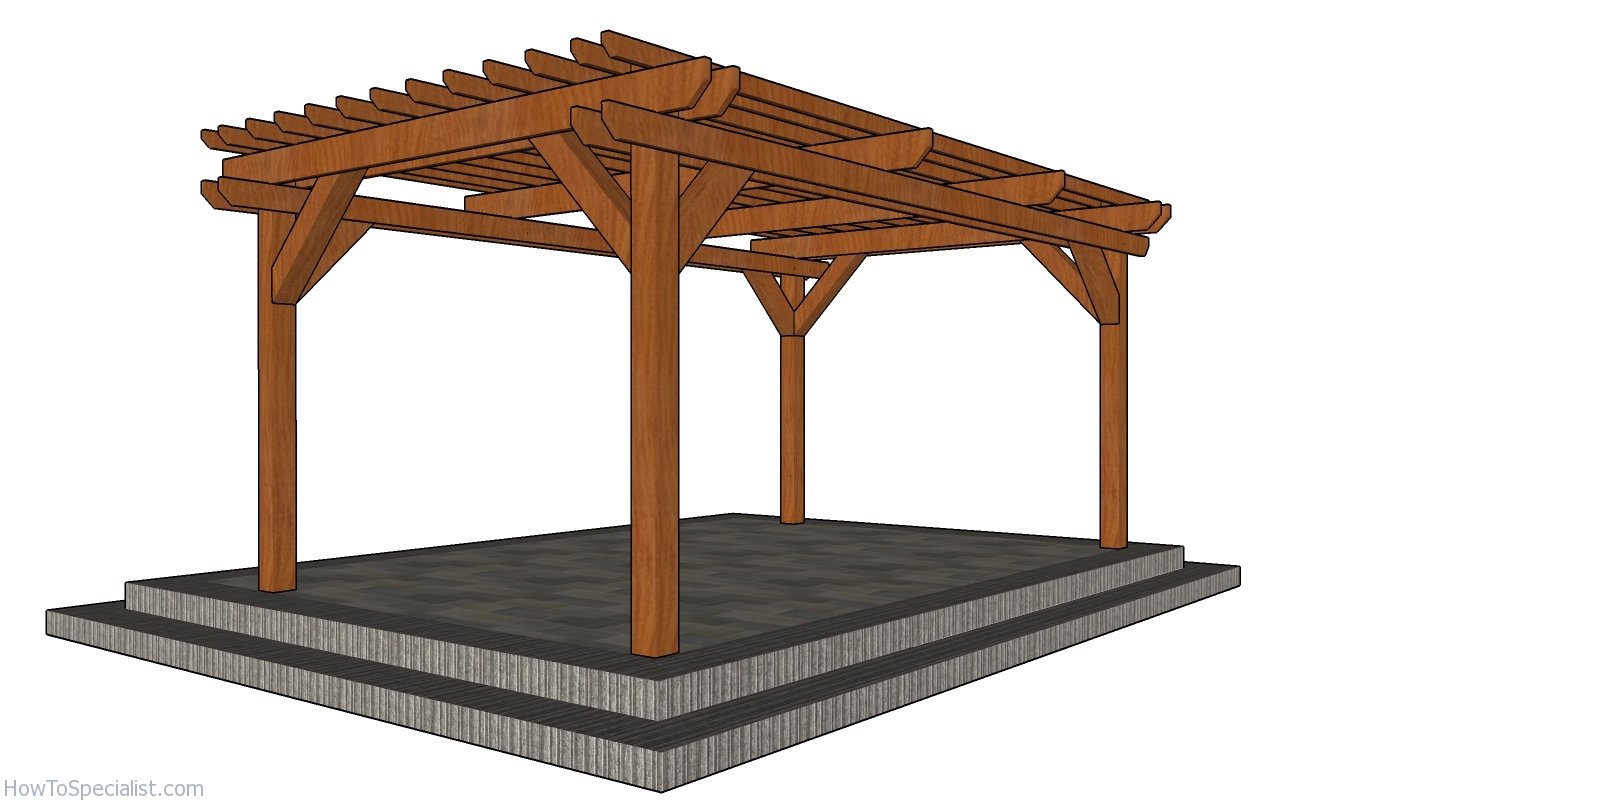
How to build a 10×16 pergola
This large rectangular pergola is from my point of vie the perfect compromise between area and costs. Therefore, there will be enough shade so you can hang out with family and friends during the weekends, as well as serving coffee on the chill summer mornings.

10×16 Pergola Plans – side view
Last but not least, you need to take care of the finishing touches. Fill the holes with wood putty and then smooth the surface with sandpaper. Apply a few coats of paint or stain to enhance the look of the components and to protect them from the elements. Since you are here, you might as well take a look over the 10×12 pergola plans.
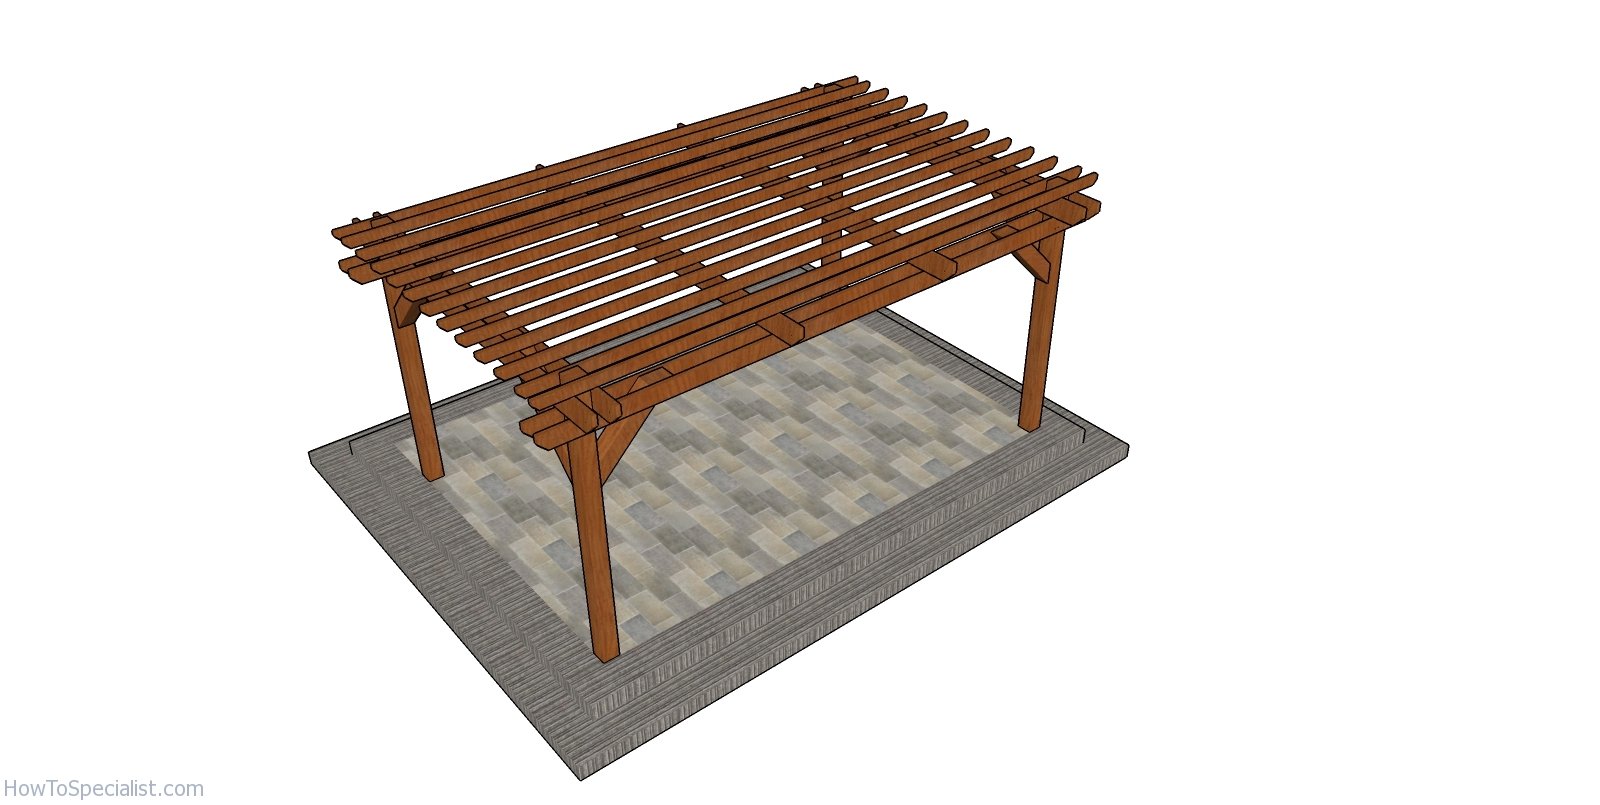
10×16 Pergola Plans
This 10×16 pergola is large enough for creating a really nice relaxation area in the backyard. With so much space you can fit a table, a few chairs and even a sofa. If you like my project, don’t forget to SHARE it on Facebook and Pinterest. See my other pergola plans, as well, for more building inspiration. See all my premium plans HERE.
My best tips to build a free standing pergola:
A free-standing pergola is a fantastic way to add structure, shade, and style to your outdoor space. Whether it’s a focal point for your garden or an elegant outdoor living area, a well-built pergola can transform your backyard. With the right tools and materials, building a pergola is a manageable DIY project. Here are my best tips for building a free-standing pergola that’s both functional and stylish.
1. Plan and Design Your Pergola
- Choose the Location: Decide where you want the pergola to be built. It should be placed in a flat, well-drained area, away from trees or structures that might obstruct the build. Consider whether it will provide shade for an outdoor dining area, serve as a garden feature, or be a standalone centerpiece.
- Determine the Pergola Size: Measure and mark the size of the pergola based on the intended use. A standard pergola is typically 10×10 feet or 12×12 feet, but you can adjust this depending on your space and needs.
- Consider the Height: The height of your pergola should be around 8-10 feet, providing enough headroom and allowing it to create a spacious, open feel.
- Check Local Building Codes: Before starting, check local building regulations and obtain any necessary permits. Some areas may have rules about the height and placement of outdoor structures.
2. Gather Materials and Tools
- Pressure-Treated Lumber or Cedar: Use pressure-treated wood or naturally durable wood like cedar or redwood for the posts, beams, and rafters. Cedar is a popular choice for its resistance to rot and insects.
- Concrete for Post Anchors: You’ll need concrete to set the posts securely in the ground, ensuring the pergola is stable.
- Post Brackets (Optional): If you want the pergola to be movable or want to avoid digging, use post brackets mounted to a concrete slab or wooden deck.
- Tools: Gather tools such as a post hole digger, level, saw, drill, hammer, measuring tape, and a tamper for packing the soil around the posts.
3. Mark and Prepare the Site
- Mark the Post Locations: Mark the location of each post with stakes and string to create the outline of your pergola. Measure diagonally between opposite corners to ensure the layout is square.
- Dig Post Holes: Using a post hole digger, dig holes for the pergola posts. The holes should be at least 2 feet deep and 12 inches in diameter to ensure a strong foundation. For extra stability, go deeper if you live in an area with heavy wind or unstable soil.
- Add Gravel for Drainage: Pour a few inches of gravel into the bottom of each hole to improve drainage and prevent water buildup around the posts.
4. Set the Posts in Concrete
- Place the Posts: Insert the 4×4 or 6×6 posts into the holes and use a level to ensure they are perfectly vertical. Brace the posts with temporary supports to hold them steady while you pour the concrete.
- Pour the Concrete: Pour fast-setting concrete into each hole around the post. Use a stick or shovel to mix the concrete with water according to the manufacturer’s instructions. Fill the hole up to the top and allow the concrete to set for at least 24-48 hours.
- Check for Level and Plumb: As the concrete sets, double-check that the posts are still level and plumb, adjusting them as needed.
5. Attach the Beams
- Cut and Prepare the Beams: Cut the horizontal beams (typically 2×6 or 2×8) to the appropriate length. These beams will span across the top of the posts to support the rafters.
- Secure the Beams to the Posts: Use carriage bolts, screws, or lag bolts to attach the beams to the top of the posts. Ensure the beams are level and evenly spaced, as they provide the main structure of the pergola.
- Double-Up the Beams (Optional): For extra strength, you can double up the beams on both sides of each post, sandwiching the post between two beams.
6. Install the Rafters
- Mark the Rafter Placement: Measure and mark the locations for the rafters on the beams. Space the rafters evenly, usually around 12-18 inches apart, depending on how much shade you want the pergola to provide.
- Cut and Notch the Rafters: Cut the rafters (typically 2×4 or 2×6 boards) to size. For added style and structural strength, notch the ends of the rafters where they will rest on the beams. You can also cut decorative shapes at the ends of the rafters to give your pergola a custom look.
- Attach the Rafters: Secure the rafters to the beams using galvanized screws or brackets. Ensure they are evenly spaced and level for a neat finish.
7. Add Cross Beams or Lattice for Shade (Optional)
- Add Shade with Cross Beams: To increase the amount of shade your pergola provides, install additional cross beams perpendicular to the rafters. These can be smaller 2×2 boards spaced evenly across the rafters.
- Install Lattice for Privacy: For more shade or privacy, consider installing lattice or a climbing structure between the posts or across the top of the pergola. This will also provide support for climbing plants like vines or ivy.
8. Anchor the Pergola for Stability
- Anchor the Posts in Concrete (for stability): If your pergola is in a windy area, consider anchoring the posts more securely by extending them deeper into the ground or using anchor bolts.
- Use Post Brackets on Concrete or Decks: If you’re building your pergola on a deck or concrete slab, use post brackets to secure the posts to the base, keeping the pergola sturdy.
9. Finishing Touches
- Sand and Smooth the Wood: Once the pergola is built, sand any rough edges and smooth the surface of the wood to prevent splinters.
- Stain or Paint the Pergola: Protect the wood by staining or painting the pergola. Use a weather-resistant finish to prolong the life of the wood and enhance the appearance. You can choose natural wood stains or bold paint colors to complement your outdoor décor.
- Add Lighting or Plants: Install string lights, hanging lanterns, or other decorative lighting to create ambiance under your pergola. You can also add hanging plants, climbing vines, or curtains for a cozy, intimate feel.
10. Maintain Your Pergola
- Inspect the Pergola Regularly: Over time, inspect the pergola for signs of wear, such as loose screws, cracks in the wood, or damaged finish. Regular maintenance will help extend its life and keep it looking great.
- Reapply Stain or Paint: Every few years, reapply stain or paint to protect the wood from the elements and refresh its appearance.
- Trim Plants as Needed: If you’ve added climbing plants or vines, make sure to trim them regularly to prevent them from overwhelming the structure.
Building a free-standing pergola is a rewarding DIY project that can greatly enhance your outdoor living space. Whether you’re looking to add shade, define a garden area, or create a stylish outdoor seating area, a pergola offers both beauty and function. By following these tips—choosing the right materials, ensuring a sturdy foundation, and adding finishing touches—you’ll create a pergola that will last for years and become a focal point in your yard.
Thank you for reading our project about free 10×16 pergola plans and I recommend you to check out the rest of the projects. Don’t forget to LIKE and SHARE our projects with your friends, by using the social media widgets. SUBSCRIBE to be the first that gets our latest projects.


10 comments
Do You have this plans in cm?
No.
Would love to download these free pergola plans, but I do not see a download link. Not sure how to get the “free” plans.
The plans are Free online. If you want to get the PDF file, you need to pay.
How many 3.5″ screws are you allocating for 2×10 and 6×6 connection at top. 1 each side or 2? Thanks.
2 screws for all joints
How would you complete the task using the 10′ 2×4’s instead of 18′?
You build a smaller pergola or you don’t build it at all
Where do i buy the pdf file for the 10×16 pergola
Hi Jack, i have a question. I have 8 ft 6x6s for posts like you’re plan states. They wont be set in concrete as my main deck frame is.i will have8 ft from deckface up torwards the roof but when i subtract the 10.75 and the width of my 2×10, its shows 76 inches to bottom of 2x10x18 to deck face. That seems low. Am I figuring something wrong.