This step by step article is about free wooden gazebo plans. Building a square wooden gazebo in your backyard is a complex project, taking into account the skills you have to master and the tools and materials required to get the job done properly. Nevertheless, if you choose the right plans for your needs, tastes and budget, and use the right woodworking techniques, you can get the job done in a professional manner. Hiring a professional contractor or buying a gazebo kit are also options for you, but if you have a limited budget, probably a diy project is the best choice.
Choosing the right plans and design for the gazebo is a real challenge, as there are so many alternatives. From our experience, you should write down the required features and budget on paper, from the very beginning. Next, you should design the gazebo taking into account the materials and tools you need, as well as the woodworking techniques required for the job. Buy lumber designed for outdoor use (pressure treated, cedar lumber, pine), otherwise your gazebo won’t be durable.
Lay out the wooden gazebo in a professional manner, by using batter boards and string. Build several concrete footings and insert metal anchors to support the 4×4 wooden posts. Align the posts properly before inserting the screws, otherwise the gazebo won’t have a symmetrical look. Select the lumber with great care, before building the components, as to make sure it is perfectly straight and without visible damage. See all my Premium Plans in the Shop.
RELATED PROJECTS:
Made from this plan
In order to build a wooden gazebo, you need the following:
- 8′ long 4×4 wooden posts
- 3, 6” long nails / screws
- Tube forms
- 2×6 wooden boards
- 2×2 balusters
- Cement, sand, gravel
- 2 1/2″ screws
Tools
- Safety gloves, glasses
- Circular saw, Hammer, spirit level, carpentry pencil
- Ladder, Posthole digger
- Power mixer
Tips
- Use batter boards to lay out the gazebo
- Use adjustable anchors to set the posts
- Secure the posts with braces, before inserting the screws
Time
- Two weekends, two workers
Wooden gazebo plans
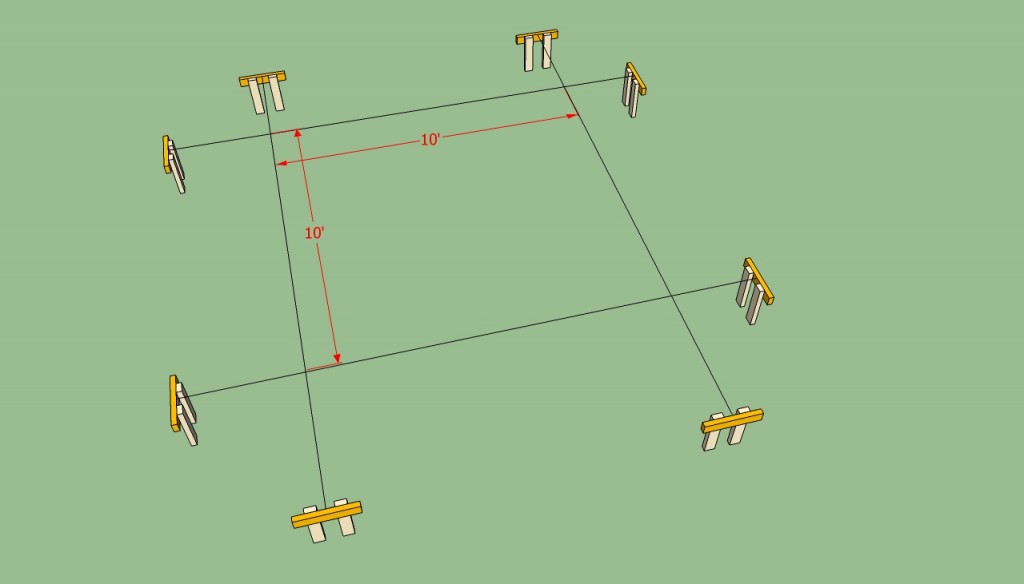
Laying out square gazebo
Lay out the wooden gazebo, after you have selected the location in your backyard. If you want to get the job done properly, we recommend you to build several batter boards (from 2x4s) and use string to lay out the gazebo.
Measure the diagonals of the square or rectangle and adjust the string, until they are perfectly equal. In this manner, all the four corners of the gazebo will be right angled.
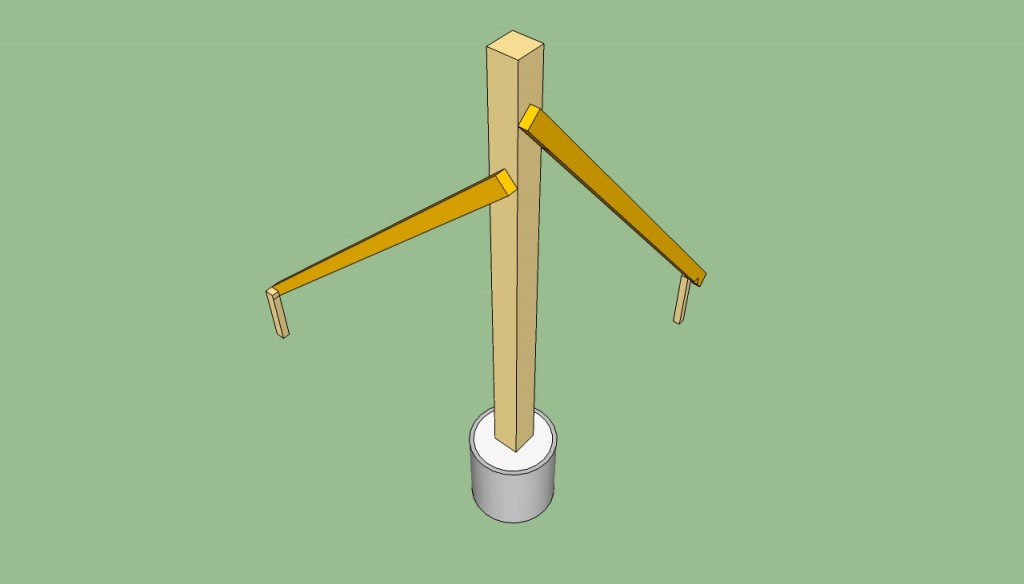
Building a gazebo
Next, you have to dig about 3′ (8” below the frost line) in order to build the concrete footings. Pour a 4” layer of gravel and compact it thoroughly. Place the tube forms in the holes and fill them with concrete. Don’t forget to install the metal anchors in the concrete.
Let the concrete dry out for 48 hours before installing the posts into place. Plumb the posts with a level, brace them with several 2×4 and afterwards drive in the screws.
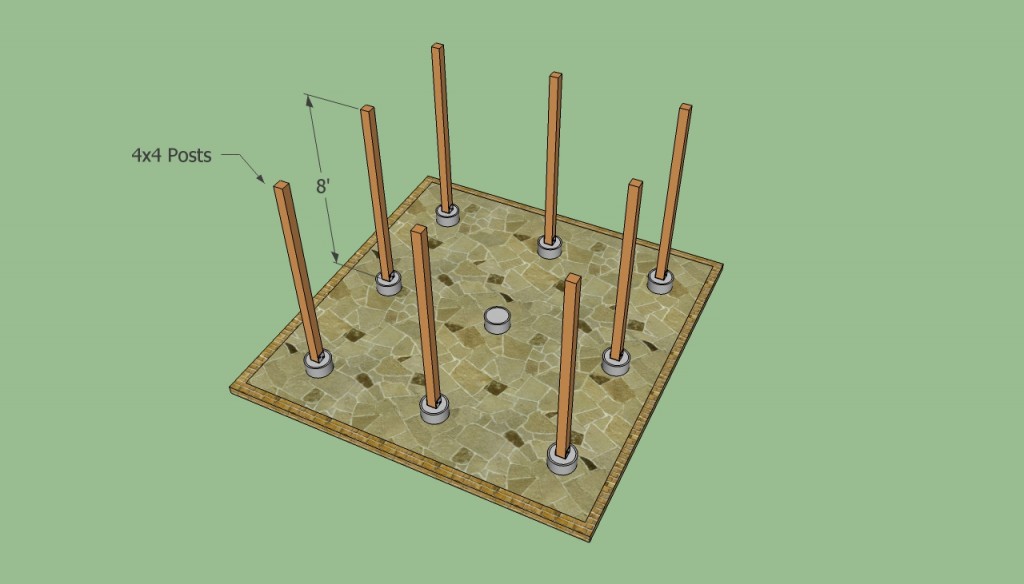
Installing wooden posts
When installing the posts, you have to make sure they are perfectly plumb and aligned one with another, otherwise the wooden gazebo won’t have a neat look. Secure the posts tightly into position with several screws, in order to build a rigid structure.
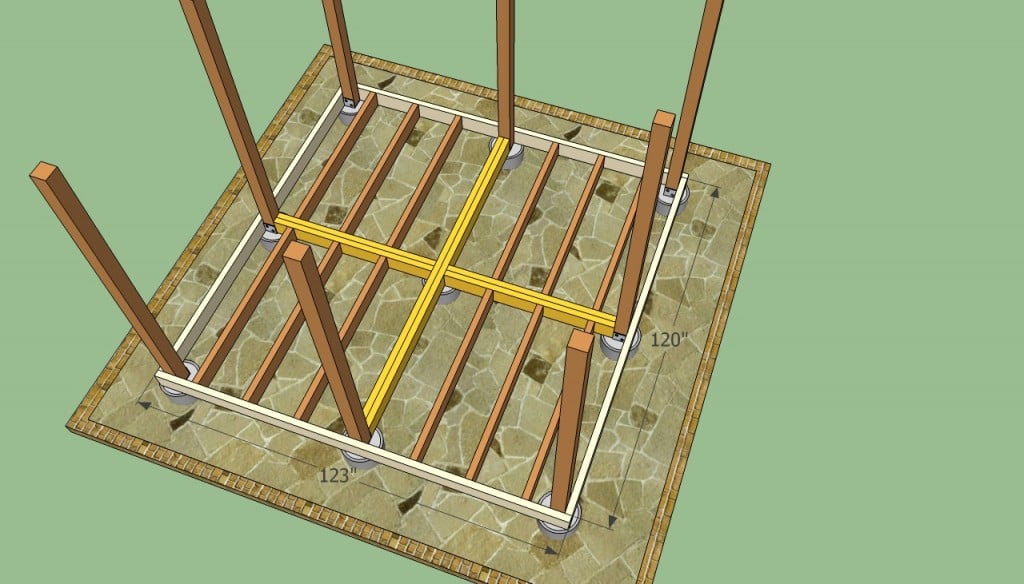
Square gazebo floor plans
Building the floor of the wooden gazebo is an essential step of the construction process, therefore you have to work with good judgement and attention. Therefore, start by installing perimeter joists and the middle joists, as in the image.
Secure the perimeter joists to the posts with 4” screws, after you have leveled them with a spirit level. Next, anchor the middle joists to the perimeter beams with metal hangers or corner brackets.
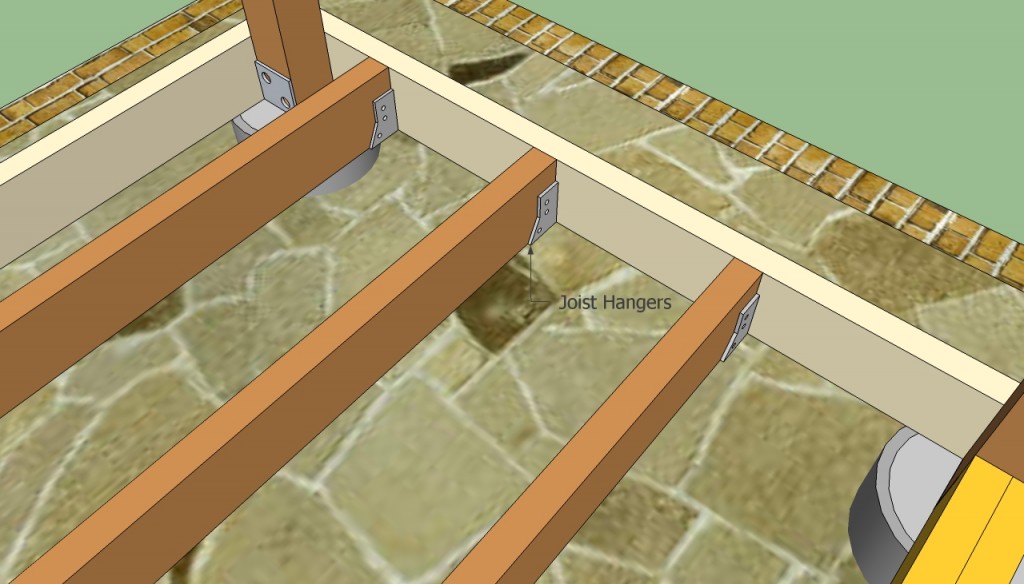
Fastening joists to perimeter beams
Afterwards, you have to set the rest of the 2×6 joists into position by using metal hangers. Place the joists every 16” on center, making sure they are equally spaced.
Use a spirit level to ensure the joists are perfectly horizontal, otherwise you won’t be able to install the decking boards properly. Select the beams with great care, making sure the lumber is straight and in good condition.

Installing decking boards
After you have installed the joists into place, you should continue your woodworking project by attaching the 2×4 decking boards. Use a circular saw to cut the boards and install them into place with 2 1/2” screws.
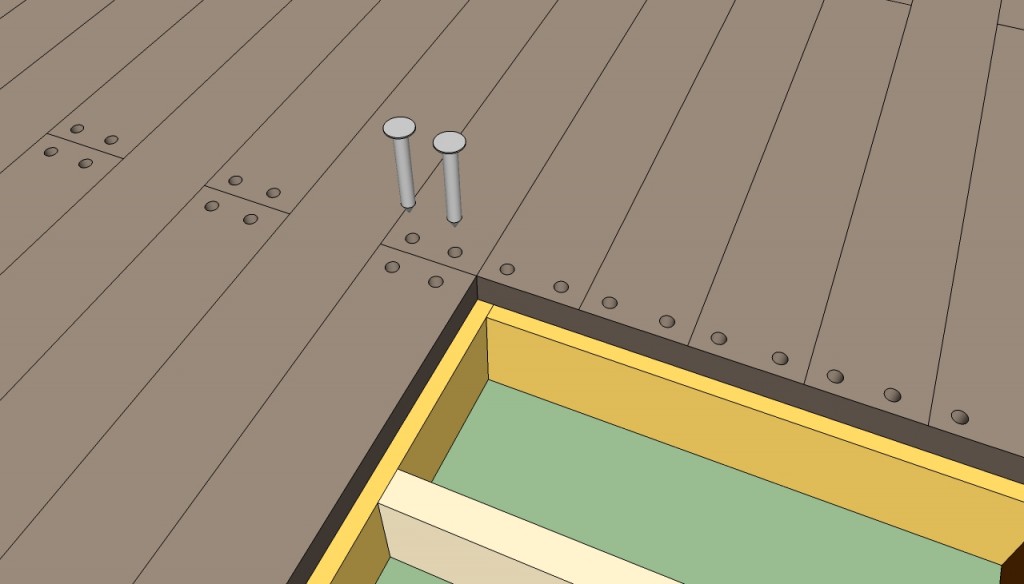
Securing decking with screws
As you can see in the image, you have to drill pilot holes in the decking boards and then insert the screws / nails. In most of the cases, we recommend you to leave at least 1/10” between the decking boards. In order to obtain consistent gaps, you should place a nail between the boards.
The pilot holes should be drilled at least 1/2” from the edges of the decking boards, to avoid wood from splitting.
Free gazebo roof plans
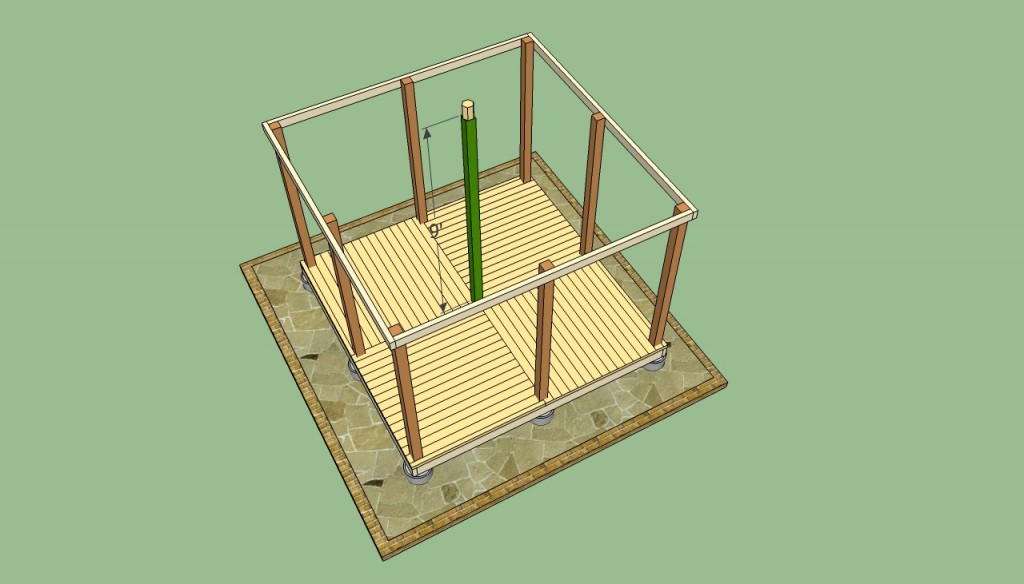
Square gazebo top plate
Build the top plates of the gazebo from 2x4s and fasten them into position with 4” screws. Nevertheless, if you want to build a nice frieze for your wooden gazebo, you should place the top plates on top of the posts.
Next, you have to build the hub of the roof, from a 3” long 4×4 post. Cut the corners of the posts, as to get a octagon. Next, place the hub on top of a 9-10′ post, as in the image.
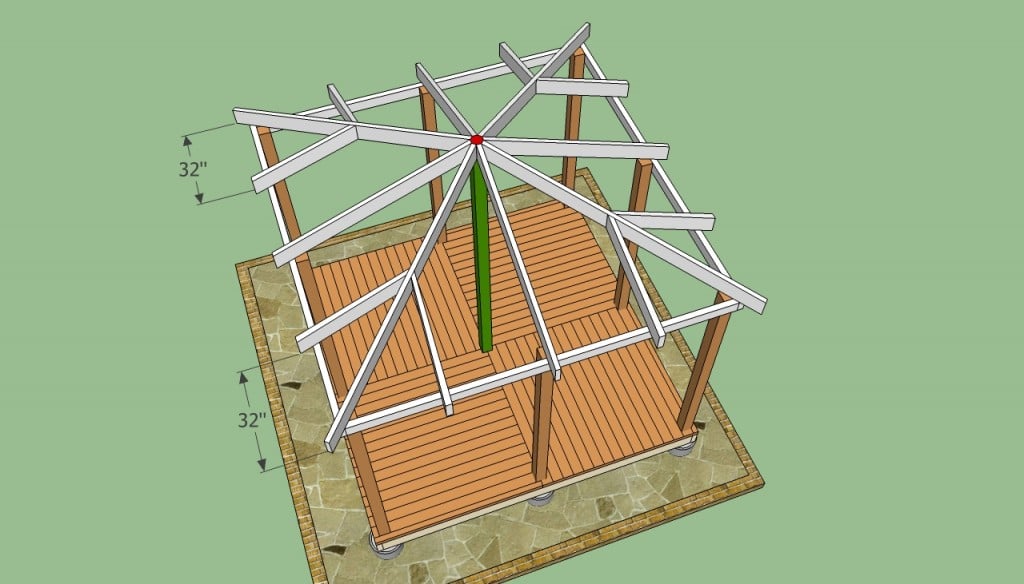
Wooden gazebo roof plans
Afterwards, you have to build the rafters and anchor them into place with several screws. At one end, you should drive in screws through the rafters in the hub, while at the other end, you have to attach the rafters to the top plates.
Drill pilot holes through the rafters before inserting the screws, to prevent the wood from splitting. Make sure you place the rafters equally spaced on all sides of the wooden gazebo.
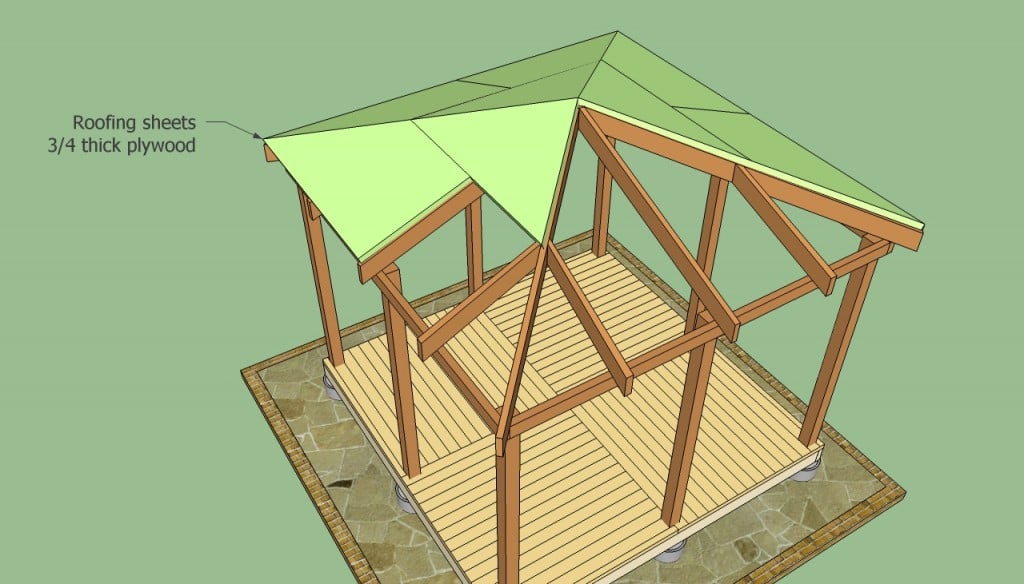
Installing the roofing sheets
Next, after you have set the rafters and the hub into place, you should install the roofing sheets. In most of the cases, you should use 3/4 plywood to get the job done properly, but there are situations in which you can also attach 1×6 wooden boards to the rafters.
Regardless of your choice, you should properly secure the tongue and groove plywood sheets or boards to the rafters, by using 2” screws.
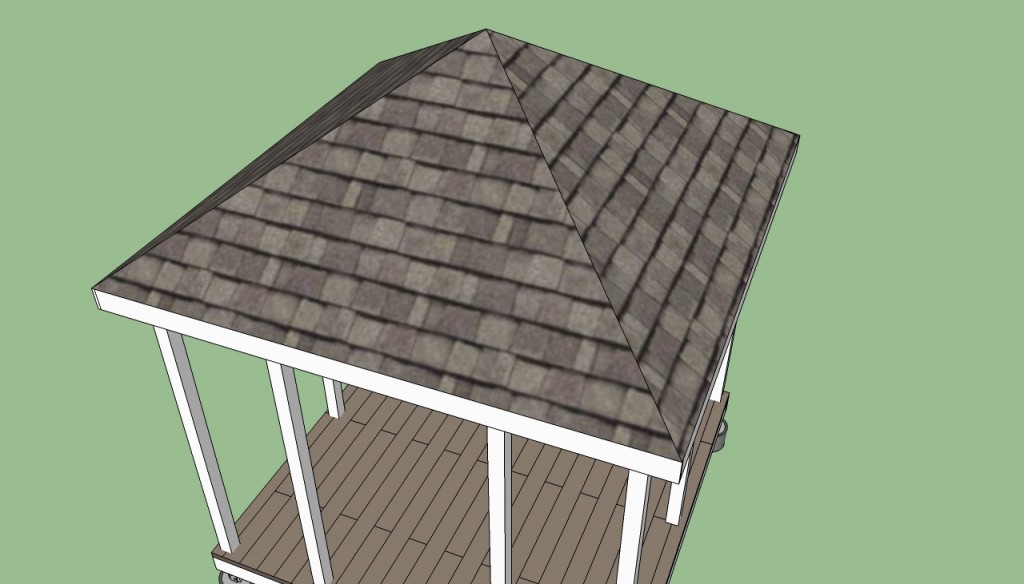
Installing asphalt shingles
Next, you have to install roofing paper over the roofing sheets and draining caps. Afterwards install asphalt shingles, wooden shingles or metal sheets to protect the gazebo from rain or snow. Start the installation with the bottom of the roof, towards the top. Afterwards, install the ridge cap shingles, after you have cut the ridges from regular shingles.
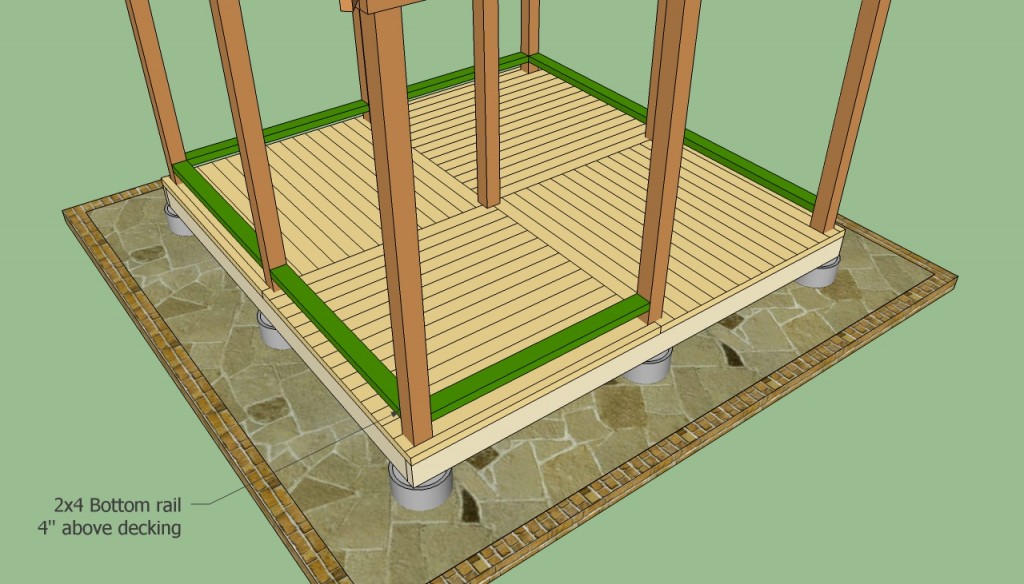
Installing bottom rail
Building the rail of the wooden gazebo is not a complex procedure, if you follow our plans and use the right techniques. Therefore, you should install first the 2×4 bottom rails, about 4” above the flooring of your gazebo.
Use metal brackets to secure the bottom rail, after you have aligned and leveled them properly. Don’t forget to leave a panel opened, to serve as entrance.

Installing gazebo railings
Next, place a 2×2 nailing cleat between the posts, as in the image. Usually the 2×2 balusters should have around 30”, but you can adjust their height according to your needs and tastes. Afterwards, place a 2×4 top rail over the balusters.
Secure the balusters to the bottom rail by toenailing them, or insert screws through the bottom plate directly in the balusters. Plumb the balusters with a spirit level.

Wooden gazebo plans
Sand the wooden gazebo with medium-grit sandpaper (120) and apply several coats of protective paint, in order to avoid water damage or wood decay. Don’t forget to fill the gaps with wood putty, before sanding the wooden surfaces, if you want to get a nice look. Make sure you check out my 12×12 gazebo with screens plans, because I have put a lot of work into it. Full Cut & Shopping lists included!
Thank you for reading our article about free wooden gazebo plans and we recommend you to check out the rest of our projects. Don’t forget to SHARE our projects with your friends, by using the social media widgets. LIKE us on Facebook to be the first that gets the latest updates and to help us create more free plans for you.

3 comments
I just want a direct link to the PDF. I do not want to ad an extension to chrome…
You don’t need any extension. See this: http://howtospecialist.com/faq/
How many feet do the footing have to be apart from each other?