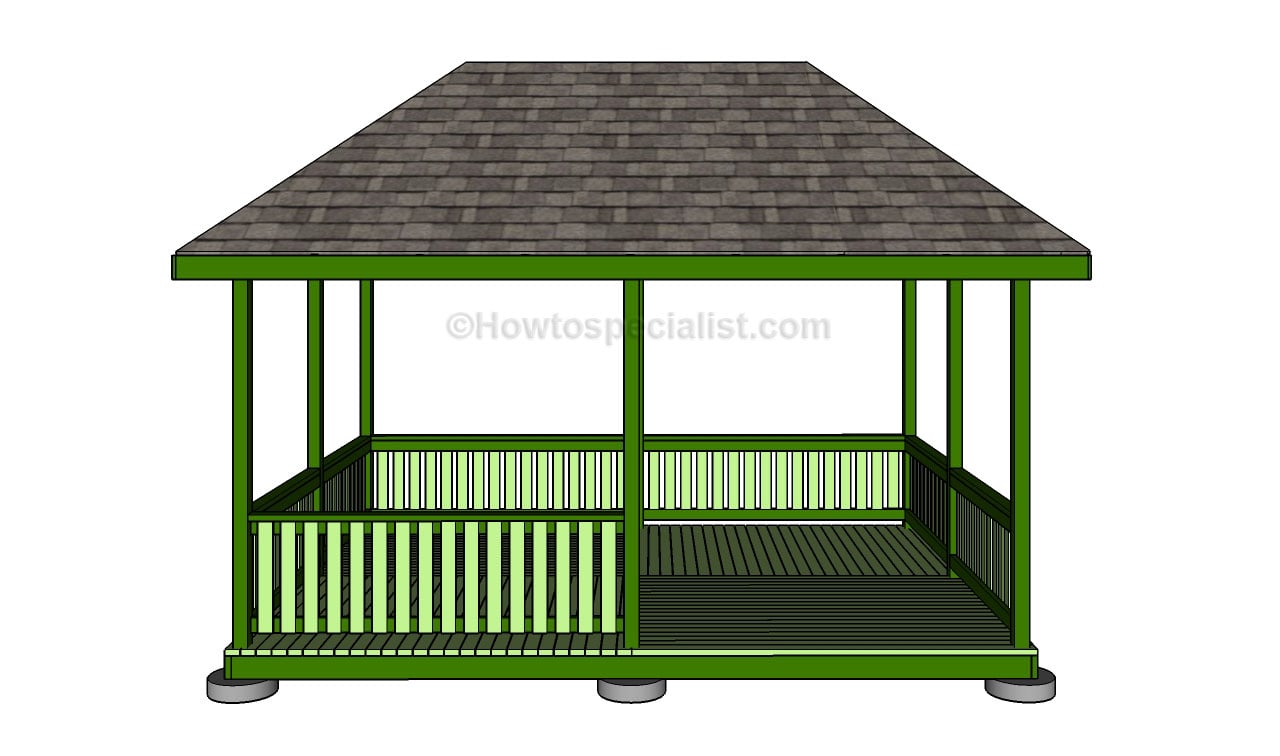
This step by step diy project is about how to make a gazebo. Building a 12×16 rectangular gazebo is easy, especially if you use proper plans and materials. Due to the high amount of information, we have split the project in two parts. In this article we talk about building the floor and the railings, while in the second part of the project we show all you have know about building the roof.
There are several things that you should take into account when making a gazebo. Therefore, we recommend you to study the local building codes and to pay attention to all the legal requirements, starting with the materials used, up to the depth of the footings. Always use quality materials and professional tools, if you want to make a rectangular gazebo with a neat appearance.
If you have a significant budget, you should invest in quality lumber, such as cedar, pine or redwood. Make sure the components are weather-resistant and they fit properly into place, before drilling pilot holes and inserting the galvanized screws. You can choose from may designs when building the railings, so you should study the alternatives before starting the woodworking project. See all my Premium Plans in the Shop.
Made from this plan
In order to make a gazebo, you need to use the following:
Materials
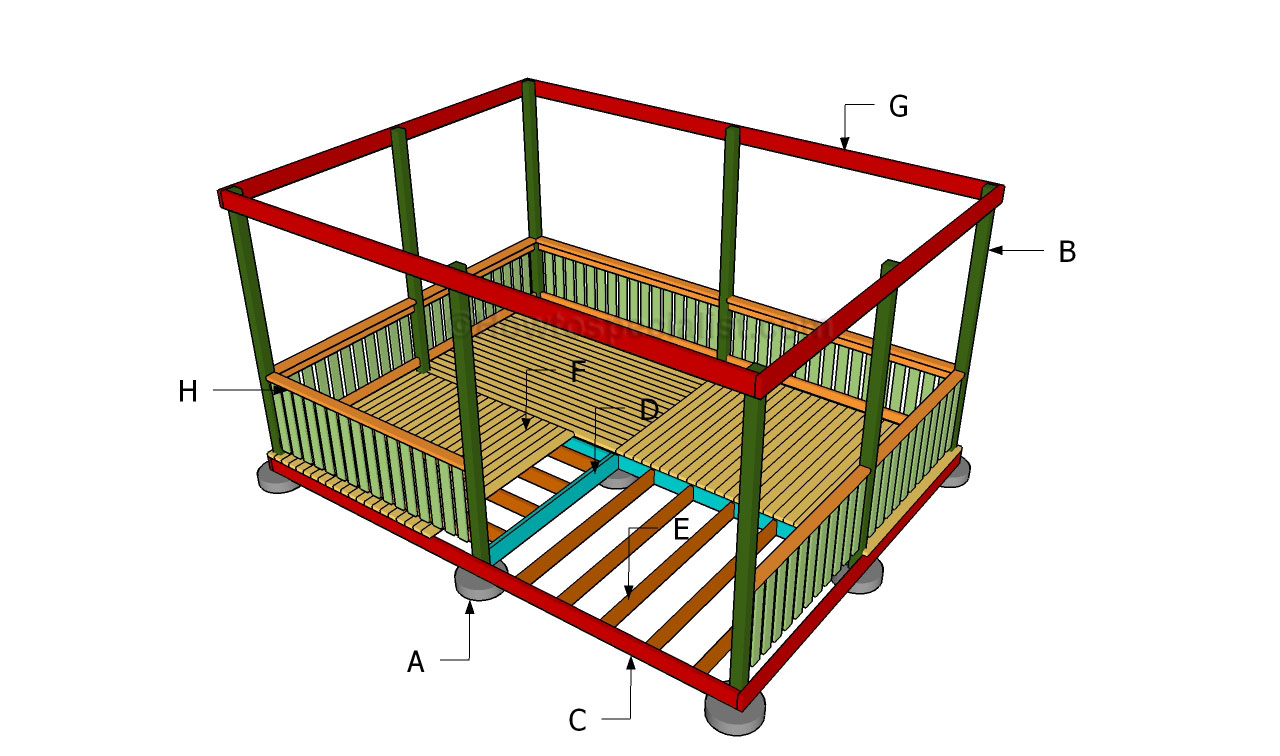
- A – sand, cement, gravel, 8 pieces of tube forms FOOTINGS
- B – 8 pieces of 4×4 lumber – 130″ long POSTS
- C – 2 piece of 2×6 lumber – 144″ long, 2 pieces – 189″ long RIM JOISTS
- D – 4 pieces of 2×6 lumber – 66 1/4″ long, 1 piece – 182″, 2 piece – 89 1/2″ long MIDDLE JOISTS
- E – 10 piece of 2×6 – 69 3/4″ long, 8 pieces of 2×6 – 93” long JOISTS
- F – 40 pieces of 2×4 lumber – 96″ long, 52 pieces of 2×4 lumber – 72″ long DECKING
- G – 2 piece of 2×6 lumber – 144″ long, 2 pieces – 189″ long TOP RAILS
- H – 9 pieces of 2×4 lumber – 89 1/4″, 12 pieces – 65 1/4″, 92 pieces – 27″ RAILINGS
- sand, cement, gravel, 8 pieces of tube forms
- 8 pieces of 4×4 lumber – 12 ft
- 5 pieces of 2×6 lumber – 16 ft
- 4 pieces of 2×6 lumber – 12 ft
- 24 pieces of 2×6 lumber – 8 ft
- 49 pieces of 2×4 lumber – 8 ft
- 50 pieces of 2×4 lumber – 12 ft
- 2 1/2″ screws
- 1 1/4″ screws
- glue, stain
- wood filler
Tools
- Safety gloves, glasses
- Miter saw, jigsaw
- Chalk line, tape measure, spirit level, carpentry pencil
- Drill machinery and drill bits
Tips
- Apply several coats of wood stain to the wooden components
- Fill the holes with wood filler and smooth the surface
Time
- One Day
Related
- Part 1: How to make a gazebo
- Part 2: How to build a gazebo roof
- How to build a gazebo
- Gazebo designs
Building a rectangular gazebo

Building a rectangular gazebo
How to make a gazebo
The first step of the project is to lay out the rectangular gazebo in a professional manner. Therefore, use batter boards and string to mark the outline of the gazebo, as you can easily notice in the image. Check if the corners for squareness using a carpentry square and measure the diagonals of the rectangle. Make the necessary adjustments as to get a professional result.
Setting the 4×4 posts of the gazebo is a complex and essential part of the building process, there fore you should tackle it with attention and good judgement. As you can see in the image, you need to dig 2-3′ deep holes (at least 6″ under the frost line) and compact a 2″ layer or gravel on the bottom. Fit tube forms and pour a small quantity of concrete before fitting the posts into place.
Let the concrete to dry out for several days, before installing the rim joists. Cut the 2×6 joists at the right size and lock them to the exterior of the posts with 3 1/2″ wood screws. Drill pilot holes trough the components in order to prevent the wood from splitting. In addition, level the rim joists with a spirit level, in order to make sure the floor will he horizontal.
In order to lock the joists into place, we recommend you to use joist hangers. As you can see in the plans, you need to attach the metal hangers to the rim joists, using 1 1/4″ galvanized screws. Make sure hangers are equally spaced and the at the same level.
Fitting the middle joists is the next step of the project. As you can easily notice in the image, you need to attach the joists to the middle posts and lock them with galvanized screws. Drill pilot holes at both ends of the components, at angle, and insert the screws after making sure the joists are horizontal.
The next step of the project is to install the intermediate joists. As you can notice in the image, you need to cut the 2×6 lumber at the right size and attach them into place, using metal hangers. Place a spirit level on top of the joists, in order to check if the floor frame is perfectly level. It is essential to align the joists every 16″, in order to distribute the weight properly.
Installing the decking boards is a straight-forward process, but you need to choose a pattern and a design that fits your needs. As you can notice in the image, you need to use 2×4 or 2×6 boards and lock them to the joists with 2 1/2″ galvanized screws. It is essential to drill pilot holes before inserting the screws and to countersink their heads.
In addition, place a nail between the slats. In this manner, the water will drain properly and the components will be protected against excessive moisture.
Secure 2×6 components to the top of the posts and lock them into place with 3 1/2″ wood screws. Use a spirit level to make sure the top plates are horizontal.
Building gazebo railings
Building railings for your gazebo is easy, but the real challenge is to choose a design that fits the style of your house and garden. First of all, you need to install 1×4 cleats between the posts and lock them into place with 3 1/2″ galvanized screws.
Attach 1×4 slats to the cleats and secure them into place with 1 1/4″ screws. As you can easily notice in the image, you need to drill pilot holes trough the slats and place them every 2″. Read the local building codes, as to choose the right size and shape for the gazebo railings.
Last but not least, we recommend you to take care of the finishing touches. Fill the holes with wood filler and let it to dry out for several hours. Afterwards, smooth the wooden surface with fine-grit sandpaper and vacuum the residues.
Thank you for reading our project about how to make a gazebo and we recommend you to check out the rest of the projects. Don’t forget to LIKE and SHARE our projects with your friends, by using the social media widgets.
<< Previous | Next >>


