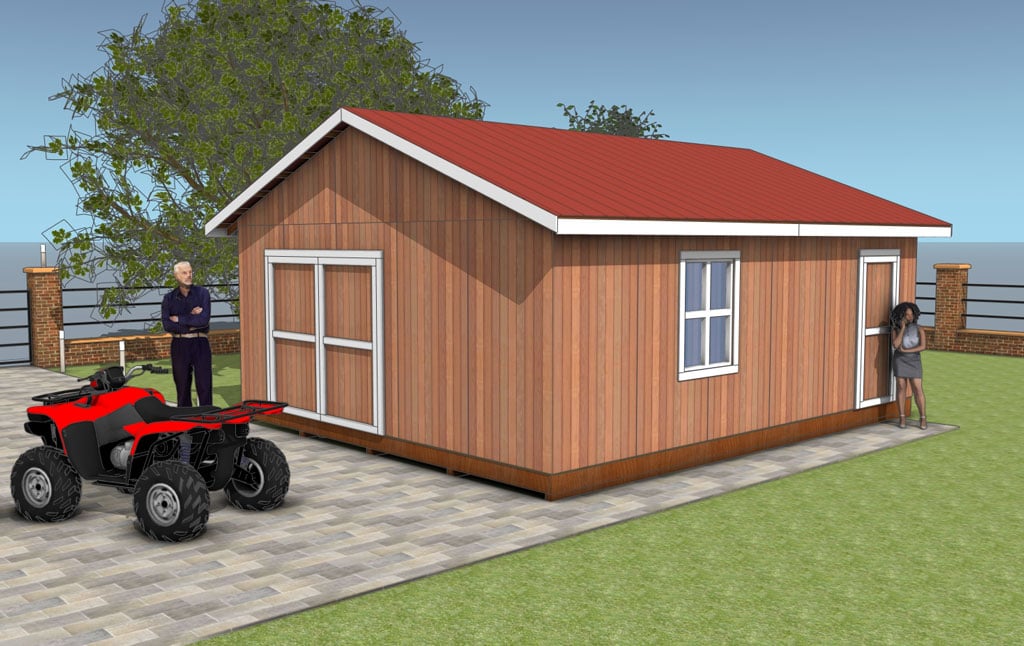
This step by step woodworking project is about 20×24 gable shed plans. This shed is perfect for anyone needing some extra storage space or a new workshop area. It features a set of 8 ft double doors right up front, making it super easy to move big items in and out. Plus, there’s a handy window and a side door for extra convenience and light. The roof is sturdy and built with trusses, topped off with durable metal roofing to keep everything inside safe and dry. Let’s dive into the details and get building!
Let’s talk about the budget for this 20×24 shed. For the lumber, siding, roofing, doors, windows, and all the hardware, you’re looking at around $3,000 to $5,000, depending on local prices and material choices. This includes everything from the 2×8 floor joists, 2×4 wall studs, T1-11 siding, metal roofing, and all the screws and nails to get the job done right. See my other DIY projects HERE. PDF downloadable plans with premium features in the Store.
We recommend you to invest in the best materials you could afford. Therefore, you should buy weather-resistant lumber, such as pine or cedar. Always take accurate measurements before adjusting the size of the components at the proper size. Drill pilot holes trough the components before inserting the wood screws, to prevent the wood from splitting. My plans come with a full cut / shopping list and they are PDF Download and Print friendly. See all my Premium Plans HERE.
Made from this plan
Pin for later!
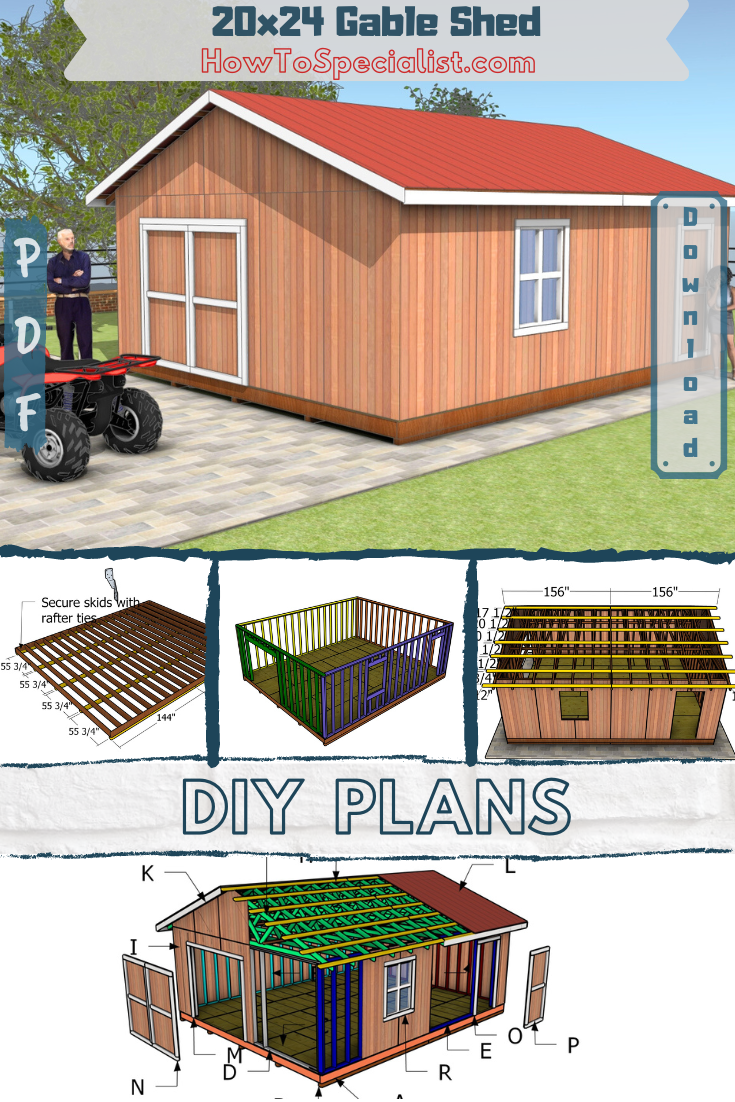
20×24 Gable Shed – DIY Plans
Building-a-20×24-gable-shed
Materials
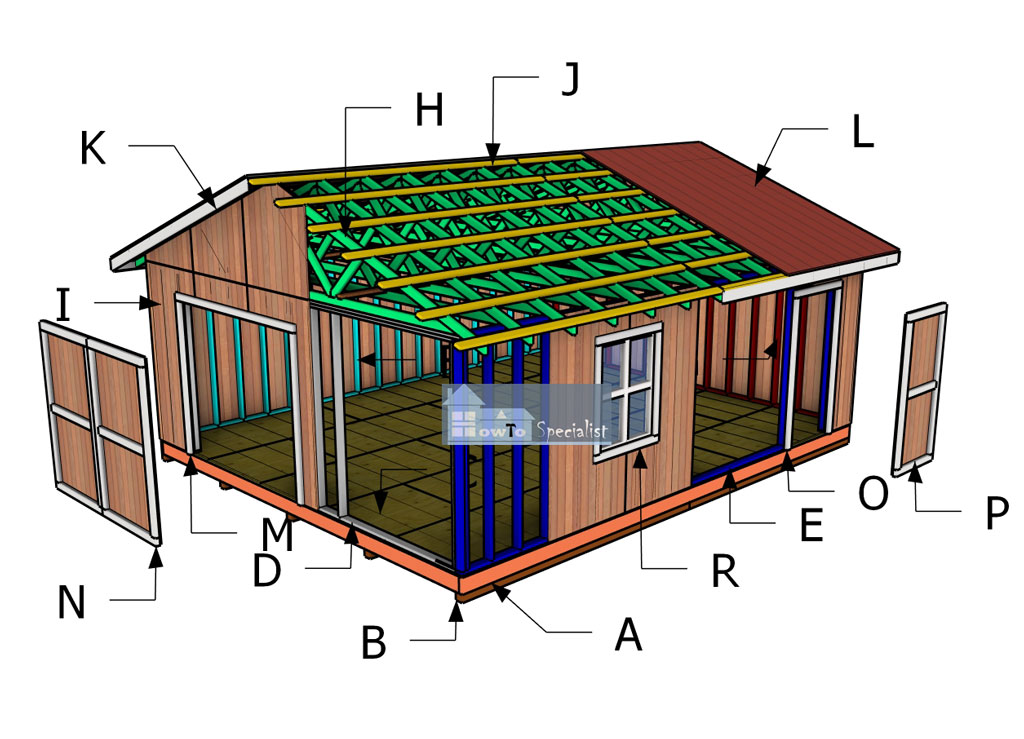
- A – 2 pieces of 2×8 lumber – 24 ft long, 19 pieces – 237″ long FLOOR FRAME
- B – 10 pieces of 4×4 lumber – 12 ft long SKIDS
- C – 13 pieces of 3/4″ plywood – 48″x96″ long, 4 pieces – 48″x48″ long FLOOR
- D – 1 piece of 2×4 lumber – 30 3/4″ long, 1 piece – 106 1/4″ long, 1 piece – 233″ long, 1 piece – 240″ long, 11 pieces – 91 1/2″ long, 2 pieces – 78 1/2″ long, 8 pieces – 5 3/4″ long, 2 pieces of 2×8 lumber – 99″ long FRONT WALL
- E – 2 pieces of 2×4 lumber – 24 ft long, 1 piece – 281″ long, 1 piece – 25 3/4″ long, 1 piece – 226 1/4″ long, 19 pieces – 91 1/2″ long, 2 pieces – 78 1/2″ long, 4 pieces – 25″ long, 8 pieces – 7 1/2″ long, 2 pieces – 48″ long, 6 pieces of 2×6 lumber – 39″ long SIDE WALL WITH WINDOW
- F – 2 pieces of 2×4 lumber – 24 ft long, 1 piece – 281″ long, 21 pieces – 91 1/2″ long SIDE WALL
- G – 1 piece of 2×4 lumber – 233″ long, 1 piece – 240″ long, 16 pieces – 91 1/2″ long BACK WALL
- I – 21 pieces of 5/8″ T1-11 siding – 48″x96″ long, 1 piece – 48″x16″ long, 4 pieces – 48″x21 3/4″ long, 4 pieces – 48″x39 3/4″ long, 2 pieces – 48″x48 3/4″ long EXTERIOR PANELS
- H – 2 pieces of 2×4 lumber – 144″ long, 1 piece – 240″ long, 2 pieces – 28 1/2″ long, 2 pieces – 57 3/4″ long 13xTRUSSES
- J – 28 pieces of 2×4 lumber – 156″ long PURLINS
- K – 4 pieces of 1×6 lumber – 156″ long, 4 pieces of 1×6 lumber – 145 1/2″ long ROOF TRIMS
- L – 18 pieces of metal roofing – 3’x12′ ROOFING
- M – 2 pieces of 2×4 lumber – 80″ long, 1 piece – 103″ long JAMBS
- N – 2 pieces of 2×4 lumber – 73″ long, 2 pieces – 48″ long, 1 piece – 41″ long, 1 piece of T1-11 siding – 48″x80″ long 2xDOOR
- O – 2 pieces of 2×4 lumber – 80″ long, 1 piece – 43″ long JAMBS
- P – 2 pieces of 2×4 lumber – 73″ long, 2 pieces – 36″ long, 1 piece – 29″ long, 1 piece of T1-11 siding – 36″x80″ long DOOR
Tools
- Miter saw
- Circular saw
- Drill machinery, drill bits
- Safety gloves, glasses
- Chalk line, tape measure, spirit level, carpentry pencil
Time
- One week
20×24 Gable Shed – Building the frame
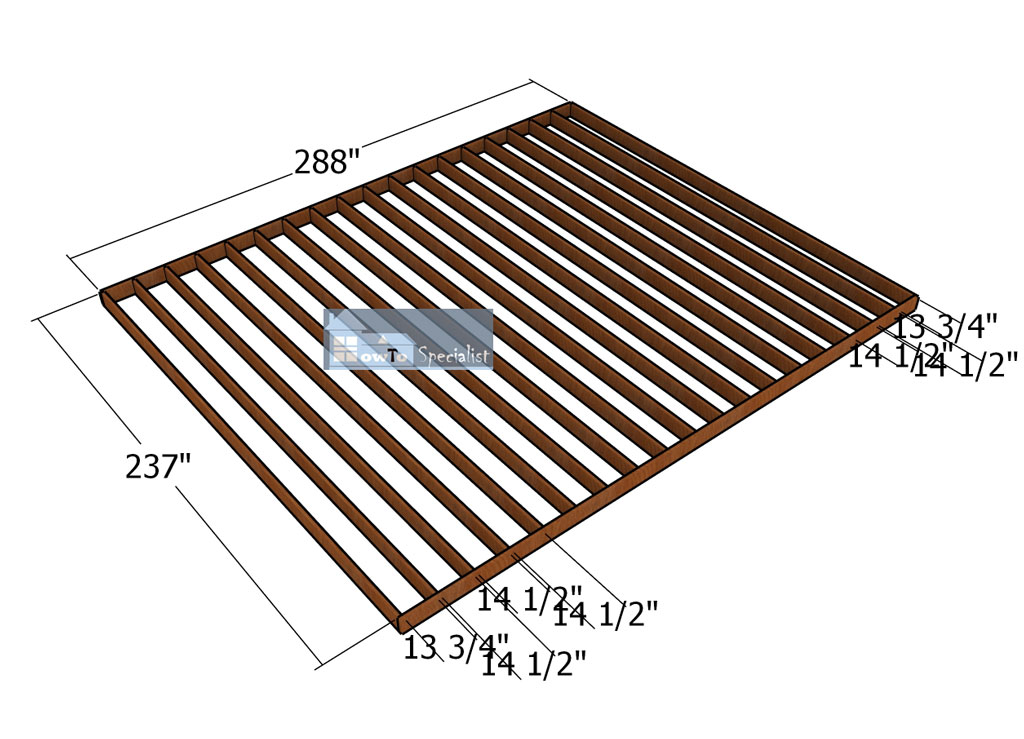
Floor-frame—20×24
The first step in building our 20×24 storage shed is to construct the floor frame using 2×8 lumber for the joists. Begin by cutting the joists according to the diagram. Drill pilot holes through the long beams and secure them to the perpendicular joists using 3 1/2″ screws.
Place the joists every 16 inches on center, ensuring that the corners are square and the edges are aligned flush. This will create a solid and sturdy foundation for the shed.
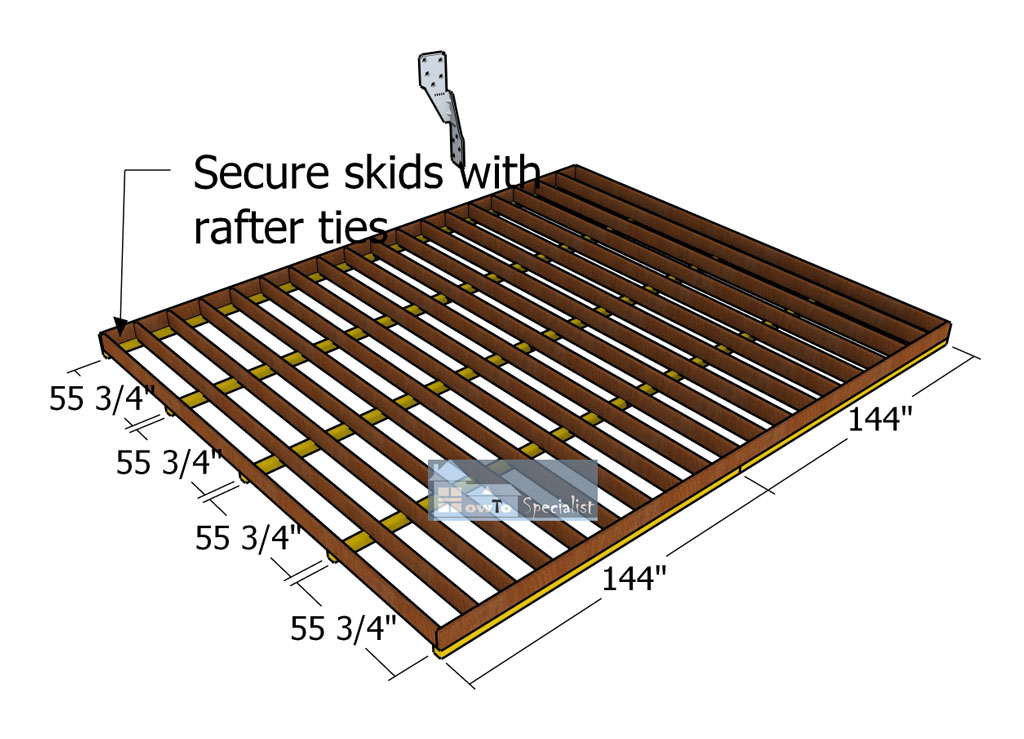
Fitting-the-skids
Next, use 4×4 lumber for the skids and place them under the floor frame. Secure the skids to the floor frame using rafter ties. Select the location for your shed and remove any vegetation. Make sure to level the surface thoroughly so the shed sits tightly in place.
Use a spirit level to ensure the floor frame is horizontal. Measure the diagonals of the floor frame and adjust until they are perfectly level. To help with water drainage and protect the shed components from moisture, compact a 4-inch layer of gravel under the shed frame.

Attaching-the-floor-sheets
Next up, use 3/4″ tongue and groove plywood sheets for the floor. It’s worth investing in pressure-treated plywood since the floor will be exposed to moisture. Cut the sheets to the dimensions shown in the diagram and cut list.
Make sure to leave no gaps between the sheets and align the edges flush. Drill pilot holes and secure the sheets into place with 1 5/8″ screws, spacing them every 8 inches along the framing. This will give you a sturdy, durable floor for your shed.
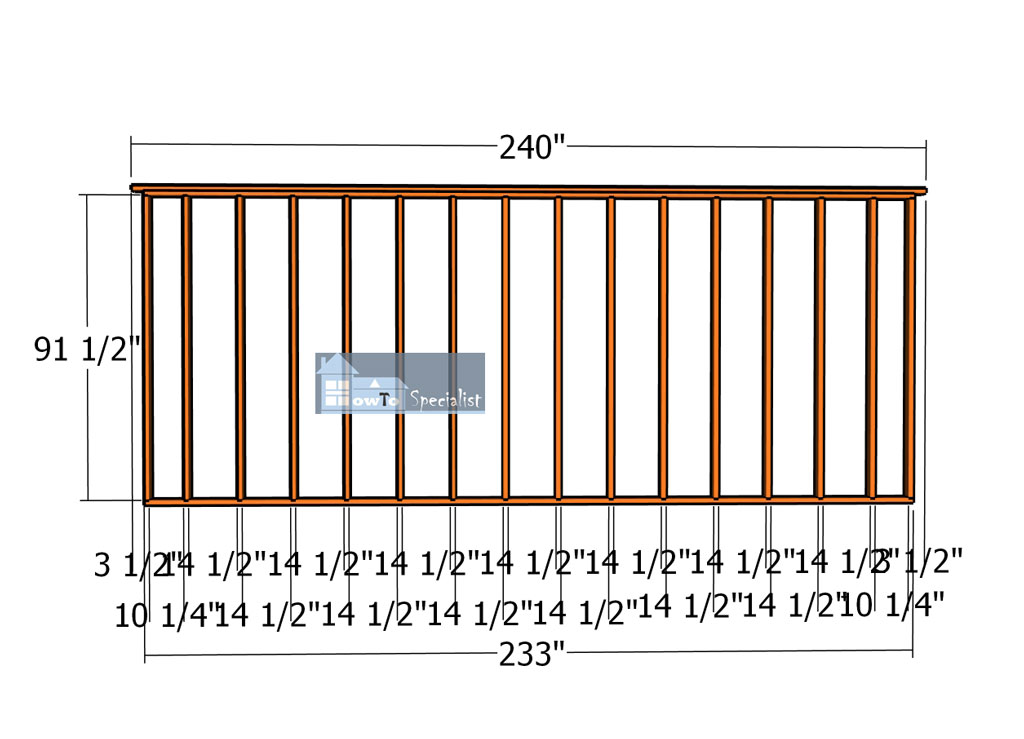
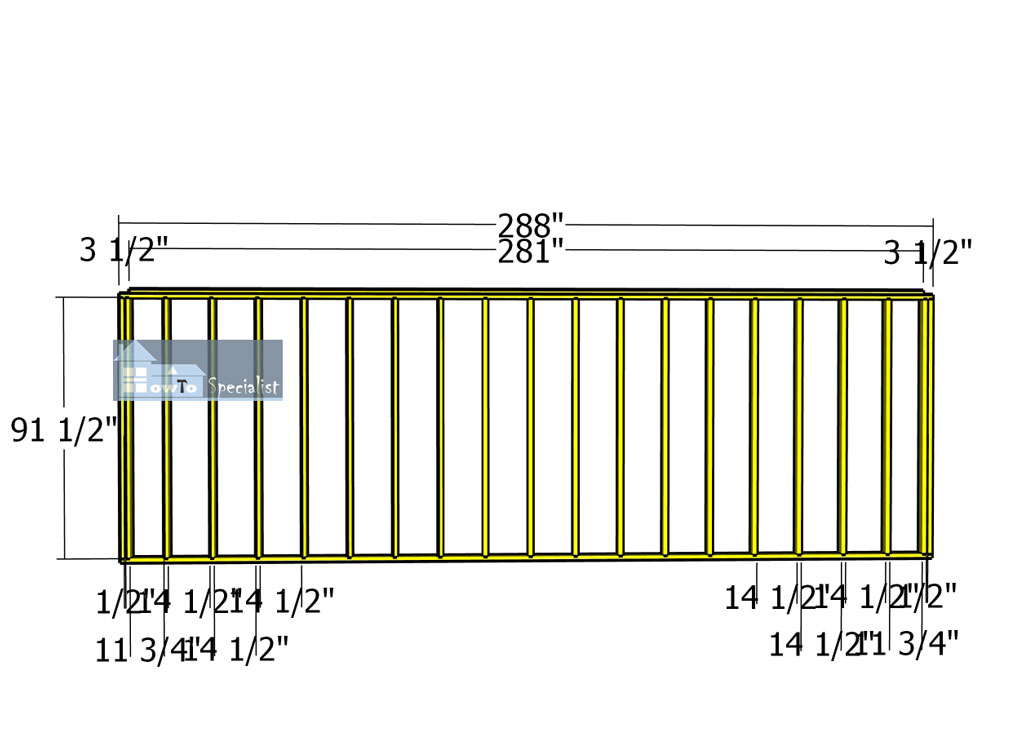
Back-wall-frame
Now let’s move on to the back wall frame. Use 2×4 lumber and cut the components to the right dimensions as shown in the diagram. Drill pilot holes through the plates and assemble the wall frame using 3 1/2″ screws.
Make sure your corners are square and the edges are aligned flush. Place the studs every 16 inches on center. This will create a strong and reliable frame for your shed’s back wall.
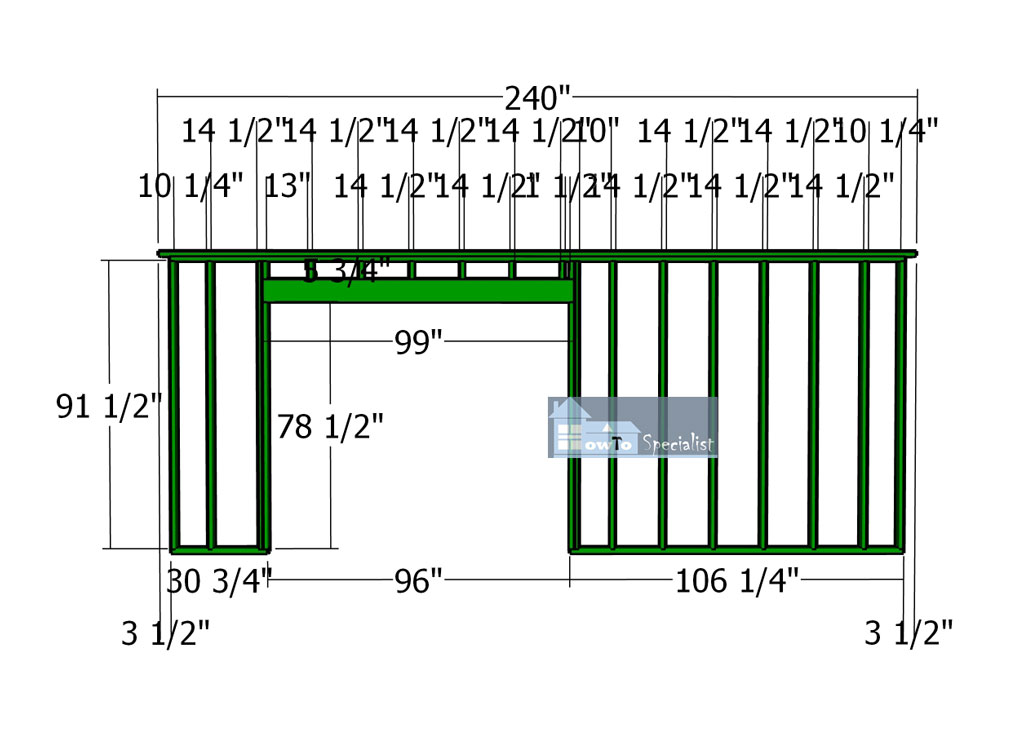
Front-wall-frame
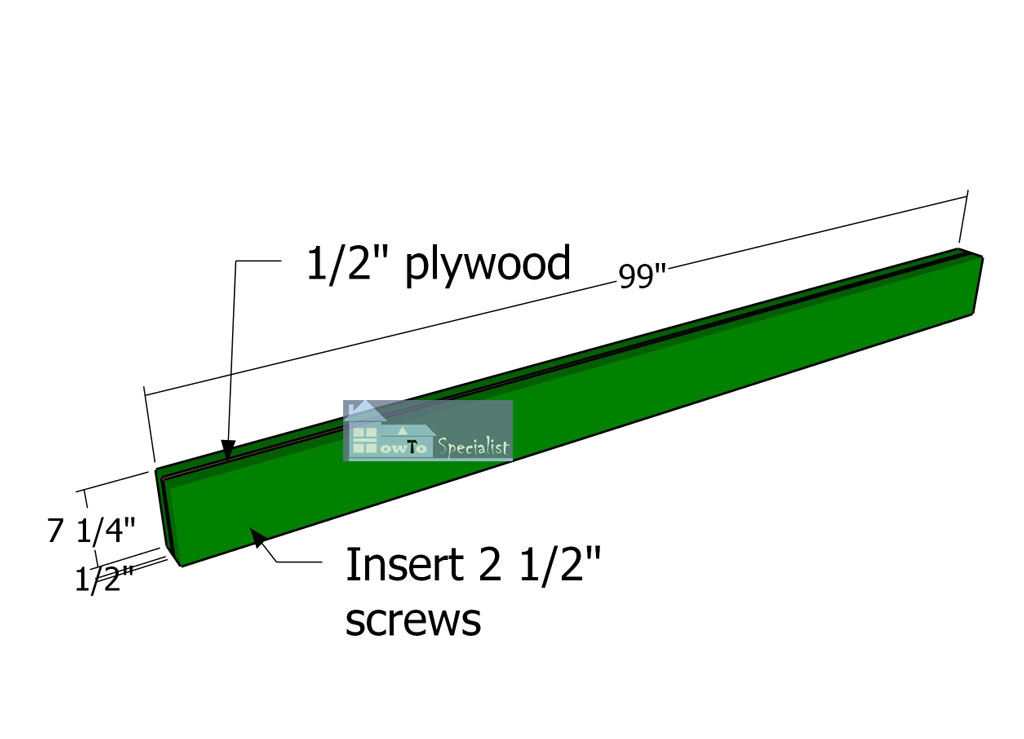
Double-header
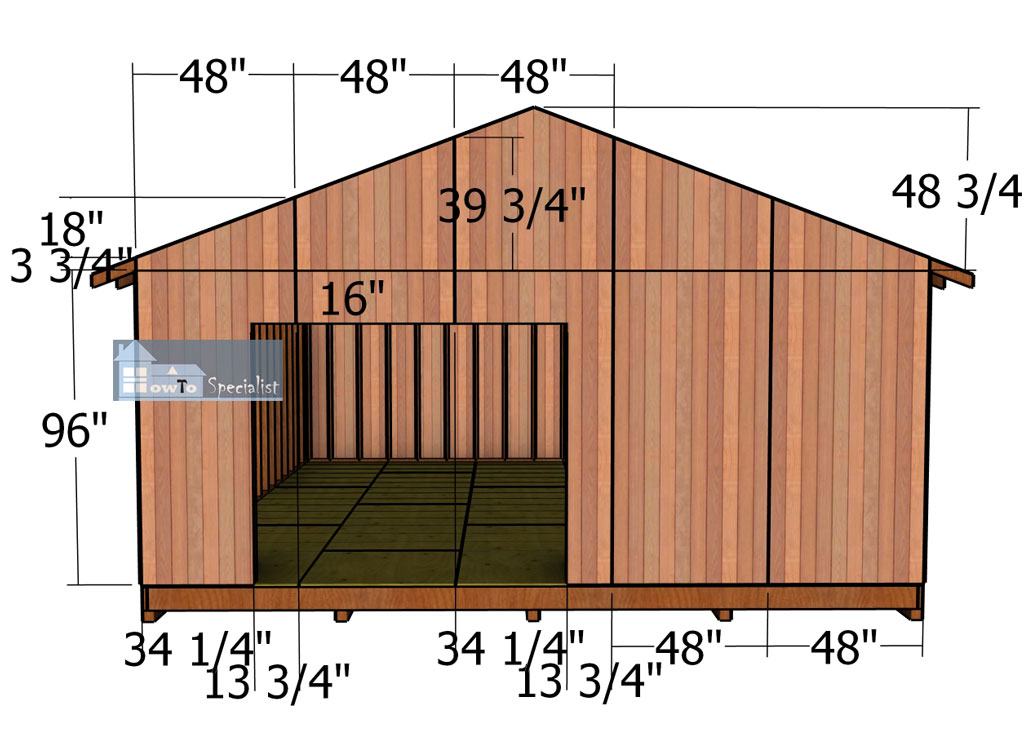
Next, let’s assemble the front wall frame for the 20×24 garden storage shed. According to the diagram, you’ll need to leave a 96″ opening for the double 4 ft doors. Use 2×8 lumber for the double header, and fit a piece of 1/2″ plywood between the 2x6s to make it 3 1/2″ thick.
Feel free to adjust the size of the opening to suit your needs—you can even install a garage door if you want. Place the studs every 16 inches on center and make sure the corners are square. This will give you a solid front wall frame with the perfect opening for your doors.
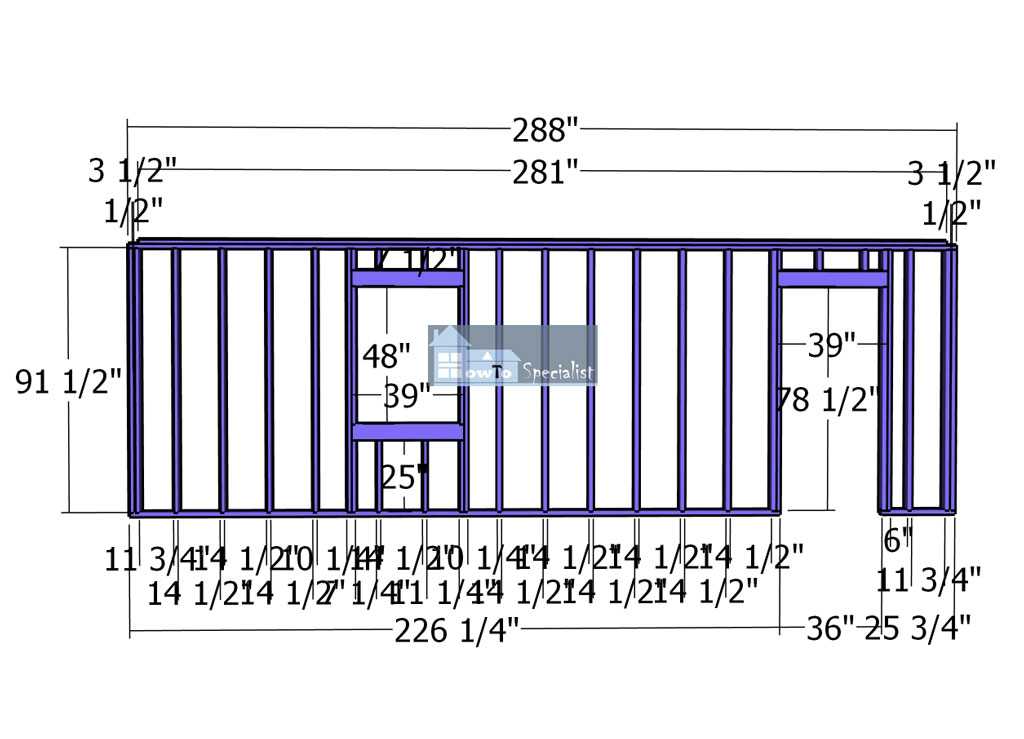
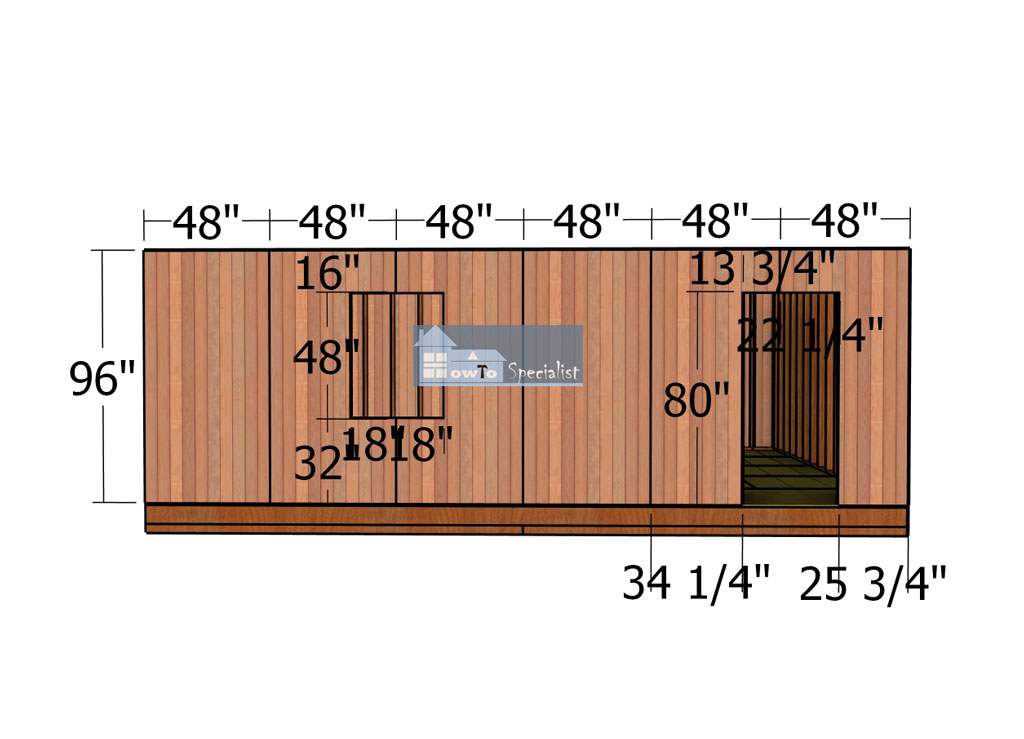
Side-wall-with-door-frame
Now let’s build the side wall with the windows and access door, following the diagram. Drill pilot holes through the plates and secure the studs with 3 1/2″ screws. Place the studs 16 inches on center, as shown in the HowToSpecialist.com plans. Use double studs at both ends of the wall and fit 1/2″ plywood blockings between them.
For the headers, use double 2x6s with 1/2″ plywood in the middle. Add glue to the joints and secure the headers with 2 1/2″ screws from both sides. You can adjust the window sizes to fit your needs. Also, frame the door opening. You can either install a pre-hung door or build a simple door using my plans. This setup will give you a sturdy and functional side wall with plenty of light and easy access.
Plain-side-wall-frame
Now, let’s build the opposite side wall using the same techniques described above. Place the studs every 16 inches on center, ensuring everything is aligned and secure. This will give you a sturdy and consistent structure for your shed.
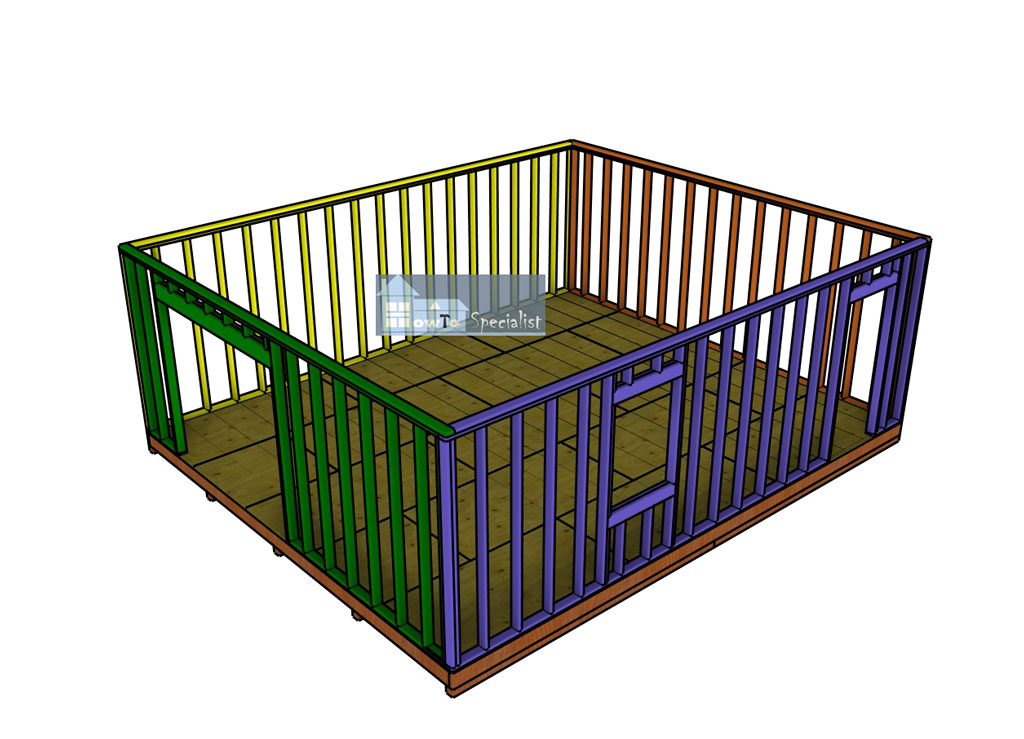
Assembling-the-shed-frame
Next, fit the wall frames to the floor of the shed. Align the edges flush and use a spirit level to plumb them vertically. Drill pilot holes and secure the bottom plates to the floor frame with 3 1/2″ screws. Make sure the corners are square, then lock the adjacent walls together tightly with 3 1/2″ screws. This will ensure your shed walls are sturdy and well-aligned.
Side-wall-with-door
For the exterior of the shed, use T1-11 siding sheets. Align the edges with the top and sides of the wall frames. Secure the siding with 8d nails, spacing them every 8 inches along the framing to lock everything tightly in place.
Make sure there are no gaps between the sheets. Use a saw to make the cutouts for the windows and the door. This will give your shed a clean and professional finish.
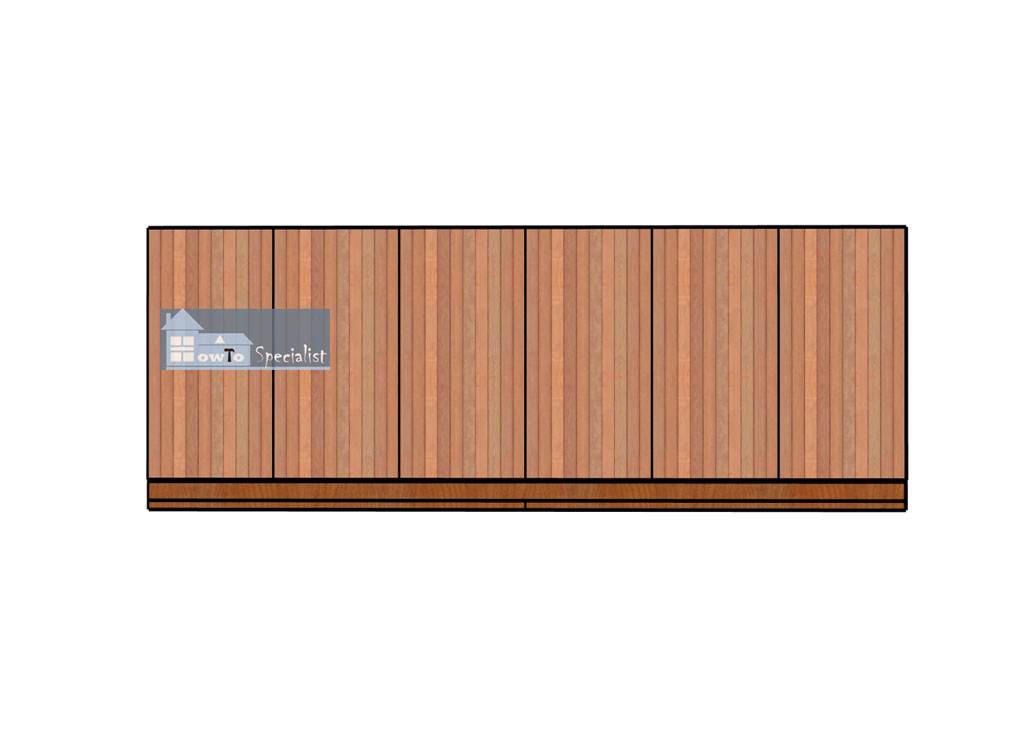
Side-wall-siding-panels
Attach the panels to the opposite side of the wall. Leave no gaps between the sheets and insert 8d nails to lock them into place, every 8″ along the framing.
Building a gable roof for a 20×24 shed
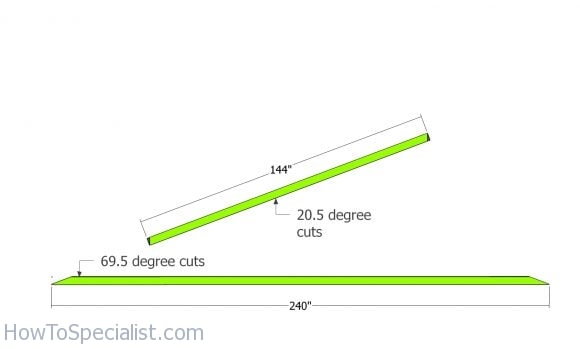
Rafters
Next up, let’s build the trusses for the large storage shed. I personally recommend using engineered trusses because they arrive at the construction site pre-assembled and are designed for your local weather conditions. This gives you the best cost-to-benefit ratio.
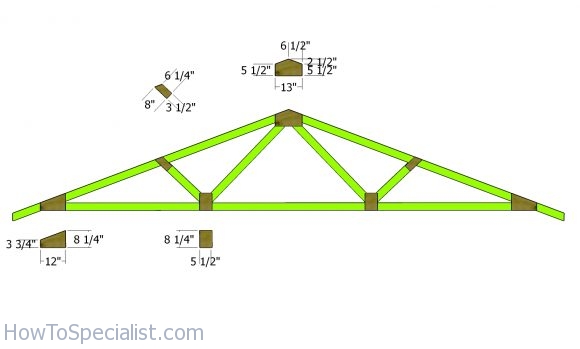
However, I’ll show you how I would build the trusses myself. Use 2×4 lumber for the rafters and the bottom chord. Use a miter saw to make the cuts to the rafters as shown in the diagram. This method will ensure you have strong and reliable trusses for your shed.
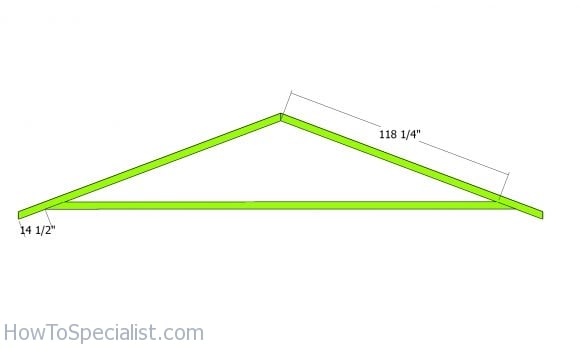
Rafters truss
Lay the rafters on a level surface and then align the components, as shown in the diagram. You can set a jig to speed up the rest of the project.
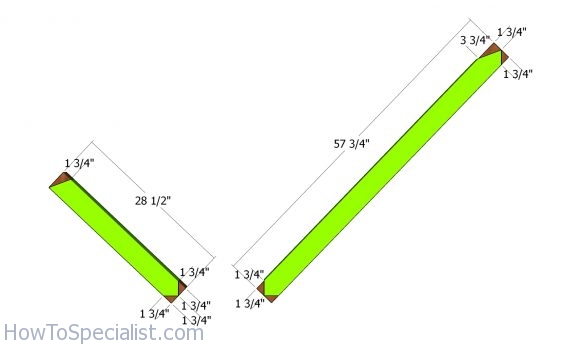
W rafters
Use 2×4 lumber for the webs. Make the cuts according to the info in the diagram.
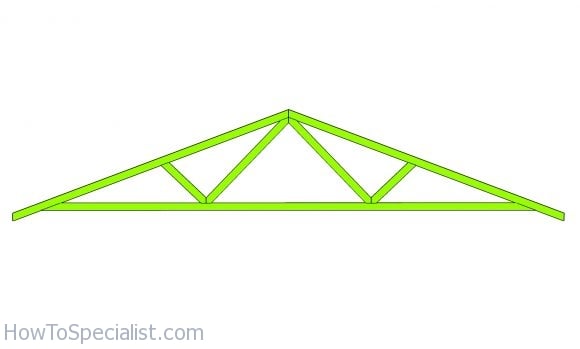
20 ft truss
Fit the webs to the trusses, as shown in the diagram. Leave no gaps between the components.
Gussets
Use strong tie plates to join the components together tightly with structural nails. Alternatively, you can use 1/2″ plywood for the gussets. Lay the gussets over the joints and align the edges flush.
Drill pilot holes and insert 1 5/8″ screws. You could add construction glue to the joints. In addition, the best would be to add gussets on both sides of the trusses.
Attaching-the-trusses
Attaching-the-trusses—detail
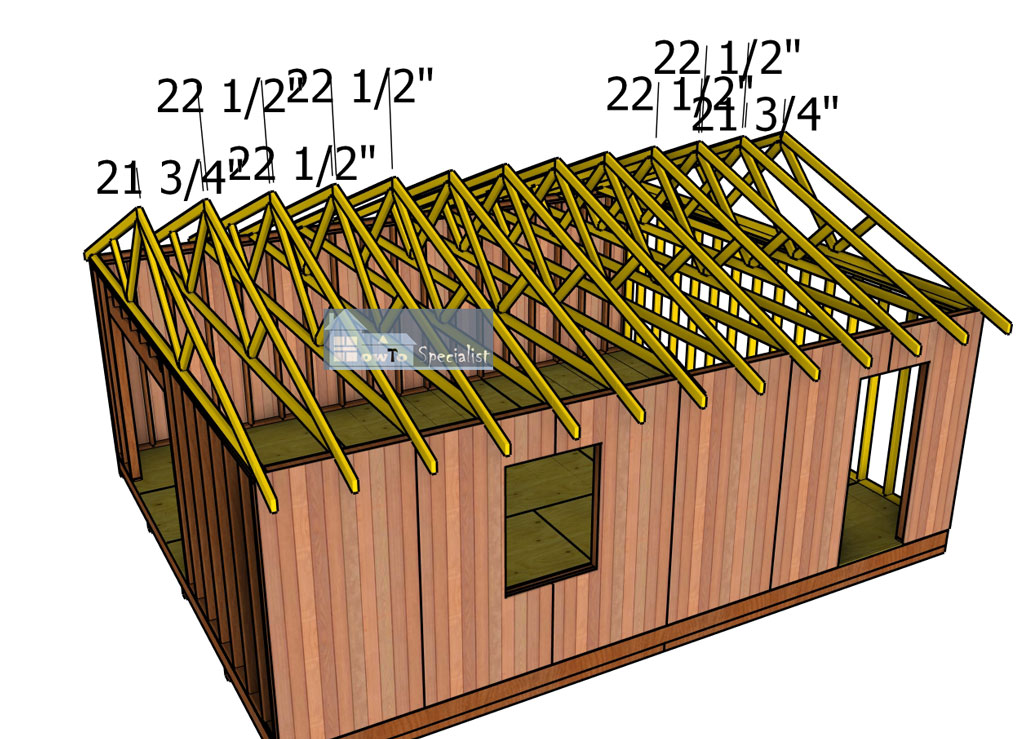
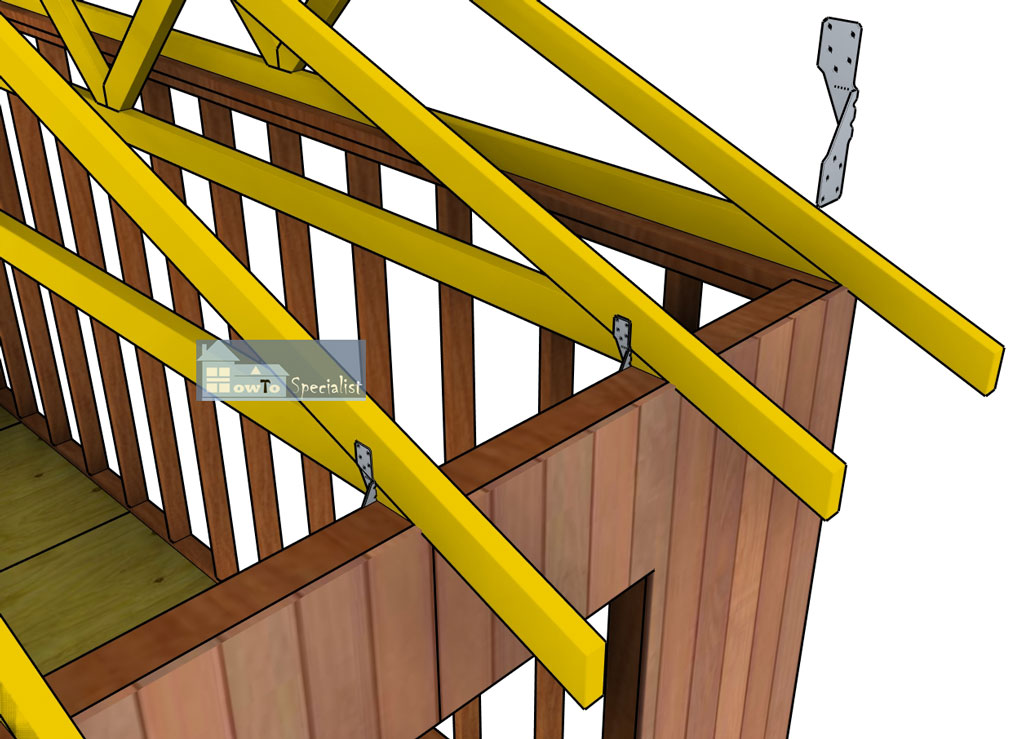
Fit the trusses to the top of the storage shed. Place the trusses every 24″ on center and use a spirit level to plumb them. Use rafter ties to secure the rafters into place tightly. Insert 1 1/2″ structural screws.
Gable-end-panels—front
Use T1-11 siding sheets cover the front and the back of the storage shed. Align the edges flush and leave no gaps between the sheets. Insert 8d nails to secure the sheets into place tightly.

Back-wall-panels
Attach the siding sheets to the back of the shed. You can notice there are no openings to this wall.

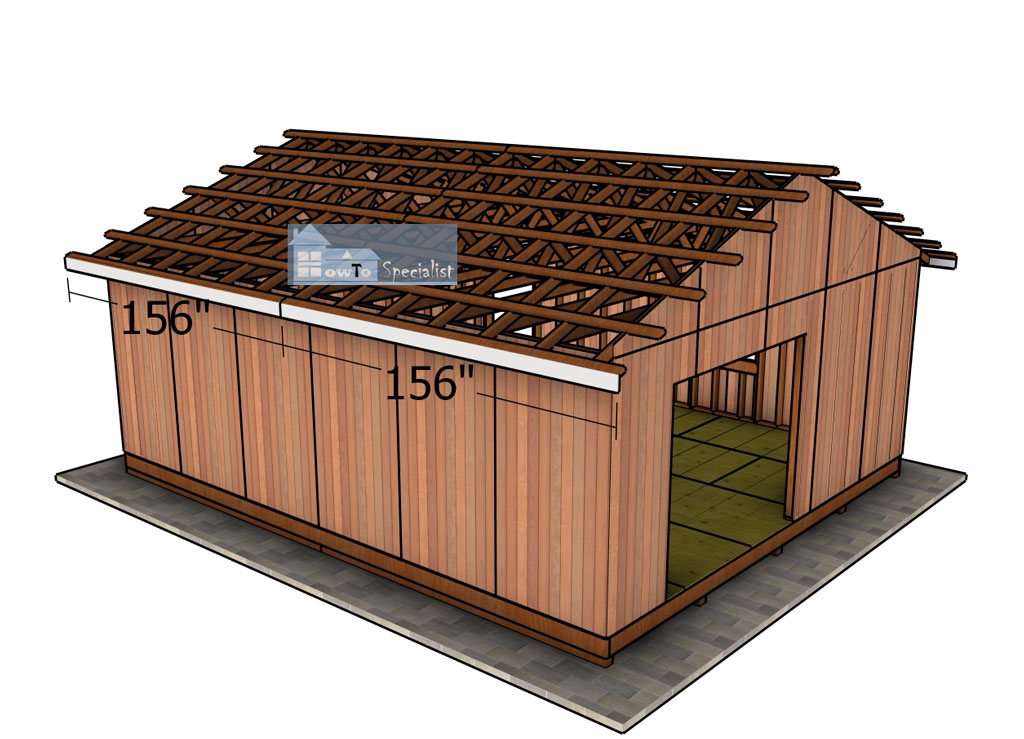
Fitting-the-purlins
The next step of the project is to attach the 2×4 purlins to the top of the gable shed. See the 12″ overhangs to the front and back of the shed. Place the purlins every 24″ on center. Drill pilot holes and insert 8″ screws to lock them into place tightly.
Side-roof-trims
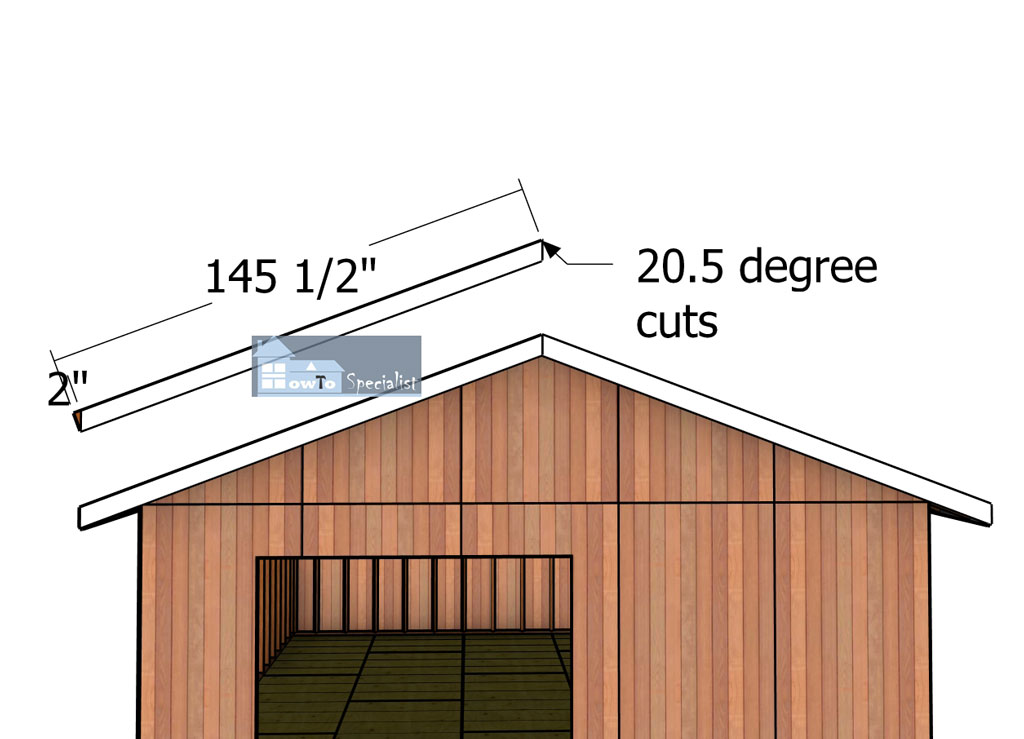
Gable-end-trims
Use 1×6 lumber for the roof trims. Make angle cuts to the front and back trims. Align the edges flush and secure them into place with 2″ nails. Leave no gaps between the trims for a polished look.
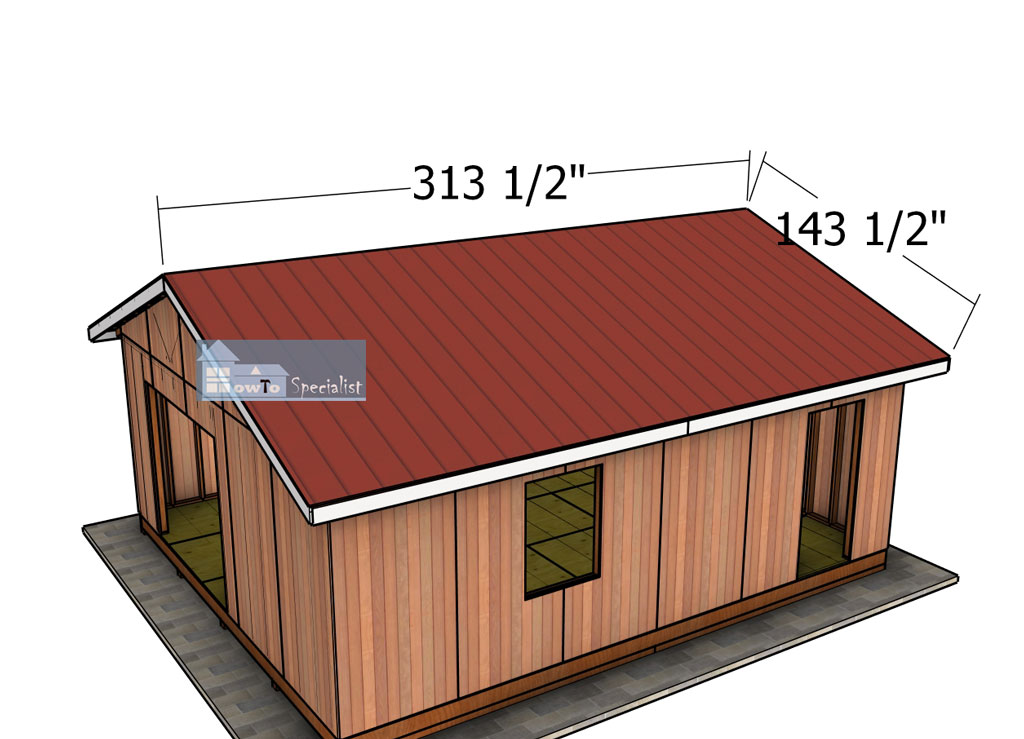
Fitting-the-roofing
To add metal roofing to your shed with 2×4 purlins spaced every 24 inches on center, start by laying down a moisture barrier or roofing underlayment over the purlins.
Position the first metal roofing panel at one corner of the shed, aligning it with the edge and securing it to the purlins using roofing screws with rubber washers, spaced about 12 inches apart along the purlin lines.
Overlap the next panel’s edge over the first panel’s rib and continue securing each panel in the same manner. When you reach the ridge, install a metal ridge cap to cover the top seam, ensuring it’s fastened securely. Finally, trim any excess metal with tin snips for a clean finish and check all screws to ensure they’re tight and properly sealed.
Building the Shed Doors
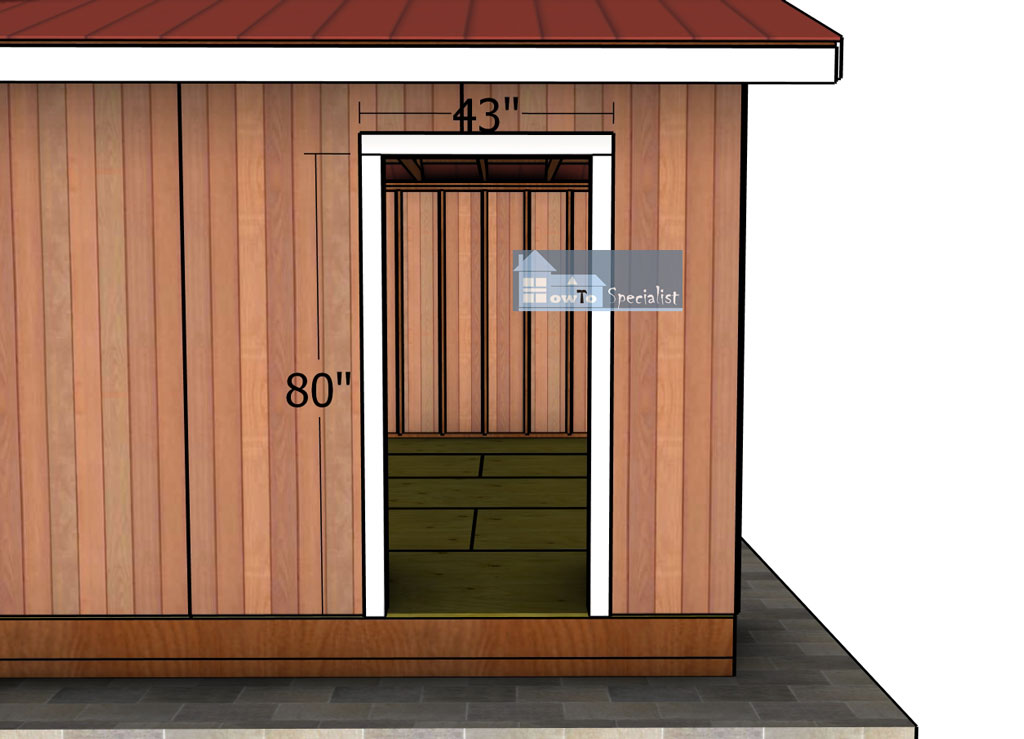
Side-door-jambs
Fit the 2×4 jambs around the side door opening. Align the edges flush and insert 2 1/2″ screws every 8″ to lock them into place tightly.
Side-door-frame
Assemble the door frame using 2×4 lumber. Drill pocket holes at both ends of the vertical and middle components. Lay everything on a level surface, align the edges flush and make sure the corners are square. Insert 2 1/2″ screws to assemble the door frame tightly.
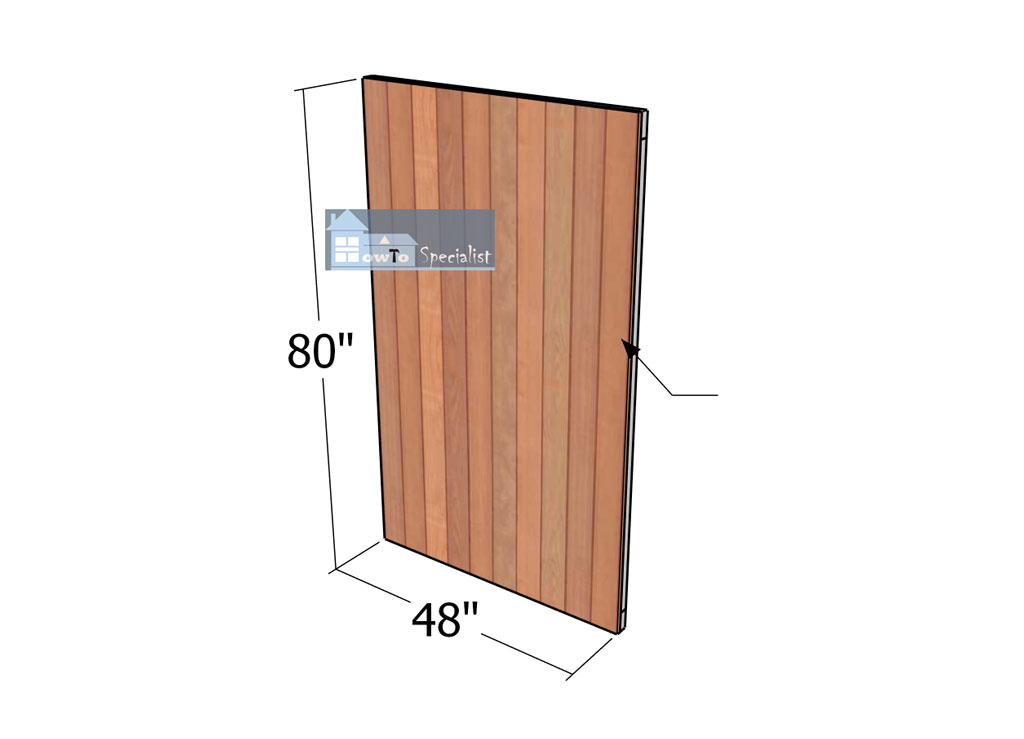
Side-door-panel
Attach the siding panel to the door frame and align the edges flush. Insert 1 5/8″ screws to secure the panel to the door frame.
Fitting-the-side-door
Fit the door into place and align the edges flush. Use hinges to secure the door to the jambs. Lock the door into place with a latch.
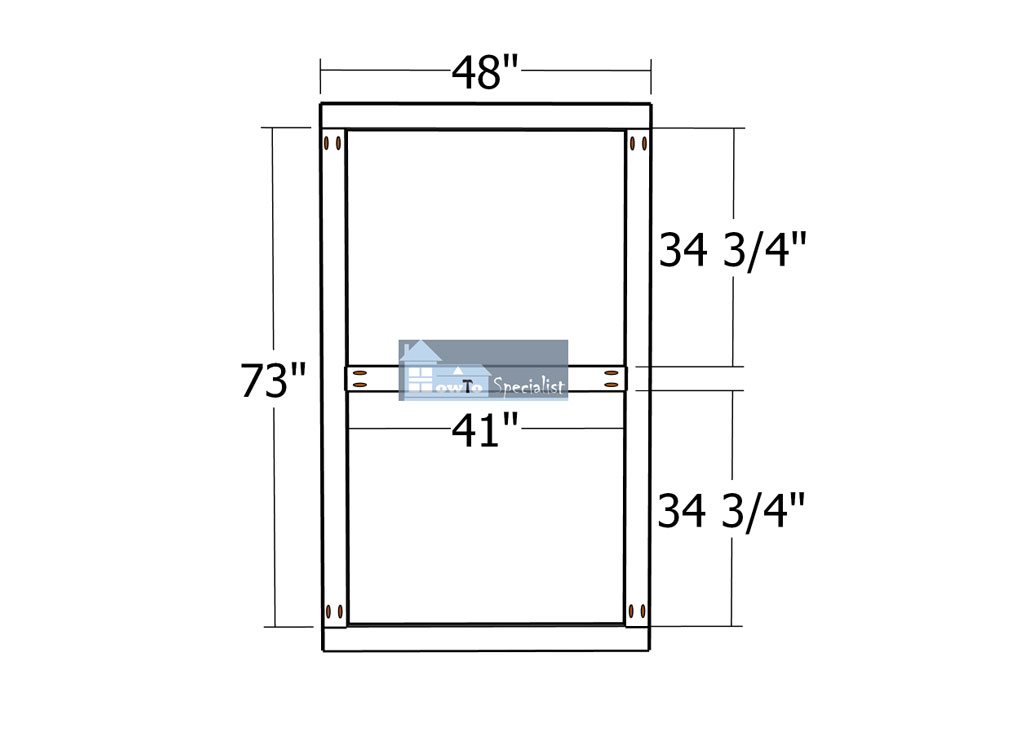
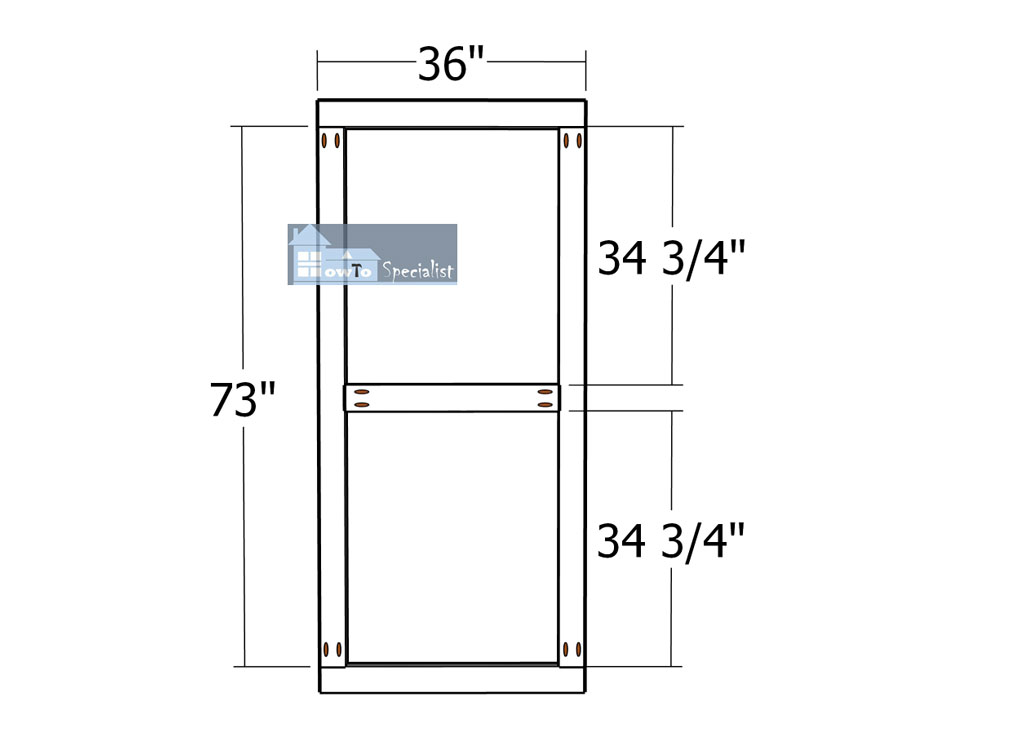
Double-door-frames
Assemble the double door frames using the same techniques described above.
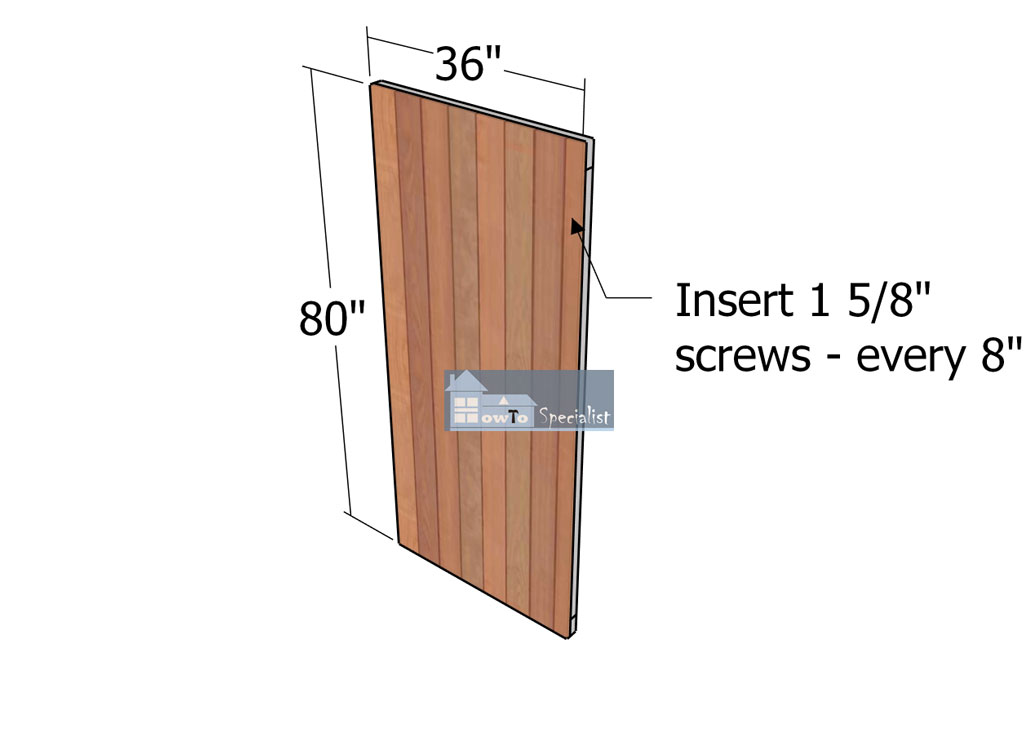
Double-door-panels
Attach the panels to the door frames.
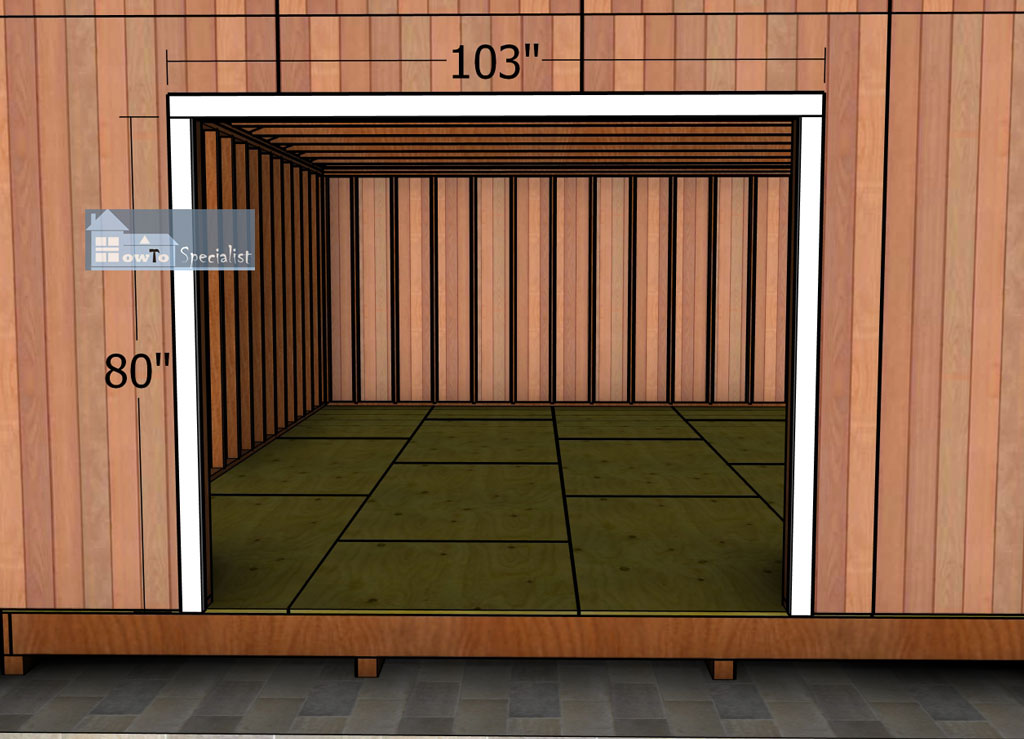
Double-door-jambs
Fit the 2×4 jambs around the double door opening. Align the edges flush and insert 2 1/2″ screws to lock them into place tightly.
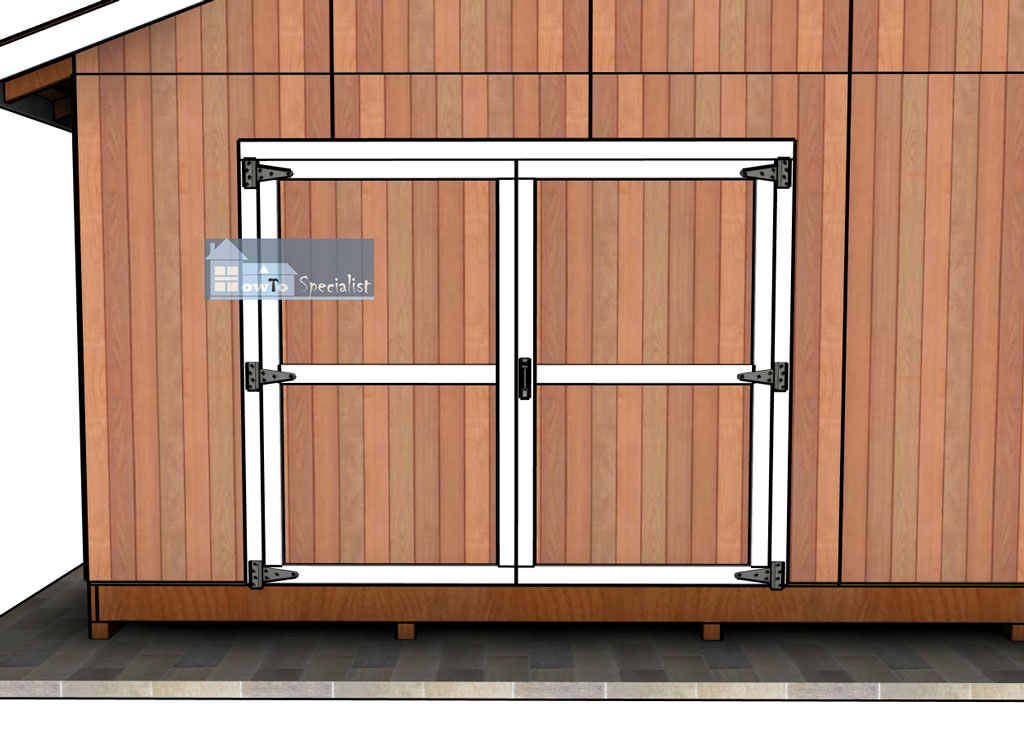
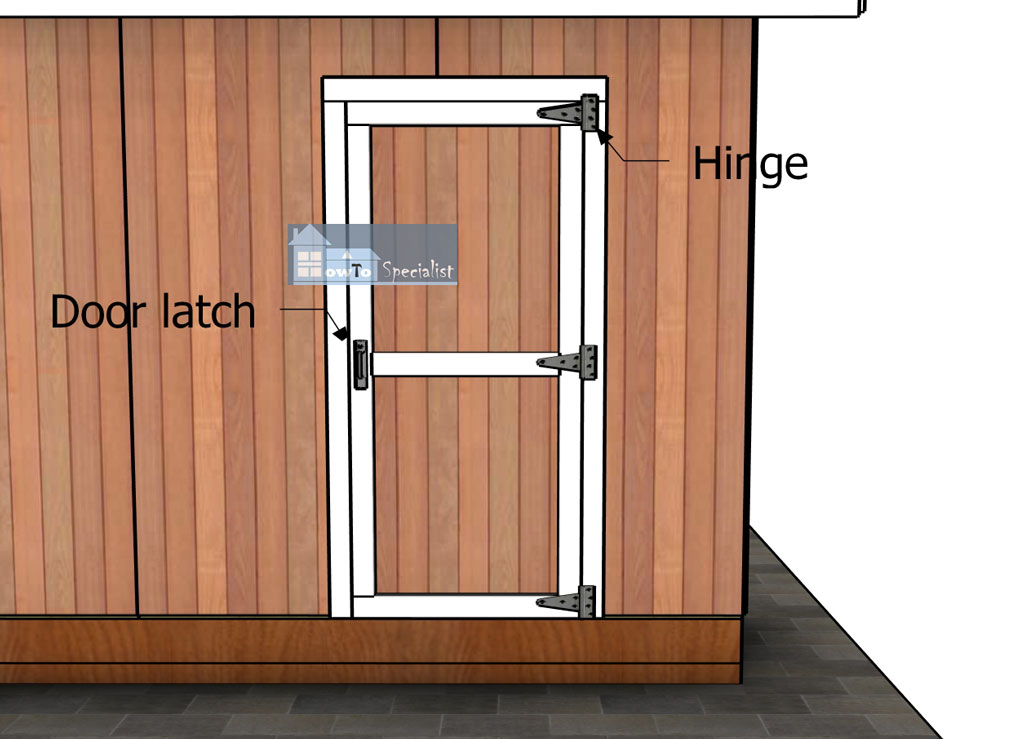
Fitting-the-double-doors
Attach the doors into place with hinges and a latch.
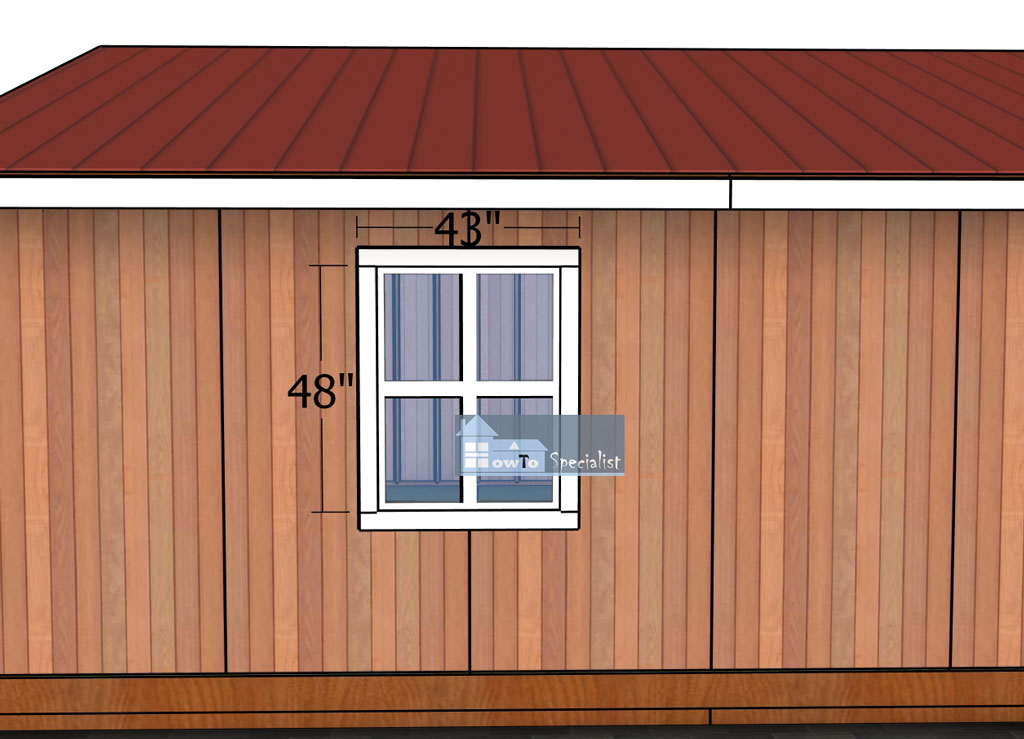
Attaching-the-side-window
Now, let’s get that window installed in your shed! First, place the window into the rough opening, making sure it’s centered and level. Use shims around the edges to get it perfectly level and plumb. Once it’s in position, secure the window by driving screws through the window flange into the framing.
Make sure to use screws that are long enough to go through the flange and into the studs for a solid hold. Finally, remove any excess shims and seal around the window with exterior caulk to keep it weatherproof.
Finishing Touches
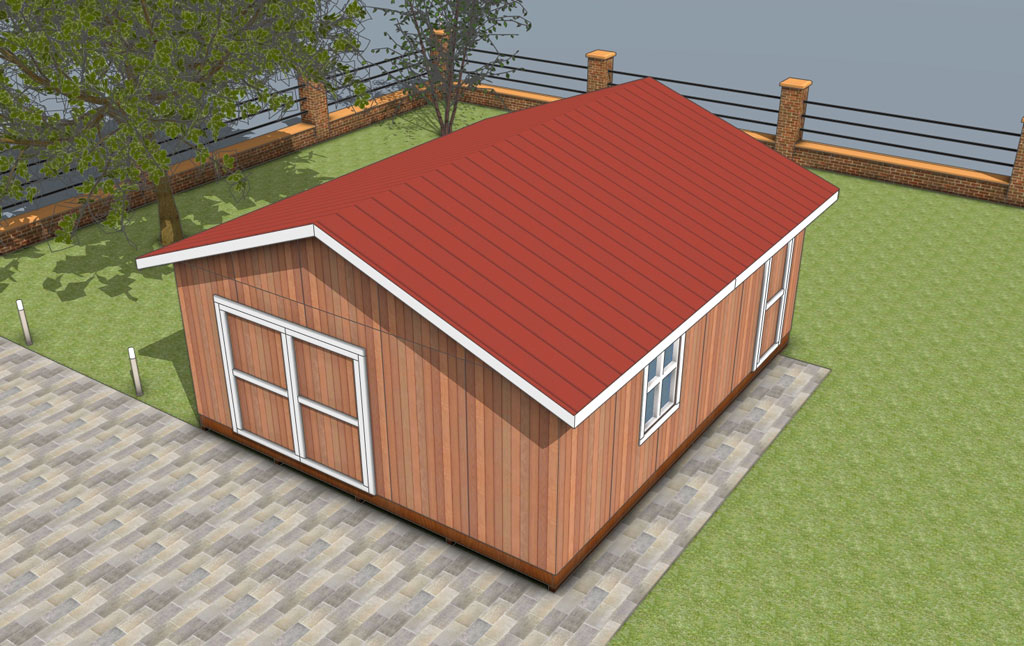
Top-view
This shed is built to last with solid construction and practical design. From the double doors to the metal roofing, every detail is about durability and functionality, ensuring it meets all your storage needs. With 2×8 floor joists, 2×4 wall studs, and engineered trusses, this structure is designed to withstand the elements and provide long-lasting utility.
Building it yourself not only saves money but also gives you the satisfaction of creating something substantial and reliable. Get your hands dirty and enjoy the process, knowing you’re building a shed that will stand the test of time. You can use this tutorial to make a cool ramp for this shed.
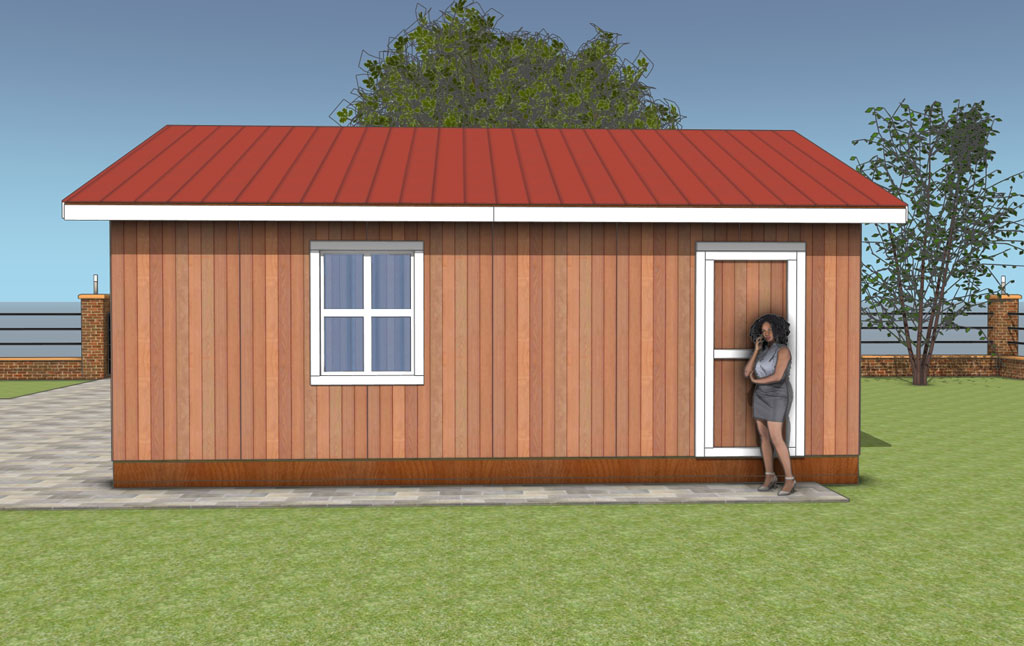
20×24-Shed-Plans—side-view
This is one of the best HowToSpecialist.com shed plans and designs. Also, you can take a look over my other large shed plans 16×24.
Let’s put the finishing touches on this shed. Start by painting or staining the exterior to protect the wood and give it a nice look—choose a high-quality exterior paint or stain for the best results. Next, add some trim around the doors and windows to give it a polished finish. Finally, install any additional hardware like door handles, window latches, and gutters to complete the shed and make it fully functional. Happy building!
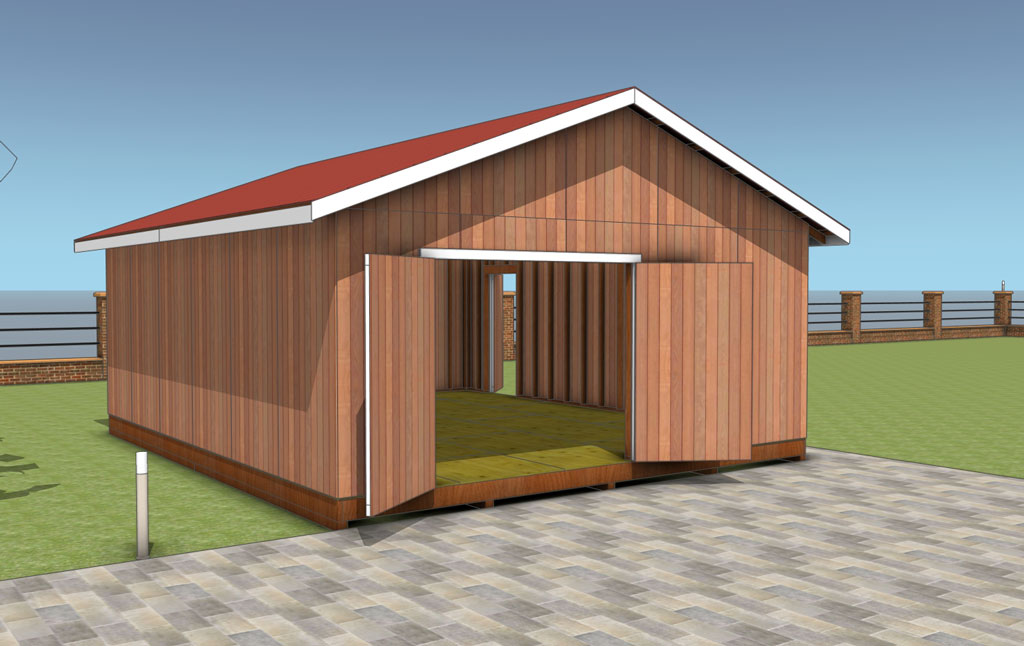
20×24-Shed-Plans—interior-view
I hope these shed plans help you create the perfect storage solution for your needs. With a little time and effort, you’ll have a sturdy, functional shed that you can be proud of.
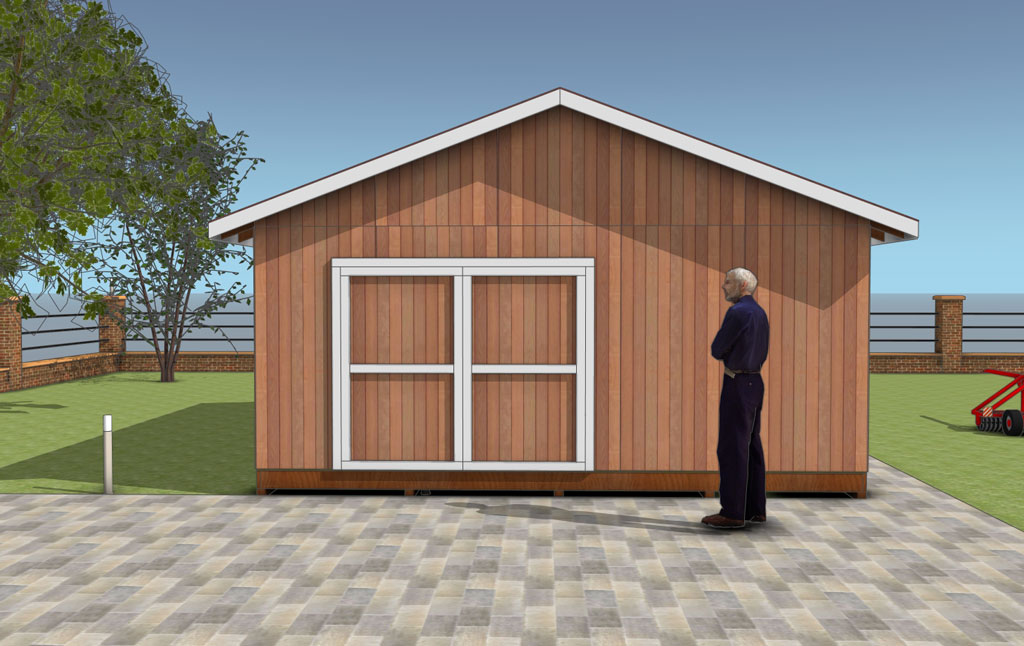
20×24-Shed-Plans—front-view
Since you are here, don’t miss the plans for a double trash container shed.
20×24-Shed-Plans
Thanks for checking out my 20×24 gable shed plans! Make sure to browse through my other projects for more awesome ideas. Don’t forget to hit that LIKE button and SHARE with your friends using the social media links below.
 |