This diy step by step article is about patio table plans. Building a wood patio table is a simple weekend project, if you use proper plans, the right tools and woodworking techniques. If you have a large patio or a pergola, you should make everything possible to build a table, especially if we consider the simplicity of this project. If you master several woodworking techniques and you have worked before with lumber, this project should be straight forward and you should not face any issues. Select the lumber with great care, as it has to be designed for outdoor use and shouldn’t have any visible signs of damage.
There are many plans to choose from, as the patio tables come in many shapes, sizes and designs. If you don’t have enough time to undertake the project by yourself, you could buy a kit or hire a professional to get the job done for you. Nevertheless, taking into account that building a patio table requires just a few basic woodworking techniques, you could save money by choosing to build it by yourself.
Work with great care and with good judgement if you want to obtain a professional result. Use a circular saw to cut the wooden boards and a chisel to clean the surface. If you choose to lock the boards together with screws, you have to drill pilot holes, to avoid the wood from splitting. On the other hand, if you install wood dowels you should use a drill bit and drill machinery to make a few holes.
Made from this plan
Materials
- A – 4 pieces of 4×4 lumber – 27″ long LEGS
- B – 2 pieces of 2×4 lumber – 40″ long, 4 pieces – 22″ long APRONS
- C – 5 pieces of 1×6 lumber – ” long TABLETOP
Tools
- Safety gloves, glasses
- Circular saw, chalk line
- Hammer, spirit level, carpentry pencil
Tips
- Cut out the posts of the table, as shown in our plans
- Pre-drill holes in the wooden pieces, before inserting the screws
Time
- One weekend
Patio table plans

Patio table legs
First, you have to build the legs of the patio table, from 4×4 posts. Nevertheless, you can also get the job done by using 2x4s, if you want to keep things simple. Before cutting out the top of the posts, select the lumber with great care.

Building patio table
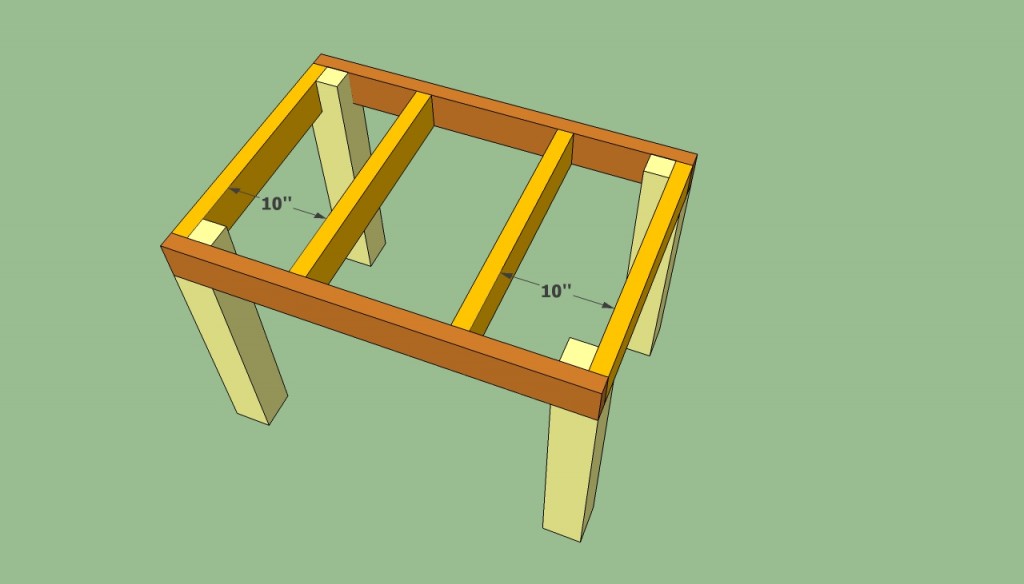
After you have build the wooden legs , you should decide the size of the table, as to fit your needs and tastes. If you like our free plans, we recommend you to use the dimensions that can be seen in the images, along with the appropriate woodworking techniques.

How to build a patio table
Next, you have to build the rest of the parts, as to secure the legs in a rigid structure. In order to build the frame of the patio table, we recommend you to use 2×4, making sure the lumber is perfectly straight and in a good condition.
Before driving in the screws through the apron, you have to plumb the posts and lock the parts together with several C-clamps. Make sure the corners are right-angled, by using a framing square.
How to build a patio table

Securing the table with screws
In order to lock the wooden components together, you can either use screws or dowels. Each of these approaches has its pros and cons, but it is easier to use screws, especially if you are an amateur handyman.
If you want to obtain a professional result, drill pilot holes before inserting the screws (to prevent wood from splitting). Make sure you drill the holes at least 1/2” from the edges.

Attaching the top boards
Next, you should use a spirit level, to ensure the frame is perfectly horizontal. Afterwards, you should build the top of the table, from 2×6 or 1×6 boards, according to your needs.
Make sure you place the boards equally spaced (1/4-1/2”). You can obtain a symmetrical result by installing the middle board first. Continue the process by attaching the rest of the boards until you complete the top of the table.

Patio table plans
After you have assembled all components of the patio table, you should check again if they are plumb and level. Fill the gaps with wood putty and smooth the surface of the table with medium grit sandpaper.
Make sure you sand the edges of the wooden boards and don’t forget to apply several coats of varnish, to protect the patio table against water damage and decay.

Outdoor table plans
There are many outdoor table designs you can choose from, but in this article we show you simple patio table plans. As you can easily notice in the image, you have to build wooden components and to lock them together with screws.
Thank you for reading our article about patio table plans and we recommend you to check out the rest of our projects. Don’t forget to SHARE our articles with your friends, by using the social media widgets.
