Looking to transform your outdoor space into a cozy and stylish retreat? This DIY patio sectional bench is the perfect project to elevate your backyard game! Not only is it functional and durable, but it also brings a custom, handmade touch to your outdoor seating area. Designed to fit standard 24″ x 24″ seat cushions and 24″ x 18″ backrest cushions, this bench ensures both comfort and style with ease, no need to search high and low for the perfect fit.
Whether you’re hosting friends for a barbecue or sipping your morning coffee in the fresh air, this sectional is built to provide charm and practicality. Follow along as we walk you through the step-by-step process to build this stunning sectional—no need to be a woodworking pro, just bring your enthusiasm and a can-do attitude.
Building this patio sectional bench will take approximately 8-10 hours, depending on your skill level and the tools you have on hand. As for the cost, you can expect to spend around $430-$450 for materials, including lumber, screws, cushions, paint or stain, and glue. The bulk of the expense comes from the cushions, which ensure the bench is both comfortable and stylish. With a modest investment of time and money, you’ll end up with a custom-built outdoor sectional that’s durable, functional, and perfectly tailored to your space. It’s a rewarding project that delivers excellent value for the effort!
We recommend you to invest in the best materials you could afford. Therefore, you should buy weather-resistant lumber, such as pine or cedar. Always take accurate measurements before adjusting the size of the components at the proper size. Drill pilot holes trough the components before inserting the wood screws, to prevent the wood from splitting. My plans come with a full cut / shopping list and they are PDF Download and Print friendly. See all my Premium Plans HERE.
Made from this plan
Pin it for Later!
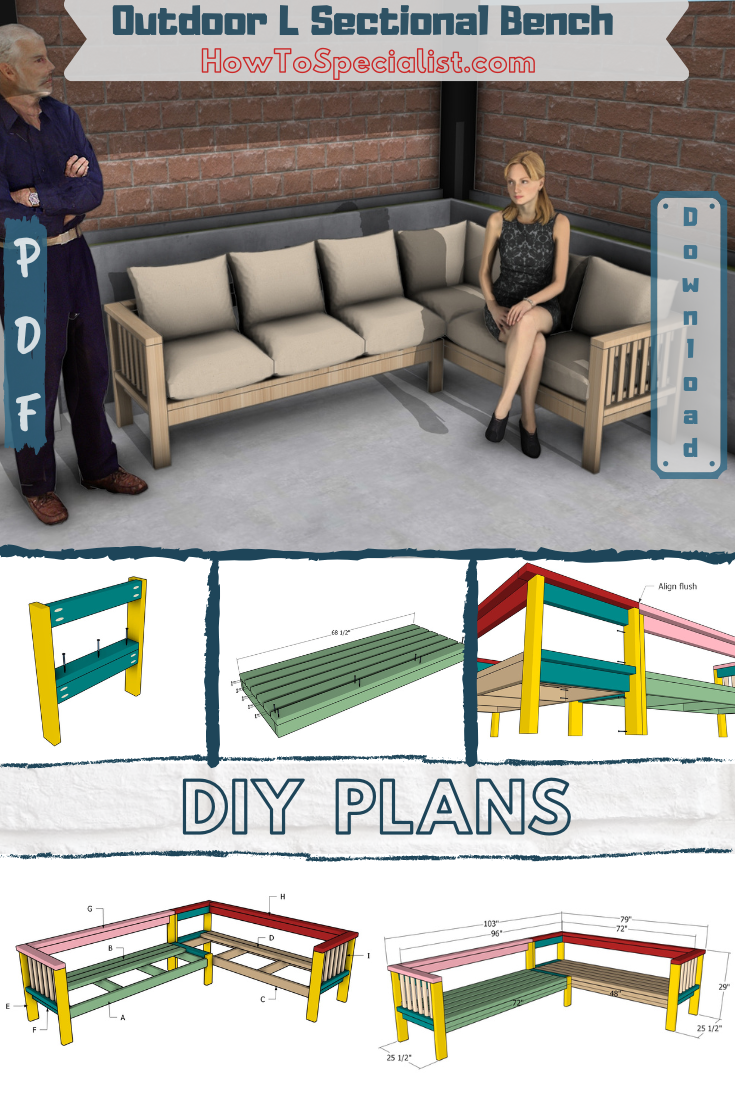
Patio Sectional Bench – Free DIY Plans
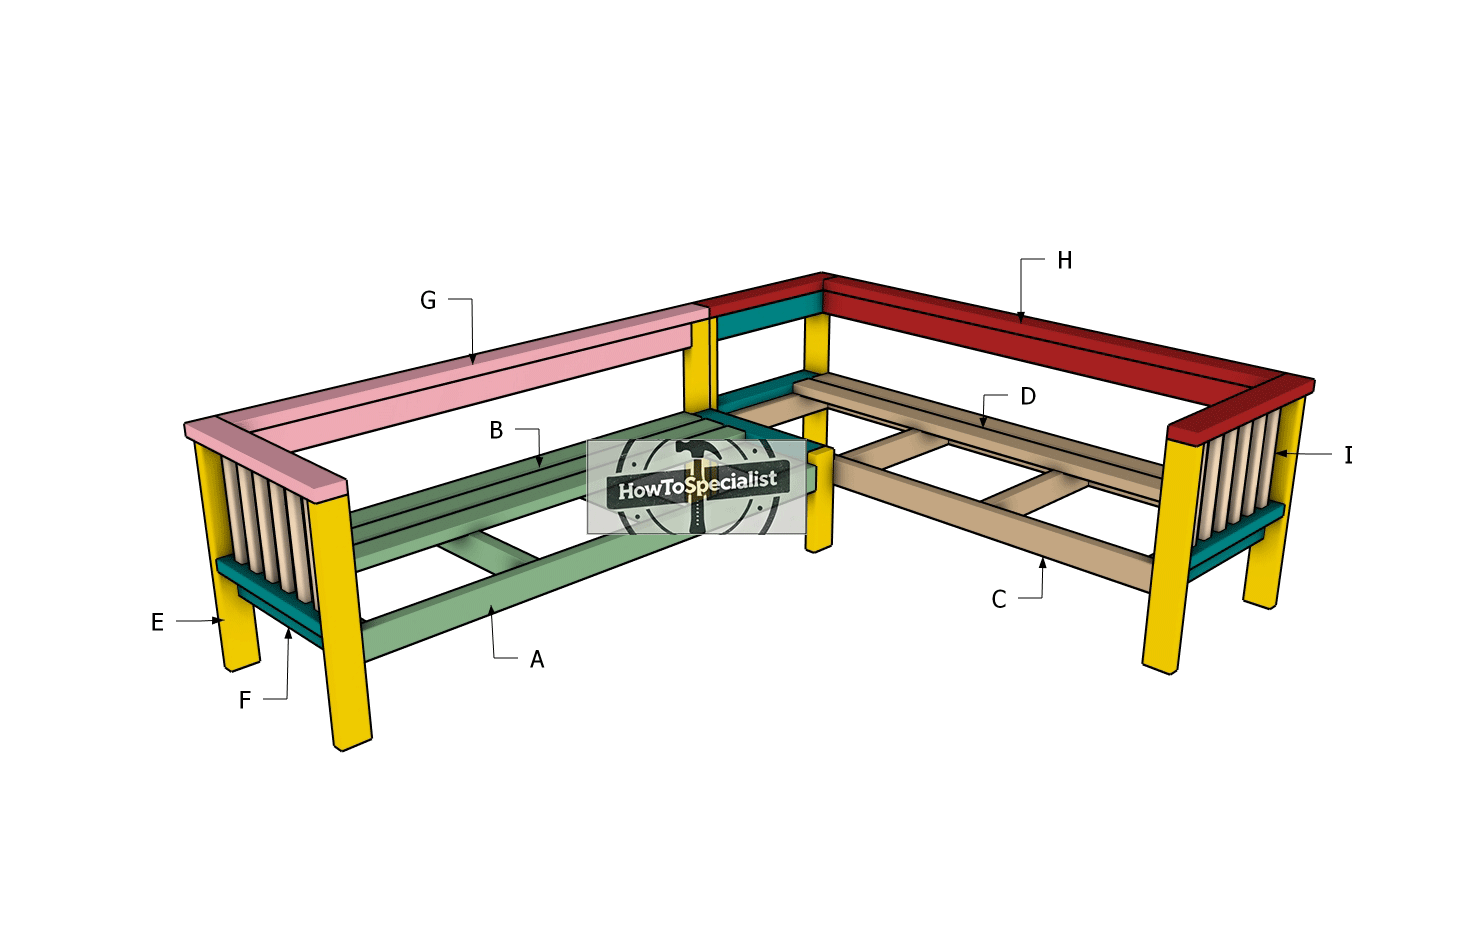
Building-an-outdoor-sectional
Materials (for 6 bins)
A – SEAT FRAME – 2×4 lumber 68 1/2″ – 2 pieces
A – SEAT FRAME – 2×4 lumber 22 1/2″ – 4 pieces
B – SEAT – 2×4 lumber 68 1/2″ – 6 pieces
C – SEAT FRAME – 2×4 lumber 72″ – 2 pieces
C – SEAT FRAME – 2×4 lumber 22 1/2″ – 4 pieces
D – SEAT – 2×4 lumber 72″ – 6 pieces
E – LEGS – 2×4 lumber 27 1/2″ – 7 pieces
E – LEGS – 2×4 lumber 14″ – 1 piece
F – SIDE FRAME – 2×4 lumber 22 1/2″ – 11 pieces
G – BACKREST – 2×4 lumber 68 1/2″ – 1 piece
G – BACKREST – 2×4 lumber 72″ – 1 piece
G – BACKREST – 2×4 lumber 27 1/2″ – 1 piece
H – BACKREST – 2×4 lumber 72″ – 2 pieces
H – BACKREST – 2×4 lumber 27 1/2″ – 2 pieces
I – CLEATS – 2×2 lumber 22 1/2″ – 2 pieces
I – RAILS – 1×2 lumber 13 1/2″ – 12 pieces
- 2×4 lumber 8 ft – 26 pieces
- 2×2 lumber 8 ft – 1 piece
- 1×2 lumber 8 ft – 2 pieces
- 2 1/2″ screws – 200 pieces
- 1 5/8″ screws – 50 pieces
- 24″ x 24″ seat cushions – 6 pieces
- 24″ x 18″ backrest cushions – 7 pieces
- Paint / Stain – 1 can
- Glue – 1 piece
Tools
- Miter saw, Pocket hole jig
- Drill machinery, Drill bits, Jigsaw
- Safety gloves, Glasses
- Chalk line, tape measure, spirit level, carpentry pencil
Time
- One week
Related
Step 1: Building the first outdoor bench
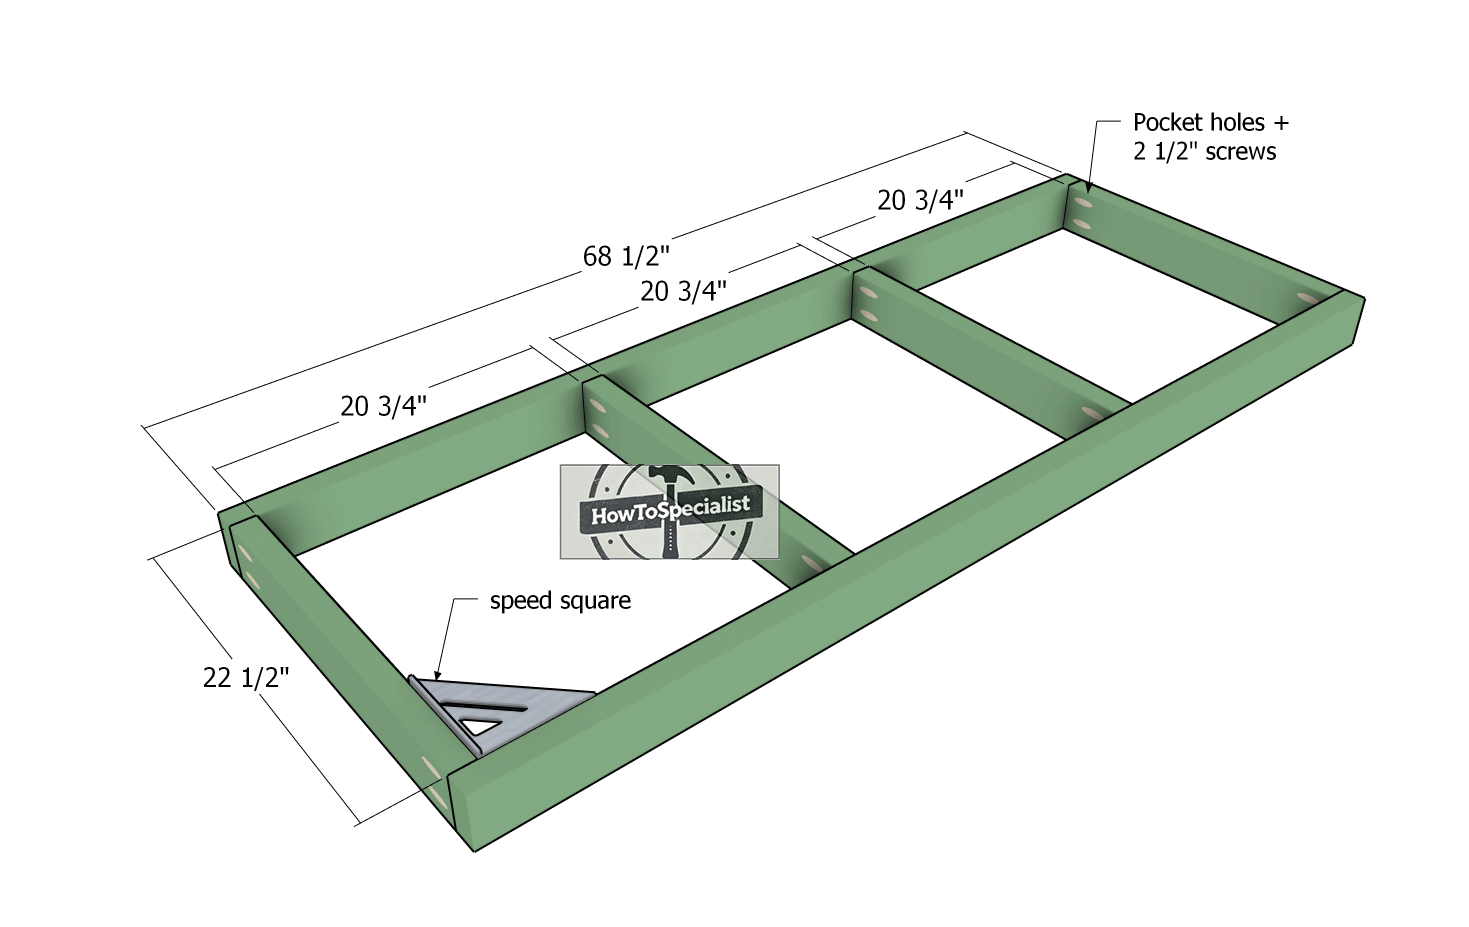
Seat-frame
Kick off your project by diving into the seat frame assembly—it’s where the magic begins! Start by cutting the 2×4 components to size, channeling your inner precision master. Drill pocket holes at both ends of the shorter pieces; these are the unsung heroes that keep everything sturdy.
Align those edges flush like a pro, and grab your trusty speed square to ensure the corners are sharp and perfectly right-angled. Once you’re squared away, secure the frame using 2 1/2″ screws, adding a generous dab of glue to the joints for that extra “built to last” touch.
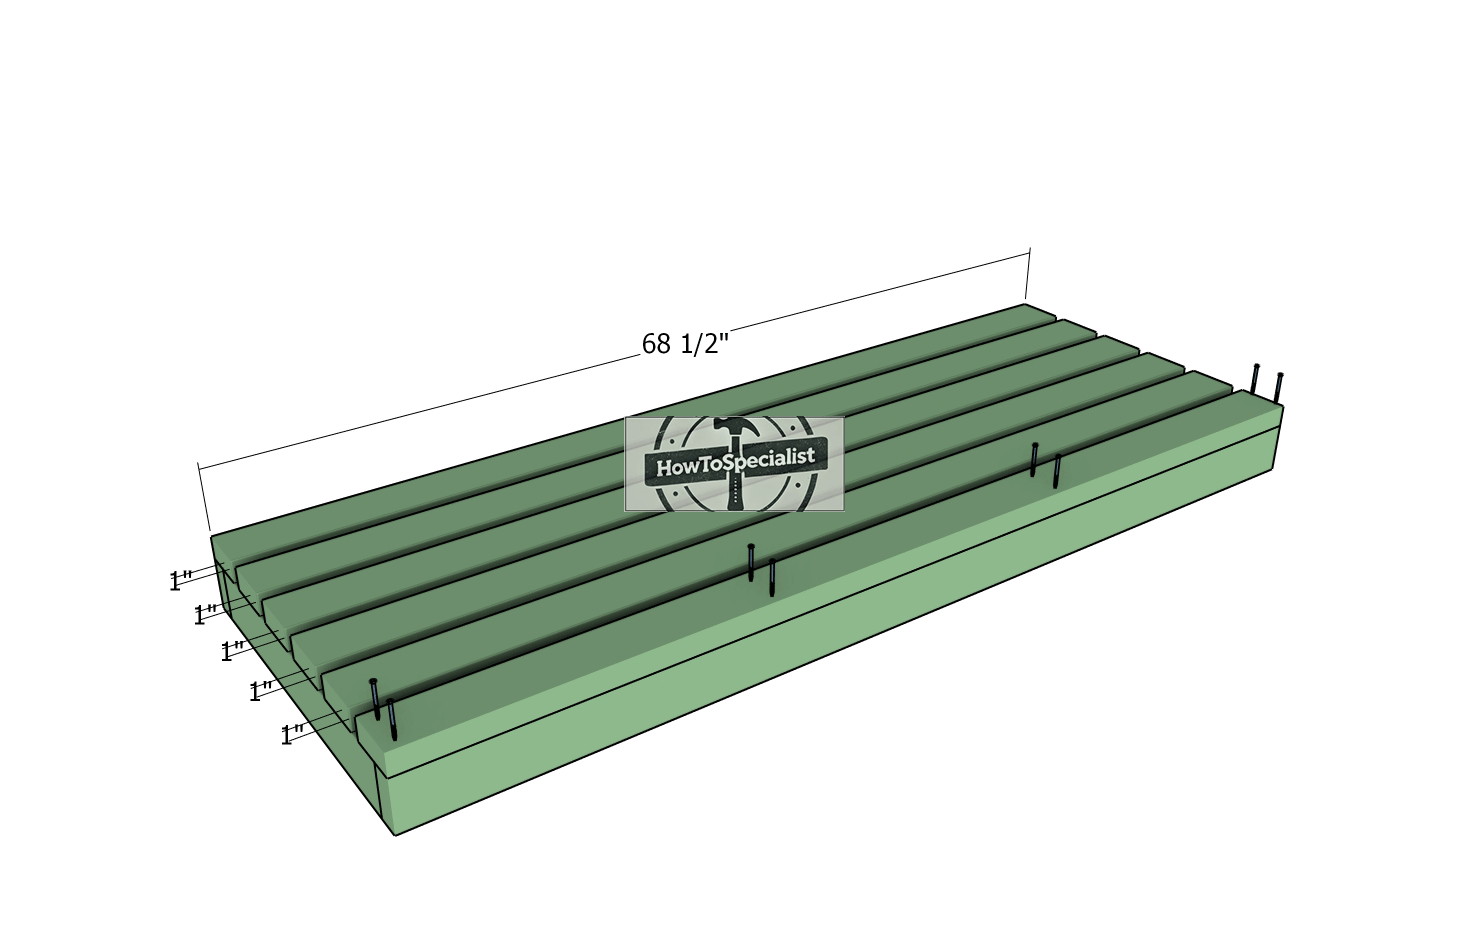
Seat-slats
Next up, it’s time to deck out the seat frame with those 2×4 slats, think of it as adding the stylish yet functional finishing touches. Align the slats flush with the frame, and don’t forget to use 1″ spacers between them for perfectly even gaps (because no one likes a wonky seat!).
Before you go drill-happy, drill pilot holes to keep the wood from splitting, your future self will thank you. Secure each slat to the frame using 2 1/2″ screws, with two screws per joint for rock-solid support.
Side-frames
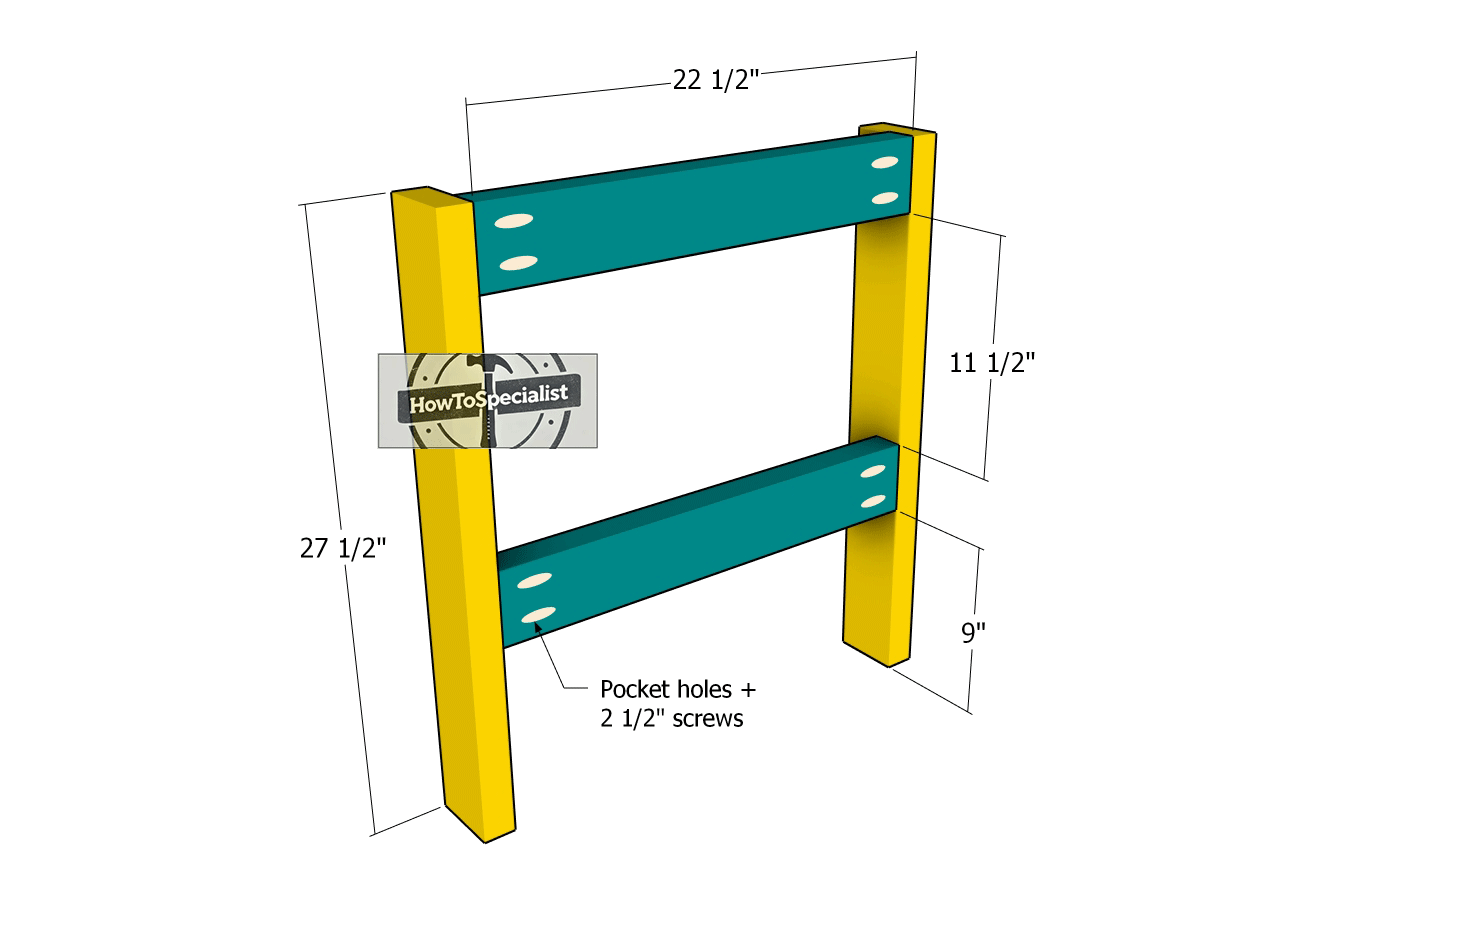
Now it’s time to bring the side frames to life, where strength meets style. Grab your 2×4 lumber and cut the pieces precisely as shown in the diagram (because a great cut is the secret to a perfect fit). Drill pocket holes at both ends of the horizontal components; these will be the hidden anchors that hold it all together.
Attach the horizontal pieces to the legs with 2 1/2″ screws, making sure everything is snug and square. Don’t skimp on the glue, it’s the secret sauce that adds durability to your masterpiece.
Side-supports
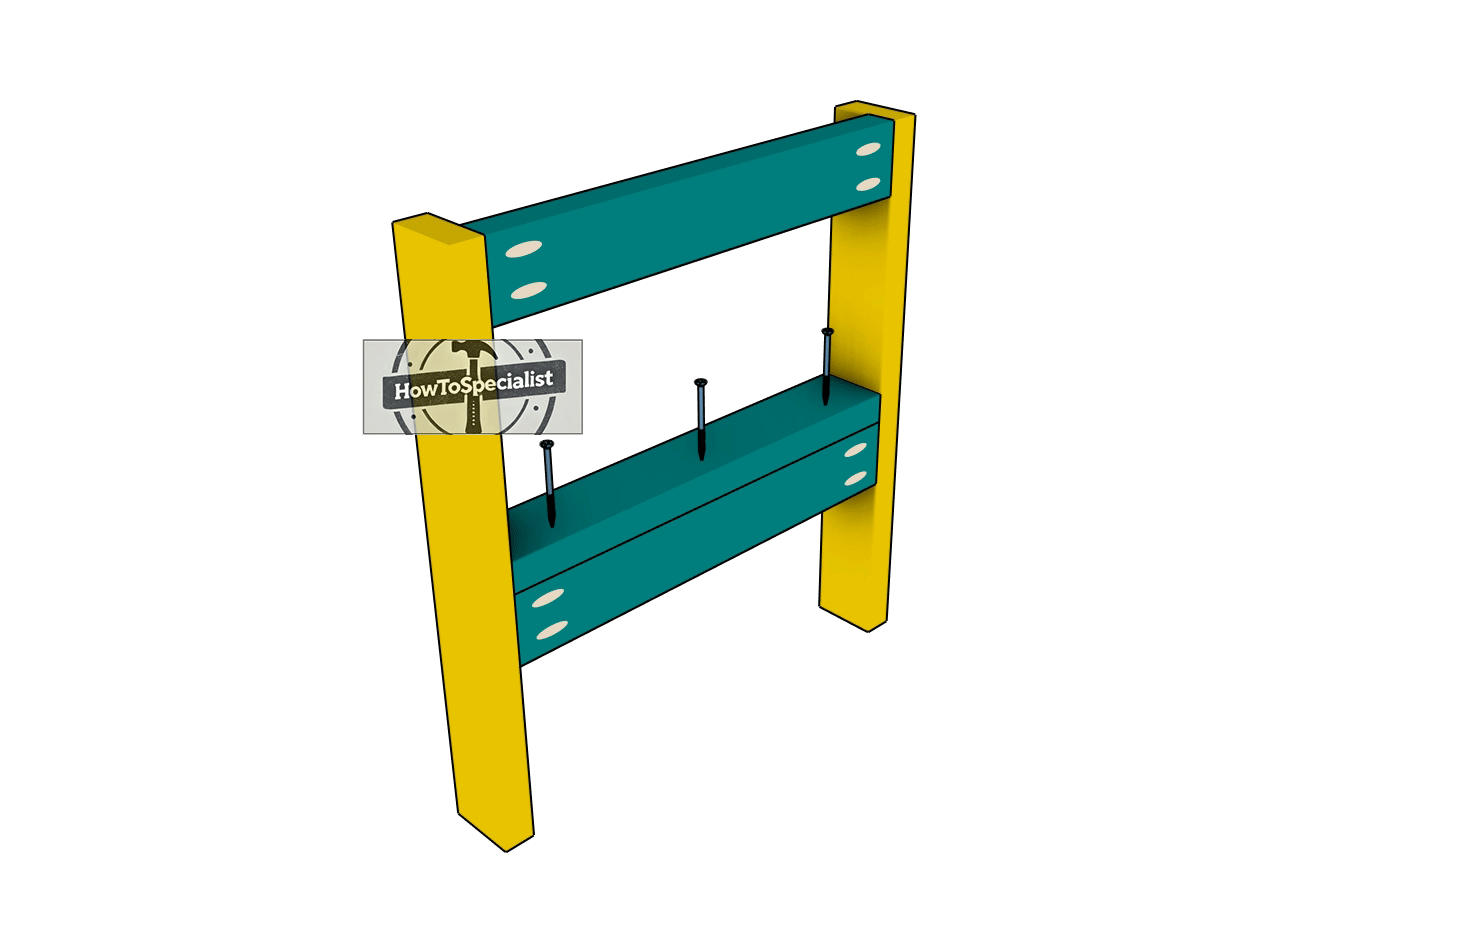
Time to bring it all together by fitting the 2×4 board to the frames, this is where things start looking seriously impressive. Use the dimensions from the plans like a seasoned pro, and make those cuts count.
Drill pilot holes first (because split wood is nobody’s friend), then align the edges flush for that seamless, polished look. Lock everything into place with 2 1/2″ screws, tightening them up snug like you’re sealing the deal on a handshake.
Middle-frame
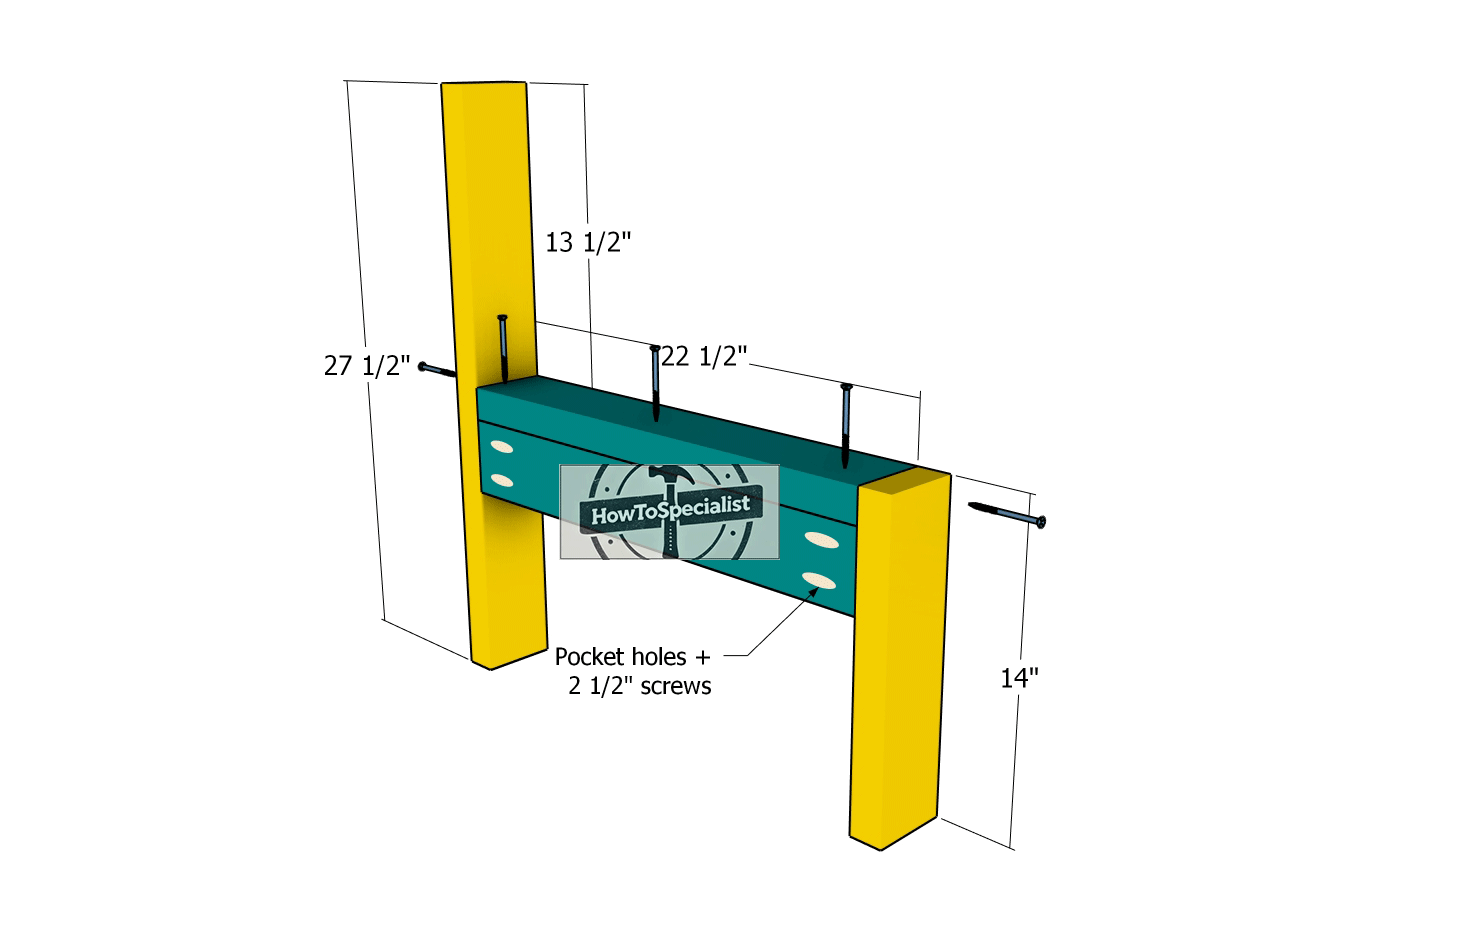
Let’s tackle the middle frame, think of it as the heart of your project. While it’s similar to the other frames, there’s a little twist: the front leg needs to sit flush with the seat for a clean, professional finish. Use pocket holes to assemble the frame, securing everything with 2 1/2″ screws (because stability is the name of the game).
Don’t skip the pilot holes, these are your insurance policy against splitting wood, especially for the screws anchoring the front and back of the frame. Nail this step, and you’re well on your way to a structure that’s not just built to last but built to impress!
Attaching-the-side-frames
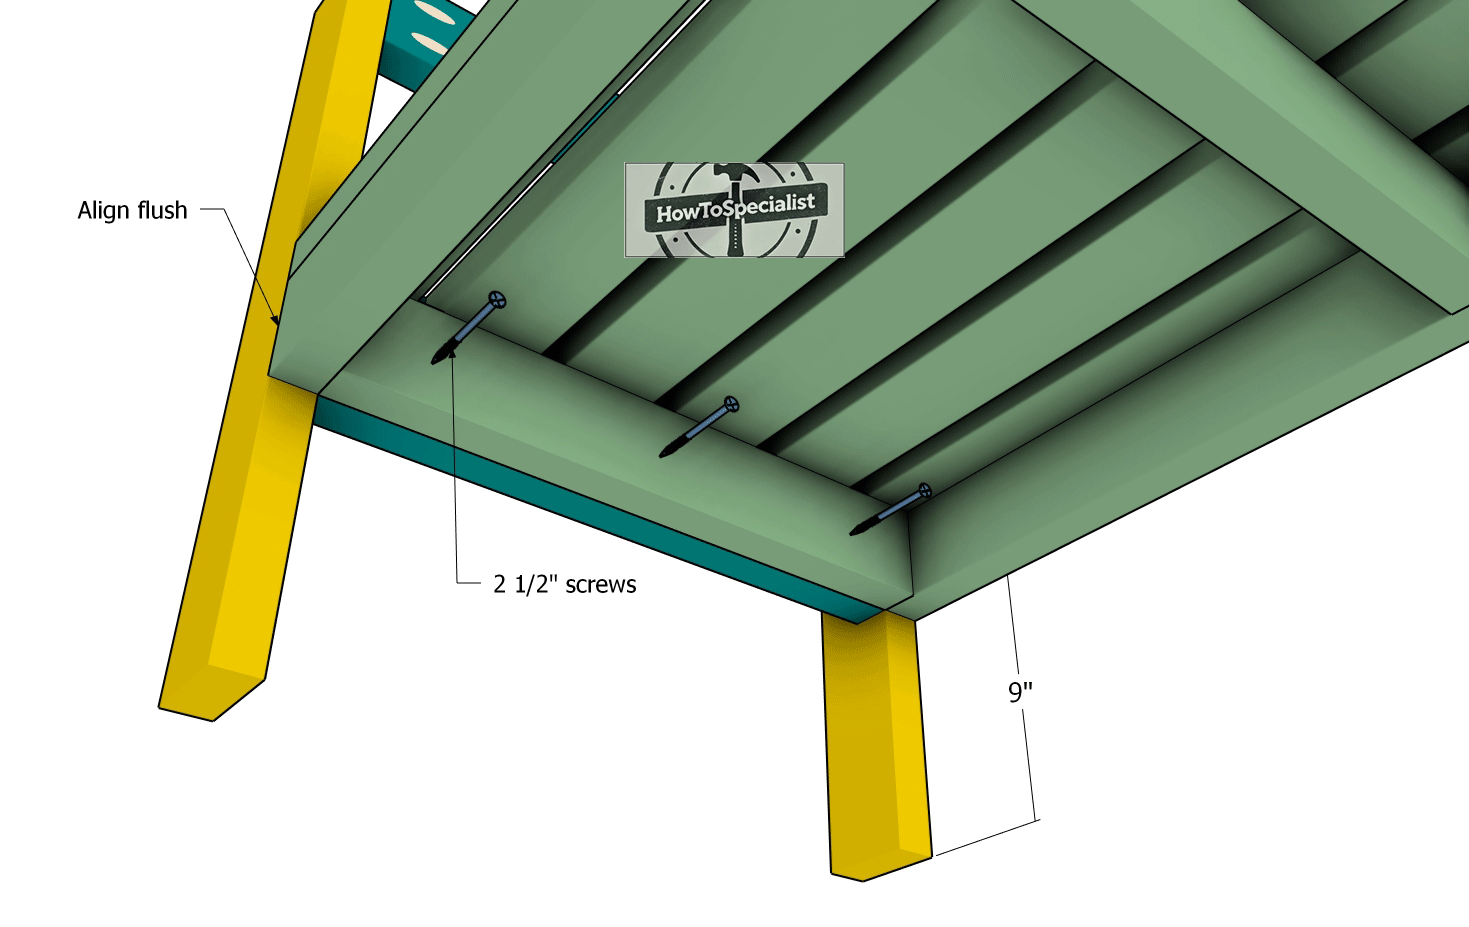
Let’s bring the structure to life by attaching the first frame to the left side, it’s like setting the stage for greatness. Start by aligning the edges flush, ensuring everything looks as seamless as a custom-fit glove.
Drill pilot holes to avoid any last-minute surprises (aka split wood), then secure the frame with 2 1/2″ screws. Tighten them up with confidence, knowing this connection is as solid as your DIY game.
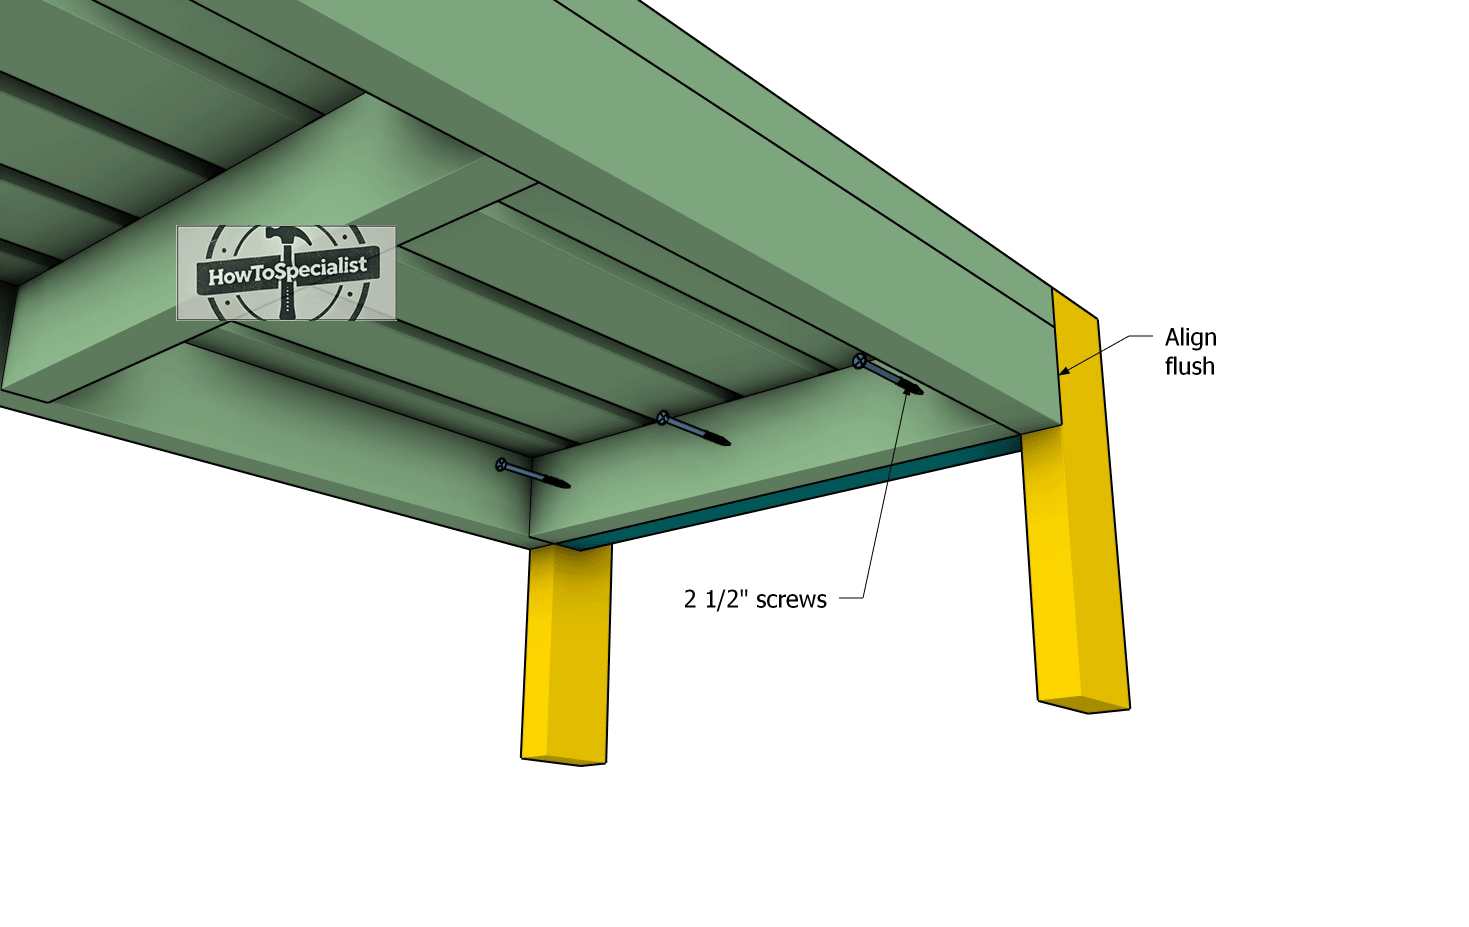
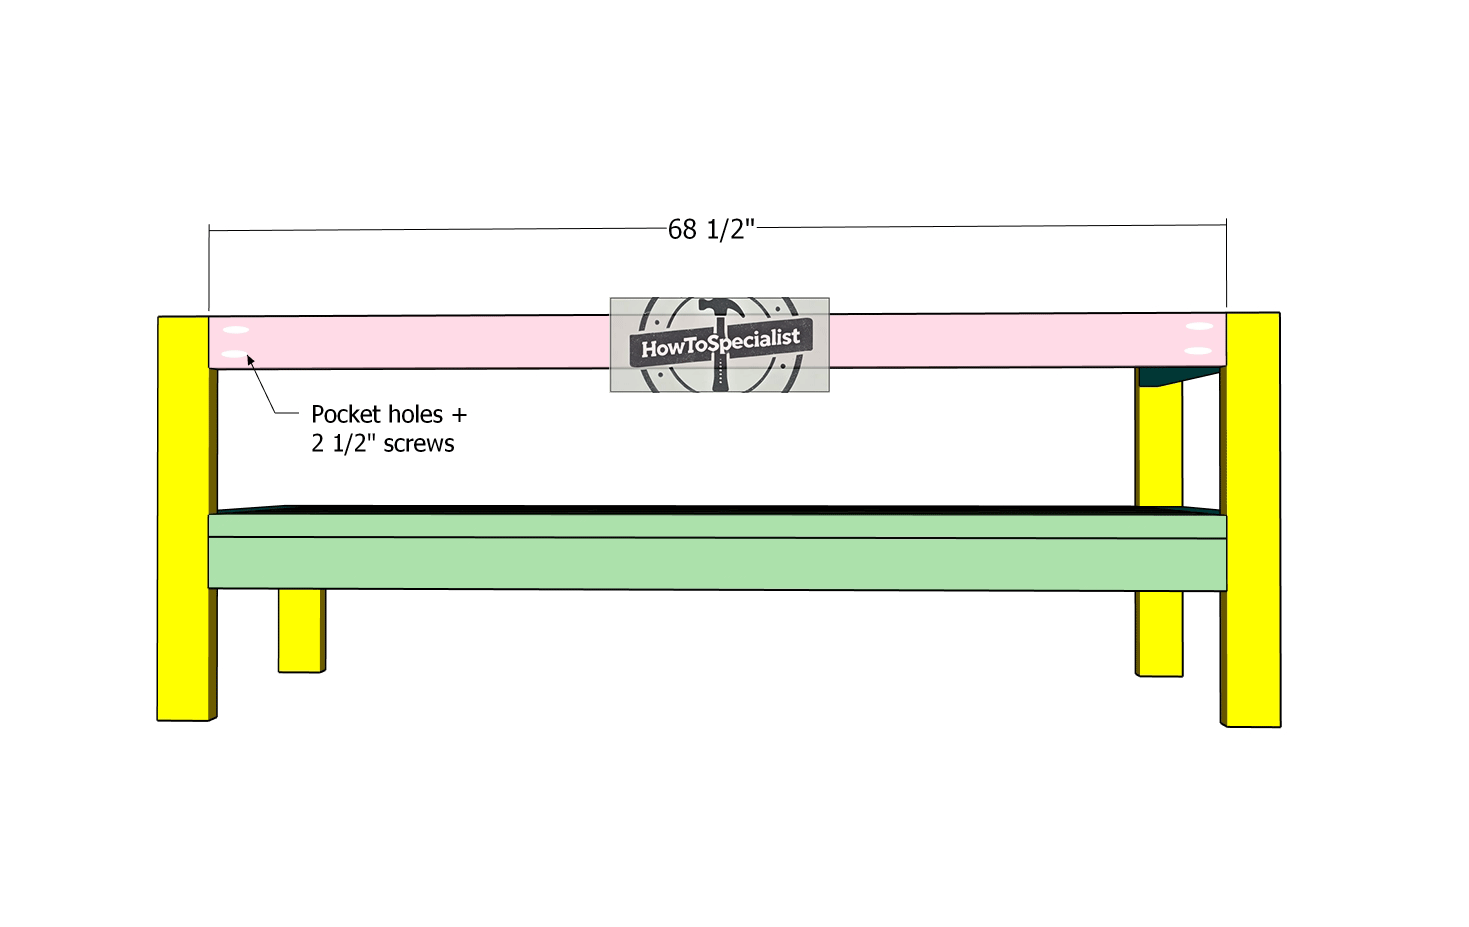
Attaching-the-middle-legs
Now, let’s balance things out by attaching the second frame to the other side of the seat frame, symmetry is key here! Align the edges flush, keeping everything straight and square, like a true craftsman.
Drill those pilot holes to keep the wood intact (we’re all about precision), then lock it all together with 2 1/2″ screws. Tighten them snugly and watch your project gain structure and stability.
Back-support
Next up, let’s add some backbone, literally, by fitting the 2×4 support to the backrest of your outdoor sectional bench. Drill pocket holes at both ends of the support piece, making it ready for a rock-solid connection.
Attach it to the back legs using 2 1/2″ screws, ensuring everything is aligned like a well-rehearsed dance. Add a generous squeeze of glue to the joints for extra durability, then lock it down tight with a few more 2 1/2″ screws.
Fitting-the-top-trims
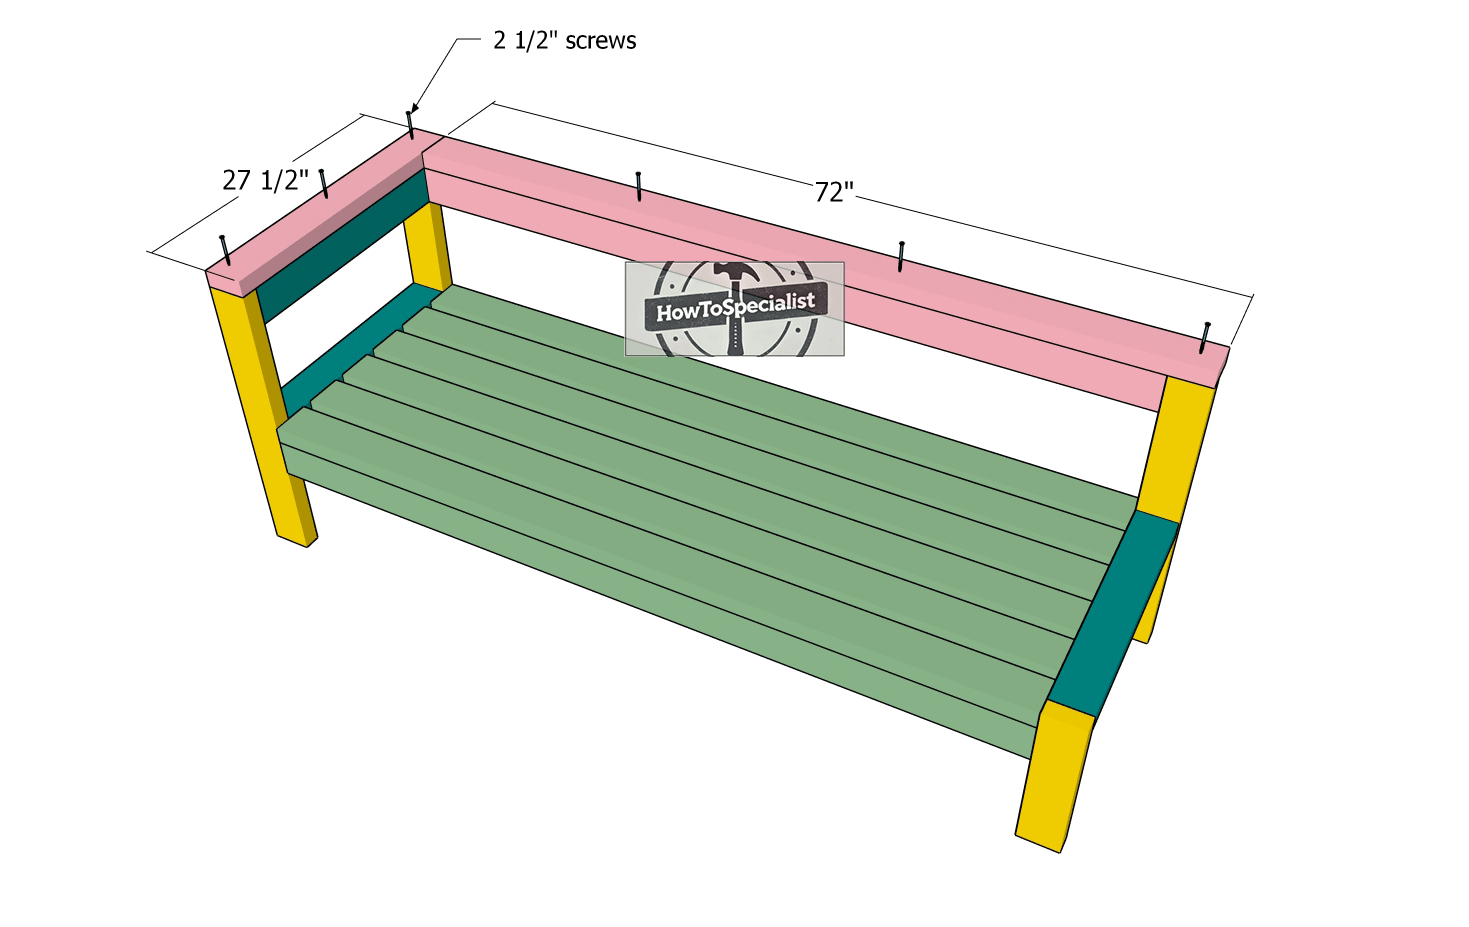
Time to crown your L-shaped patio sectional bench with those sleek top trims! Cut the 2×4 boards to size with precision, this is the cherry on top, so make it count. Pre-drill the holes to keep the wood in pristine condition (splits are not invited to this party).
Then, secure the trims to the bench using 2 1/2″ screws, following the diagram for perfect placement.
Step 2: Building the second bench
Sectional-seat-frame
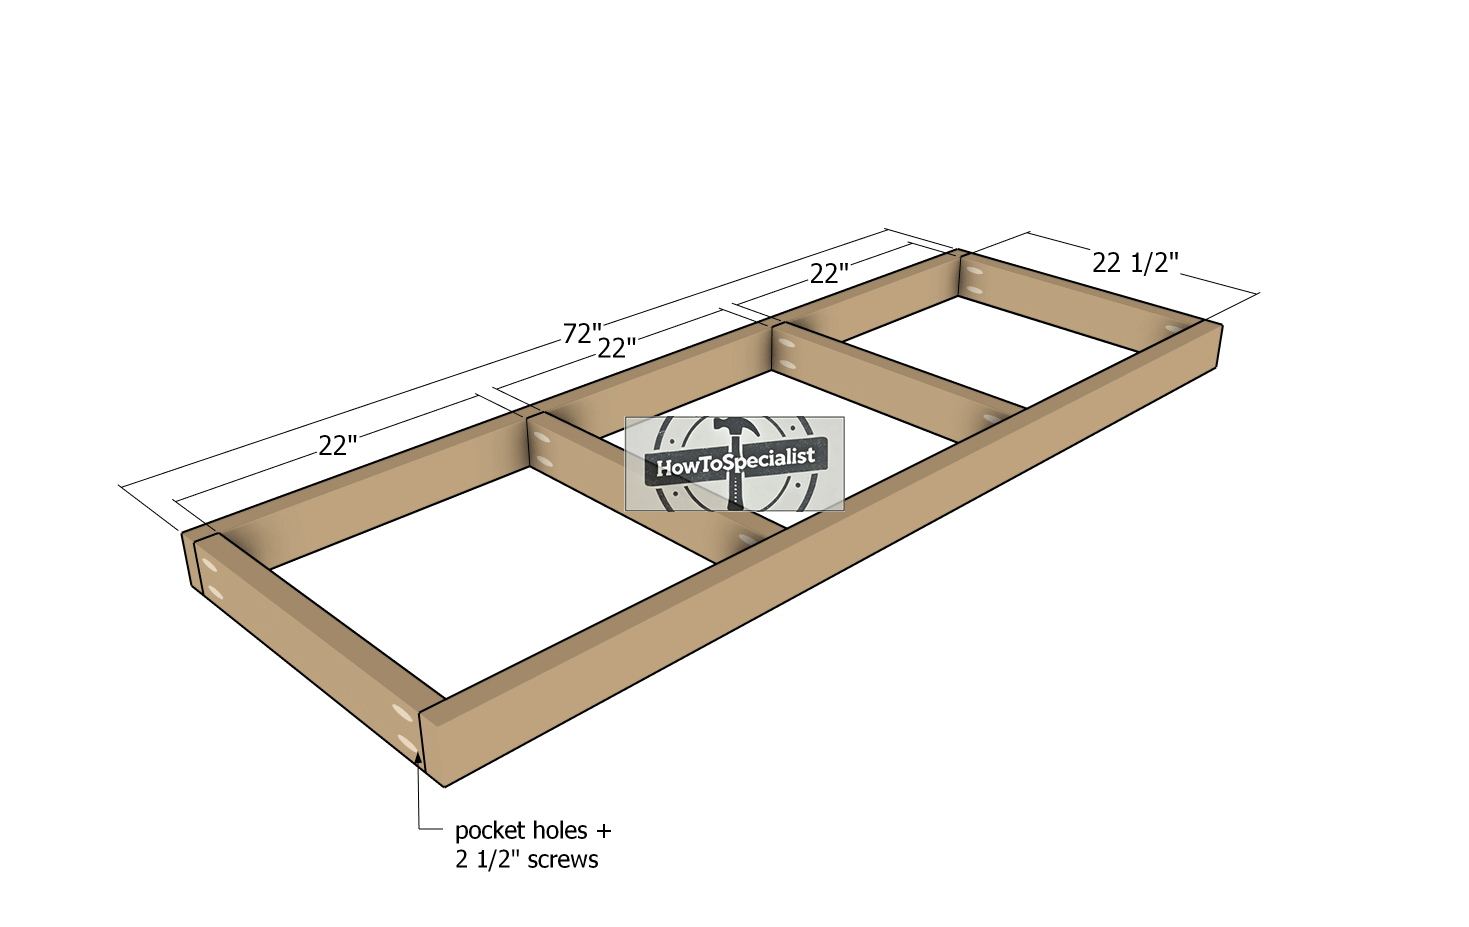
Keep the momentum going by diving into the second bench for your wood sectional, it’s all about building harmony! Start with the seat frame, cutting your 2×4 lumber to the perfect dimensions.
Drill pocket holes at the ends of the components and secure them with 2 1/2″ screws. Add a dab of glue to each joint for that unbeatable durability, and double-check that those corners are square, precision is your best friend here.
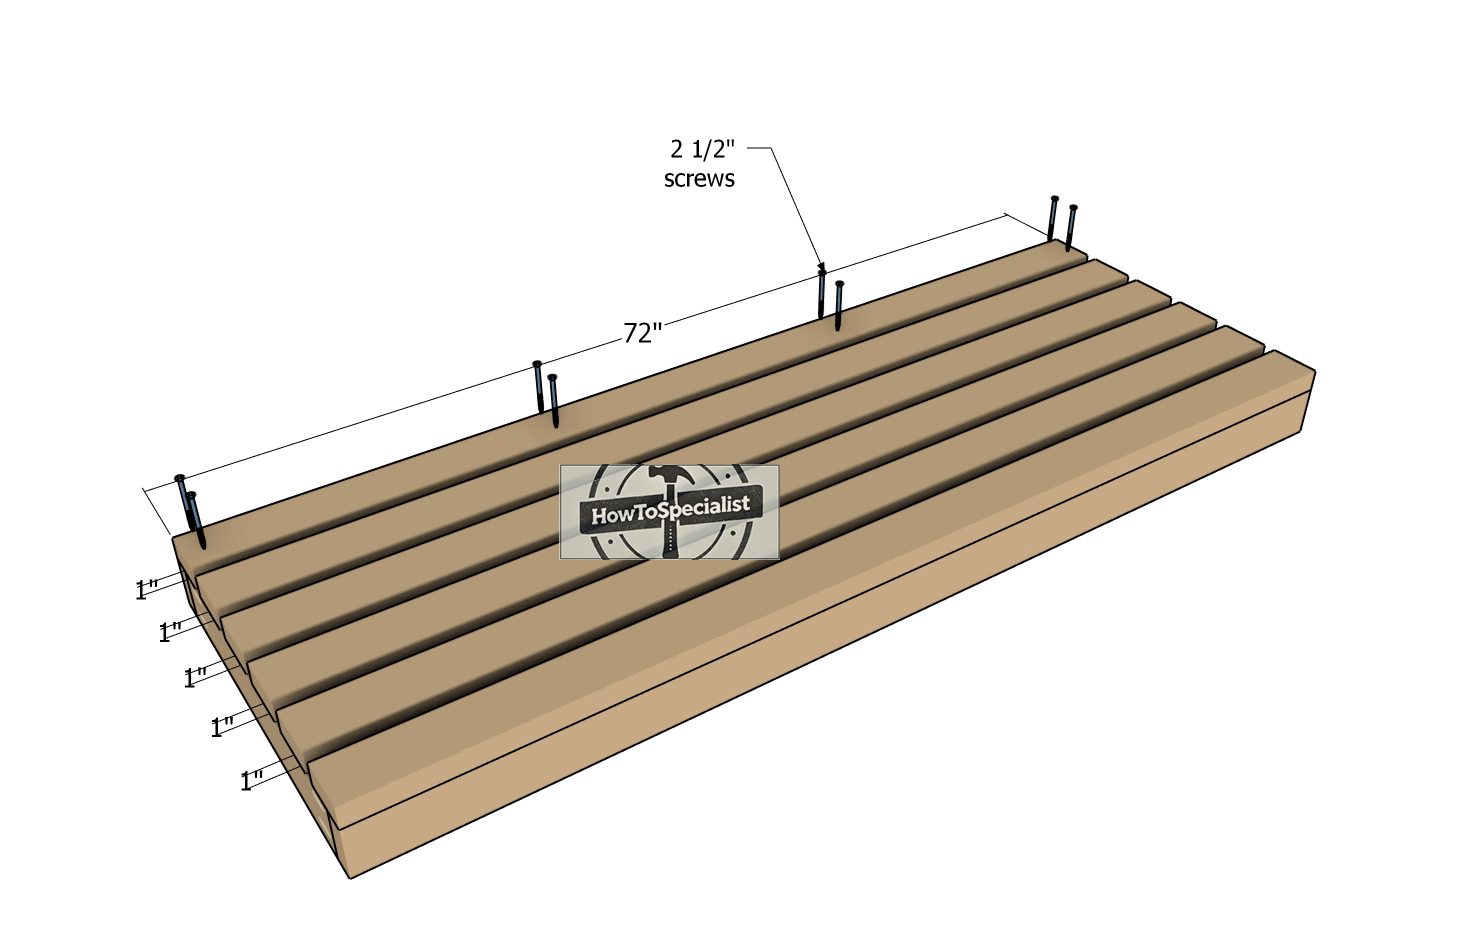
Seat-slats—section
Let’s give the seat frame its finishing touch by adding the 2×4 boards! Align the boards flush with the frame for that clean, polished look. Drill pilot holes to keep the wood intact and secure each board with 2 1/2″ screws, tightening them up for a snug fit.
Use 1″ spacers at both ends to ensure consistent gaps between the slats, because even spacing isn’t just functional, it’s classy. Don’t forget to countersink the screw heads for a smooth, professional finish.
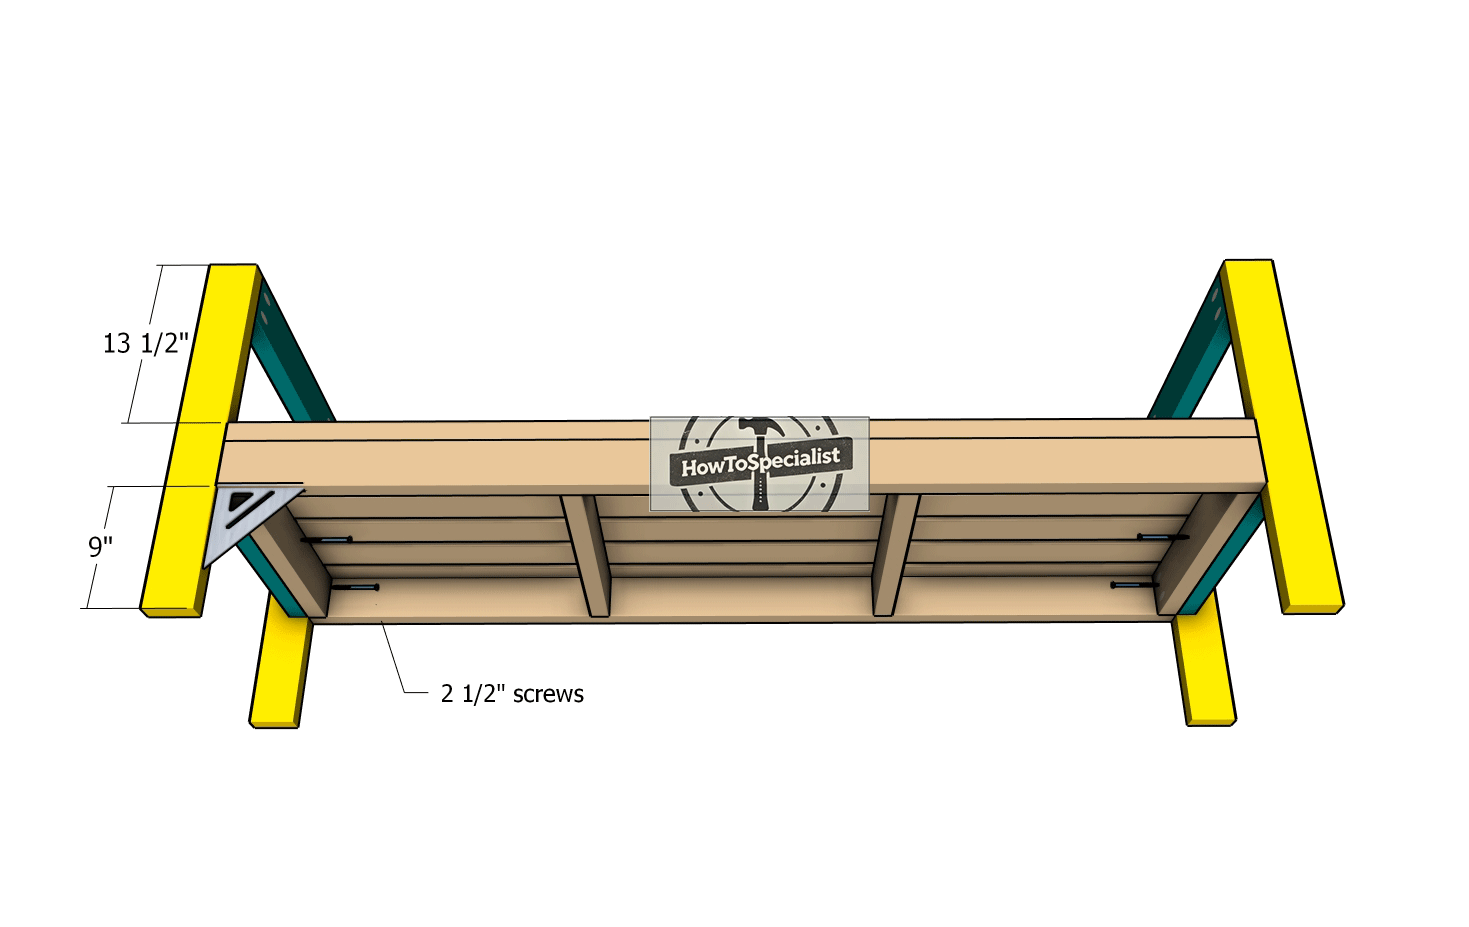
Assembling-the-section
Now, let’s give your bench some vertical flair by attaching the frames to the sides of the seat frame. Align the vertical frames precisely and grab your speed square to ensure those corners are as right-angled as a perfect Tetris piece.
Drill pilot holes to avoid any pesky wood splitting, this is craftsmanship at its finest. Once everything’s lined up, secure the frames with confidence.
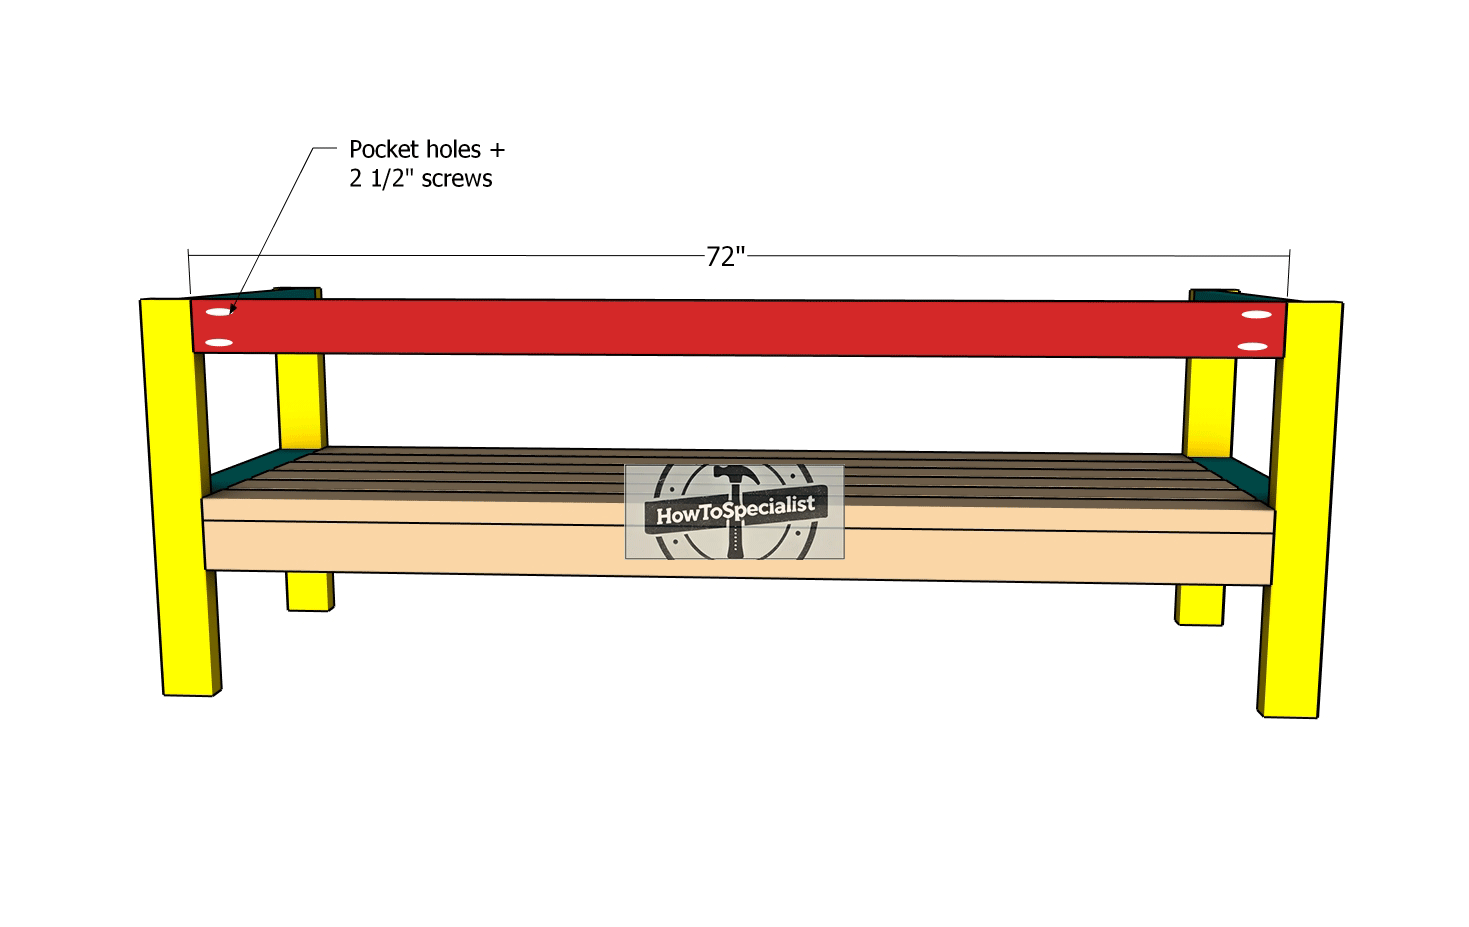
Back-support—section
Attach the backrest support to the bench with pocket holes and 2 1/2″ screws.
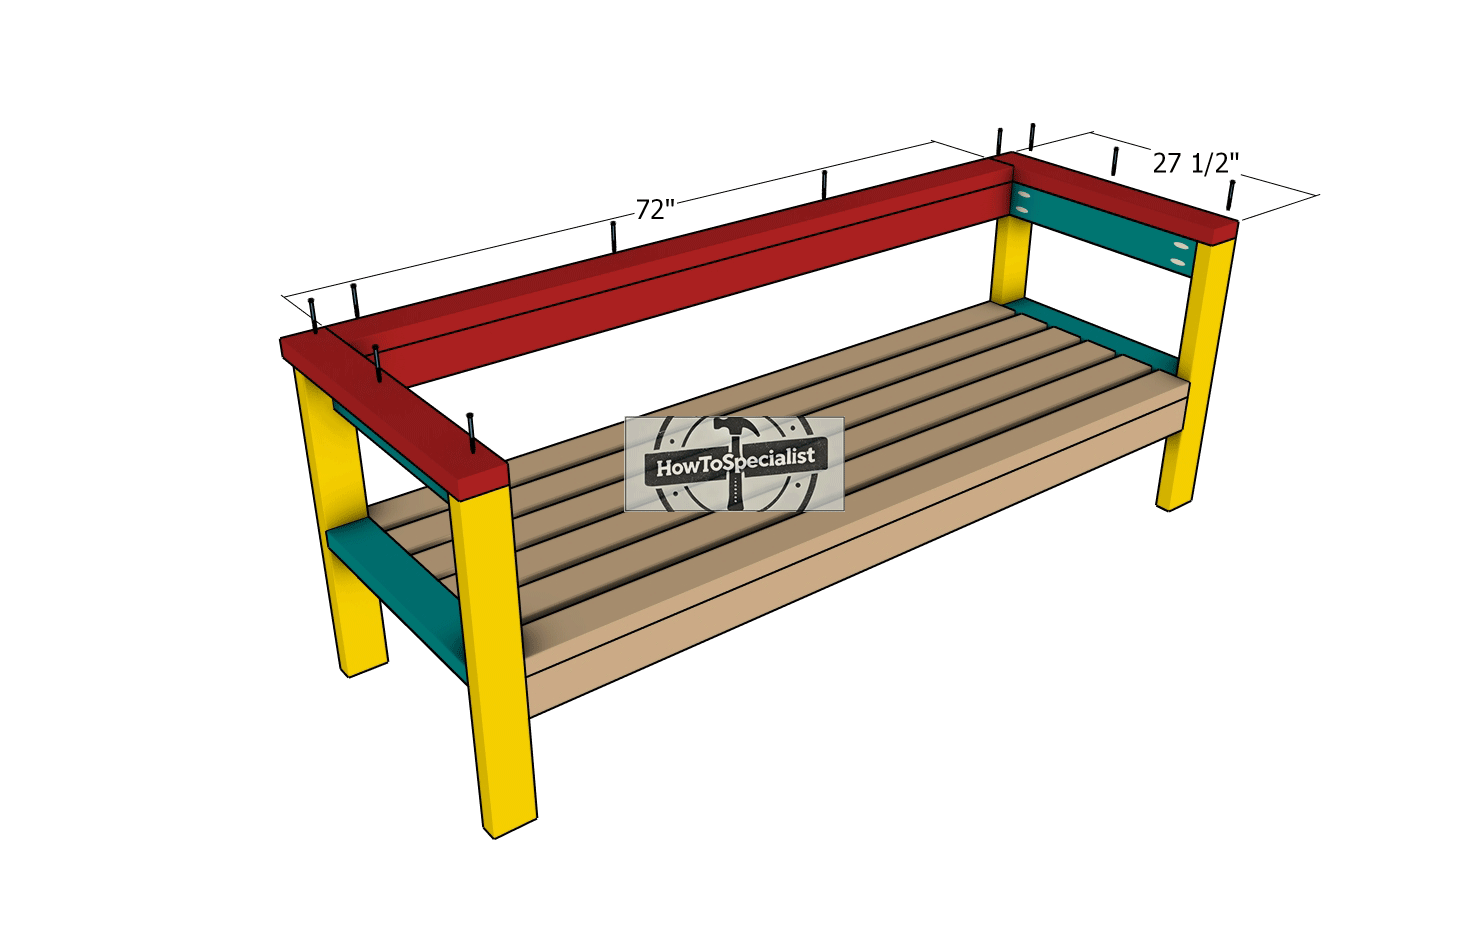
Top-trims
Let’s top off your wood bench in style by fitting the 2×4 boards to the top. Align the edges flush with the interior for a sleek and seamless look, precision is key here! Drill pilot holes to protect the wood from splitting, then secure the boards with 2 1/2″ screws.
Tighten everything into place, ensuring those trims are locked down securely. This finishing touch not only adds strength but also gives your bench a polished, professional look that’s ready to impress.
Step 3: Finishing touches
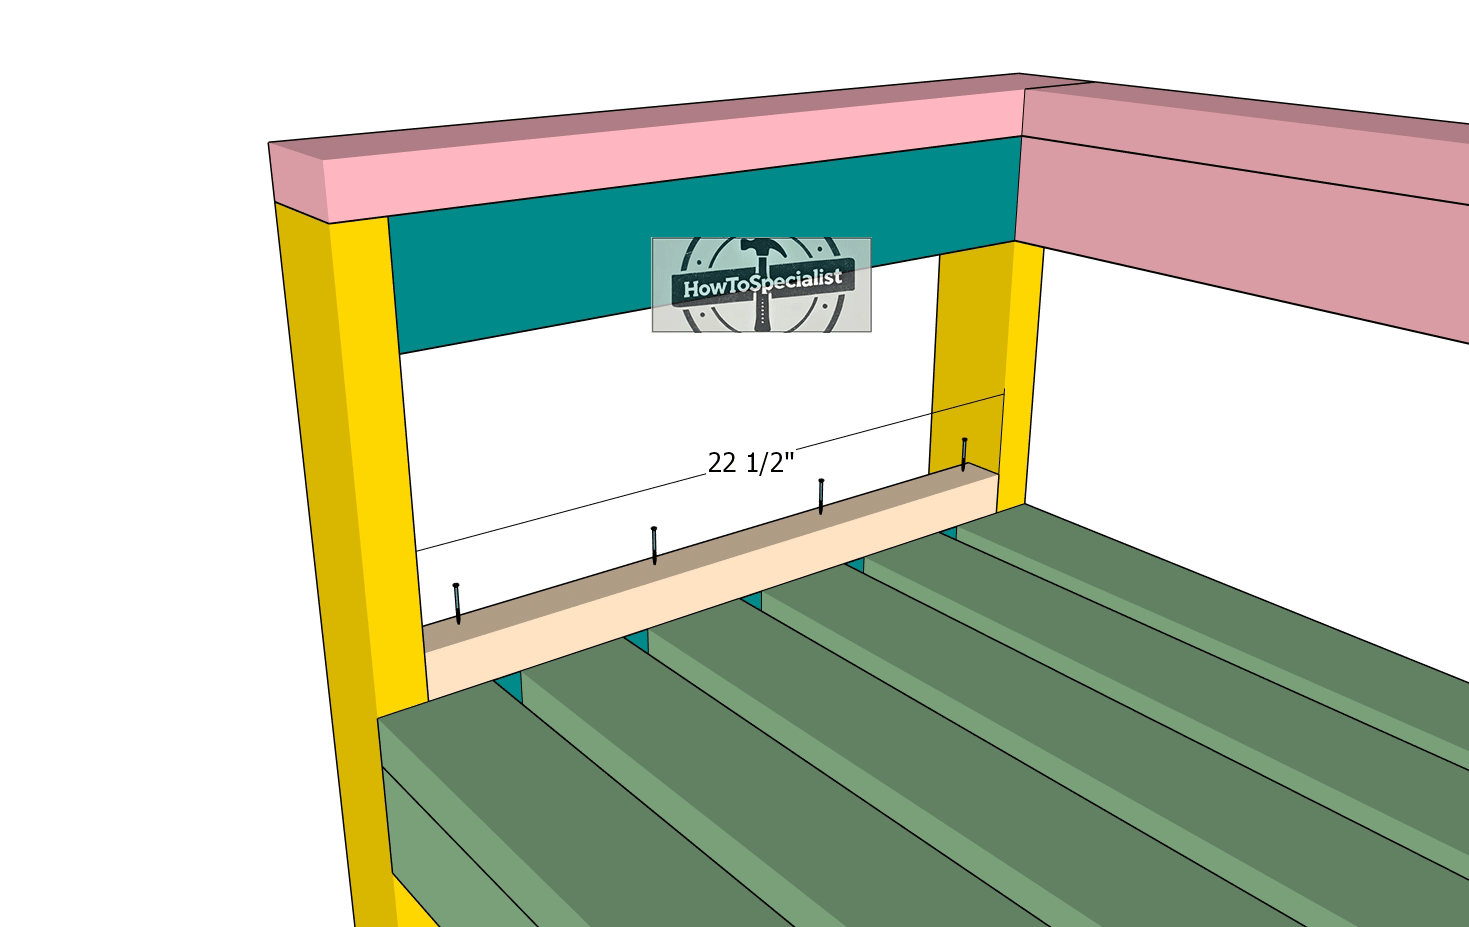
Cleats
For a little extra flair and functionality, consider this optional step: adding rails to the sides of your patio sectional bench. Start by attaching 2×2 cleats to the sides, these are the foundation for your rails, so get them lined up perfectly, as shown in the diagram.
Align the edges flush, ensuring everything is neat and tidy, then secure the cleats with 2 1/2″ screws. This small detail not only boosts the bench’s style but also adds a layer of customization that makes it uniquely yours.
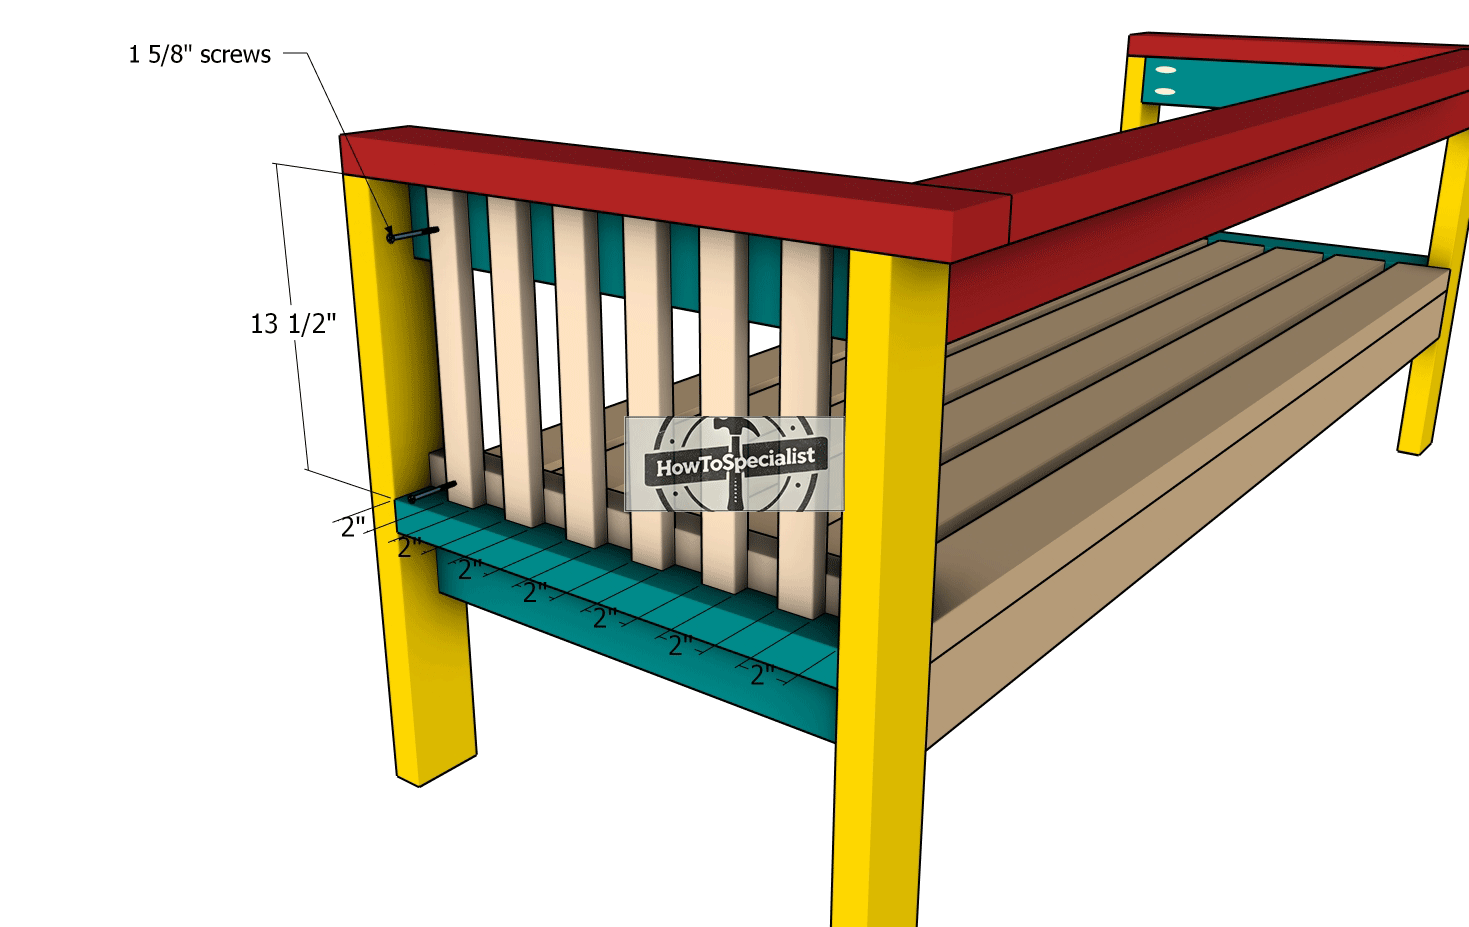
Balusters
Now it’s time to give your bench a touch of charm by fitting the 1×2 rails to the sides. Use 2″ spacers between the rails to ensure perfectly even gaps, this step is all about symmetry and style!
Drill pilot holes first (because split wood is a no-go), then secure the rails in place with 1 5/8″ screws. Tighten them snugly, and watch as your bench transforms into a stunning blend of functionality and flair.
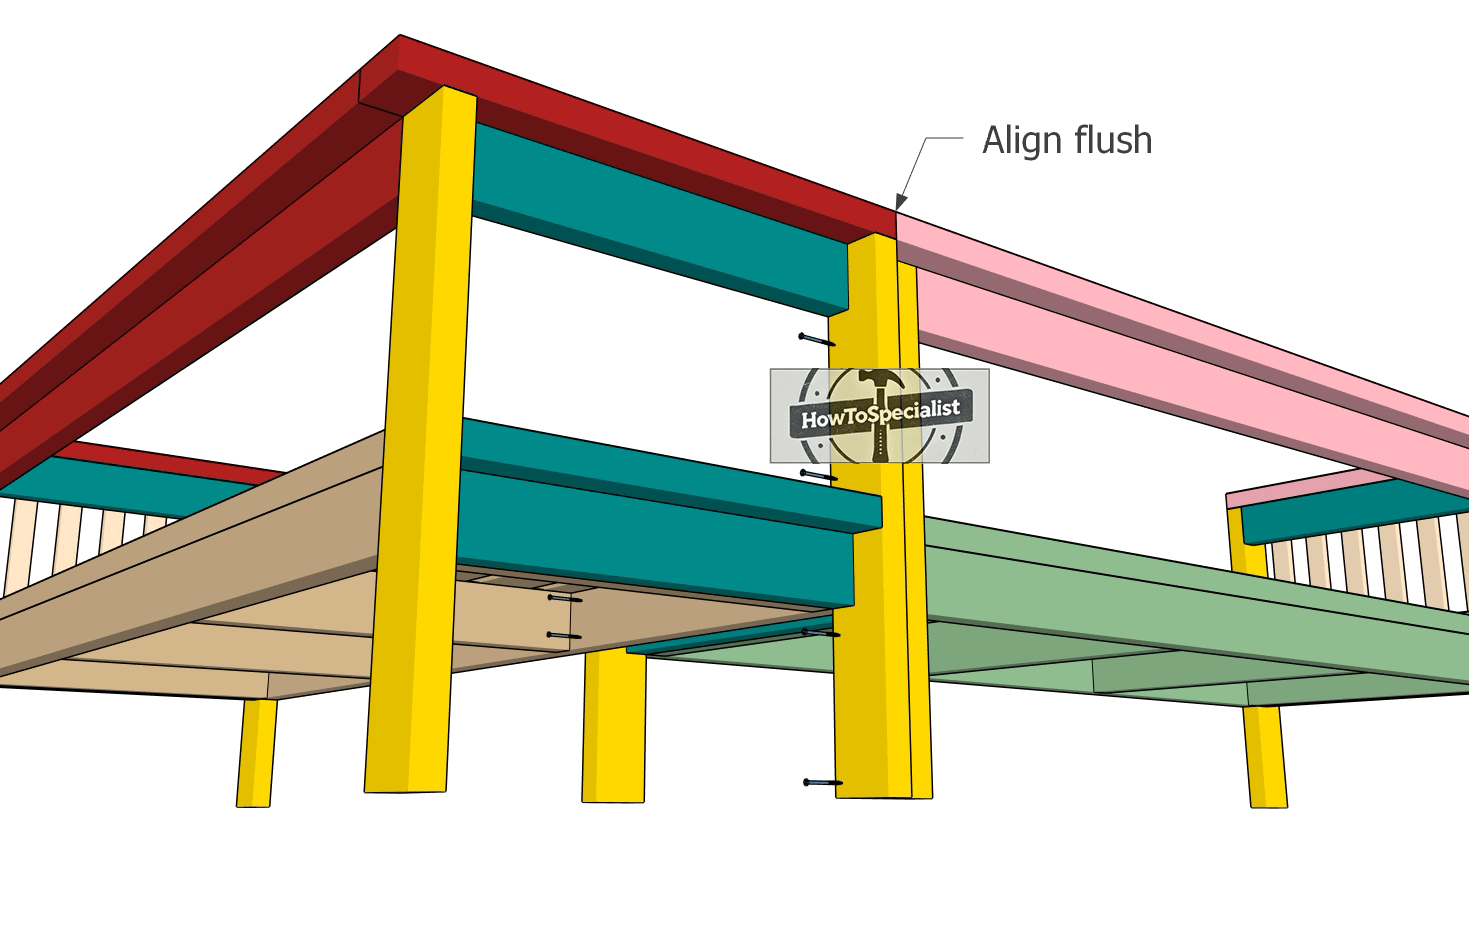
Assembling-the-l-sectional
With both benches ready to roll, it’s time to bring them together into one unified masterpiece! Align the tops of the benches perfectly flush, ensuring the front faces are also in seamless alignment, this step is all about precision. Drill pilot holes along the joining edges to prevent any splitting, then secure the benches together using 2 1/2″ screws.
Tighten them down snugly, locking everything together for a sturdy and polished finish. Now, your sectional is officially a show-stopper, ready for endless outdoor lounging sessions!
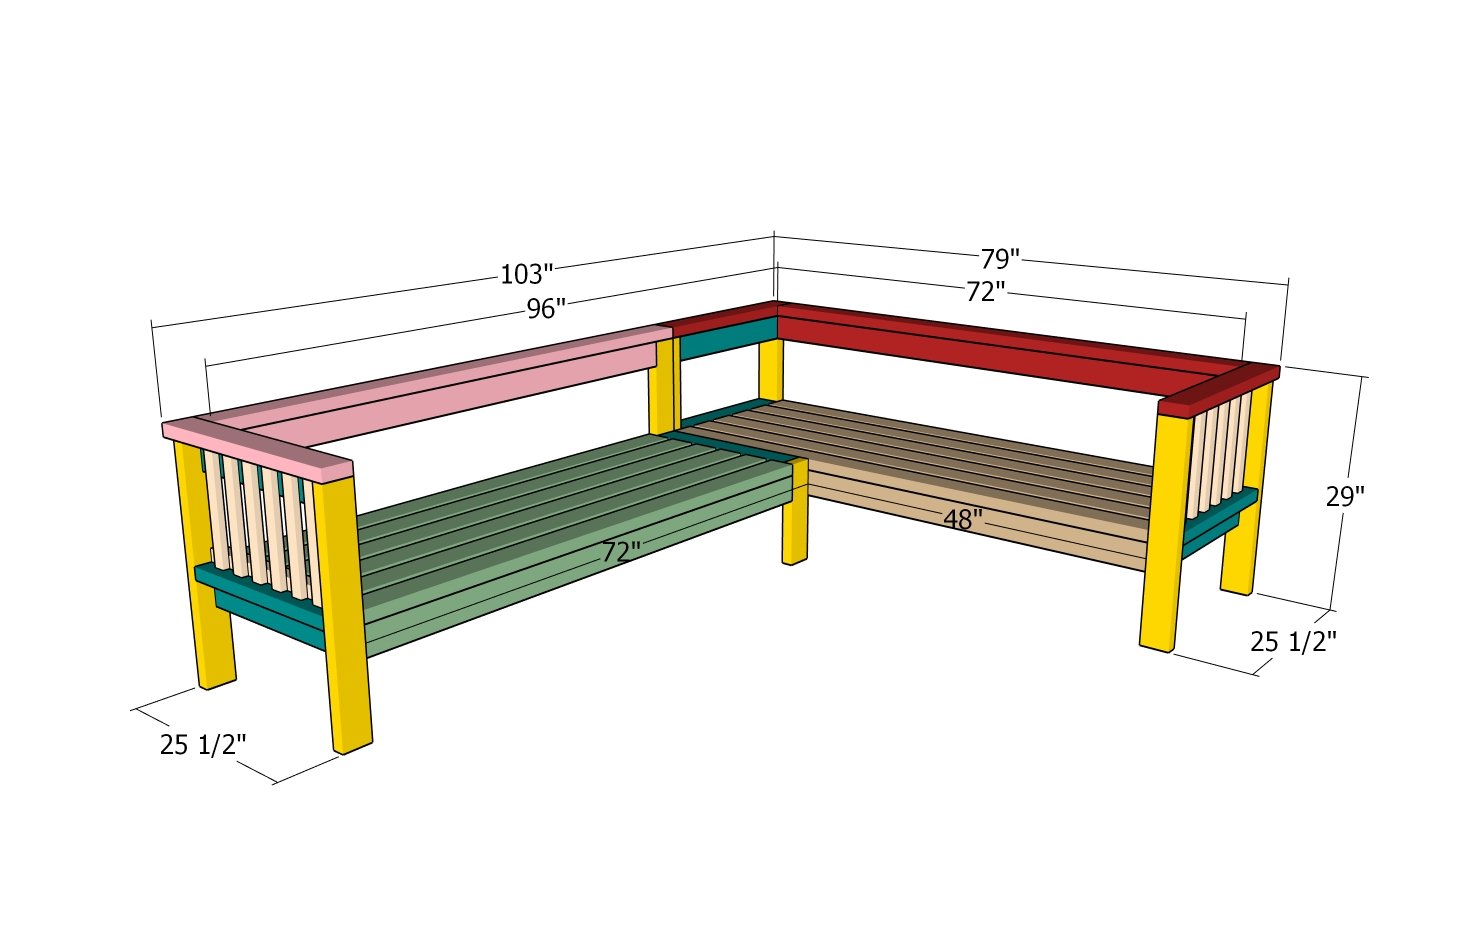
How to build an outdoor L section
Now that your patio sectional is fully assembled, it’s time for the finishing touches that will truly make it shine. Start by sanding down any rough edges or surfaces to ensure a smooth, splinter-free finish, because comfort matters. Wipe away any dust, then choose a wood stain or outdoor-rated paint that complements your space and protects the wood from the elements.
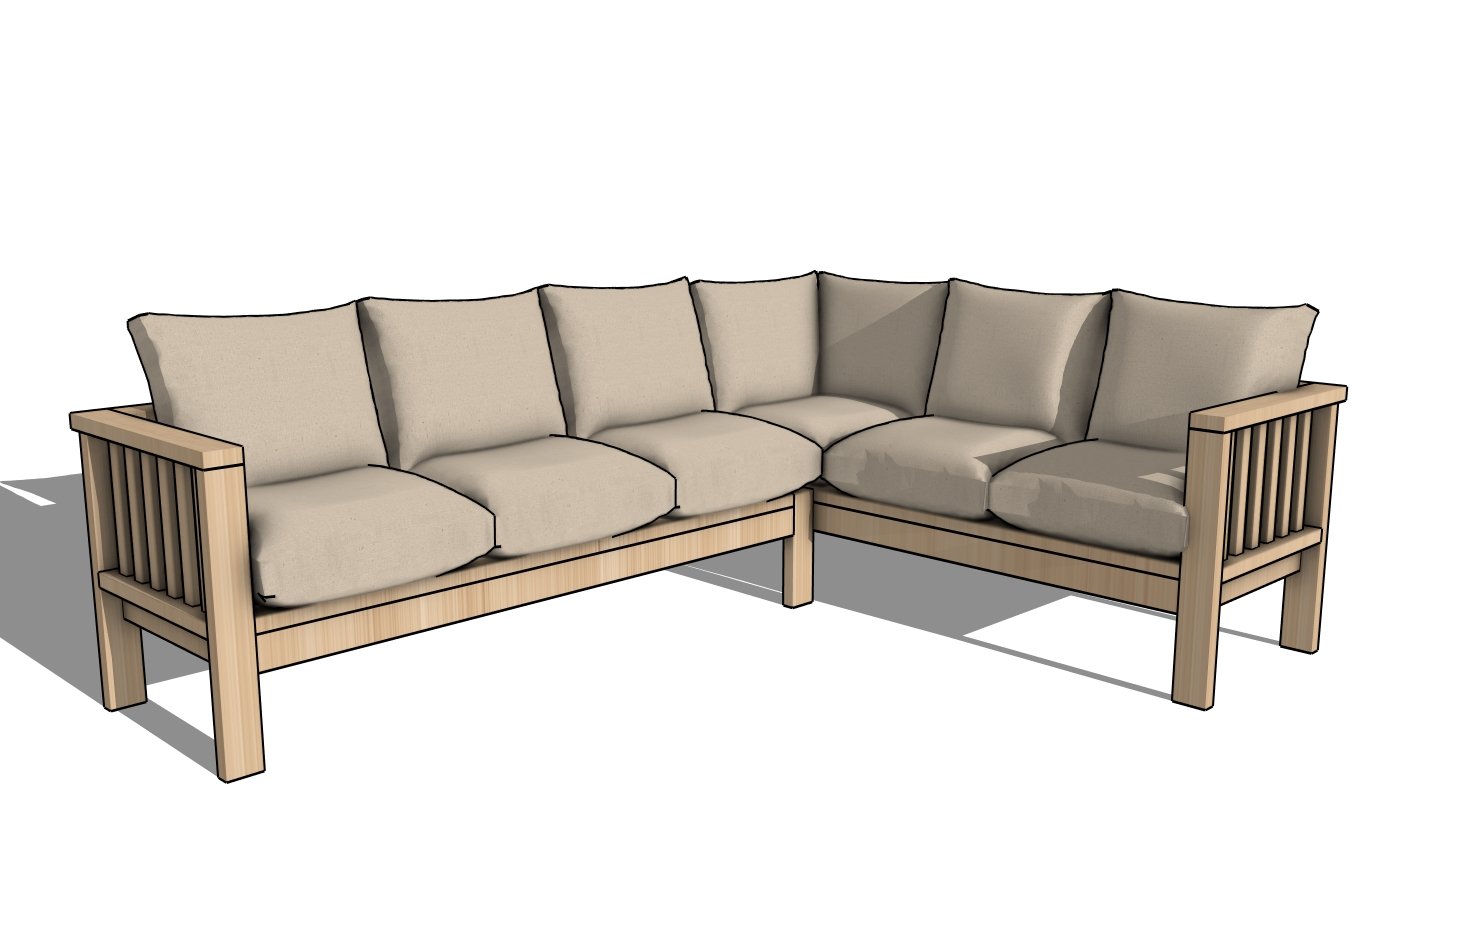
How to make an outdoor sectional
Apply it evenly, letting the rich tones or vibrant colors bring your sectional to life. For added durability, seal the finish with a clear topcoat.
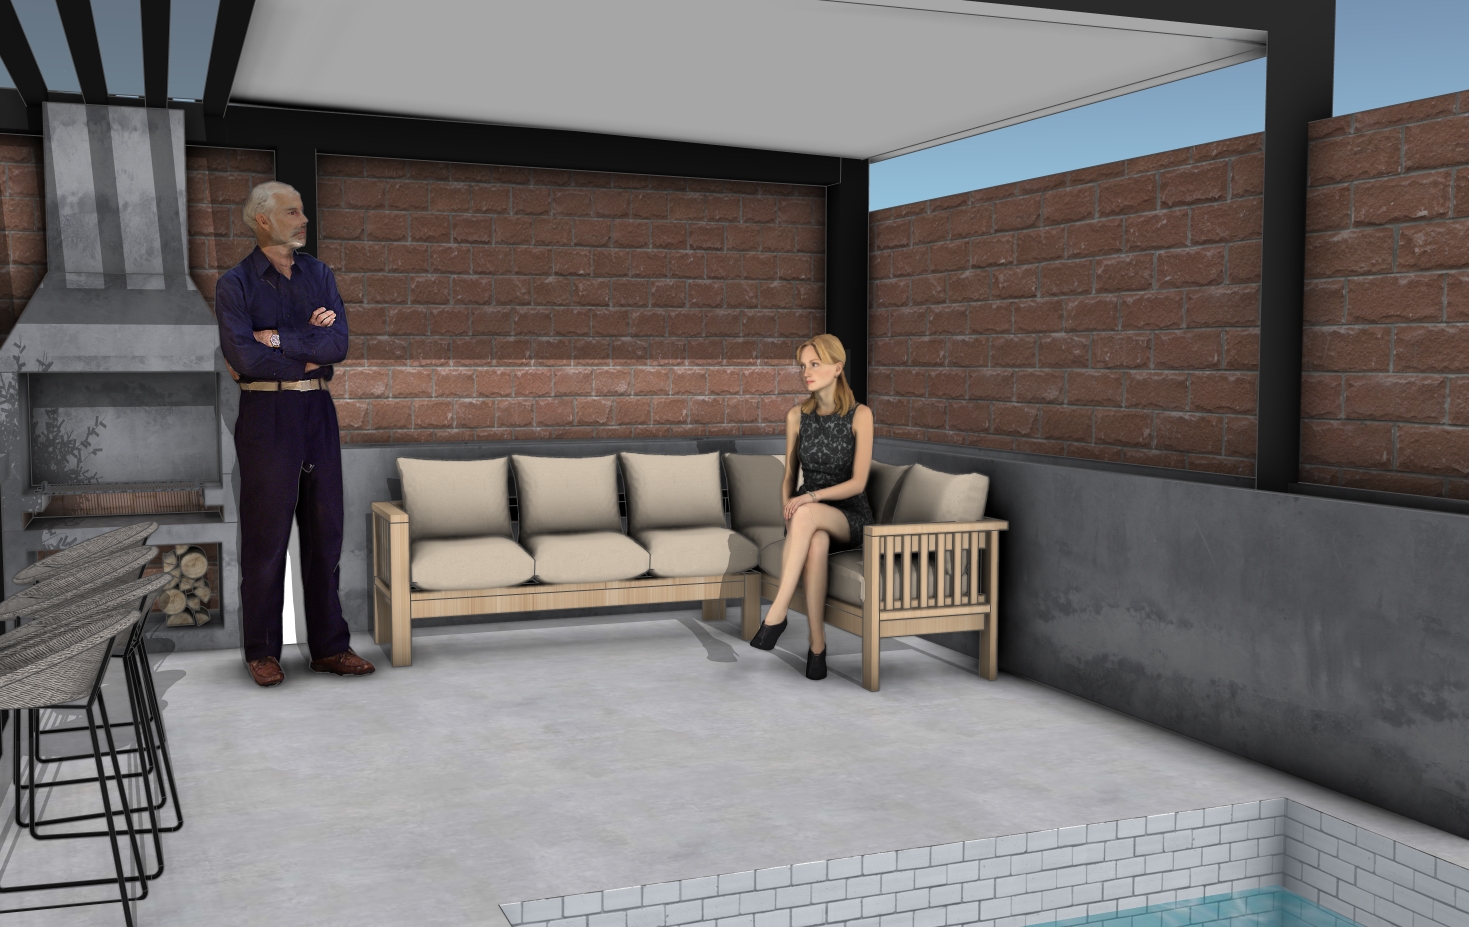
Outdoor sectional plans
And there you have it: a stunning patio sectional bench, crafted with care and built to last! Whether you’re hosting a backyard barbecue, soaking up some sun, or enjoying a quiet evening under the stars, this sectional is ready to be the centerpiece of your outdoor living space.
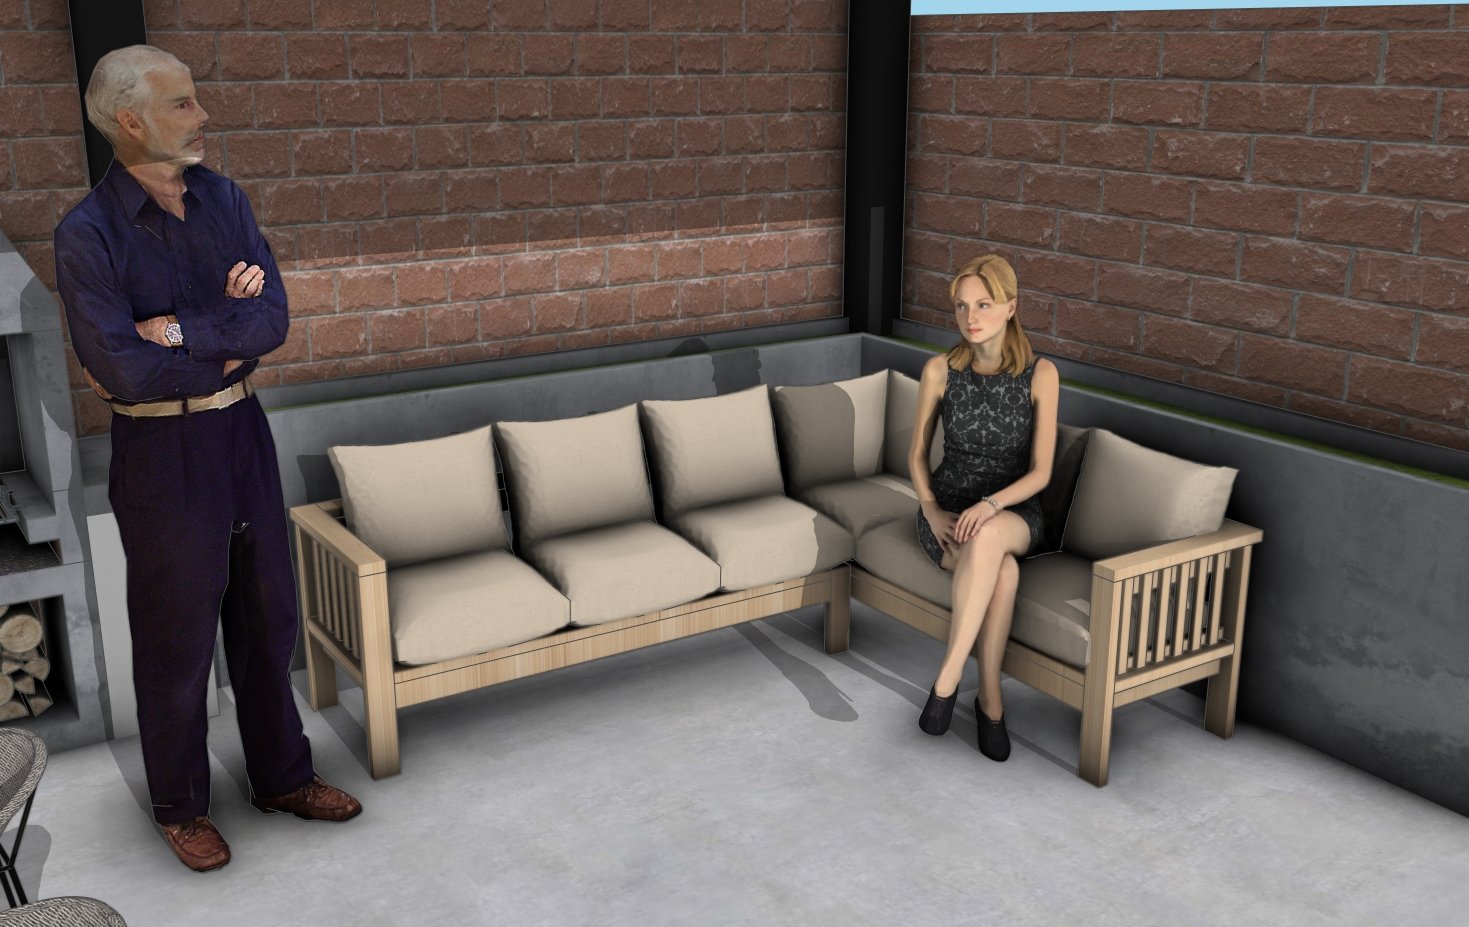
DIY Outdoor Sectional Plans
By following these steps, you’ve not only created a piece of furniture but a space for making memories. Now, grab some cozy cushions, your favorite throw blanket, and settle in, your handcrafted masterpiece deserves to be enjoyed. Don’t forget to share your finished project and inspire others to build their own! Happy DIY-ing! Check out the matching plans for the outdoor coffee table, as well.
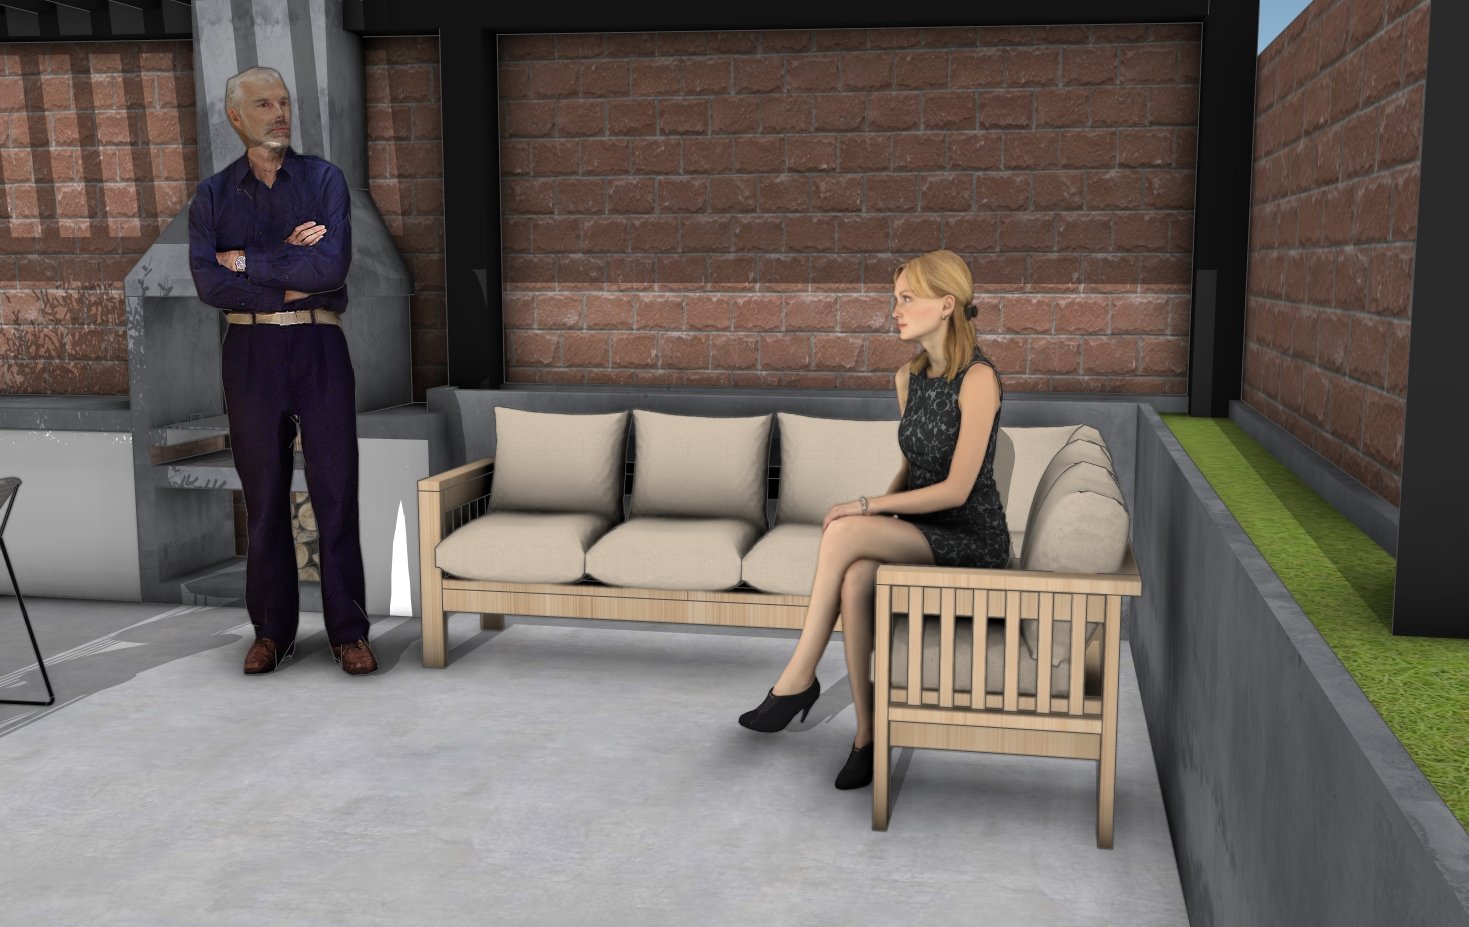
How to build an outdoor sectional
Video Tutorial
Thanks for checking out my DIY outdoor sectional bench plans! Be sure to explore my other projects for more fantastic ideas. Don’t forget to hit the LIKE button and SHARE with your friends using the social media links below.

