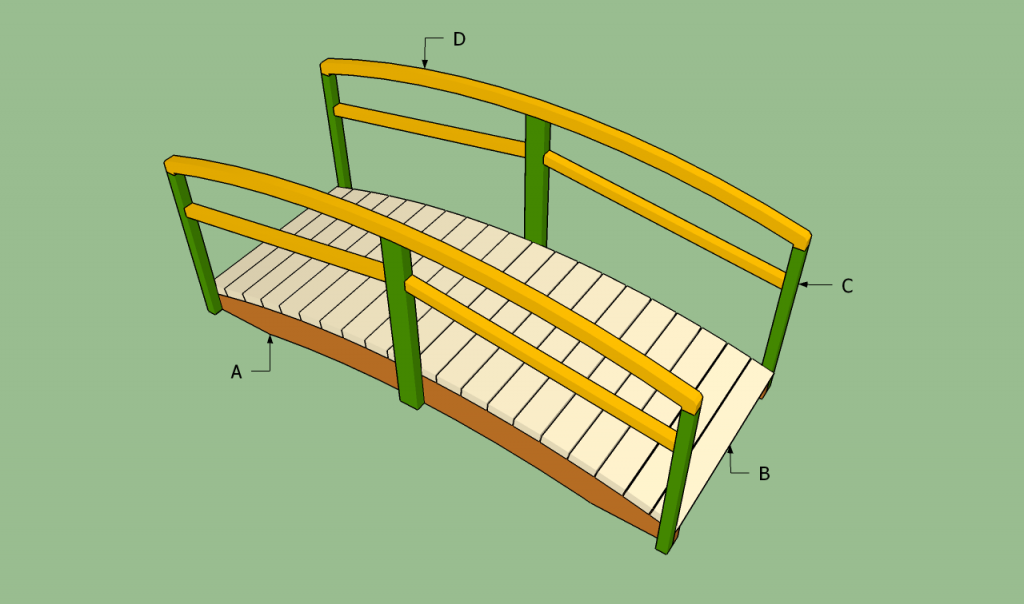
This article is about garden bridge plans. Even if you don’t have a stream on your backyard, the garden bridge will enhance the rustic look and add value to your property. The building techniques are straight forward and you also don’t need too much materials to get the job done. On the contrary, taking into account the small scale of the project, you can reuse scrap lumber for most of the components and buy the rest from your local diy store. In this step by step article we show you how to cut the stringers, how to make the railings and how to build the garden bridge, along with the rest of the woodworking techniques required to get the complete the project.
In order to build a durable arched bridge, we recommend you to use cedar, redwood or pressure-treated lumber: 2×4 treads, 2×12 beams for the stringers and handrails, and 2x2s for the posts. Work with good judgement and pay attention to all the steps during the construction process, as there are many things that can turn out wrong if not done properly from the very beginning.
If you want to obtain a professional look, we recommend you to round over the edges of the wooden pieces, by using a belt sander or a router. Work with great care and attention, if you want to obtain consistent results. After you have completed the project, we recommend you to apply several coats of protective varnish all over the garden bridge, to avoid water damage or wood decay. See all my Premium Plans in the Shop.
Made from this plan
In order to build a garden bridge, you need the following:
Materials
- A – 2 pieces of 2×12 lumber – 90″ long STRINGERS
- B – 20 pieces of 2×4 lumber – 32″ long SLATS
- C – 4 pieces of 2×2 lumber – 28″ long, 2 pieces of 2×4 lumber – 31″ long POSTS
- D – 4 pieces of 2×2 lumber – 41″ long, 1 pieces of 2×12 – 90″ long RAILS
Tools
- Safety gloves, glasses
- Circular saw, jigsaw
- Hammer, spirit level, carpentry pencil
- Drill machinery and drill bits
Tips
- Plumb the railing with a spirit level
- Apply several coats of varnish over the wooden components
Time
- One Weekend
Building a garden bridge

Building a garden beridge
Building a garden bridge is a straight-forward process, provided you use proper plans and materials for your needs. From our experience, we recommend you to invest in quality materials, such as redwood, pine or cedar.
Smart tip: Use a circular saw with a fine blade to build the curved components. Drill pilot holes before inserting the screws, to prevent the wood from splitting. Round the exposed edges with a router and a 1/4” bit.
Garden bridge plans

Building the stringers for the bridge
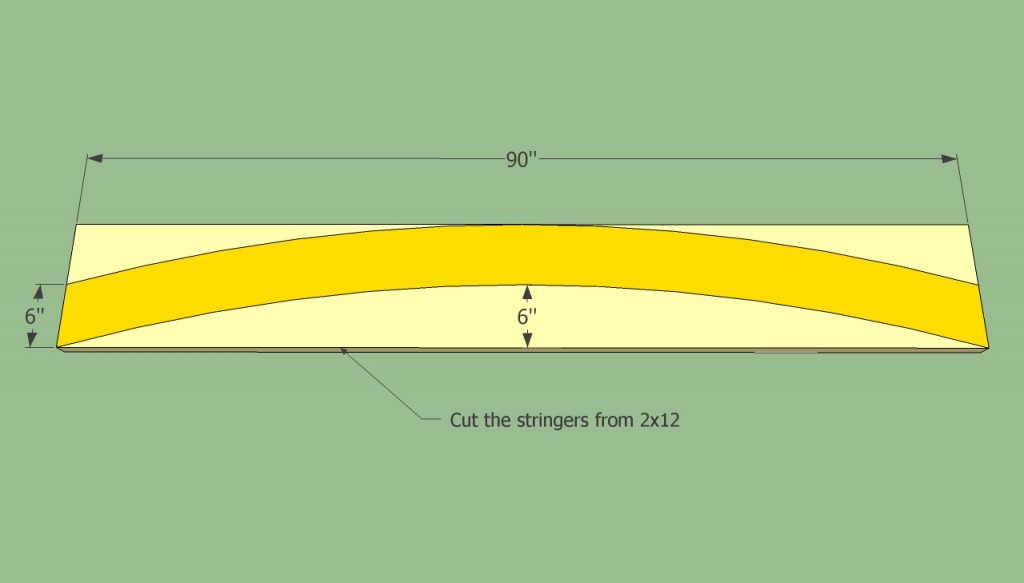
Use a pencil-and-string compass to mark the curved cut lines on the 2×12 beams. Next, use a jigsaw to cut the first stringer and use it as template for the second component. If you want to get a steeper curve, you could build the stringers from more components, although it takes longer.

Stringers for the wooden bridge
After you have cut the first stringer, you should use it as template for the second component. In this manner, you will make sure the wooden stringers have the same size and shape. Leave about 15” from the end of the boards, to support the weight of the bridge properly.
If you need a shorter or longer garden bridge, you could adjust the size of the components as to fit your tastes.

Building arch bridge
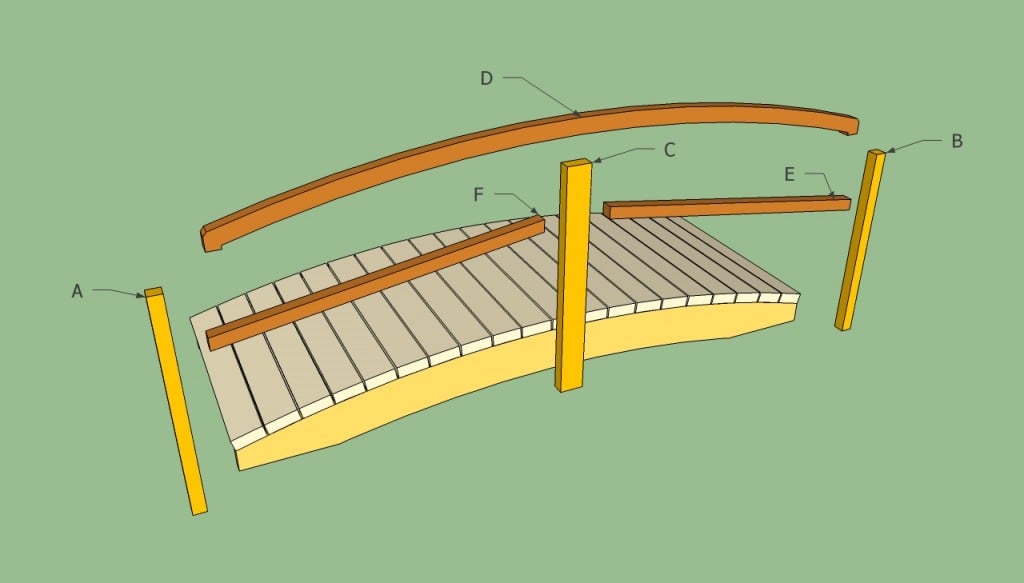
In order to get the job done like a professional, you should also build the rest of the components: the handrails, the rail and the post. As to build the handrails, you should cut them from 2×12 beams, in the same manner as described above.
How to build a garden bridge

Building garden bridge
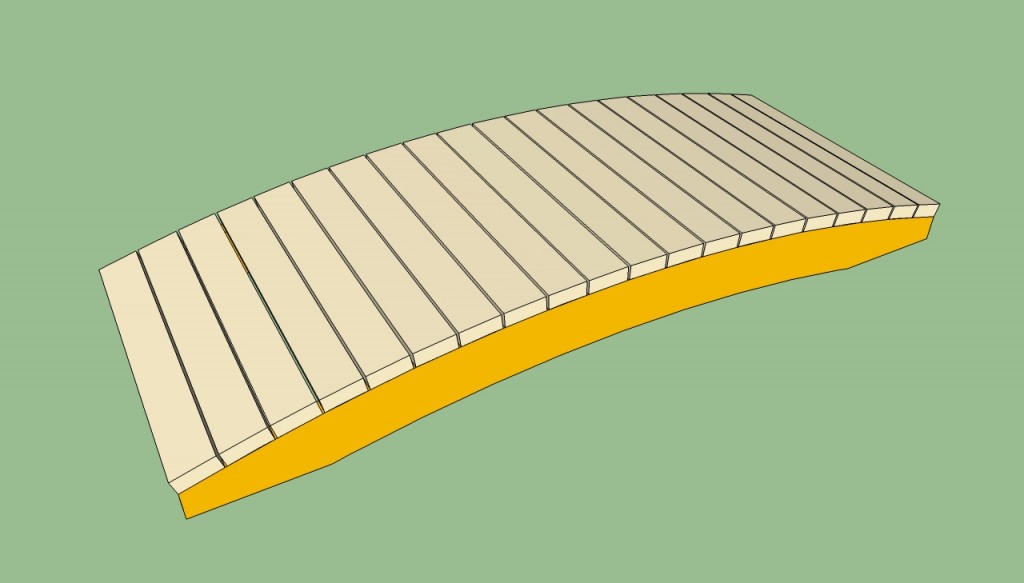
Plumb the stringers with a spirit level and place them 32” apart. Lock them into position by fastening a couple of treads, as in the image. Cut the treads from 2×4 boards at the appropriate size (in our case 32”) and lock them into position with several 2 1/2-3” screws.
Work with great care and attention, if you want to obtain a neat look. Align the boards at both ends, drill several pilot holes and drive in the screws with a electric screwdriver.

Fastening the treads to the bridge
Place the boards equally spaced one from another, to obtain a nice look. In order to get consistent gaps between the treads, just place a regular nail between them and remove it after you insert the nails.

How to build a garden bridge
After you have installed the treads, your garden bridge should look similar to the one in the image. As you can easily notice, building an arched bridge is not a complex job, if you use the right materials, tools and techniques for your needs and tastes.
Next, you have to build the components of the railings, if you want to add a dramatic effect to your wooden garden bridge. Nevertheless, if you want to keep things simple, you could use the bridge without installing the railings.

Bridge railing plans
Connecting the elements of the railings together and attaching them to the bridge are straight forward processes, if you have cut them at the right dimensions. Therefore, fasten the posts to the bridge using carriage bolts. Don’t forget to countersink the holes, before driving in the screws.

Garden bridge plans
Afterwards, you have to sand the garden bridge with medium-grit sandpaper and apply several coats of varnish to protect it against wood decay and water damage. Fill the cracks and the gaps with wood putty, let it dry out and finish the surface with a sander.
Thank you for reading our article about garden bridge plans and we recommend you to check out the rest of our projects. Don’t forget to SHARE and LIKE our articles with your friends, by using the social media widgets. SUBSCRIBE to be the first that gets our latest projects.
