This step by step woodworking project is about 7 kayak storage rack plans. Hey there, fellow DIY enthusiasts! Today, I’m excited to share my latest project with you: a seven-kayak storage rack made entirely out of wood. If you’re anything like me, you know the struggle of keeping your kayaks organized and off the ground. Well, worry no more! With these plans, you’ll have a sturdy, stylish rack that will keep your kayaks safe and sound, all while adding a touch of craftsmanship to your storage area. Let’s dive in and get started on building this essential piece for any kayak lover!
What’s even better is that this rack is completely free-standing, meaning you can place it anywhere without needing to anchor it to a wall or other structure. Its solid base ensures stability, even when fully loaded with kayaks. Let’s dive in and get started on building this essential piece for any kayak lover.
We recommend you to invest in the best materials you could afford. Therefore, you should buy weather-resistant lumber, such as pressure-treated lumber, cedar or redwood. If you use regular pine, I recommend you to apply the appropriate products to enhance its durability. Always take accurate measurements before adjusting the size of the components at the proper size. Drill pilot holes trough the components before inserting the wood screws, to prevent the wood from splitting. See all my Premium Plans HERE.
Made from this plan
Seven Kayak Rack – DIY Plans
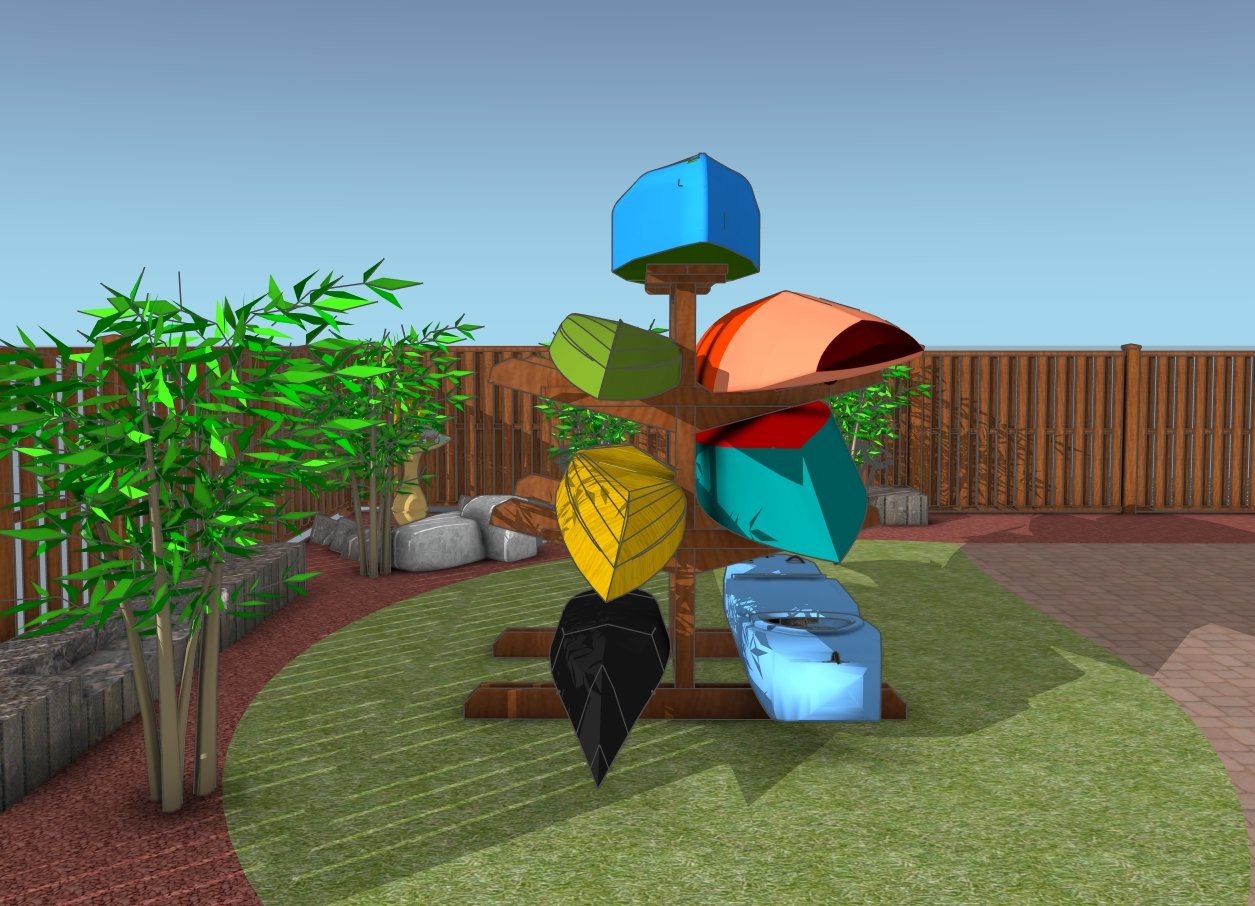
Building-a-large-kayak-storage-rack
Materials
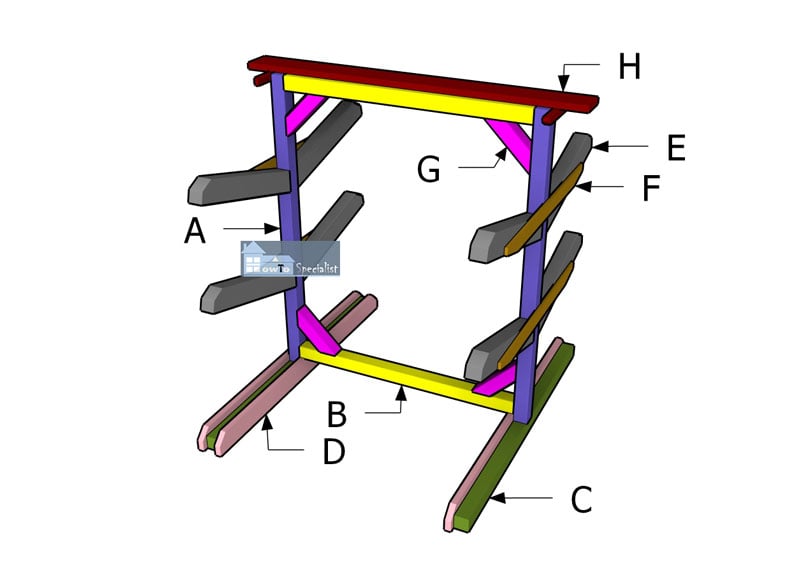
A – Posts – 4×4 lumber 80″ – 2 pieces
B – Frame – 4×4 lumber 62″ – 2 pieces
C – Base – 4×4 lumber 80 1/2″ – 2 pieces
D – Base beams – 2×6 lumber 83 1/2″ – 4 pieces
E – Supports – 4×6 lumber 36 3/8″ – 4 pieces
F – Braces – 1×4 lumber 54″ – 4 pieces
G – Braces – 4×4 lumber 16″ – 6 pieces
H – Shelf Supports – 2×2 lumber 14 1/2″ – 2 pieces
H – Shelf – 2×8 lumber 84″ – 2 pieces
*Buy Premium Plans for Cut and Shopping Lists
Tools
- Safety gloves, glasses
- Miter saw, jigsaw
- Chalk line, tape measure, spirit level, carpentry pencil
- Drill machinery and drill bits
Time
- One Weekend
How to build a kayak rack – PDF Download
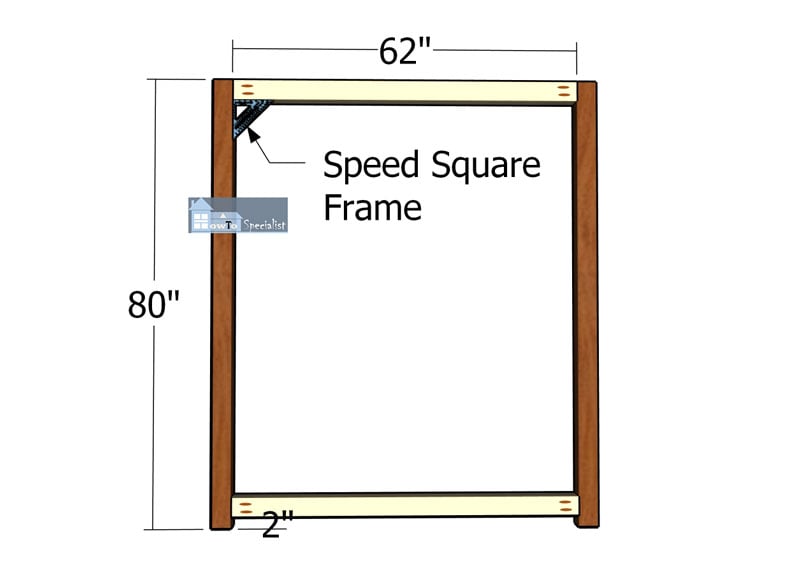
Assembling-the-main-frame
Let’s kick off this project by assembling the main frame for our seven-kayak rack. We’re going to use sturdy 4×4 lumber for this part, so go ahead and cut the parts to the dimensions shown in the diagram.
Next, we’ll drill pocket holes at both ends of the horizontal components. Lay all the components out on a level surface, making sure the edges are perfectly aligned and the corners are nice and square. Now, grab those 3 1/2″ screws and secure the frames together tightly. This is the foundation of our rack, so let’s make it rock solid!
Base-beam—detail
Next up, let’s get those base beams centered on the bottom of the frame and aligned flush with the edges. This part is crucial for stability, so take your time to get it just right. Drill pilot holes first to prevent the wood from splitting, and then insert 5 1/2″ screws to lock everything together tightly. Double-check to make sure those corners are square. This will give our kayak rack a solid base to stand on!
Base-beams—cutting-diagram
Let’s move on to the base beams. We’re going to use 2×6 lumber for these. Make 45-degree cuts on both ends of the beams, just like in the diagram. Fit the beams snugly to the base frame and secure them with 3 1/2″ screws.
Fitting-the-base-beams
Don’t forget to insert screws through the side 2×6 beams into the upright posts, too. This will really reinforce the rigidity of our rack, ensuring it stays rock solid.
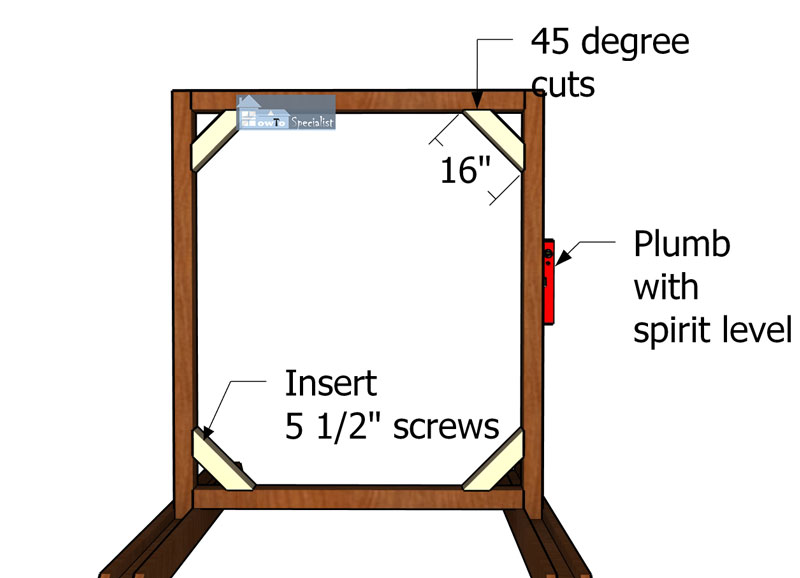
Main-frame-braces
Now let’s add some diagonal braces for extra stability. Cut your braces to length with the ends angled at 45 degrees. Position them right on the main frame, ensuring those corners are nice and square. Drill your pilot holes and then grab some 5 1/2″ screws to lock those braces into place. This step is crucial for making your structure rock solid, just like we want it!
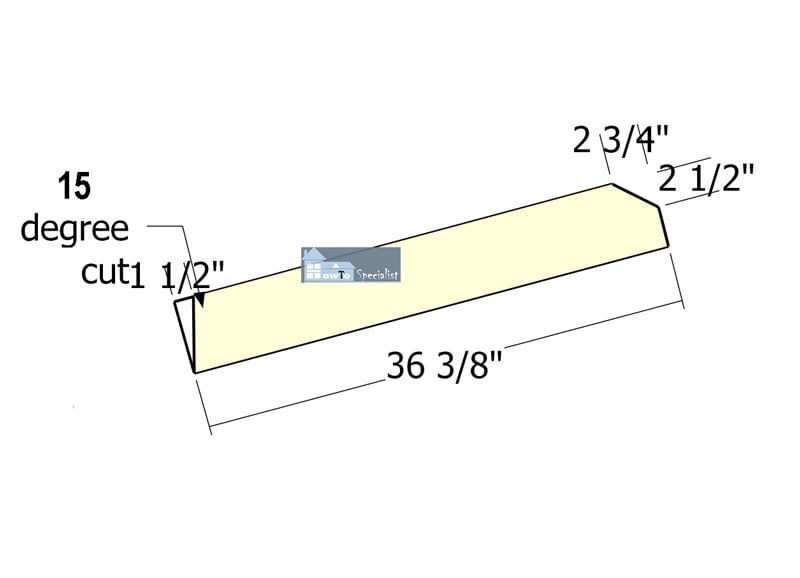
Kayak-supports
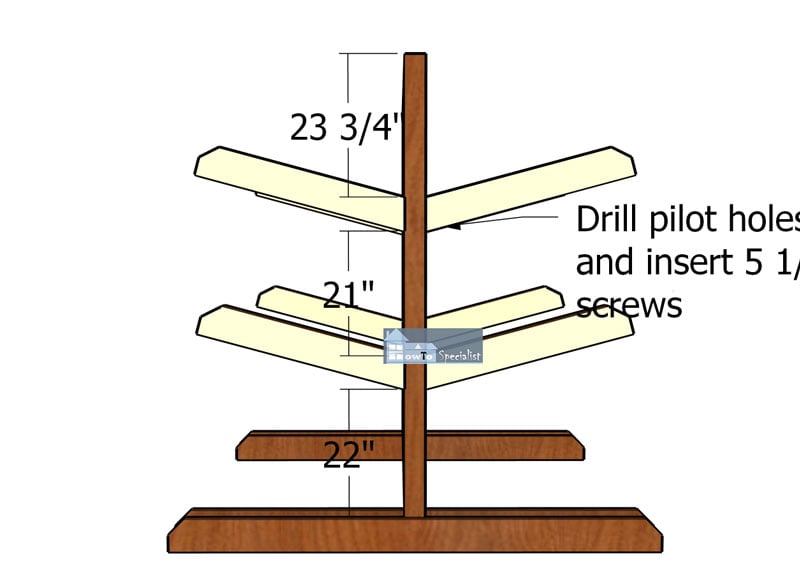
Attaching-the-kayak-supports
Now, let’s tackle the side kayak supports using 4×6 lumber. You’ll want to make a 15-degree cut on one side of the supports and a 45-degree decorative cut on the opposite end. Once you’ve got your cuts done, drill pilot holes into the supports and secure them to the uprights with 5 1/2″ screws. Make sure to use 2 screws for each joint to ensure a sturdy bond between the components. This will keep our kayaks safe and our rack looking sharp!
Fitting-the-side-braces
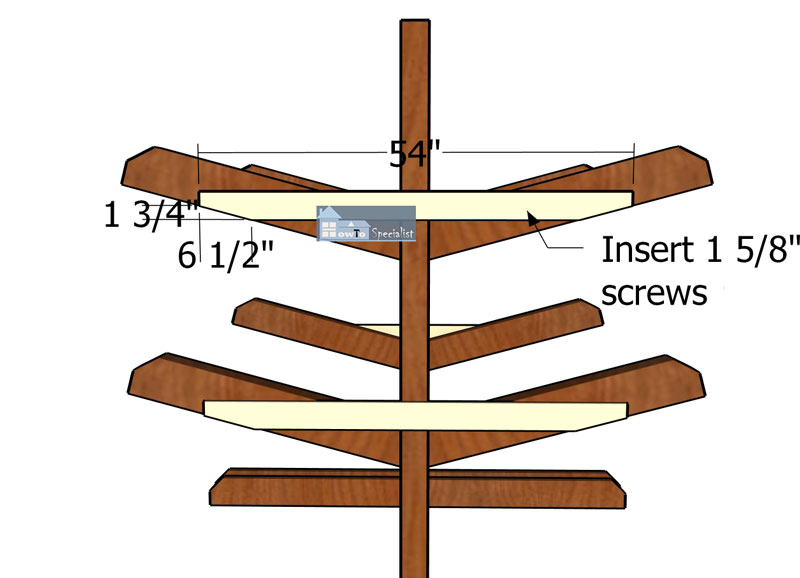
Next up, we’re gonna add the 1×4 braces to hold those side supports together. Go ahead and make your angle cuts on both ends of the braces. Now, secure them in place using 1 5/8″ screws. And don’t forget to use a spirit level to make sure those braces are perfectly horizontal. This is gonna keep everything nice and sturdy, just the way we like it!
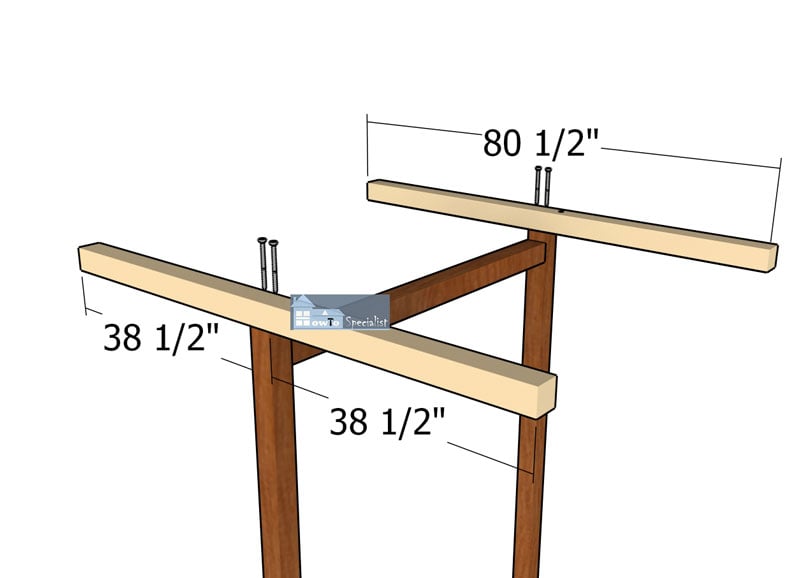
Top-shelf-supports-installation
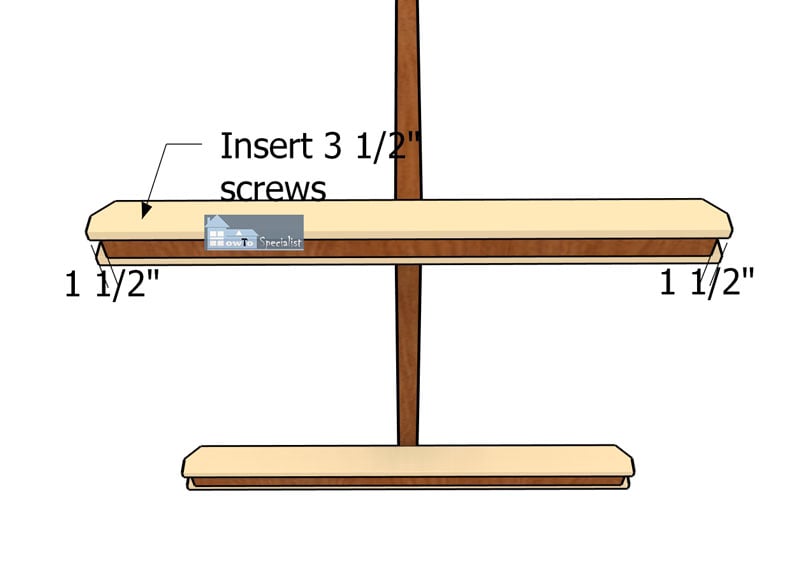
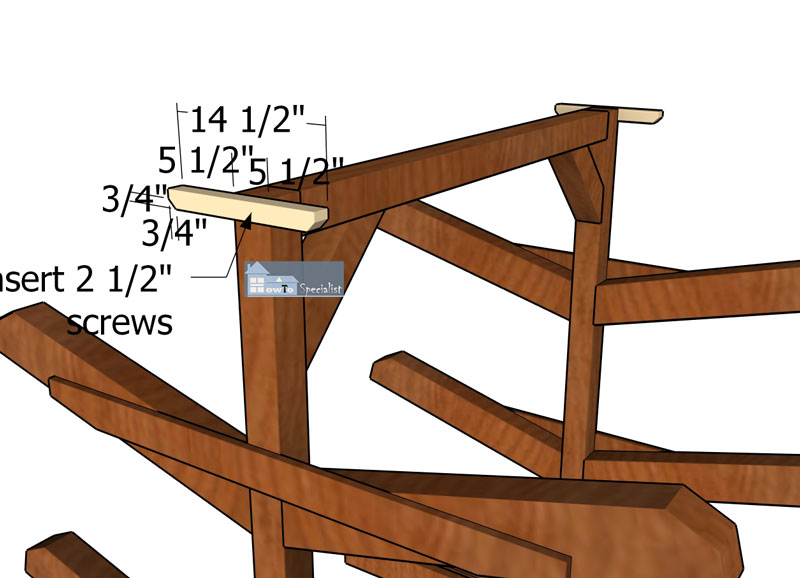
Now, it’s time to build the top shelf. Start by attaching the 2×2 supports to both sides of the rack. Grab your 2 1/2″ screws and lock those supports right onto the frame of the rack. This will give us a solid structure for our top shelf, ensuring it’s secure and ready to hold some weight.
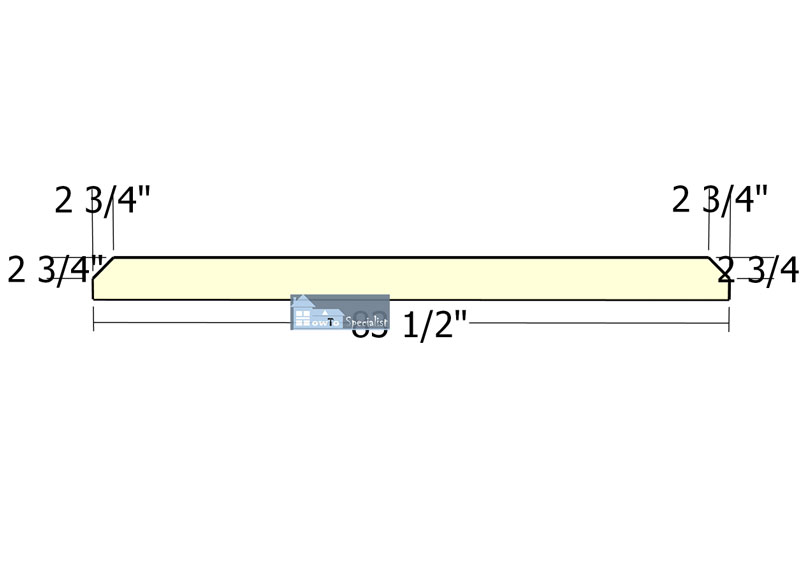
Fitting-the-top-shelf-boards
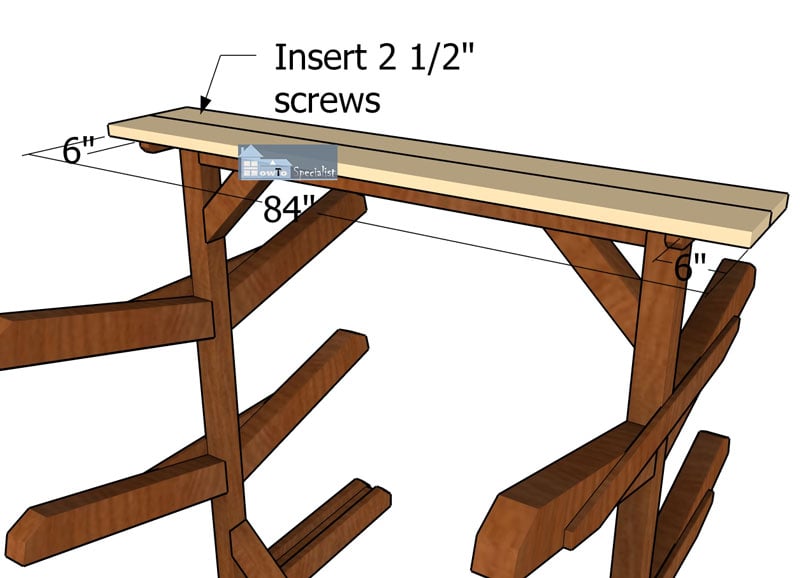
Next, position the 2×8 boards on top of the supports. Make sure to align the edges flush and leave no gaps between the boards. Drill pilot holes, then insert 2 1/2″ screws to lock the boards into place tightly. This will ensure our top shelf is secure and gap-free, just the way we want it!
Fitting-the-bottom-braces
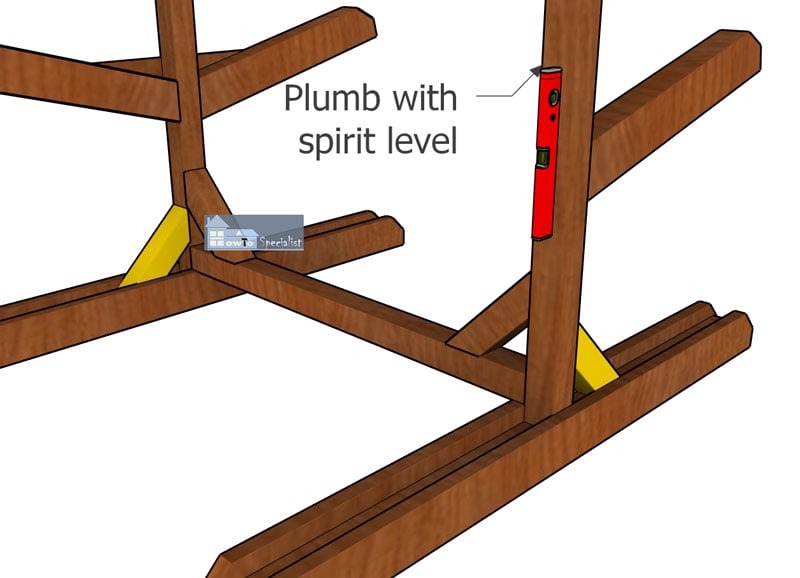
Let’s get these braces fitted to the bottom end of our kayak rack! These bad boys are gonna lock the base to the uprights, making everything nice and solid like it’s all glued together. So, grab your braces, screws or bolts, and your trusty drill.
Measure twice, mark your spots, and then drill those holes. Now, let’s get those braces in place and tighten everything up. Once that’s done, your kayak rack will be rock solid and ready to roll!
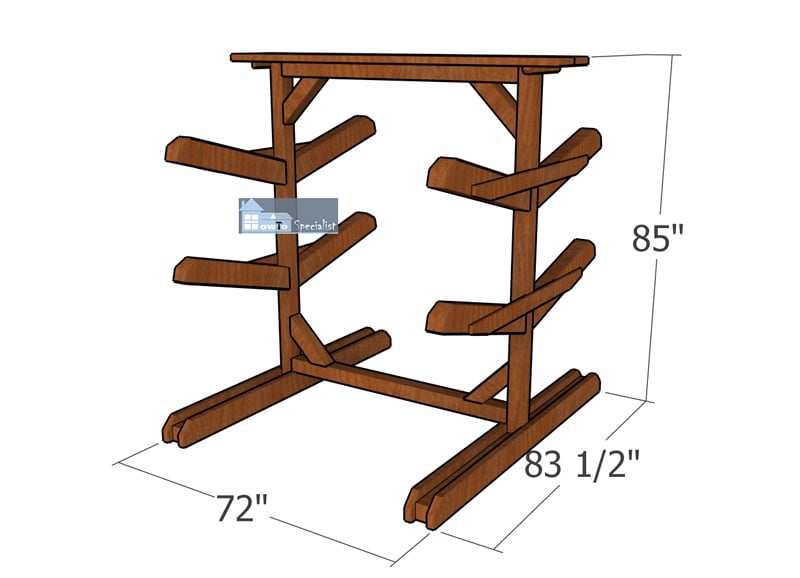
6-Kayak-rack-plans—dimensions
We’re in the home stretch with the finishing touches for this project. First up, give everything a good sanding to smooth out any rough edges and prep the surface for painting. Make sure to use a fine-grit sandpaper for a nice, smooth finish. Once you’re done sanding, wipe down the entire rack to remove any dust.
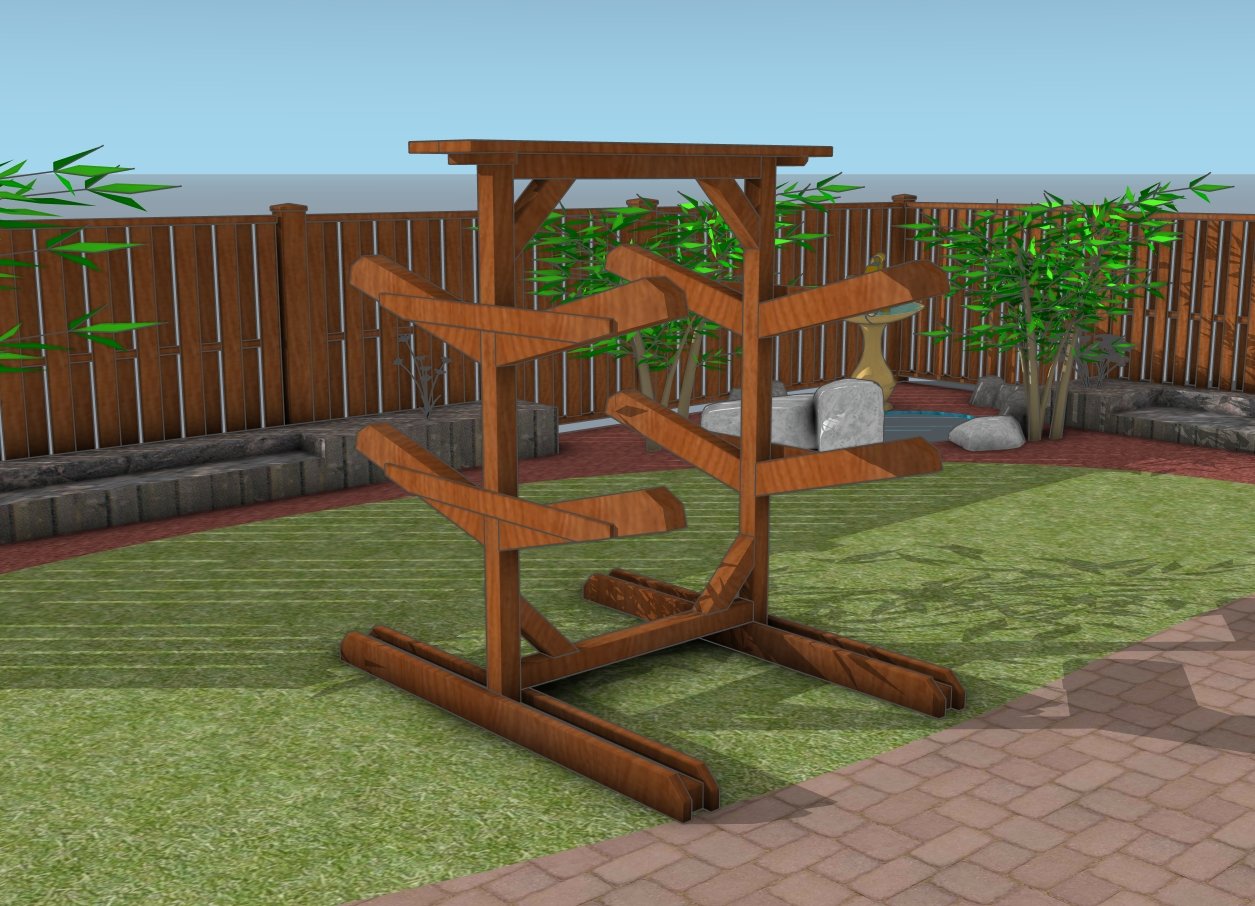
How to build a kayak rack
Now, it’s time to paint! Choose a high-quality exterior paint or wood stain to protect your rack from the elements and give it a polished look. Apply a couple of coats, letting each one dry thoroughly. This will not only make your kayak rack look great but also ensure it lasts for years to come.
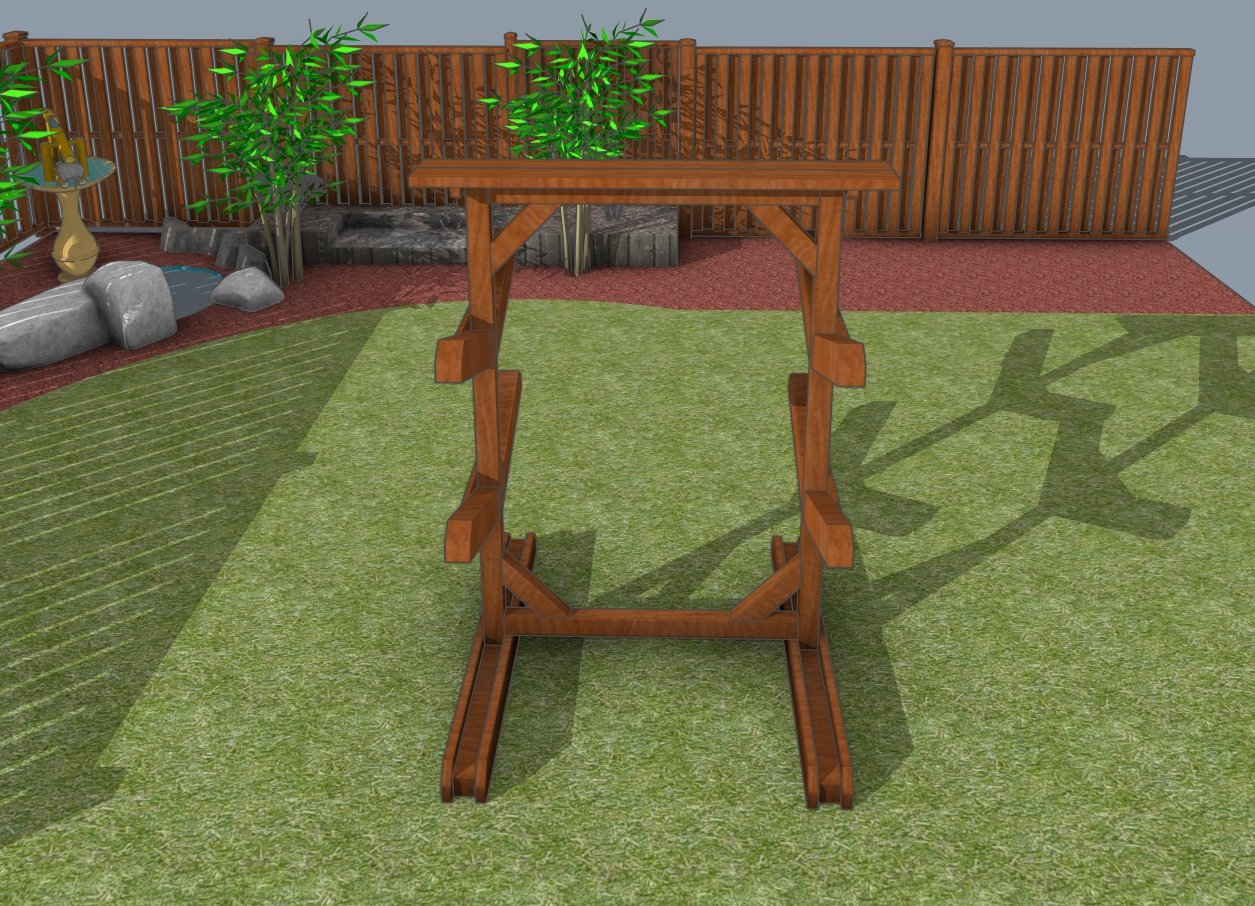
DIY kayak rack
7 Kayak rack plans HTS
7 Kayak rack plans – side view
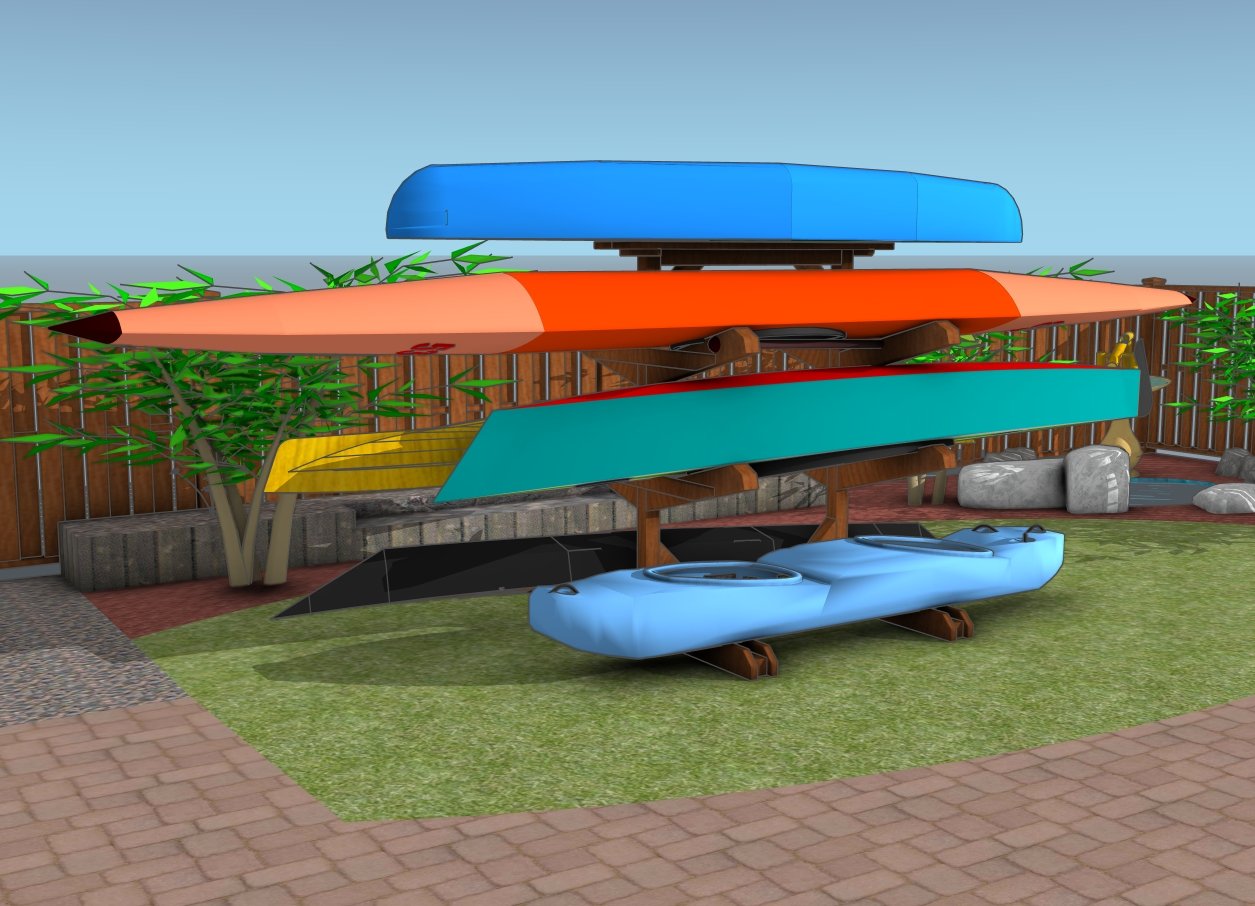
And there you have it, guys! Your seven-kayak rack is now complete and ready to use. I hope this project adds a touch of functionality and craftsmanship to your space. In total, you’re looking at an estimate of $150-$300 for this project, depending on the quality of materials you choose and prices in your area.
Thanks for checking out my seven-kayak storage rack plans! Be sure to browse through my other projects for more awesome ideas. And don’t forget to hit that LIKE button and SHARE with your friends using the social media links below!
