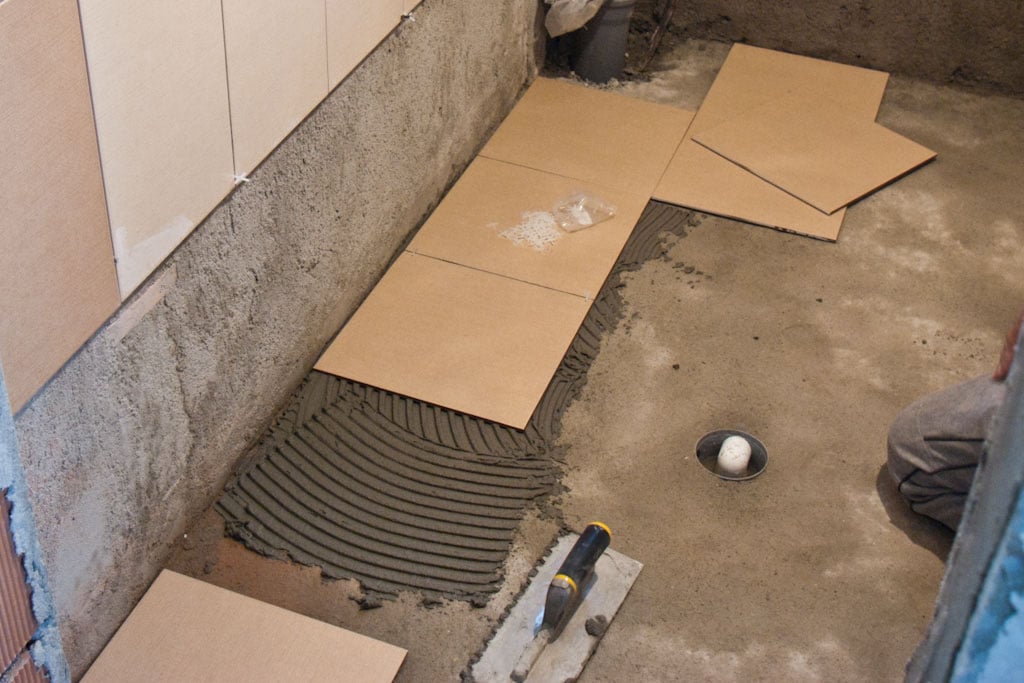
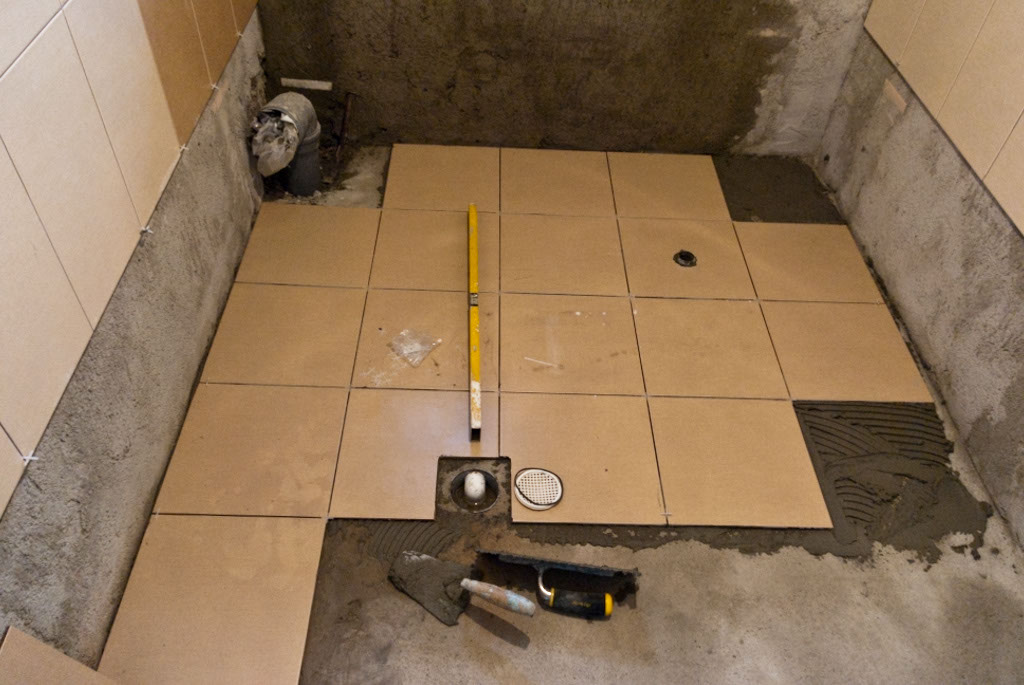
This article is about how to install tile flooring in bathroom, but these techniques could help you tile any concrete floor. Ceramic tiles have a nice appearance and make a very good flooring material, as they are very resistant to water, heat and humidity, provided they are installed properly. If you choose to install tiles on your bathroom floor, you have to read carefully both the manufacturer’s instructions and our step-by-step guide, as to get the job done in a professional manner. The installation itself is not as difficult as it might seem, but choosing the right materials and laying out them can give you a hard time. Nevertheless, there are a few essential aspects one has to take into account, before installing tile flooring.
Prepare thoroughly the surface before installing ceramic tile flooring. Consequently, use a scraper to remove floor irregularities and a vacuum cleaner to remove dust. However, if the floor is not level, you have to take into consideration pouring a 2” mortar bed, or install cement board underlay for tile floor. Use a large 4′ spirit level to ensure the surface is prepared for a proper tile installation. If the bathroom sub-floor is made of wood, then you should install cement backer boards, tape their joints with thin-set and drive in several galvanized screws to lock it into position.
Measure the size of the room and set an appropriate layout. Consequently, use tape measurement and determine the length and the width of the room. Next, when buying the floor tiles have in mind these dimensions , as to get the highest number of full tiles and to make sure you don’t have to install small stripes (<3”) along the walls of your bathroom. Nevertheless, if you cannot find a convenient layout, at least make sure you install the stripes in the less visible areas, when entering the room. See all my Premium Plans in the Shop.
Made from this plan
In order to install tile flooring in bathroom, you need the following:
Materials
- Ceramic tiles
- Trim tile
- Tile spacers
- Thinset
Tools
- Safety gloves, eye protection
- Measuring tape, framing square, pencil
- Rubber mallet, spirit level
- Score-and-snap tile cutter or wet saw
- Notched trowel, tile nippers
- Margin trowel, bucket
Tips
- Spread the adhesive on small surfaces, to avoid getting dry
- Use a level to check the quality of your work
Time
- 6-8 hours for a surface of 100 ft2 / 10 m2, one diy-er
Installing tile flooring in bathroom

Installing flooring tile in bathroom
Use the right tools, as to do the job right. Consequently, for an average surface of 100 ft2/10 m2, you need a score-and-snap tile cutter. For larger areas we recommend you to buy or rent a wet saw. In addition, if you install tile flooring in your kitchen or bathroom, you will have to cut out tiles, as to install them around floor drains or pipes. That is why, you will have to rent a wet saw and hole saw drill bit to make round cuts accurately.
Preparing the floor before installing tile

Preparing the floor for tile installation
Make sure the surface is clean, otherwise your tile floor won’t be level. Use a trowel to remove all bumps and irregularities on the floor. Nevertheless, if you cannot solve these issues, you have two options: either pour a 2” bed of mortar, or install underlay for tile flooring.
In addition, use a vacuum cleaner to remove dust and other residues, to make sure the surface is level and the adhesive will stick to the floor. Seal the wooden floors by installing cement backer boards. Next, tape their joints and drive in anti-corrosion screws to lock them into position.

Tile flooring layout
Before installing the ceramic tiles, you have to lay them on the floor and set the right layout. Consequently, start laying them from a wall (the area most visible from the door entry), and lay the tiles in a straight line making sure you use spacers between them.
Preparing tile adhesive

Preparing ceramic tile adhesive
Next, we have to prepare adhesive in a clean bucket. In order to avoid making dust, fill one third of the bucket with water and pour the adhesive powder.
There are two generic types of adhesives: mastic and thinset. We recommend you to go for the second one, as it secures the tiles better and it is more resistant to water and heat. Nevertheless, read carefully the instructions or ask a qualified professional from your local diy store to give you more information.

Preparing adhesive for ceramic tiles
Let the adhesive to soak water for 5-10 minutes, before you start mixing the compounds. In this way, the water will activate the additives that make the mortar so resistant to water and humidity. Make sure you wear a respiratory mask when pouring and mixing the thinset.
Installing tile flooring

Spreading tile adhesive on floor
Set the layout from the very beginning, making sure the full tiles are installed in the most visible areas when entering the room and the cut tiles are laid under vanities, as much as possible.

Cutting out tile with grinder with diamond blade
There are situations in which you have to cut out a tile, as to fit in a certain location: around floor drains, pipes or any other obstacle. In this case, you can use either a wet saw or a grinder with a diamond blade.
We strongly recommend you to rent a wet saw, as it is safer for unexperienced diy-ers, as compared to a grinder. There are both efficient for making these types of cuts, but a diy-er should choose the safer option: the wet saw. Remember that we have a large experience, so we can cope with the risks, but you should use the grinder only if you know how to use it.

Installing tile flooring
The tiles have to be installed in the following manner: push them firmly in the adhesive and then twisting them gently, till they are locked into position. If they are not level, you should use a mallet to tap them gently. If you still face problems with installing them properly, there are two possible explanations: you might have used too much adhesive or the floor is crooked.
In both cases, lift the tile from one corner with a trowel, remove the adhesive and spread it again, this time properly.

Checking the level of the tile flooring
Use a spirit level every time you install a new tile, as to make sure you have installed them properly. Nevertheless, you could tilt slightly the tiles towards the floor drain, as to prevent water from staying on the floor.

Installing tile spacer
Install spacers between tiles, as to make sure the joints are even. There are several types of spacers, so you can use the ones recommended by the manufacturer or the ones you like the most. Thick spacers will create large gaps between the tiles, while thin ones will create small gaps.

Installing tile around floor drain
In this image you can see the way you should make the cuts around the floor drain. Before installing the tiles into position, you have to verify again if you’ve cut them properly and if the drain fits properly.

How to install tile flooring
Afterwards, you have to grout the floor tiles in a professional manner. Therefore use a colored grout (to match with the bathroom tiles) and a float to distribute it evenly over the whole surface. Sprinkle water on the tile flooring before spreading the grout.
My best tips on how to install tile flooring:
Installing tile flooring is a rewarding project that can add beauty and durability to your home. Here are my best tips for installing tile flooring like a pro:
1. Prepare the Subfloor: Start by ensuring your subfloor is clean, dry, and level. For concrete subfloors, make sure it’s free of cracks or uneven spots. If you’re tiling over a wooden subfloor, install a cement backer board to provide a stable, moisture-resistant surface for the tiles.
2. Plan Your Layout: Dry-lay your tiles before applying adhesive to plan your layout. Start from the center of the room or another focal point and work outward. This helps you visualize where tiles will need to be cut and ensures even spacing. Avoid small, awkward cuts by adjusting your layout.
3. Use Tile Spacers: To maintain consistent grout lines, always use tile spacers between the tiles. This helps keep your tiles aligned and evenly spaced. The most common spacer sizes range from 1/8 inch to 1/4 inch, depending on your desired grout width.
4. Apply Adhesive Evenly: Use a notched trowel to spread thinset adhesive on the floor in small sections, working only an area you can tile before the adhesive starts drying. Hold the trowel at a 45-degree angle to create ridges, which help the tiles adhere more securely.
5. Back-Butter Large Tiles: For larger tiles (12×12 inches or bigger), it’s a good idea to back-butter the tile by applying a thin layer of adhesive to the back of the tile before setting it down. This ensures a stronger bond and prevents air pockets under the tile.
6. Work in Small Sections: Don’t rush. Work in small sections to ensure each tile is properly placed and aligned before the adhesive starts setting. Frequently check for levelness using a spirit level, and make adjustments by gently tapping tiles into place with a rubber mallet.
7. Cut Tiles with Precision: For edges, corners, and tight spaces, you’ll need to cut tiles to fit. Use a wet saw or tile cutter for straight cuts, and tile nippers for more intricate cuts. Measure twice and cut once to avoid wasting material.
8. Leave an Expansion Gap: Always leave a small expansion gap (about 1/4 inch) between the tiles and the walls. This allows for slight movement and prevents the tiles from cracking. The gap will be covered by baseboards or trim.
9. Allow the Adhesive to Dry: Once all the tiles are laid, let the adhesive cure for 24-48 hours before grouting. Walking on the tiles too early can cause them to shift and ruin the alignment.
10. Grout Carefully: After the adhesive has set, mix and apply the grout using a rubber float. Work diagonally to press the grout into the joints, and wipe away excess grout with a damp sponge. Rinse the sponge often and avoid over-wetting the grout lines.
11. Seal the Grout: Once the grout is dry, apply a grout sealer to protect it from moisture, stains, and mold, especially in high-moisture areas like bathrooms or kitchens. This extends the life of your grout and makes maintenance easier.
By following these tips, your tile flooring will look flawless, last for years, and add a beautiful, durable finish to your space!
Thank you for reading our article on how to install tile flooring in bathroom and we recommend you to SHARE our projects with your friends, by using the social media buttons. LIKE us to be the first that get our latest projects and to help us create more free tutorials.
