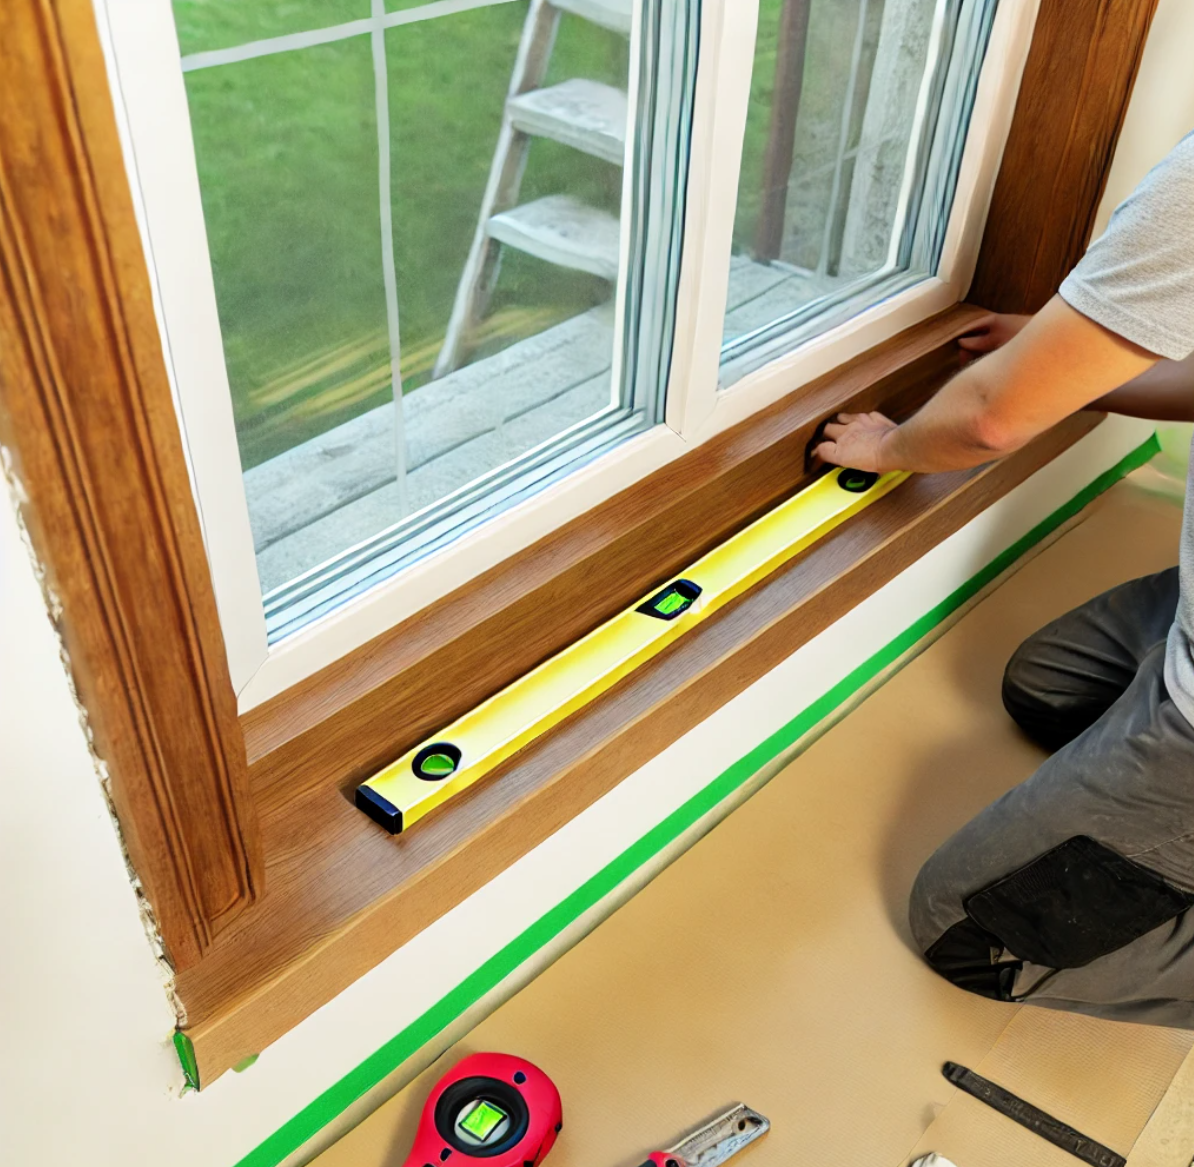
This article is about how to install a window sill, in order to add style and character to your house. Generally speaking, there are may types of window sills: sills made of wood, typical for American houses, granite sills for homes with a classical design or PVC sills, which have gained market share, due to their low price and long-term durability. Nevertheless, in this project we will show our method of installing a PVC window sill. This is not a heavy duty project, so you should be able to do it by yourself, provided you pay attention to safety regulations and follow our guidelines. Nevertheless, before installing the window sill, you should consider several key aspects.
If you are replacing an old sill, you have to make sure the surface is free of dust and residues, otherwise the adhesive won’t bond the materials properly. When buying the window sill, you have to choose the type that best suits your needs and tastes. In other words, the material of the sill must fit with the rest of the room and add value to your home. A PVC sill has a modern look, is cheap, easy to maintain, durable and comes in any dimension you might want. On the other hand, the granite sill is much more expensive and comes in several standard dimensions. It is possible to order a customized window sill, but it will cost a little fortune.
You should secure the PVC window sill, according to the base surface. Consequently, if you have to install a wooden sill on a wooden surface, you can fix it with nails. On the other hand, a PVC window sill has to be glued with adhesive or mortar. After you attach the PVC sill into place, you have to place several heavy items on to, as to enhance the bond with the base surface. See all my Premium Plans in the Shop.
Made from this plan
In order to install a PVC window sill, you need the following:
Materials
- PVC window sill
- Adhesive for PVC
- Paper tape
Tools
- Level, rubber hammer, hammer
- Chisel, measuring tape, jig saw
- Vacuum cleaner / broom
- Clamps, several weights (water bottles)
- Acrylic latex sealant
Tips
- Use a smart setup for precision cutting of the sill board
- Make sure you seal the window using acrylic sealant
Related
My best tips on installing a window sill:
A window sill can add a nice finishing touch to any room while also protecting your windows and walls from moisture damage. Whether you’re replacing an old sill or installing a new one, it’s a relatively simple DIY project that can make a big difference. Here are my best tips to help you install a window sill with ease.
1. Gather the Right Materials
Before you begin, make sure you have all the necessary materials and tools:
- Window sill board (choose wood, MDF, or another durable material)
- Measuring tape
- Circular saw or miter saw
- Sandpaper
- Wood glue
- Construction adhesive
- Level
- Nails or screws
- Wood filler
- Caulk
- Paint or stain (optional)
2. Measure the Window Opening
Start by measuring the width and depth of your window opening where the sill will be installed. Make sure to include the depth of the wall, as the sill should extend slightly past the wall (about 1 inch) to create an overhang. Add an additional 1/4 inch to each side of the sill for an overhang on the width as well.
3. Cut the Sill to Size
Using your measurements, cut the window sill board to size. If you’re using a miter saw, make sure to get clean, straight edges. Double-check the fit by placing the board in the window opening before securing it in place. If it doesn’t fit snugly, trim it down as needed.
4. Test the Fit
Once your sill is cut to size, place it in the window opening to check for fit and level. It should sit flat and flush with the bottom of the window frame, with a slight overhang on the front and sides. Use a level to ensure it’s sitting perfectly straight, as a sloped sill can cause issues down the line.
5. Secure the Window Sill
Once you’re happy with the fit, secure the window sill in place using construction adhesive. Apply adhesive to the top of the wall frame where the sill will rest, then press the sill down firmly. You can use wood glue along the edges of the sill for extra support, especially if you’re working with wooden frames.

6. Nail or Screw It in Place
For added stability, drive a few nails or screws through the sill into the window frame. Use finishing nails or countersink your screws, then fill the holes with wood filler for a clean, seamless look. Make sure the sill is securely fastened and doesn’t move.
7. Fill Gaps and Sand Smooth
After securing the sill, inspect for any gaps between the sill and the window frame. Use caulk to seal any small gaps, which will prevent drafts and moisture from getting in. Once everything is dry, sand the edges of the sill smooth to prepare for painting or staining.
8. Paint or Stain the Sill
If you’re painting or staining your window sill, now’s the time to do it. Apply a primer first if you’re painting, followed by two coats of paint or stain for a durable finish. Make sure to let each coat dry thoroughly before applying the next.
9. Finishing Touches
After your paint or stain is fully dry, check for any touch-ups needed. If you’ve installed trim around the window, apply caulk along the seams for a polished, finished look. Finally, wipe down the sill to remove any dust or residue.
Bonus Tip: Keep It Functional A window sill is more than just a decorative element—it helps protect your windows and walls from moisture. Make sure it’s securely sealed and slightly sloped away from the window to help water drain properly.
Preparing the surface before installing the window sill

As we have already said, in this article we will show you how to install an interior PVC window sill. Although, we are accustomed to installing wood sills, in this article we fit a PVC window sill. In the image you can see a white PVC window sill, but you should remember that you can choose from a large variety of colors.

Next, you have to prepare the base surface before proceeding to the actual installation of the window sill. Consequently, use a spirit level to check if of the base is level. If you face several issues with the surface, you have to make it straight using mortar or self leveling compound.

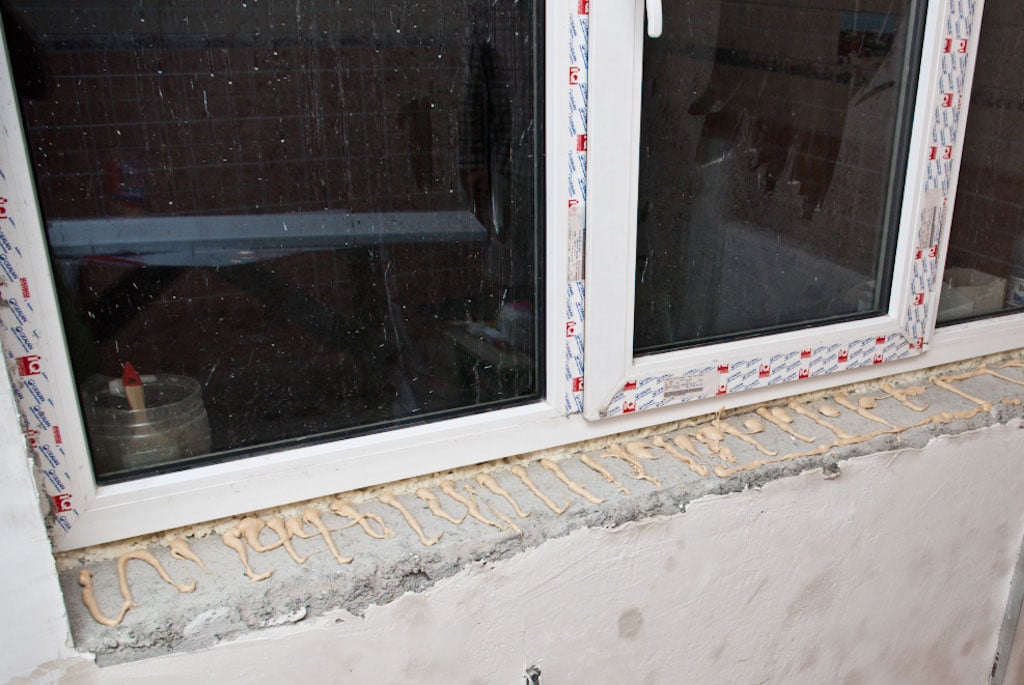
After you have leveled the base surface, it is time to apply the adhesive as to be able to fix the PVC window sill. Therefore, you have to lay the adhesive in straight lines, every 2”/5 cm or so, as to lock firmly the sill into position.

In this image, you can see the way we have applied adhesive on the concrete surface. You should remember that the adhesive beads have to be spaced from each other when installing the sill and they shouldn’t overlay. This is a key aspect, as the adhesive needs air in order to dry out.
Installing the PVC window sill

Next, we have to cut the PVC sill to the proper dimension, as to fit inside the window frame. If you managed to buy the PVC sill at the needed length, then you should skip this step.
First we have to measure the base surface, using a tape measurement. Next, we use a L-square as to draw a straight mark on the PVC sill, at the appropriate length.

Afterwards, we used a special setup, in order to obtain a professional cut. Therefore, we used two C-clamps to lock a straight board,over the PVC sill. You should notice that, the blade of the jigsaw is exactly over the drawn line, at both ends.

Then, you have to attach the PVC window sill over the adhesive. First, make sure the sill is properly aligned with all the four corners. Next, use a level to check if the PVC window sill is perfectly horizontal.

If the window frame is narrow, then you can choose to cut the PVC sill as in the image. Therefore, you have to notch the ends of the PVC sill so the section between the jambs fits against the window.
First, you have to cut the sill (the width of the window + 5” on each side). Next, center the PVC sill on the window and mark the ends of the window frame on it. Last but not least, use an L-square to mark the depth of the notches on the sill and cut them with a jigsaw.

The last step of installing the window sill is to caulk the gap between the window and the PVC sill. Caulking is essential, as it gives a neat look to your windows and insulates properly the room, as to save energy during winter. Use a waterproof sealant, and make sure you apply it on a continuous bead, without leaving any space between the line of caulk.
By following these tips, you can install a new window sill that looks great and functions well, giving your window a fresh, finished look. Whether you’re updating an old sill or starting from scratch, it’s a DIY project that can elevate any room.
Thank you for reading our article on how to install a PVC window sill and we recommend you to check out the rest of our indoor projects. Please share our projects with your friends, by using the social media widgets.
