This article is about free wood greenhouse plans. If you want to build a construction to store your plants during the cold winters or to grow your own vegetables, we will show you all you need to know before starting the project. If you pay attention to the location of the wood greenhouse and use the right materials, you will build a nice 10×14 greenhouse in just several weekends. Plan everything from the very beginning, if you want a straight forward process without major issues. Check out the rest of our greenhouse plans.
The location of the wood greenhouse should be set as to benefit from sunlight, most of the day. This aspect is essential for your future crops, as the plants need morning light to develop properly. Place the solar greenhouse far away from buildings or trees. If this is not possible, try to build it as to get the morning light from east. Before building the wood greenhouse, level the ground and excavate the soil if necessary. If you don’t have enough expertise in the field, you could buy a greenhouse kit or hire a contractor to assemble it for you.
If you want build a durable greenhouse, you should choose the materials with great care. Buy pressure treated lumber or cedar, making sure the studs and beams are perfectly straight. In addition, examine the studs and select the lumber without visible signs of damage. Use the right woodworking techniques, as to join the wood properly and a spirit level to plumb the walls before setting them into place. See all my Premium Plans in the Shop.
Made from this plan
In order to build a wood greenhouse, you need the following:
Materials
- A – 2 pieces of 4×4 lumber – 120” long, 2 pieces of 4×4 lumber – 168” long BASE
- B – 4 pieces of 2×4 lumber – 113” long, 4 pieces of 2×4 lumber – 168” long PLATES
- B – 24 pieces of 2×4 lumber – 72” long STUDS
- C – 8 pieces of 2×4 lumber – 87 1/2” long, 8 pieces of 2×4 lumber – 6” long RAFTERS
- D – 14 pieces of 2×2 lumber – 14” long, 14 pieces of 2×2 lumber 22” long VENTS
- E – 2 pieces of 2×3 lumber – 36”, 2 pieces of 2×4 lumber – 69” long, 1 piece – 33″ long DOOR
- F – 500 sq ft of translucent polyethylene foil / polycarbonate sheets FOIL
- 500 pieces of 2 1/2″ screws
- vent opener
- programmable outlet thermostat
- foil
Tools
- Safety gloves, glasses
- Circular saw
- Hammer, spirit level, carpentry pencil
Tips
- Place the greenhouse in an area where it gets the maximum sunlight
- Fit the side posts every 2′ / 60 cm
- Install plastic strips every 1′, to support the foil
Related
- One weekend
Greenhouse plans free

Free greenhouse plans
Building a small greenhouse in your backyard is a great project, as it is the first step towards a healthier lifestyle. If you pay attention to the basic guidelines, you will get a nice greenhouse with all the features needed to grow your own vegetables during the whole year.
Free greenhouse plans
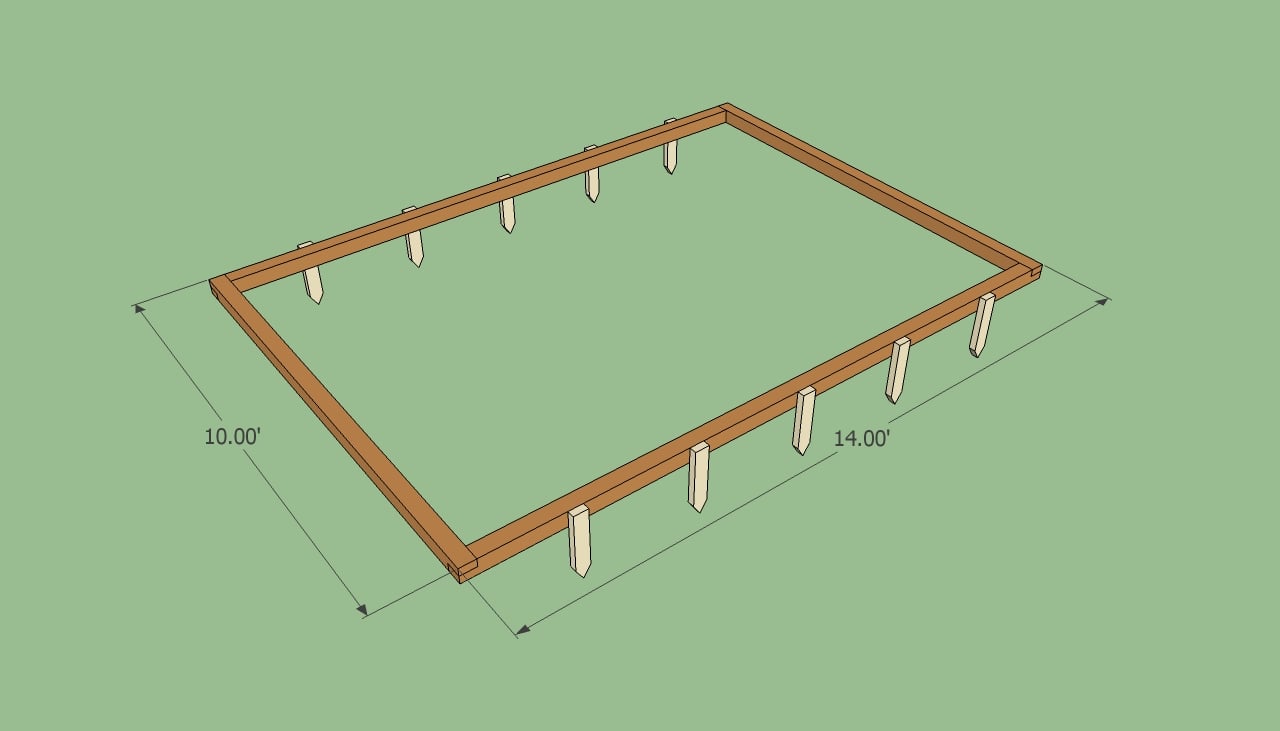
Building the greenhouse frame
First, build the base of the wood greenhouse. Therefore, you have to choose an appropriate location and build the base, using 4×4 pressure treated lumber. Measure the diagonals of the rectangle, to ensure the corners are right-angled.
Anchor the base into place, by inserting several 24″ long 2×4 stakes. Drive in several screws through the stakes into the frame, after you have installed them into position properly.

Joining greenhouse base
In order to join the wooden posts together, you have to cut their ends, as in the image. In this manner, the base of the greenhouse will be durable and it will support the rest of the structure properly. Use a spirit level to ensure the base is horizontal.
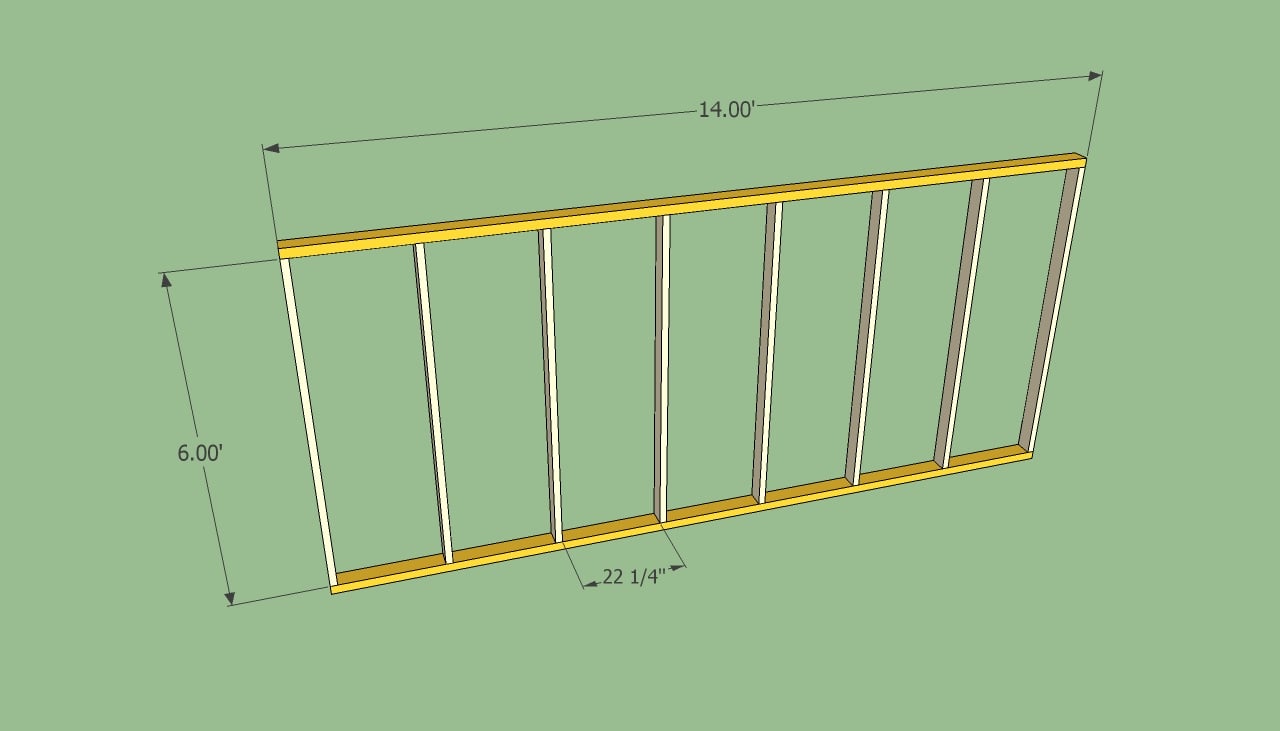
Greenhouse wall plans
Next, you have to build the side walls of the greenhouse, using 2×4 studs. As you can see in the image, you should anchor the wooden studs to the bottom and top plate. Insert 2 1/2” screws through the plates in the 2×4 studs, after you pre-drill several holes.
Place the studs equally spaced, every 22 1/4”. If adjust the size of the greenhouse, you can place the posts no more than 2′ one from another.

Installing the side walls
After you have built the side walls of the greenhouse, according to our free plans, you should install them into position, by driving 3 1/2” screws through the bottom plates into the wooden base.
If you want to get the job done in a professional manner, you should plumb the walls with a spirit level and lock them into position with 2×4 braces. Afterwards, insert 3 1/2” screws or nails through the bottom plate into the wooden base.

Greenhouse door frame
Continue the process, by building the front and back walls of the wood greenhouse. Proceed in the same manner as described above: build the walls on the ground and afterwards, install them into place. Cut the bottom and top plates at 113″ and the studs at 72″.

Wood greenhouse plans free
If the frame is not rigid enough, you should install several braces, as in the image. The best method is to use a 4×4 post and to cut its ends, to fit perfectly into position.
Drive in screws through the braces into the wooden studs. Work with great care and with good judgement, if you want to obtain a professional result. Take accurate measurements several times before cutting the components.
Wood greenhouse plans free

Building the rafters
Cut the rafters at the right size after taking accurate measurements. Pay attention to the instructions described in the diagram.

Fitting the supports
The next step of the woodworking project is to attach the vertical supports into place. Drill pocket holes at both ends of the components and secure them to the rafters, as described in the image.

Greenhouse roof plans
After you have built the main frame of the wood greenhouse, you should install the rafters. As you can see in the image, this greenhouse doesn’t have a symmetrical roof , as we will build several windows at the top.
Use 2x4s to build the short and long rafters, according to our plans. As you can see in the image, you should cut the base of the rafters at 30º, and the other end of the short rafter at 60º.
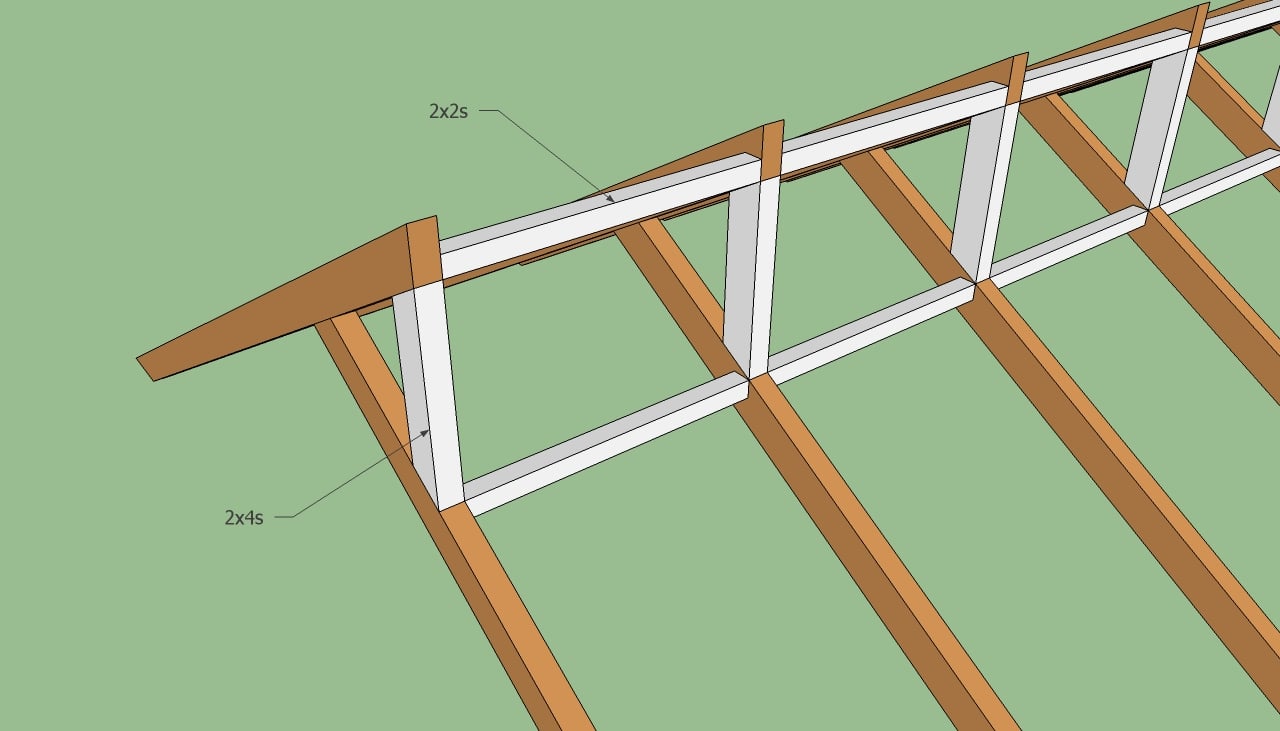
Greenhouse window frame
Continue the building process by installing the frame of the top windows. Therefore, you should use 2x2s to build the bottom and the top frame, as you should notice in the image.Plumb them into position with a level.
In addition, you should build several wooden elements from 2x4s, as to joint the rafters together. Use a spirit level when fitting them into position (cut their both ends at 30º).

Greenhouse window
Building the windows of the greenhouse is a straight-forward process. Use a tape measure to determine the size of the windows and use 2x2s to build the frame. Work with great care and attention to make sure the corners of the windows are right angled.
Cover the frames with polycarbonate sheets and lock them into position with metal hinges. The poly-carbonate is more durable than regular foil.
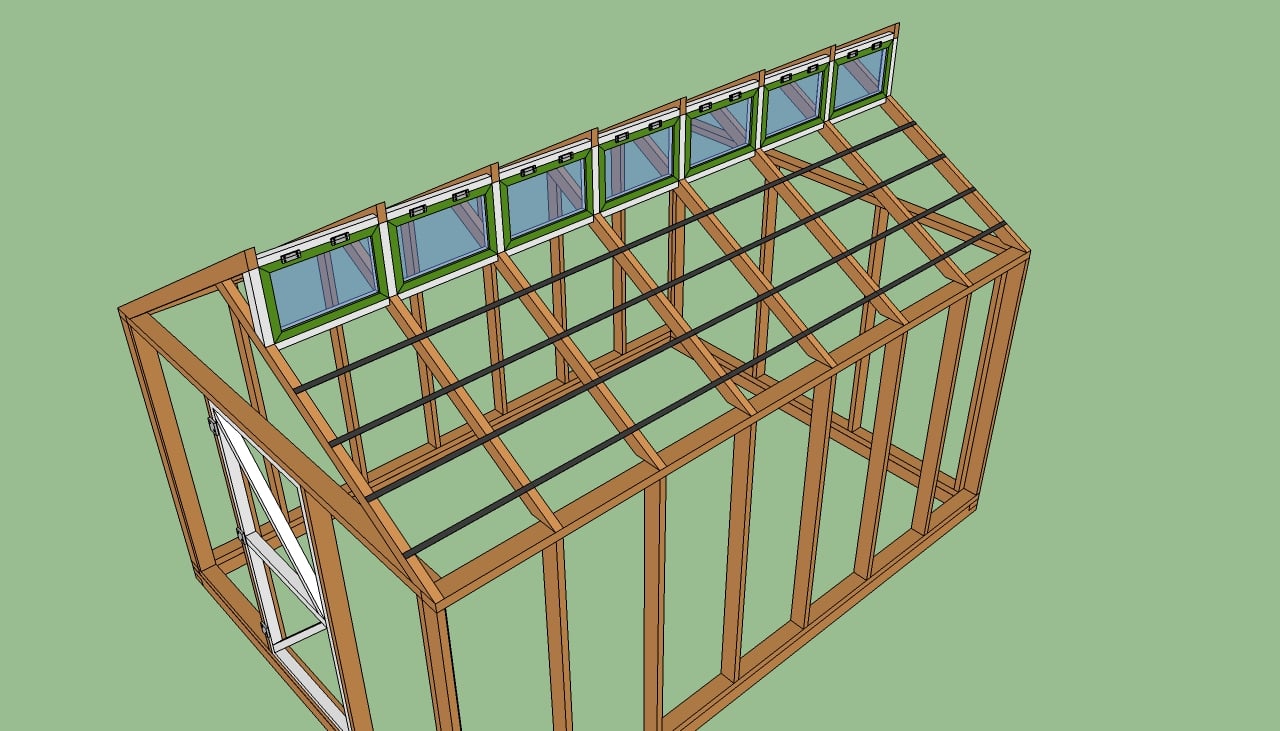
Wood greenhouse plans
An essential step of the construction process is to install plastic strips every 10”, as to support the translucent polyethylene foil. Work with great care and attention, as to install the strips equally spaced. Staple the strips to each rafter, after you have ensure they are equally spaced. This step is not necessary if you fit polycarbonate sheets.

Greenhouse door
Next, you have to build the front door of the greenhouse, from 2x3s. Use a framing square when building the door, to ensure the corners are right angled. Drive in several 4” screws at any corner, after you have drilled the pilot holes (to avoid the wood from splitting). Cut the vertical supports at 69″ and the horizontal components at 36″. Drill pilot holes through the horizontal supports and insert 2 1/2″ screws into the vertical supports.
Lock the door into position by using 3 hinges. Plumb the door and then insert the screws. Last but not least, install a latch to make it a functional door.
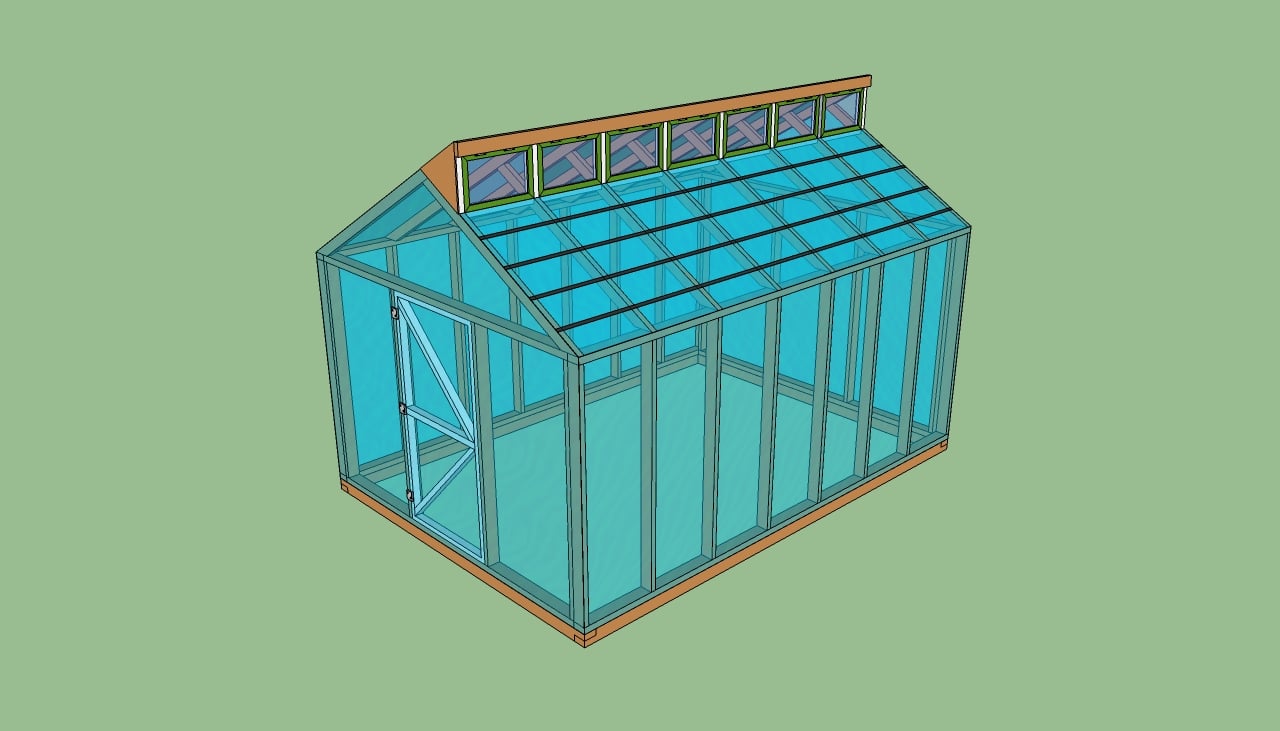
Free greenhouse plans
Check attentively the wood greenhouse before covering it with translucent polyethylene foil / sheets. Make sure there are no sharp edges or protrusions that could damage the foil.

10×16 Greenhouse Plans
Check our latest greenhouse plans here. The new plans are more detailed and come with a cut list and step by step diagrams. This greenhouse is made entirely from 2×4 lumber, so that you can get the job done with common tools in just a weekend.
My best tips to build a 10×14 wooden greenhouse:
Building a 10×14 wooden greenhouse is a fantastic way to create a protected space for growing plants year-round. With the right design, materials, and techniques, you can construct a sturdy greenhouse that suits your gardening needs. Here are my best tips for building a 10×14 wooden greenhouse.
1. Plan Your Design
Before you begin building, take time to carefully plan your greenhouse design:
- Choose the type of roof: A gable roof is common and easy to build, but you could also opt for a lean-to or arched roof for different aesthetics.
- Consider ventilation: Plan for vents or windows to allow airflow and prevent overheating. You may also want to include space for fans or exhaust systems.
- Access and layout: Design the greenhouse with wide doors for easy access, and plan for shelves or benches inside to maximize growing space.
Make sure your design allows for plenty of sunlight and is suitable for the types of plants you want to grow.
2. Select the Right Location
Choosing the right location is essential for maximizing sunlight and ensuring the greenhouse performs well:
- Maximize sun exposure: Place the greenhouse where it will receive at least 6 hours of direct sunlight per day. An east-west orientation is best for capturing the most sunlight.
- Level the ground: Choose a flat, level area to build on. If the ground is uneven, level it out or create a raised foundation to ensure stability.
- Consider wind protection: Build in an area that’s protected from strong winds to avoid damage.
3. Gather the Right Materials
You’ll need the following materials to build a 10×14 wooden greenhouse:
- Pressure-treated lumber for the frame (e.g., 2x4s, 4x4s for posts, and 2x6s for base rails)
- Polycarbonate panels or greenhouse plastic for the covering
- Hinges and hardware for doors and windows
- Concrete or gravel for the foundation
- Wood screws or galvanized nails
- Treated plywood for the base if desired
- Caulk or weather sealant to seal gaps
4. Prepare the Foundation
A solid foundation is essential for the durability and stability of your greenhouse:
- Concrete foundation: Dig out the area and pour a concrete slab to provide a solid base. This is a long-lasting option, ideal for a permanent structure.
- Gravel foundation: If you prefer a simpler method, spread a layer of gravel across the ground and use it as a foundation. This is more flexible and provides good drainage.
- Wooden foundation: Create a raised wooden base by building a perimeter with pressure-treated 4x4s or 2x6s and filling the area with compacted gravel or paving stones.
Ensure the foundation is level before you begin constructing the frame.
5. Build the Wooden Frame
Once the foundation is ready, you can begin constructing the wooden frame of the greenhouse:
- Base and vertical posts: Start by laying out the 2×6 base rails along the perimeter of the greenhouse and securing them to the foundation. Then, install the 4×4 vertical posts at each corner and along the sides (spaced about 4-5 feet apart).
- Wall framing: Use 2x4s to frame the side walls, adding horizontal supports between the vertical posts to strengthen the structure.
- Door frame: Construct a sturdy door frame in the front wall. The door opening should be at least 30-36 inches wide for easy access.
Use galvanized wood screws to attach all parts of the frame, and make sure the structure is level and square as you build.
6. Add Roof Rafters
Once the walls are up, it’s time to install the roof:
- Gable roof: If you’re building a gable roof, cut 2×4 rafters to the desired angle and attach them to the top of the side walls. Space them about 24 inches apart.
- Support beams: Install a ridge beam along the top of the greenhouse to support the rafters.
- Roof angle: Ensure the roof has enough slope (at least 30 degrees) to allow for rain and snow runoff.
Secure the rafters in place with screws or metal brackets, making sure they’re properly aligned.
7. Install the Greenhouse Covering
Once the frame is complete, it’s time to install the covering:
- Polycarbonate panels: These are durable and provide excellent insulation while allowing plenty of light to enter. Cut the panels to size and secure them to the frame with special screws and washers designed for polycarbonate.
- Greenhouse plastic: If using plastic sheeting, stretch it tightly over the frame and attach it using batten tape or staple strips to ensure it’s secure and wind-resistant.
Make sure the covering is tightly secured to prevent drafts or tears.
8. Install Doors and Windows
Proper ventilation is essential for temperature control:
- Install doors: Build a sturdy wooden door and attach it to the frame with heavy-duty hinges. Make sure the door opens and closes smoothly, and consider adding a latch or lock.
- Add windows or vents: Install louvered windows or roof vents to allow heat to escape during the hot summer months. Place vents at both the top and bottom for better airflow.
If you’re in a particularly hot or cold climate, consider adding automated vent openers to help regulate the greenhouse temperature.
9. Seal Gaps and Insulate
To ensure the greenhouse is as efficient as possible:
- Use caulk or weather sealant to seal any gaps between the frame and the polycarbonate panels or plastic sheeting.
- For added insulation, especially in colder climates, you can use bubble wrap or additional layers of plastic sheeting on the interior during winter months.
This step helps prevent heat loss and keeps the greenhouse environment stable.
10. Add Shelving and Benches
Maximize the usable space inside your greenhouse by adding shelves or benches for your plants:
- Build sturdy wooden benches or install wire shelving along the side walls to hold pots and trays.
- Make sure the shelves are easy to access and provide adequate sunlight to all levels of plants.
Consider leaving space for a potting table or storage area for tools and supplies.
Bonus Tip: Install a Watering System To keep your plants properly hydrated, consider installing a drip irrigation system or a simple hose hookup inside the greenhouse. This makes watering more efficient and consistent, especially during hot weather.
By following these steps, you’ll be able to build a 10×14 wooden greenhouse that provides plenty of space for growing plants while being sturdy and efficient. With careful planning and attention to detail, your DIY greenhouse will be a valuable addition to your garden.
Thank you for reading our article about free greenhouse plans and we recommend you to check out the rest of our projects. Don’t forget to share our articles with your friends, by using the social media widgets. LIKE us on Facebook to be the first that gets our latest updates and to help us create more free plans for you.

24 comments
Great greenhouse plans – look like they were designed by a carpenter – no nonsense, to the point and scaleable.
For folks that are going to use polycarbonate panels the lowest horizontal framing member at bottom of vertical / plumb window(s) could be a 2×4 or wider and project above the roof rafter plane which would allow the polycarbonate panel a place to butt against and not interfere with window operation. Flashing
could be installed here to land on top of panel and prevent water from entering greenhouse. Vinyl hopper windows could be used right out of the box.
Thanks
Thanks for the tip!
Hi, thanks for your tips. What are vinyl hopper windows?
In the parts list you have a vent opener and thermostatic bu..t there is no instructions on when or where to install, do you need for all windows or just one?
The instruction for installing the vent opener comes with the product. I would personally add the opener on all vents, as it will keep a proper temperature inside the greenhouse easier.
Hi Jack, I want the product, but have no clue where to buy it. I don’t see a download or purchase link any where. Can you please advise? Thanks
Great plan ,,, slight modifications, I added wall insulated wall panel to build the best vermin proof turkey house ever. Plenty of light and ventilation it is perfect as a breeder house I now have built more !
That is awesome! Congrats for the project and I am happy that my plans were useful. I would love to see a few pics of the project. You can share them at: http://howtospecialist.com/give-back/diy-wood-greenhouse/
What are the plastic strips you talk about and where would you get them? What size are they?
Packing strips. They should be around 1/2-3/4″ wide. You can use 1×2 lumber to secure the plastic foil to the framing, as well.
Cost estimate?
Hi Jack, do you have any plans in this style but for a 12 by 18 or potentially a 12 by 16?
I have a 10×16 greenhouse: http://howtospecialist.com/garden/10×16-greenhouse-plans/ If you want a 12×16 greenhouse, take a look here: http://myoutdoorplans.com/garden/wood-greenhouse-plans/
Hi Jack, I would like to know if this style of greenhouse could be expanded to 16’ x 48’, and if so, what would the rafter lengths have to be? Thanks.
I’m in the process of building this now. About 90% completed with the framing.. great set of plans, easy to follow instructions. Only thing I found was your angles on the rafters are swapped. Should be 60° at the plates and 30° at the top cuts..
Regardless of that, I’m super happy I found your plans and very happy to be building this greenhouse !
Thank you! Looking forward to seeing your project!
Yes, I have been struggling with that as well. I think the angles have to be slightly adjusted a few degrees to make everything line up at 10′ wide. Everything is close but not quite lining up for me…could just be I am not doing something correctly as well.
The Build EZ 8′ wide greenhouse uses the same angles with shorter lengths for the same style roof.
Hi I am not finding a PDF or plan bo button To purchase your 10 x 14 greenhouse plans.
Can you please supply me with the link?
Any additional recommendations for an all year 20×40 in the northwoods of Wisconsin? Including heating it.
I have the frame all built and am working on the windows that I have modified just a little to do a two window top versus the seven windows. Also adding a vent fan on a thermostat to the back wall. I found that I needed a few cross braces on the corners for rigidity and it will also help with the polycarbonate siding that I am using. Since I live in the deep south and rarely have really hard winters, I am only using the single wall siding – it also is quite a cost savings over the double wall siding. I hope that I don’t regret that move.
Thank you for the plans. It is my first construction project of this kind, and I won’t lie and say that it has been easy, but considering my lack of experience, it have gone well.
I plan on doubling this, any tips?
Do you have printable plans available? I need it on paper to make sure I get it all right.
Is the roof strong enough as it stands without any extra truss bracing or rigid fixings such as lumberlok plates? I’d like to buy once cry once as they say!
I need to build this off an existing side deck to the house, more of a lean to option on one of the ends. Any plans for one of those? 8×14 space exists now.