This step by step woodworking project is about 12×16 greenhouse plans. I had a few requests for a 12×16 easy to build greenhouse and you know I cannot refuse a good challenge. That is why I’ve decided to design this wooden greenhouse with a gable roof, that is both pretty and sturdy. The greenhouse has 6′ side wall and a maximum height of 9′. You can add lots of unique features to the greenhouse, such as automatic vents or doors, so you can control the climate. In addition, you can cover the greenhouse with glass, film or poly-carbonate sheets.
The location of the wood greenhouse should be set as to benefit from sunlight, most of the day. This aspect is essential for your future crops, as the plants need morning light to develop properly. Place the solar greenhouse far away from buildings or trees. If this is not possible, try to build it as to get the morning light from east. Before building the wood greenhouse, level the ground and excavate the soil if necessary.
If you want build a durable greenhouse, you should choose the materials with great care. Buy pressure treated lumber or cedar, making sure the studs and beams are perfectly straight. In addition, examine the studs and select the lumber without visible signs of damage. Use the right woodworking techniques, as to join the wood properly and a spirit level to plumb the walls before setting them into place. See all my Premium Plans HERE.
Made from this plan
12×16 Greenhouse Plans
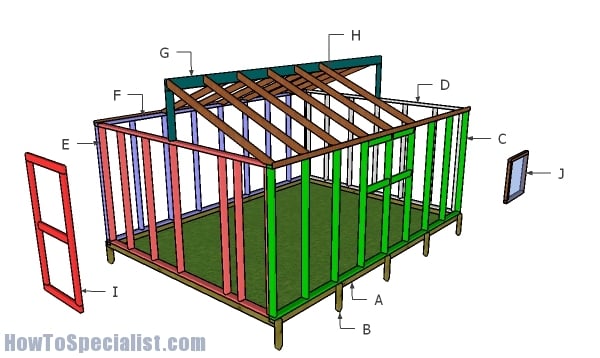
Building a 12×16 greenhouse
Materials
- A – 2 pieces of 4×4 lumber – 144 long, 2 pieces – 192″ long BASE
- B – 10 pieces of 2×4 lumber – 16″ long STAKES
- C – 2 pieces of 2×4 lumber – 192″ long, 9 pieces – 72″ long, 4 pieces – 22 1/2″ long SIDE WALL
- D – 2 pieces of 2×4 lumber – 137″ long, 7 pieces – 72″ long BACK WALL
- E – 2 pieces of 2×4 lumber – 137″ long, 7 pieces – 72″ long FRONT WALL
- F – 2 pieces of 2×4 lumber – 192″ long, 9 pieces – 72″ long SIDE WALL
- G – 2 pieces of 2×4 lumber – 25 1/2″ long, 1 piece of 2×6 lumber – 192″ long RIDGE BEAM
- H – 18 pieces of 2×4 lumber – 77 3/4″ long, 2 pieces of 1×3 lumber – 192″ long RAFTERS
- I – 2 pieces of 2×4 lumber – 65″ long, 2 pieces – 36″ long, 1 piece – 29″ long DOOR
- J – 2 pieces of 2×2 lumber – 22 1/2″ long, 2 pieces – 19 1/2″ long 2xVENT
- 1 piece of 2×6 lumber – 16′
- 2 pieces of 4×4 lumber – 12′
- 2 pieces of 4×4 lumber – 16′
- 2 pieces of 1×3 lumber – 16′
- 4 pieces of 2×4 lumber – 16′
- 21 pieces of 2×4 lumber – 12′
- 18 pieces of 2×4 lumber – 8′
- 2 pieces of 2×2 lumber – 8′
- 500 pieces of 2 1/2″ screws
- 3 1/2″ screws
- film
- vent opener
- thermostat outlet
- hinges + latch (door)
- hinges for vents
Tools
- Safety gloves, glasses
- Miter saw, jigsaw
- Chalk line, tape measure, spirit level, carpentry pencil
- Drill machinery and drill bits
Time
- One Week
Related
12×16 Gable Greenhouse Plans Free – PDF Download
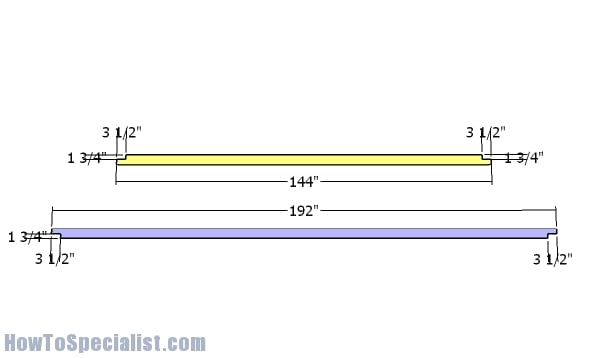
Building the skids
The first step of the project is to build the base for the greenhouse. Therefore, all you need to do is use 4×4 pressure treated beams for the skids. Use a circular saw to make parallel cuts and then remove the excess with a chisel. Smooth the surface with sandpaper.
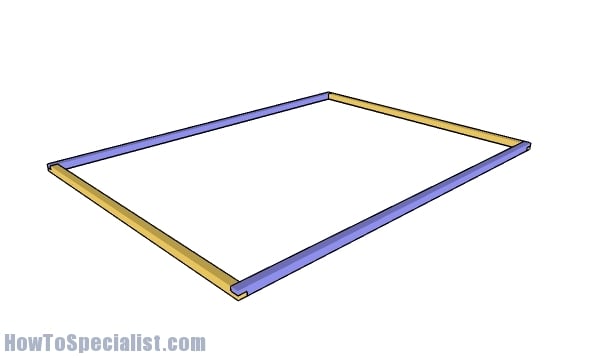
Assembling the base of the greenhouse
Select the location for the greenhouse, making sure it gets a lot of natural light so the plants will grow healthy. Level the surface and then lay the beams, as shown in the plans. Make sure the corners are square and then drill pilot holes, before inserting the 3 1/2″ screws.
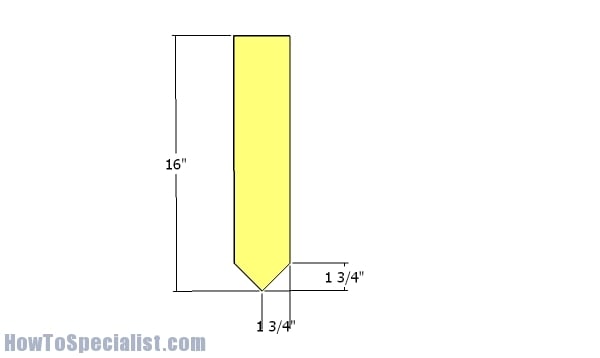
Stakes
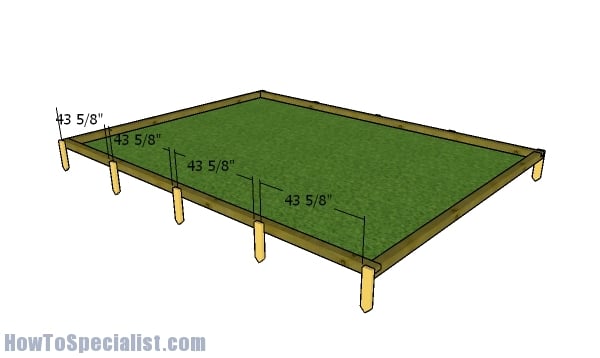
Fitting the anchors to the greenhouse base
Use 2x4s for the anchors. Cut one end of the stakes in V-shaped, so you can fit them to the ground easily. Then use 2 1/2″ screws to secure the stakes to the base of the greenhouse.
Building the wall frames
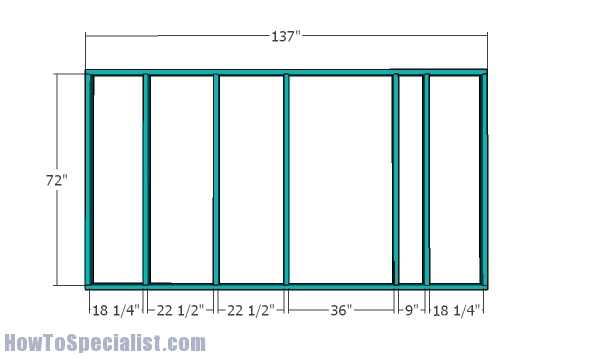
Front wall frame
Next, you have to build the wall frame for the front of the greenhouse. As you can easily notice in the diagram, you need to frame the door opening. I went conservatively so I made it 3′ wide, but you can plans with the dimensions and make it suit your needs.
Lay the components on a level surface and then assemble the frame with 3 1/2″ screws. Drill pilot holes through the plates before inserting the screws to prevent the wood from splitting. Make sure the corners are square and align the edges flush.
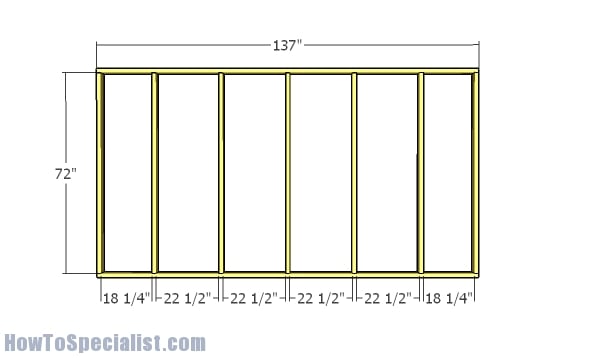
Back wall frame – 12×16 greenhouse
Continue the project by assembling the back wall. You can add a door do this wall as well, if you want an easy access to the interior.
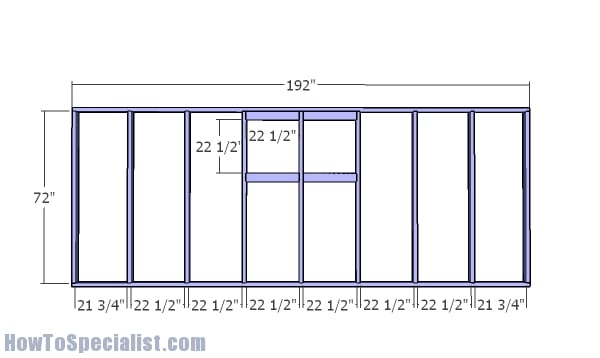
Side wall with vents frame – 12×16 greenhouse plans
Next, we need to frame the side walls. As you can notice in the plans, I have added 2×4 supports for the vents. Drill pocket holes at both ends of the supports and then lock them to the studs with 2 1/2″ screws. You can adjust the size of the vents, as well as their location. I am no gardener, so I let that to you, if you have more experience.
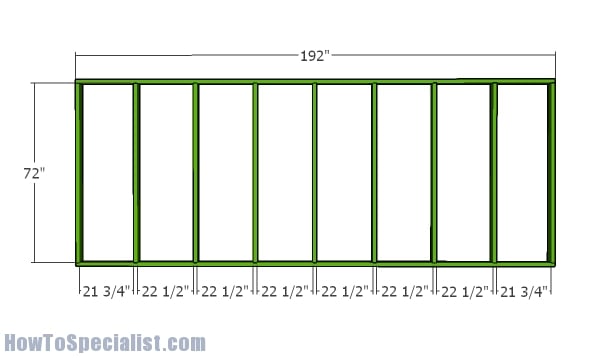
Side wall frame – 12×16 greenhouse plans
Build the opposite side wall for the 12×16 wooden greenhouse.
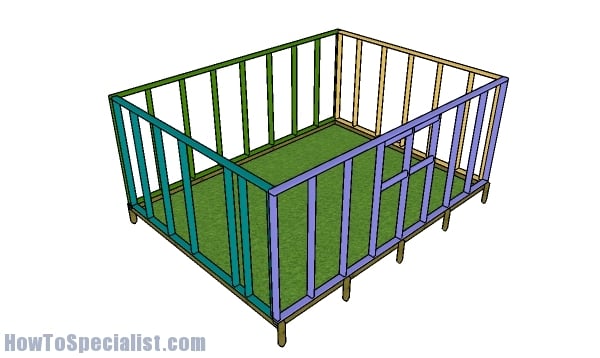
Assembling the frame of the greenhouse
After assembling the wall frames for the greenhouse, you need to assemble everything. Fit the wall frames to the skids and align the edges flush. Plumb the walls with a spirit level and then drill pilot holes through the bottom plates. Insert 3 1/2″ screws to lock the wall frames to the base. Next, lock the adjacent wall frames together with 2 1/2″ screws.
Building the roof
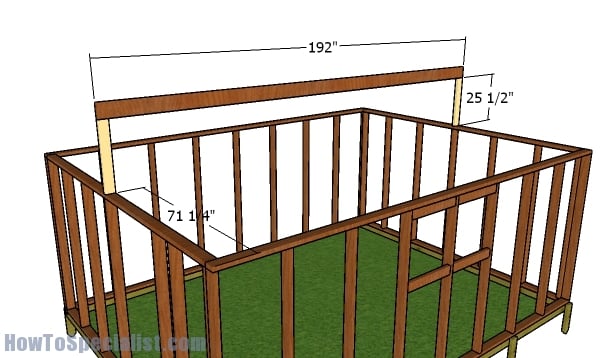
Fitting the ridge beam
Use 2×4 lumber for the ridge beam supports and 2×6 lumber for the ridge beam. Drill pocket holes at both ends of the supports and then secure them to the middle of the front and back wall plates , using 2 1/2″ screws. Make sure the corners are square and align everything with attention. Fit the ridge beam and don’t worry, the structure will be way stiffer when adding the rafters.
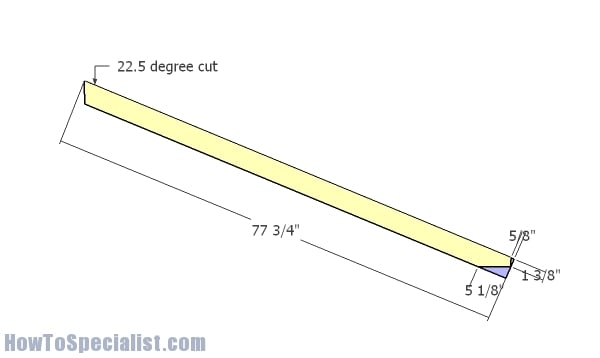
Building the rafters
Talking about the rafters, I want to show you how to cut them. Use a miter saw to make the angle cuts. But before making the cuts, you need to mark the lines on the 2×4 slats.
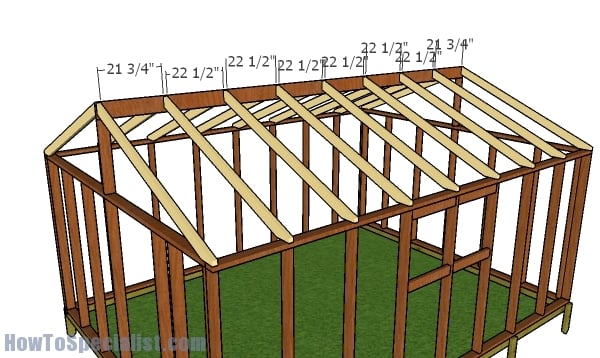
Fitting the rafters
Fit the rafters to the top of the greenhouse and then place them every 24″ on center. Drill pilot holes and insert 3 1/2″ screws to lock the rafters into place tightly.
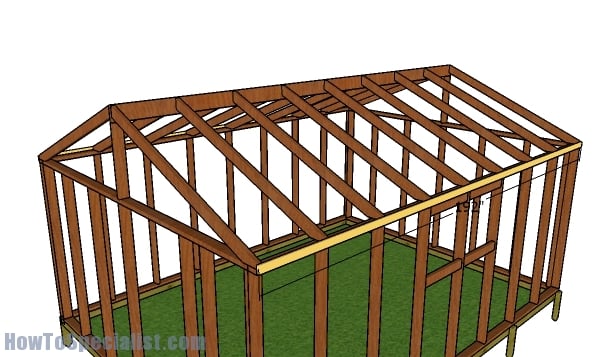
Fitting the end rafter slats
Fit the 1×3 slats to the end of the rafters, so you can protect the film when stretching it over the greenhouse.
Building the door
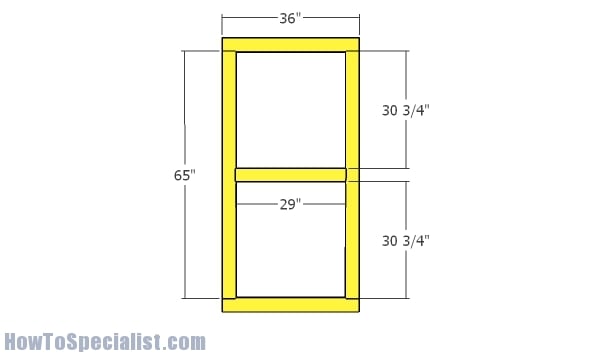
Building the door
Build the door from 2x4s, as shown in the plans. Drill pocket holes at both ends of the vertical supports and at both ends of the middle support. Make sure the corners are square and use 2 1/2″ screws to lock everything with attention.
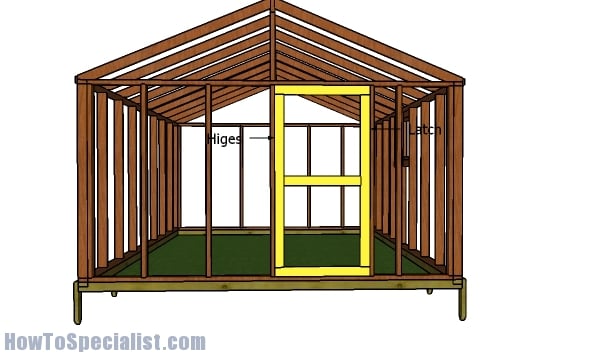
Fitting the door
Fit the door to the front of the greenhouse and lock it into place with hinges. Add a latch so you can close the door properly.
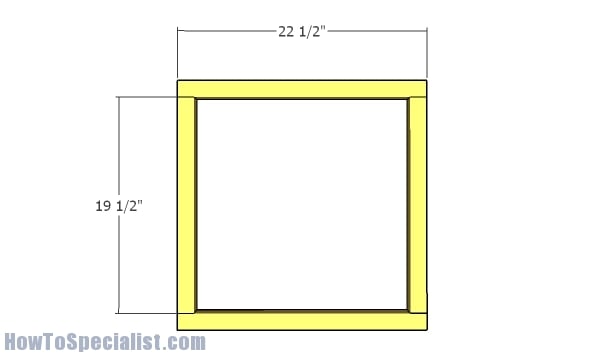
Building the vents
Use 2×2 lumber for the frames of the vents. Align the edges and make sure they are perfectly square. Drill pilot holes and insert 2 1/2″ screws to lock everything together tightly.
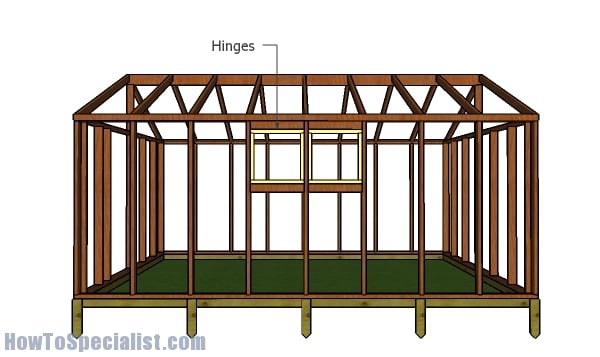
Hitting the vents
Fit the vents to the openings and lock them to the top supports with hinges. Install the automatic vent so you can control the climate inside the greenhouse with ease.
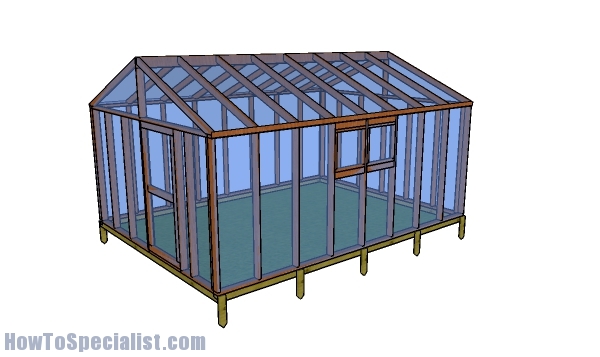
12×16 greenhouse plans
Last but not least, you need to attach the film to the exterior of the greenhouse. Use 1×2 trims, along the framing of the greenhouse, so you can lock the film into place tightly.
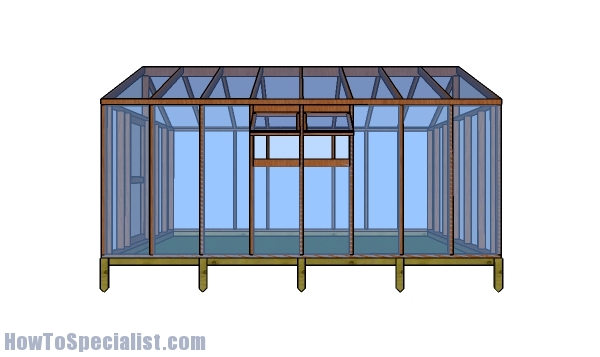
12×16 greenhouse plans – side view
This is a super easy to build greenhouse, so you shouldn’t feel intimidated by the task. Just follow the instructions religiously and at the end you will have a brand new greenhouse in the backyard.
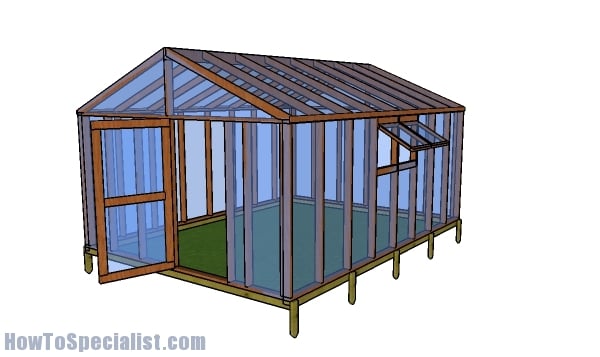
How to build a 12×16 greenhouse
You could apply a few coats of treatment over the wooden framing, so they withstand the elements.
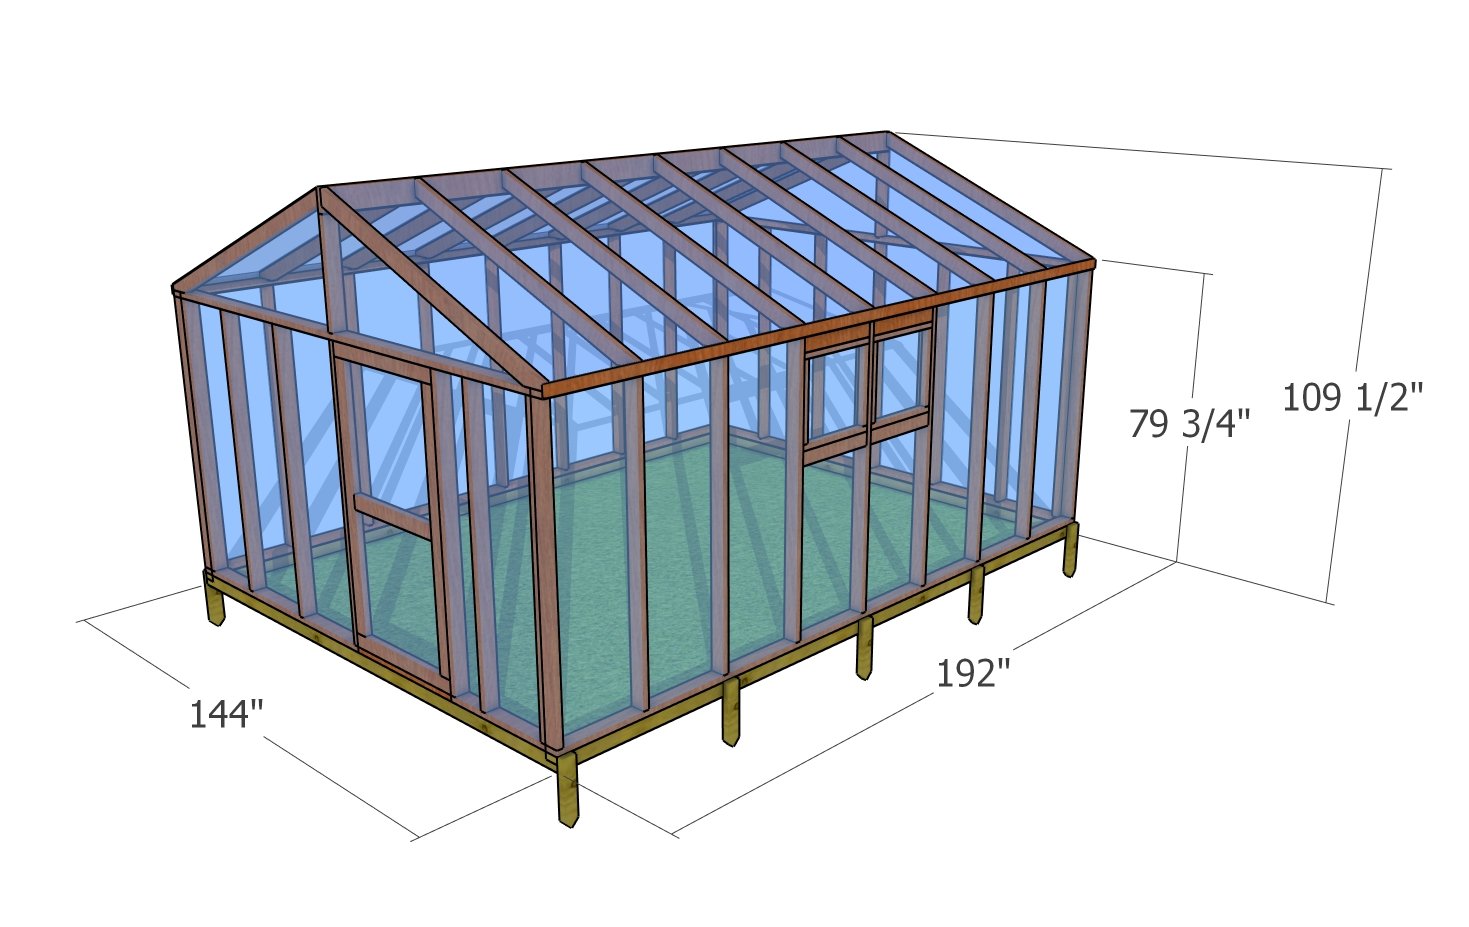
12×16 greenhouse plans – dimensions
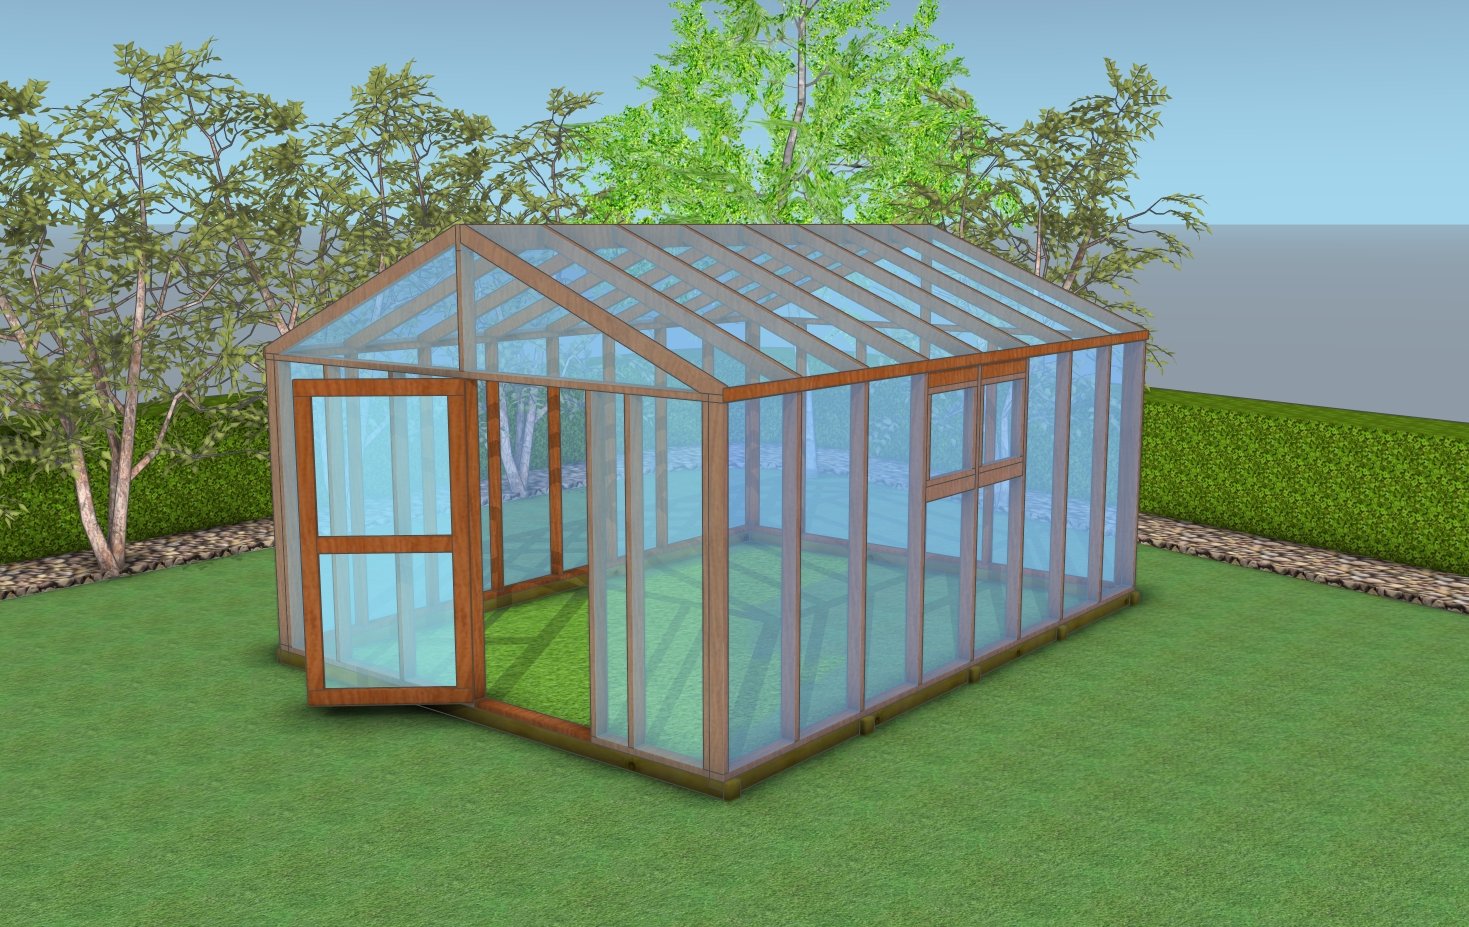
12×16 gable greenhouse plans
Thank you for reading our project about 12×16 greenhouse plans and we recommend you to check out the rest of the projects. Don’t forget to LIKE and SHARE our projects with your friends, by using the social media widgets. SUBSCRIBE to be the first that gets our latest projects.

21 comments
Thanks very well written easy to follow much appreciated
I’ll be building this greenhouse soon. However, I do need to make a modification to the door to be wide enough to allow an IBC tote (48″ wide) to be moved into the greenhouse. What kind of modifications would you recommend to accommodate a door opening that wide? Also, how well does this design hold up in high wind?
The greenhouse is ok with strong wind, just use the rafter ties to secure the rafters into place. Also add diagonal braces. To frame the door use a 2×6 header above the opening, just like you would do in a shed.
Also, I’m considering modifying the walls to be 8′ high instead of 6′ (mainly because I don’t want to worry about bumping my head every time I enter the greenhouse). Would that modification cause the structure to be unstable?
You can adjust the size of the walls to 8 ft with no problem.
I’m in the process of building this greenhouse (thanks for the easy to follow plans!). My twinwall polycarbonate panels are 2′ X 8′. What are your thoughts on spacing the joists 24″ on center rather than 22 1/2″ in order to accommodate the panel width better?
The studs are 24″ OC. The 22 1/2″ is the space BETWEEN the studs. So you should be right on. Good luck and let me know how it comes out. Looking forward to seeing your greenhouse!
Hi Jack,
I’m nearly finished with the build (some more to do on the inside and a few PVC corner pcs to add. I have a lot of feedback. I’d love to share pictures with you but I’m not sure how (I don’t have a website).
1. The plans are an awesome starting point!
2. I think additional bracing is required to gain proper support/rigidity. I added angular 2X4’s between the studs at the corners. I also added 3 2×4’s between the walls to help stabilize them (No additional rafter support was required).
3. if you do this right, it’s an expensive build (poly carbonate panels aren’t cheap, treated lumber is expensive, etc.). This of course is just an observation.
4. in Georgia, I’m not sure the vents as designed would be enough, I added a 16in exhaust fan, louvre vent to open when fan kicks on, and a real screen door. I’m not quite precise enough to build my own door and have it function smoothly.
5. In support of #4 above, I added two 100 watt solar panels, a charge controller, a deep cycle battery, and a 4000 watt inverter. I’m not completely finished with this portion of the build and currently have an extension cord running from the house.
6. After I finished most of my trim I discovered PVC trim pcs; as my white stained trim rots I’ll replace it with this material which should be impervious to almost everything. If anyone reads these comments and is serious about building this greenhouse, I’ll also point out they make a galvanized roof cap pc avail in 10 ft sections. This solved the problem about how to close off where the roof panels met at the ridge line and looks great too.
In closing, my project looks GREAT! Thanks for the plans!!
David
Hey. I would love to feature your project on the blog. You can send the pics on the email admin@howtospecialist.com or using this form: https://howtospecialist.com/give-back/
About how much does this plan cost in all wood including the palaram panels ?
Hi Luke,
I have about $4.5k or so in my greenhouse. The treated lumber and poly carb panels of course were the two biggest single expenses. Other notable costs included; solar panels (2X100w), charge controller, inverter, marine battery, marble rocks for flooring, sand, concrete, deck screws, PVC trim boards, potting soil, etc..
It has been a really fun project though. Hope this helps. David
Jack: Beautiful design (great Sketchup skills!) — But our county building code limits me to 120 square feet. My existing greenhouse will be torn down very soon. It is on a 9’x16′ ground frame of 4x4s.
How would I scale this to fit 9′ width and 12′ (or 13′) length?
Have you done a greenhouse plan of less than 120 square feet?
Thank you…
Any ideas on floor material?
Hi. I’m looking into building this 12×16 model but I would like to have 2 barn doors at the front to allow me to back the truck up and unload. How would be the best way to do this. Would I just take the middle support beam out and only have the two support beams.
Good evening Jack, what is the process for downloading or purchasing the 12 X 16 Greenhouse plans? Thanks
See the Get PDF Plans button at the bottom of the article
Hi Jack
I love this.
I’m wanting the same size, only I would like a steeper pitch on my roof. A 6:12. What would you recommend? TIA!
Very impressed and well done! Your work is amazing and your plans very simplified simplified. If you were looking for carpentry work I would hire you in a heartbeat for our construction company. I was actually looking for a simplified greenhouse design that I can build by myself. I need two that are 16X16 and tall which I can modify using longer lumber, rafter ties, plates, bolts, anchors etc. I just needed visual basics. I will be doing 6 mil plastic until I can make the switch and also pull a few windows and a door from a remodel. Thank you again for making these free and so great.
how many 3 1/2″ screws
500 pieces
thank you