This article is about platform bed frame plans. In the past years, the platform bed frames have gained market share due to their nice appearance and high functionality. Consequently, more and more people crave to freshen up their bedrooms by purchasing a nice platform bed frame. Unfortunately, a king size platform bed frame may come at a prohibitive price for most of us, or you might haven’t found yet the one to fit your needs and tastes. Consequently, in this step by step article we will show how to build a nice platform bed by using our free plans. Moreover, you can adjust the dimensions or the design of the platform frame, as to fulfill your needs and tastes.
A platform bed can take many shapes and designs, so it is up to you the one you choose. In addition, before building the platform bed frame, you have to decide the size of the mattress you are going to use. Our platform bed frame plans are designed for a king size mattress, but you can adjust them as to fit your needs. When building the frame, you have to make pilot holes and then insert the screws (otherwise the wood would split).
Consequently, use a good drill machinery with torque control and sharp wood drill bits to make the holes. Then, insert the screws by using an electric screwdriver. Make sure the size of the drill bits is compatible with the screws you are using. Don’t forget to check out the rest of our furniture projects, if you want to see more step by step tutorials.
If you don’t like the idea of a double platform bed, then you could build just the top bed frame and the headboard. In addition, if you are a skilled diy-er you can add storage drawers and other unique features, as to satisfy your tastes and needs. In order to build the platform bed frame, you can choose to buy finished wood boards (more expensive but better quality), or regular wooden planks and sand them properly (cheaper but time-consuming). See all my Premium Plans in the Shop.
Made from this plan
In order to use our platform bed frame plans, you need the following:
Materials
- A – 2 pieces of 2×8 – 70″, 4 pieces of 2×8 lumber – 63″, 3 pieces of 2×8 – 21 1/4” BASE
- B – 2 pieces of 2×4 – 84″, 6 pieces of 2×4 lumber – 81″, 10 pieces of 2×4 – 15” FRAME
- C – 2 pieces of 3/4” plywood or MDF – 42 x 84″ SUPPORT
- D – 3 pieces of 1×6 – 48″, 7 pieces of 1×6 lumber – 84″ HEADBOARD
- 6 pieces of 2×8 lumber – 8′
- 10 pieces of 2×4 lumber – 8′
- 1 pieces of 3/4″ plywood – 4’x8′
- 9 pieces of 1×6 lumber – 8′
- 100 pieces of 2 1/2″ screws
- 200 pieces of 1 1/4″ screws
- 20 pieces of 3 1/2″ screws
- glue, stain
- king size mattress
Tools
- Safety gloves, glasses
- Circular saw, jigsaw
- Spirit level, carpentry pencil, corner square
- Drill machinery and wood drill bits
- Electric screwdriver
Tips
- Make sure you pre-drill holes before inserting the screws
- Use hardware brackets rather than driving in the screws directly
- Use pocket hole screws
Time
- One Day
Related
- How to build a storage platform bed frame
- How to build a king size bed frame
- How to build a queen size bed frame
- Bunk bed frame plans
My best tips on building a king size platform bed with headboard:
Building a king-size platform bed with a headboard is a rewarding project that allows you to create a custom piece of furniture perfectly suited to your space. A platform bed is not only stylish but also functional, providing solid support without the need for a box spring. Here are my best tips for building a sturdy and attractive king-size platform bed with a headboard.
1. Plan Your Design
Start by planning the design of your platform bed. Consider the following:
- Size: A king-size bed typically measures 76 inches wide by 80 inches long, so your platform frame will need to accommodate this size. Make sure to leave some extra space for bedding or adjustments.
- Height: The height of the platform can vary, but a common height is between 12-18 inches off the ground. This height offers storage space underneath if desired.
- Style: Decide on the style of your bed. You can go for a minimalist design with clean lines or add decorative elements such as trims and molding for a more elegant look.
- Headboard: Plan for the size and style of the headboard. A tall, padded headboard adds a luxurious touch, while a simple wooden headboard gives a rustic or modern feel.
Sketching out your design helps you visualize the final product and ensures that you have the right materials.
2. Gather the Materials
Here’s a list of the essential materials for building a king-size platform bed:
- 2x4s or 2x6s for the bed frame and headboard
- Plywood (3/4 inch thick) for the platform base
- Wood screws and lag bolts
- L-brackets or corner braces for added stability
- Wood glue
- Sandpaper and wood stain or paint
- Headboard materials (plywood, fabric, padding, or additional wood)
- Tools: Circular saw, drill, measuring tape, clamps, and level
Be sure to choose high-quality, sturdy wood for the bed frame to ensure long-lasting durability.
3. Build the Bed Frame
The bed frame is the foundation of your platform bed, so it needs to be solid and secure:
- Cut the frame pieces: Cut two side rails from 2×6 boards, each 80 inches long, and two end rails at 76 inches. These will form the outer frame.
- Assemble the frame: Attach the end rails to the side rails using wood screws and L-brackets for reinforcement. Check that the frame is square by measuring diagonally from corner to corner.
- Add support beams: Cut additional 2×6 boards to create support beams that will run across the middle of the bed frame. Space the support beams every 16-18 inches to provide a sturdy base for the mattress.
- Install corner supports: Reinforce the corners with corner braces or additional wood blocks for extra stability.
Once the bed frame is assembled, make sure it’s level and sturdy before proceeding.
4. Add the Platform Base
The platform base provides the surface for the mattress to rest on:
- Cut the plywood: Measure and cut 3/4 inch plywood to fit snugly on top of the bed frame. You may need to use multiple pieces, depending on the width of the plywood.
- Secure the plywood: Attach the plywood to the frame using wood screws, making sure it’s evenly spaced and flush with the top of the frame. Pre-drill the holes to prevent the wood from splitting.
This creates a flat, supportive base for the mattress, ensuring a stable sleeping surface.

5. Build the Headboard
The headboard is a key feature that adds both style and function to your bed:
- Cut the headboard frame: Use 2×4 or 2×6 boards to build the frame for the headboard. A typical king-size headboard is about 76 inches wide and can range in height from 36-48 inches, depending on your preference.
- Attach the headboard: Secure the headboard frame to the back of the bed frame using lag bolts or wood screws. Make sure the headboard is centered and level.
- Decorate the headboard: You can customize the headboard by adding plywood backing, fabric, and padding for an upholstered look, or leave it natural for a more rustic or modern design.
If you choose an upholstered headboard, wrap the plywood backing with foam padding and fabric, then secure it with a staple gun.
6. Sand and Stain or Paint
Before finishing the bed, sand all surfaces to smooth out rough edges and imperfections:
- Sand the wood: Use medium-grit sandpaper to smooth the edges and surfaces of the frame and headboard.
- Apply stain or paint: Once the wood is smooth, apply your choice of wood stain or paint to match the style of your room. If staining, apply at least two coats of stain and finish with a clear sealant to protect the wood.
- Allow drying time: Let the stain or paint dry completely before moving on to the final assembly.
Sanding and finishing not only enhance the look of the bed but also protect the wood from wear and tear.
7. Assemble the Bed in Place
Once the frame, platform, and headboard are complete, it’s time to assemble the bed in its final location:
- Move the bed frame: If you’ve built the frame outside the bedroom, carefully move it into place. You may need help to carry and position the bed frame, especially for a king-size bed.
- Secure the headboard: Attach the headboard securely to the wall or the bed frame, depending on your design. Ensure it’s flush and level.
Once the bed is assembled, place your mattress on top and enjoy your new custom platform bed!
Bonus Tip: Add Storage Underneath If you want extra storage space, consider adding built-in drawers or storage baskets underneath the platform. This makes the most of the space and adds functionality to your bed design.
King size platform bed plans
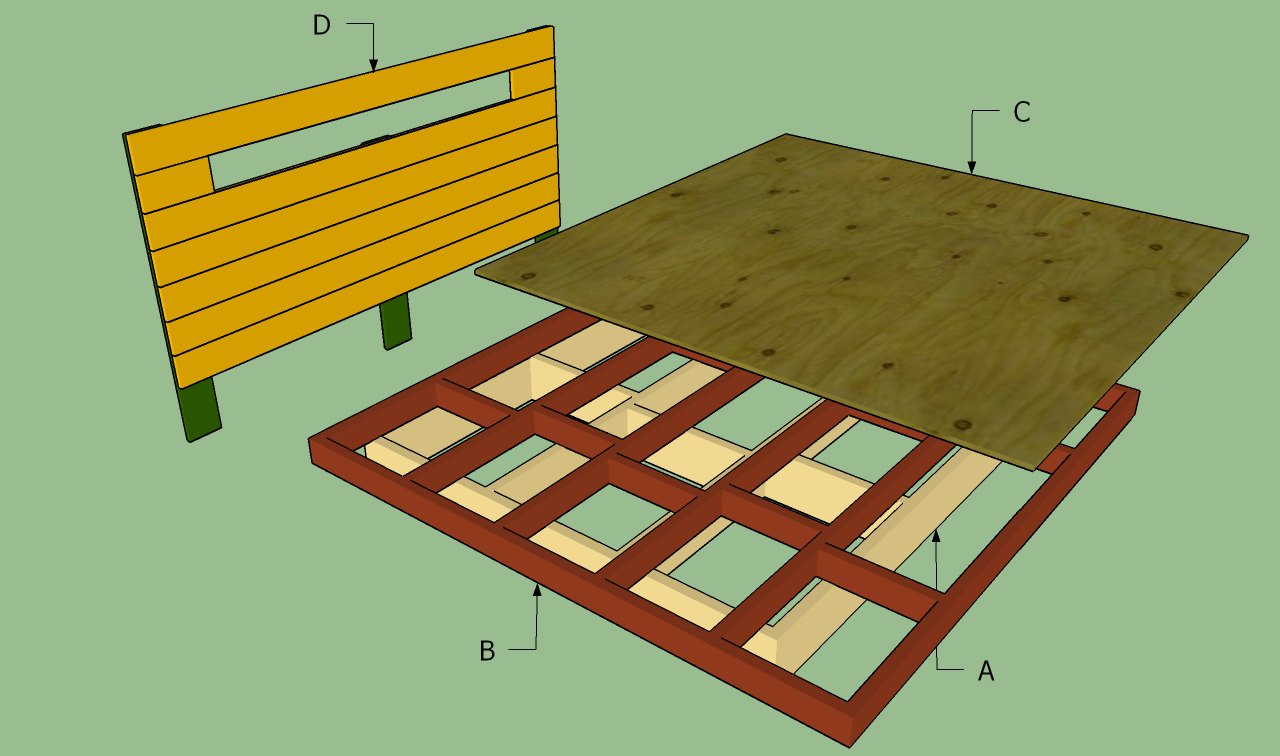
King size platform bed frame
Smart tip: Building a simple platform bed frame is a great opportunity to use your creativity. The plans in this article are detailed and can be used as their are, but you could also adjust the size and the design of the bed frame, as to fit your needs and the style of your bedroom.
Platform bed frame plans
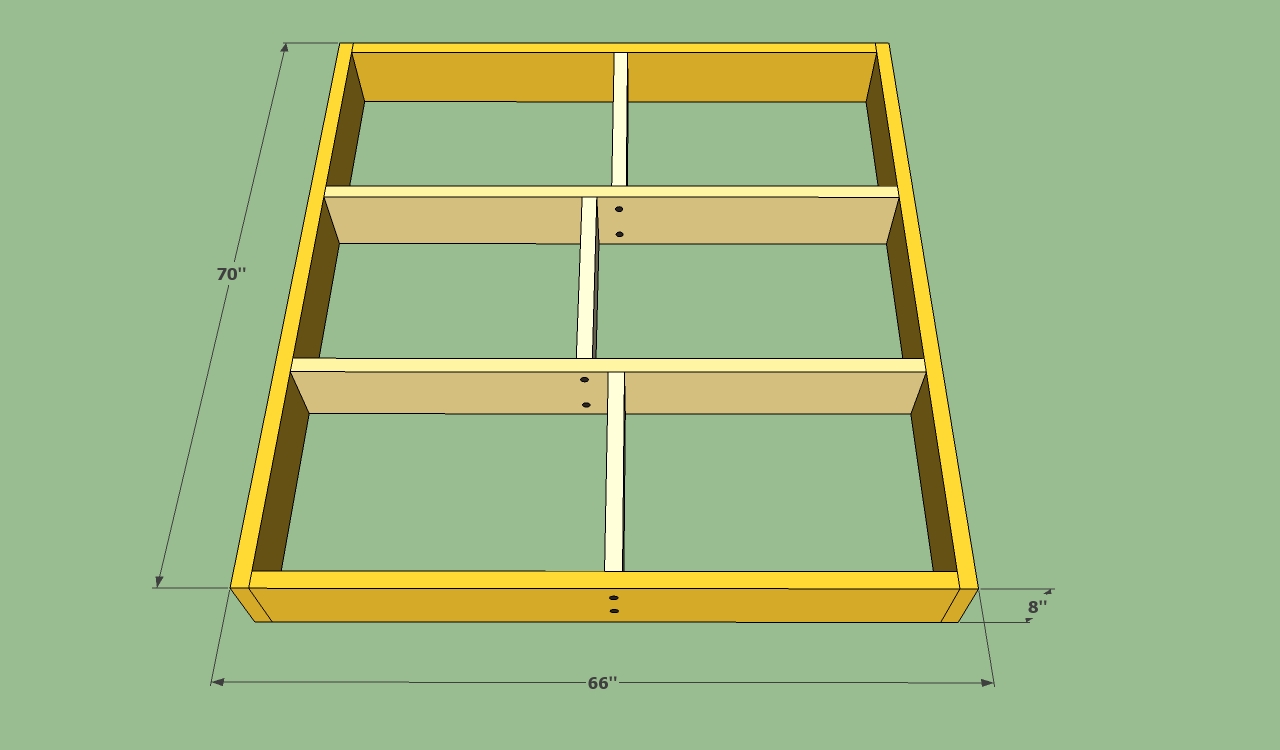
Platform bed base structure
First of all, you have to build the base bed frame, by using 2×8 wooden boards (you can use 2×10 boards if you want a taller bed frame). Consequently, cut 2 wooden boards at 70”, while the other boards must be cut at 63”. In order to make the cuts, you have to use a circular saw or a jig saw.
Make sure you buy quality wooden boards, without scratches or cracks, as to build a durable and nice looking platform bed frames.

Cutting wooden boards
In order to make accurate cuts, you have to use an l-square and a carpentry pencil to draw the cut line. Next, you could make a smart set up, as to help you cut the boards perfectly straight. Use another board and 2 C-clamps to secure the board, to ensure the blade of the saw goes exactly over the cut line, at both ends.
You can read more about this technique, by reading our article on how to build a wooden bed frame.

Ensuring frame corners are square
Next, after you have cut the boards at the proper dimensions, you have to build the frame. Consequently, use a corner square to make sure the corners of the platform bed frame are 90º angled. This aspect is essential, so make sure you check this several times for every corner of the frame. Next, you have to drill at least 2 holes at every joint, by using a good drill machinery with torque control. If you decide to insert the screws without making the pilot holes, you risk cracking the wood boards.

Setup for bed frame joint
We strongly recommend you to use the following setup when connecting the wooden boards. Therefore, use a 4×4 piece and 4 C-clamps to lock the wooden boards into position, before making the pilot holes with the drill machinery.
Use a good wood drill bit and make sure its size is compatible with the screws you are going to insert. Using a smaller or a larger drill bit is a common mistake, so pay attention to the size of the drill bit when making the holes.

Platform bed frame
Next, after you have assembled the base frame, you need to build the platform frame using the same techniques. Study carefully our platform bed frame plans and build the wooden structure properly.
Smart tip: Cut the 2×4 wooden boards at the proper dimensions and connect them by using the wooden screws (2 1/2 – 3”). Make sure you pre-drill before inserting the screws, as to avoid cracking the wood.

Centering the platform frame on base
Next, after you have finished assembling the platform bed frame, you should center it on the base structure. As you can see in the image, on both sides you must have the same distance (6”).
Nevertheless, as you can notice, at the head of the bed frame, the two structures should overlap perfectly. The platform bed frame is designed to protect your legs from hitting the base frame and to create a nice storage area for books.

Toenailing the two frames
Remember that the two frames must be locked together tightly, by using 3 1/2” screws. At each intersection of the the two frames, just drill holes (at angle) and then insert the screws. This techniques is called toenailing and it is very efficient in this case, as it lock together the wooden structures.
If you have built the frames properly (level and square), you should find it a relatively easy job to connect them together.
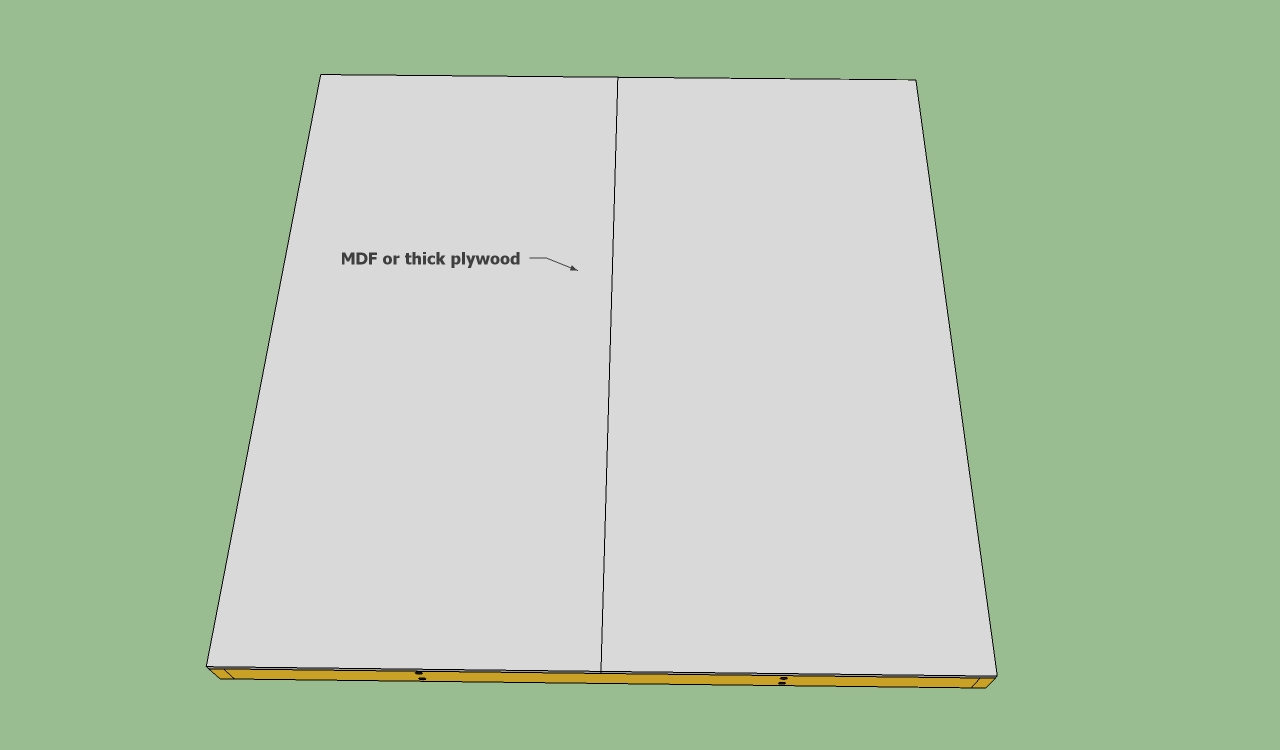
Platform bed plywood
After you have build the frame, by using our platform bed frame plans, you have to attach the plywood or the MDF. Therefore, you have to go to your local diy store and order the needed surface (in our case 84 x 84”). They will cut the plywood for you (better than you could do it with a saw) as you will need more than one board.
You could buy a thick plywood or a nice looking MDF, it all depends on your budget and tastes.

King size mattress on platform bed
Next, you have to install the mattress on your brand new platform bed frame. The cost of this project will be around 150-200 dollars, if you use the best quality materials. If you choose average quality material, you could pull it trough even cheaper.
Last but not least, I think this platform bed frame would look fantastic with a nice headboard, so we will show you the plans.
Headboard plans for platform bed frame

Bed frame headboard
We recommend you to use 1×6 wooden boards to make the frame of the headboard. Next, you have to fasten the wooden boards by using 2 screws in each frame. Pay attention to the screws you are going to use and make sure they are smaller than the added thickness of the wood boards + the frame.
Smart tip: We recommend you to use quality wooden boards, as to make your platform bed frame have a neat look.
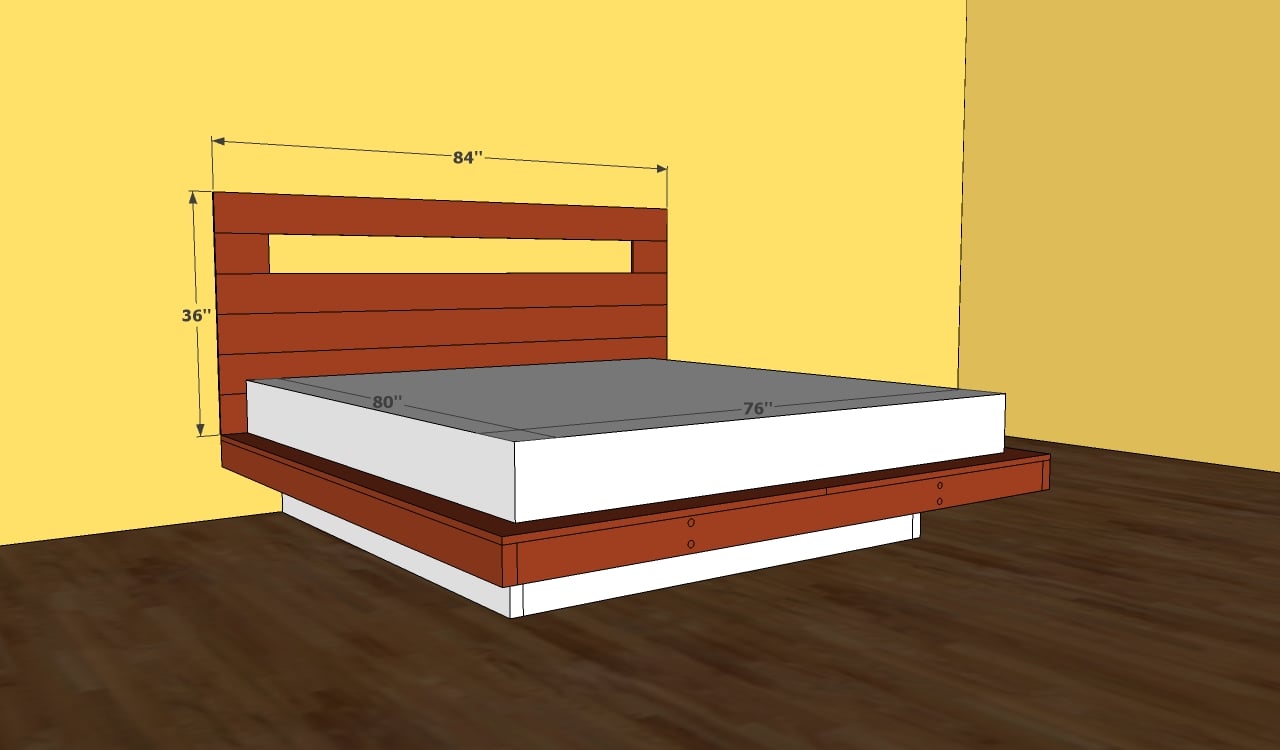
Platform bed frame
Last but not least, you have to connect the wooden headboard to the platform bed frame by using wood screws. After you have assembled the bed frame, you can enjoy your brand new bed frame.
Smart tip: You can use the space under the bed frame to deposit books or other little objects. In addition, you can paint the bed frame as to fit with the rest of your house, therefore it is essential to use quality wooden boards.
If you want to download the plans. just click on the GET PDF PLANS button bellow.
By following these steps, you’ll be able to build a sturdy and stylish king-size platform bed with a headboard. With careful planning, quality materials, and attention to detail, your DIY bed will provide both comfort and a striking focal point in your bedroom.
Thank you for reading our article about platform bed frame plans and we recommend you to check out the rest of our projects. Please share our projects with your friends, by using the social media widgets. LIKE us on Facebook to be the first that gets our latest projects and to.
Related projects:

56 comments
Hi, just wondering if I could get the measurements for a queen sized bed thank you
Give me a few days and I will make a plan for a floating queen size bed frame. Make sure you come back in a few days!
The plans are ready. You can take a look at: http://www.howtospecialist.com/finishes/furniture/floating-queen-size-platform-bed-plans/
Hi, I will like to know if I could get the measurements of a king size bed.
This is awesome! Currently overseas but my wife wants me to make this once I get back. Would also really appreciate the plans for a queen size bed, thanks
The plans are ready. You can take a look at: http://www.howtospecialist.com/finishes/furniture/floating-queen-size-platform-bed-plans/
Hey I was wondering if I could get the plans for a full size bed please
I ll add your request to my list. I am currently working on plans for the queen size bed.
Plans for the full size floating bed frame here: http://www.howtospecialist.com/indoor/bedroom/full-size-floating-bed-plans/
The dimensions on your king size plan dont seem to match the instructions on there.
Yes, they do. I looked over the dimensions and they are accurate.
For the frame you suggest to use 2×8, and on the instructions, or steps it is stating 2×4? o.O
Measurements are wrong on Base B. You can’t have a square 84″ x 84″ or the king mattress won’t fit. It should be more like 88L x 84W
This bed is designed for a 76″x80″ mattress. The extra space is for a 4″ overhang on all sides, for design considerations.
Hi, what would be the measurements for a California king 72×84 with a 4″ overhang on the left and right and a 2″ overhang on the top and bottom?
72+4+4=80″ and 84+2+2=88″
Hi im also trying to build one for a California king what are the exacts things I need to order from Home Depot if you don’t mind telling me
Hi, I was wondering if there was a way to make these measurements fit for a twin size bed
I don’t see it possible to adapt this design to a twin bed, because the base would have to be too narrow and thus make it unsafe.
I currently have a cal king used with box springs. Is it possible to build a platform to replace the box springs?
I’m not sure. I would have to see a pic with the bed so I can help you.
so if i don’t want the four inch overhang, just subtract 4 inches from base and platform measurements?
Yes. My plans are designed for a 4″ overhang on each side and front, considering a 76″x80″ mattress. However, you need a small overhand, as it won’t work otherwise.
in your tip, you mention using hardware brackets. where do you suggest using them?
for example, if you want to move the bed easily from one location to another, you can use these fittings: http://amzn.to/2kiGphb That’s what I meant.
I’m wondering if you can give the exact screw sizes? At homedepot and Lowe’s they come in #8, #10 and so forth. Which is the correct one to use
?
I d go for #8 screws.
In your DIY for the queen bed you say to make pocket holes, yet for the king bed you never mention pocket holes. Is there a reason for that? Is one better than the other?
Pocket holes with make a neat results (the holes are hidden) while the but joints are easier to make (no pocket jig required), but you need to fill the screw holes with putty. I would go for pocket holes and screws, whenever is possible and when the appearance matters.
I made this for a king size bed. I used 2 x 10’s for the base and 2×4’s for the platform. I also made a headboard with 1×6’s, instead of cutting the second plank, I just kept all planks on the headboard going the full 84″. One tip, is to make sure you can you bring the platform into the bedroom (through the doors). We couldn’t do that, so we had to do some modifications to get it through the bedroom door. We also stained it and sealed it, so hopefully it’ll last a long time. I have about 30 hours into it.
Great project, Mike. Thanks for sharing. Your project can be found at: http://howtospecialist.com/give-back/diy-king-size-platform-bed/
We would love this for our son. We are in the UK so sizing is different. Do you have any plans for the UK small double bed 122 x 190 cm/48″ x 75″ or standard double bed 137 x 190 cm/54″ x 75″?
Thank you so much.
No I don’t have exact plans for that, but I have designed something that is very closed to that: http://howtospecialist.com/indoor/bedroom/full-size-floating-bed-plans/
Do you have plans for Cal King? I want to make this and add Lighting. How would you recommend adding the LED lights, strips or ropes. With Ropes I would imagine I would drill holes through base frame and run through. Or fasten strips to bottom of top frame. Thoughts?
No, I don’t have plans for a Cal King.
Hello Jack.
I’ve decided to use your plans for my next project. They look awesome. I can’t wait to see the end result. I would have to build 2 beds to keep everyone happy. A King Size bed and a California King Size since I’m not average height. Did yo get around to make the plans for California King? or simply adjusting the king size will suffice? What do you recommend?
By the way, Kudos and Thank you for everything you do. God bless you,
Vic
Yes, you only need to modify the dimensions to fit the mattress.
Would this support box springs as well? Im using 2×6 on the base instead because 2×8 is rediculous right now. So i was just curious because of the 2 inch difference or whatever. And my mattress is also 13 to 15 inches thick and heavy as ever.
Probably not. I don’t have a clear answer. Maybe other builders can join in the discussion and leave their 2 cents.
What type of wood would you recommend for the headboard and trim pieces around the bed frame? I want a nice looking bed frame with nice wood that won’t warp or split over the years. I’m assuming you would use a regular fur 2×8 for the actual frame?
Any hardwood. I would go for oak.
Buenas, que programa utilizaste para hacer los planos? Porque quiero hacer ese modelo pero el colchón es de 1.60M X 2.00M por lo que quiero hacer los planos de 0. Otra consulta mas, las medidas que dicen en los planos, con el programa que usaste, las tira automaticamente o tenes que calcularlas vos?
Saludos y gracias.
Hi, what program did you use to make the plans? Because I want to make that model but the mattress is 1.60MX 2.00M so I want to do the plans of 0. Another query, the measurements they say in the plans, with the program you used, you automatically pull them or you have to calculate them ?
Greetings and thanks.
The software is called Sketchup. It is a 3d drawing software.
Tips so far
1. Measure mattress before. Manufacturers size and actual size does not match so the overhang is wrong for me. :(
2. Measure the width of the 2″x4″. I incorrectly assumed it was 1,5″ it was actually 1/8″ less….x 6 = big gap…..sigh…
3. Look at picture above “platform bed frame”. The cross members, the short verticals are either at 20″ in or 23.5″ in from the ends. Once you have done one of each you can use them as templates for the others, no need to measure.
4. There is an error in the picture “Centering the platform frame on base” the overhang is 9″ not 6″.
Just made this for our new Nectar mattress. I made a couple small changes, but the basic framing plan worked great. I had a good time making this and was significantly cheaper than a most decent frames sold with the mattresses. Win/win TY
A few pics would be greatly appreciated.
Plans worked great for my king size mattress my mattress was 1” smaller than your measurements it’s ok just added a lil more overhang. I also added a 1×6 for a border so the mattress doesn’t slide around it also gives a lil more character. I used 2×10’s for the base and 2×6’s for the frame to give a lil more height and also stained and sealed. Built it in a weekend and looks great and wife loves it.
Happy wife happy life!!!!!!!!😁
Thanx for posting these plans
That is great to hear! I would love to see your project and feature it on the blog. You can share the pics here: http://howtospecialist.com/give-back/
I’m wondering what type of wood you would use if you wanted to keep the price a bit lower?
Pine
Hey Jack, My name is Jacquelin and I looked but couldn’t find plans for a floating full size bed. I don’t want to build one with the platform under the frame. I need some ideas to suspend it from the ceiling. Not sure if I should use chain,but would rather use rope..Any ideas would help.. first time I’ve come across your website.. Awesome and Thanks for all the work you put into your plans
Hello Jack,
Great Plans, I do not see plans for King bed on the bottom of the page. I would purchase if available.
Thank You,
Carolyn
Could you do a California king-size floating bed, please? something easy preferably. thank you
Is there a way to commission plans for this same bed but in queen size? I don’t see the headboard included on the plans you posted previously
hi my wife wants a floating bed our mattress is 6×5 could u help me with a plan i hope to give this to her as a x-mas gift, looking for a good overhang
Hi there,
I notice that the PDF print bottom is no longer available. Is it possible for me to get the printable plans for this bed. Please and Thank you!!